
We’ve been running Cura from a flatpak because the rpm distributed version was out of date. The big drawback, though, is that this flatpak could not see the files from network mounts. The mount is fine – in fstab, same user account can interact with those files in other applications. Just not this flatpak thing.
Turns out that’s normal – flatpaks operate in a sort of sandbox. You just have to tell it to let an individual flatpak access the location where the network mounts are. In this case, the /mnt path:
flatpack override com.ultimaker.cura --filesystem=/mnt
Quick command to get the base-64 encoded certificate — useful for establishing trust with AD DS domain controllers
openssl s_client -connect dc5.example.com:636 -showcerts </dev/null 2>/dev/null | awk ‘BEGIN{c=0} /BEGIN CERTIFICATE/{c++} c==1{print} /END CERTIFICATE/ && c==1{exit}’
Microsoft Windows Cloud Files Mini Filter Driver Elevation of Privilege Vulnerability (alternately referred to as MiniPlasma) is one of those findings that is a little confusing. The vulnerability appears tied to an issue Microsoft originally addressed in 2020, which raises the obvious question: if it was already patched, why is it relevant again now?
The original fix may have closed a specific exploitation path without fully eliminating the underlying bug class. The remediation may have been incomplete. Or a later code change may have reintroduced a previously fixed condition. Without updated vendor detail, it is hard to say exactly which of those happened; but the operational conclusion is the same: a system can still be exposed today even if the original 2020 patch was installed.
For environments looking for a practical mitigation, the good news is that many servers do not need Windows Cloud Files functionality at all. The vulnerable component is the Cloud Files Mini Filter Driver (CldFlt), which supports placeholder and hydration behavior used by features such as OneDrive Files On-Demand and other CfAPI-based integrations.
That makes CldFlt a viable mitigation target. If the filter is loaded but not attached to any volumes, there is a good chance it can be safely unloaded and disabled. This does not remove the driver from disk, but it does remove the active kernel attack surface associated with the running minifilter. Since this is an elevation-of-privilege issue, that distinction matters: the goal is not to claim the file no longer exists, but to prevent the vulnerable driver from being active in the system.
The following process checks whether any volumes are associated with CldFlt, temporarily unloads the filter, verifies that the system continues functioning normally, and then disables the driver persistently.
REM Check instances on CldFlt — if 0, proceed with testing disablement
fltmc filters
REM Example output:
REM Filter Name Num Instances Altitude Frame
REM —————————— ————- ———— —–
REM bindflt 0 409800 0
REM MsSecFlt 9 385600 0
REM CSAgent 9 321410.78870 0
REM storqosflt 0 244000 0
REM wcifs 0 189900 0
REM CldFlt 0 180451 0
REM FileCrypt 0 141100 0
REM UnionFS 0 130850 0
REM npsvctrig 1 46000 0
REM Wof 1 40700 0
REM Unload cldflt
fltmc unload cldflt
REM Verify stopped
sc query cldflt
REM Verify no longer in filters list
fltmc filters
REM Verify applications and expected file operations still work normally
REM If everything looks good, disable persistent startup
sc config cldflt start= disabled
After completing an in-place upgrade from Fedora 43 to Fedora 44, dnf5 failed to run with this error:
[lisa@fedora05 ~]# dnf5 update
Cannot load dnf5 plugin: /usr/lib64/dnf5/plugins/automatic_cmd_plugin.so
Cannot load shared library “/usr/lib64/dnf5/plugins/automatic_cmd_plugin.so”: libdnf5-cli.so.2: cannot open shared object file: No such file or directory
The Fedora 44 upgrade completed, and the installed dnf5 packages were all current Fedora 44 versions. However, there was a leftover plugin file still sitting in /usr/lib64/dnf5/plugins/automatic_cmd_plugin.so.
That file was not owned by any RPM package and had been built against an older library, libdnf5-cli.so.2.
But Fedora 44 had /usr/lib64/libdnf5-cli.so.3.
dnf5 was trying to load a stale plugin from before the upgrade.
These commands showed the problem:
ls -l /usr/lib64/libdnf5-cli.so*
rpm -qf /usr/lib64/dnf5/plugins/automatic_cmd_plugin.so
ldd /usr/lib64/dnf5/plugins/automatic_cmd_plugin.so
Results:
libdnf5-cli.so.3 existedautomatic_cmd_plugin.so was not owned by any packageldd showed it was looking for libdnf5-cli.so.2Remove the orphaned plugin file:
rm /usr/lib64/dnf5/plugins/automatic_cmd_plugin.so
ldconfig
dnf5 update
After deleting the stale plugin, dnf5 worked normally again.
This appears to be a leftover orphaned dnf5 plugin from before the major version upgrade. Even though the main dnf5 and libdnf5 packages were updated correctly, dnf5 still tried to load the old .so file it found in the plugins directory.
I encountered a challenge with a Kafka management tool — it supports SSO, and I was able to get an OAUTH connection set up to control what users could see when logging in through the UI, but the API component didn’t extract information from the bearer token and there was nothing in the rbac mapping to allow the bearer-token client ID to access anything.
Updates to allow the /api components to be authenticated by simple bearer tokens and a client ID mapped into a role are at https://github.com/ljr55555/kafka-ui
AuthorizationController.java was updated to properly support non-browser, machine-principal auth.
authentication.getName() is missingclient_idsubusername/api/authorization uses the same effective RBAC matching idea as the backend/api/authorization now works for bearer-token API callers and shows:
AccessControlService.javaPreviously, getUser() only worked when the authenticated principal was a RbacUser, which covered the browser/user flow.
Now it can also derive an AuthenticatedUser from opaque-token authenticated principals by extracting:
Previously, role matching was only role name matches one of user.groups(). Now it also supports role name matches user.principal(). That enables RBAC binding directly to the API client ID.
RBAC now works for:
DynamicConfigMapper.javaFixed a mapper bug.
The method mapping resource server config created a populated OAuth2ResourceServerProperties result object but always returned null.
It now returns result.
Dynamic/config mapping for resource-server settings no longer silently discards the mapped object.
To preserve the browser UI, the jar needs to be built with frontend included — which you know if you read the doc … or you take my route, start it all up, test the API successfully, and then get baffled that the user UI throws
bash./gradlew clean assemble -Pinclude-frontend=true
server:
  port: 8443
  ssl:
    enabled: true
    key-store: file:/etc/kafkaui/certs/kafbat.rushworth.us.p12
    key-store-password: ${KEYSTORE_PASSWORD}
    key-store-type: PKCS12
    key-alias: kafbat

auth:
  type: OAUTH2
  oauth2:
    client:
      pingfed:
        client-id: ${OAUTH_CLIENT_ID}
        client-secret: ${OAUTH_CLIENT_SECRET}
        scope:
          - openid
          - profile
          - email
        client-name: oauthclient
        provider: oauthclient
        redirect-uri: https://kafbat.rushworth.us:8443/login/oauth2/code/oauthclient
        authorization-grant-type: authorization_code
        issuer-uri: https://login.example.com
        jwk-set-uri: https://login.example.com/pf/JWKS
        authorization-uri: https://login.example.com/as/authorization.oauth2
        token-uri: https://login.example.com/as/token.oauth2
        user-info-uri: https://login.example.com/idp/userinfo.openid
        user-name-attribute: username
        custom-params:
          type: oauth
          roles-field: memberOf

    resource-server:
      opaque-token:
        client-id: ${OAUTH_CLIENT_ID}
        client-secret: ${OAUTH_CLIENT_SECRET}
        introspection-uri: https://login.example.com/as/introspect.oauth2

kafka:
  clusters:
    - name: test
      bootstrapServers: ${KAFKA_BOOTSTRAP_SERVERS}
rbac:
  roles:
    - name: "admins"
      clusters:
        - test
      subjects:
        - provider: oauth
          type: role
          value: "CN=KafbatAdmins,OU=SecurityGroups,DC=example,DC=com"
      permissions:
        - resource: applicationconfig
          actions: all

        - resource: clusterconfig
          actions: all

        - resource: topic
          value: ".*"
          actions: all

        - resource: consumer
          value: ".*"
          actions: all

        - resource: schema
          value: ".*"
          actions: all

        - resource: connect
          value: ".*"
          actions: all

        - resource: ksql
          actions: all

        - resource: acl
          actions: [ view ]

    - name: "${OAUTH_CLIENT_ID}"
      clusters:
        - test
      subjects:
        - provider: oauth
          type: user
          value: "${OAUTH_CLIENT_ID}"
      permissions:
        - resource: applicationconfig
          actions: all

        - resource: clusterconfig
          actions: all

        - resource: topic
          value: ".*"
          actions: all

        - resource: consumer
          value: ".*"
          actions: all

        - resource: schema
          value: ".*"

        - resource: connect
          value: ".*"
          actions: all

        - resource: ksql
          actions: all

        - resource: acl
          actions: [ view ]
services:
  redpanda:
    image: redpandadata/redpanda:v25.1.2
    container_name: redpanda
    command:
      - redpanda
      - start
      - --overprovisioned
      - --smp=1
      - --memory=1G
      - --reserve-memory=0M
      - --node-id=0
      - --check=false
      - --kafka-addr=PLAINTEXT://0.0.0.0:9092
      - --advertise-kafka-addr=PLAINTEXT://redpanda:9092
    ports:
      - "9092:9092"

  kafbat-ui:
    image: ghcr.io/kafbat/kafka-ui:latest
    container_name: kafbat-ui
    restart: unless-stopped
    depends_on:
      - redpanda
    ports:
      - "8443:8443"
    volumes:
      - ./config/application.yml:/etc/kafkaui/application.yml:ro
      - ./config/roles.yml:/etc/kafkaui/roles.yml:ro
      - ./certs:/etc/kafkaui/certs:ro
    environment:
      SPRING_CONFIG_LOCATION: file:/etc/kafkaui/application.yml
      SPRING_CONFIG_ADDITIONAL_LOCATION: file:/etc/kafkaui/roles.yml
      KEYSTORE_PASSWORD: REDACTED
      OAUTH_CLIENT_ID: REDACTED
      OAUTH_CLIENT_SECRET: REDACTED
      KAFKA_BOOTSTRAP_SERVERS: redpanda:9092
Instead of flipping back and forth between java versions for various builds, you can just use a docker container for the proper Java version to run the build.
[lisa@docker kafka-ui]# docker run --rm -it   --user $(id -u):$(id -g)   -v "$PWD":/workspace   -w /workspace   eclipse-temurin:25   bash -lc './gradlew clean build'
Downloading https://services.gradle.org/distributions/gradle-9.2.0-bin.zip
............10%.............20%.............30%.............40%.............50%.............60%.............70%.............80%.............90%.............100%

Welcome to Gradle 9.2.0!

Here are the highlights of this release:
 - Windows ARM support
 - Improved publishing APIs
 - Better guidance for dependency verification failures

For more details see https://docs.gradle.org/9.2.0/release-notes.html

Starting a Gradle Daemon (subsequent builds will be faster)
<=============> 100% CONFIGURING [1m 46s]
> Resolve dependencies of :api:detachedConfiguration273
Oct 28, 2022 caught Ash
March 9, 2023 caught Fritter
March 29, 2023 Pebbles spayed
May 27, 2023 caught Dumplin
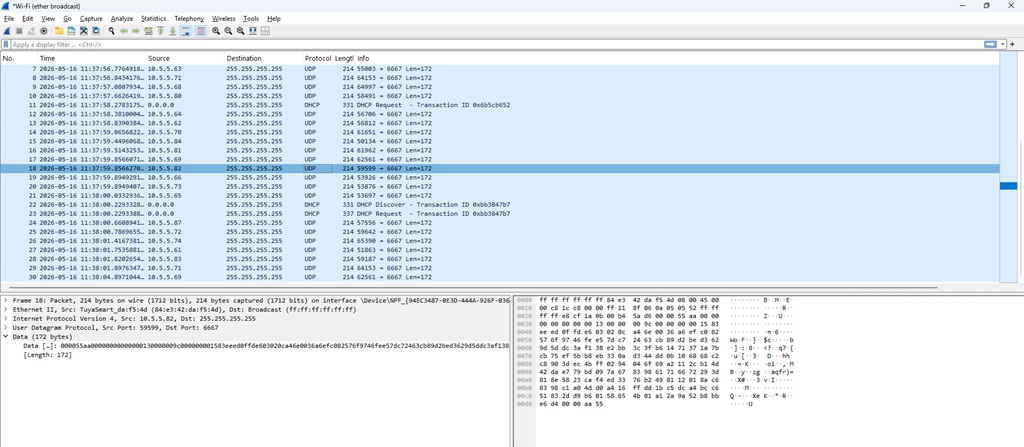
Looking at network slowness, I noticed a lot of overrun errors and an inexplicable amount of broadcast traffic. Running a sniffer trace … these tuya bulbs announce themselves in a constant loop. We’ll add a network filter for now, but some other firmware on these bulbs would be great!
Another memory – sometimes Ash would lay just outside our family room door. Stretched out on the rubber mat, relaxed and content. I wouldn’t even know he was there … and then a little shark fin would appear in the window. Then another – I called that the kitten shark.