Category: Postgresql

PostgreSQL 12 — Cascading Replication

I’ve got replicated PostgreSQL database pairs that each have some 50TB of data. The server operating systems need to be upgraded, but there is a constraint: no in-place upgrades. I don’t get to veto that constraint (i.e. the fact that we could just cross our fingers and upgrade a replica … and, if it fails, built new and pull the data again doesn’t matter). Unfortunately, trying to add a second replica delays the existing replication. Since all write operations to to the RW server and reads to to the read-only replica … having the read-only copy a day or two out of sync whilst this secondary replica comes online is a non-starter.

Fortunately, you can cascade replication — seed the new replica from the current read-only replica. Create a new replication slot — here new-pg-ro-replica-pgdata. You need to verify the new server is in the pg_hba.conf file to authenticate with the replication account.

pg_basebackup -h pg-ro-replica.example.net -D /pgdata -U replicatorID -v -P --wal-method=stream --slot=new-pg-ro-replica-pgdata

Wait … wait … wait. It’ll finish eventually. Then tweak your recovery.conf

standby_mode = 'on'
primary_conninfo = 'host=pg-rw-replica.example.net port=5432 user=replicatorID password=your_password' sslmode=require
primary_slot_name = 'new-pg-ro-replica-pgdata'

And
touch /pgdata/standby.signal

Finally, start the server

pg_ctl start -D /pgdata

Voila — a second read-only replica. Now they can decom the old server.

Postgresql with File System Compression – VDO and ZFS

Our database storage is sizable. To reduce the financial impact of storing so much data, we opted to use a compressed file system. This allows us to maintain, for example, 8TB of data in under 2TB of space. Unfortunately, the ZFS file system we use to compress our data is no longer “built in” with newer version of RedHat.

There are alternatives. BTRFS is a long-standing option, however it’s got reliability issues (we piloted BTRFS on one of the read only replicas, and the compression ratio is nowhere near as good — the 2TB of ZFS data filled the 10TB BTRFS disk even using the better compression option. And I/O was so slow there was a continual replication backlog). RedHat introduced Virtual Disk Optimizer to replace ZFS. In theory, it’s better since it also deduplicates data (e.g. if every one of us saved the same PPT presentation to the disk, only one copy would actually be stored). That’s great for email and file shares where a lot of people are likely to store the same information. Not so useful on a database server where there’s little to de-duplicate. It does, however, compress data … so we decided to try it out.

The results, unfortunately, are not spectacular. VDO does not allow you to do much customization of the compression. It’s on or off. I’ve found some people tweaking it up in unsupported ways, but the impetus behind trying VDO was that it’s supported by RedHat. Making unsupported changes to it defeats that purpose. And the compression that we’re seeing is far less than we get in ZFS. Our existing servers run between 4.5x and 6x compression

In VDO, however, we don’t even get a 2x compression factor. 11TB of information is stored in 8TB of space! That’s 1.4x

So, while we found the performance of VDO to be satisfactory and it’s really easy to use in newer RedHat releases … we’d have to increase our 20TB LUNs to 80TB to continue storing the data we store today. That seems like A Really Bad Idea(tm).

Seems like I’m going to have to sort out using OpenZFS on the new servers.

Postgresql and Timescale with RedHat VDO

RedHat is phasing out ZFS – there are several reasons for this move, but primarily ZFS is a closed source Solaris (now Oracle) codebase. While OpenZFS exists, it’s not quite ‘the same’. RedHat’s preferred solution is Virtual Data Optimizer (VDO). This page walks through the process of installing PostgreSQL and creating a database cluster on VDO and installing TimescaleDB extension on the database cluster for RedHat Enterprise 8 (RHEL8)

Before we create a VDO disk, we need to install it

yum install vdo kmod-kvdo

Then we need to create a vdo – here a VDO named ‘PGData’ is created on /dev/sdb – a 9TB volume on which we will hold 16TB

vdo create --name=PGData --device=/dev/sdb --vdoLogicalSize=16T

Check to verify that the object was created – it is /dev/mapper/PGData in this instance

vdo list

Now format the volume using xfs.

mkfs.xfs /dev/mapper/PGData

And finally add a mount point

# Create the mount point folder
mkdir /pgpool
# Update fstab to mount the new volume to that mount pint
cat /etc/fstab
/dev/mapper/PGData /pgpool xfs defaults,x-systemd.requires=vdo.service 0 0
# Load the updated fstab
systemctl daemon-reload
# and mount the volume
mount -a

it should be mounted at ‘/pgpool/’

The main reason for using VDO with Postgres is because of its compression feature – this is automatically enabled, although we may need to tweak settings as we test it.

We now have a place in our pool where we want our Postgres database to store its data. So let’s go ahead and install PostgreSQL,

here we are using RHEL8 and installing PostgreSQL 12

# Install the repository RPM:
dnf install -y https://download.postgresql.org/pub/repos/yum/reporpms/EL-8-x86_64/pgdg-redhat-repo-latest.noarch.rpm
dnf clean all
# Disable the built-in PostgreSQL module:
dnf -qy module disable postgresql
# Install PostgreSQL:
dnf install -y postgresql12-server

Once the installation is done we need to initiate the database cluster and start the server . Since we want our Postgres to store data in our VDO volume we need to initialize it into our custom directory, we can do that in many ways,

In all cases we need to make sure that the mount point of our zpool i.e., ‘/pgpool/pgdata/’ is owned by the ‘postgres’ user which is created when we install PostgreSQL. We can do that by running the below command before running below steps for starting the postgres server

mkdir /pgpool/pgdata
chown -R postgres:postgres /pgpool

Customize the systemd service by editing the postgresql-12 unit file and updateding the PGDATA environment variable

vdotest-uos:pgpool # grep Environment /usr/lib/systemd/system/postgresql-12.service
# Note: avoid inserting whitespace in these Environment= lines, or you may
Environment=PGDATA=/pgpool/pgdata

and  then initialize, enable and start our server as below

/usr/pgsql-12/bin/postgresql-12-setup initdb
systemctl enable postgresql-12
systemctl start postgresql-12

Here ‘/usr/pgsql-12/bin/’ is the bin directory of postgres installation you can substitute it with your bin directory path.

or

We can also directly give the data directory value while initializing db using below command

/usr/pgsql-12/bin/initdb -D /pgpool/pgdata/

and then start the server using

systemctl start postgresql-12

Now we have installed postgreSQL and started the server, we will install the Timescale extension for Postgres now.

add the time scale repo with below command

tee /etc/yum.repos.d/timescale_timescaledb.repo <<EOL
[timescale_timescaledb]
name=timescale_timescaledb
baseurl=https://packagecloud.io/timescale/timescaledb/el/8/\$basearch
repo_gpgcheck=1
gpgcheck=0
enabled=1
gpgkey=https://packagecloud.io/timescale/timescaledb/gpgkey
sslverify=1
sslcacert=/etc/pki/tls/certs/ca-bundle.crt
metadata_expire=300
EOL
sudo yum update -y

then install  it using below command

yum install -y timescaledb-postgresql-12

After installing we need to add ‘timescale’ to shared_preload_libraries in our postgresql.conf, Timescale gives us ‘timescaledb-tune‘ which can be used for this and also configuring different settings for our database. Since we initialize our PG database cluster in a custom location we need to point the direction of postgresql.conf to timescaledb-tune it also requires a path to our pg_config file we can do both by following command.

timescaledb-tune --pg-config=/usr/pgsql-12/bin/pg_config --conf-path=/pgpool/pgdata/postgresql.conf

After running above command we need to restart our Postgres server, we can do that by one of the below commands

systemctl restart postgresql-12

After restarting using one of the above commands connect to the database you want to use Timescale hypertables in and run below statement to load Timescale extension

CREATE EXTENSION IF NOT EXISTS timescaledb CASCADE;

you can check if Timescale is loaded by passing ‘\dx’ command to psql which will load the extension list.

in order to configure PostgreSQL to allow remote connection we need to do couple of changes as below

Postgresql SPLIT_PART and TRANSLATE

We have a database where there’s a single field, args, into which the vendor has glommed quite a few different things. Unfortunately, I need one of those numbers.

"---
- Workbook
- 4477
- Sample Report
- 18116
- null
"

You can use split_part to break a column into elements and only use one of those elements split_part(column_to_split, delimiter, ColumnToKeep)

As an example:
SPLIT_PART(b.args, E'\n', 3)AS task_workbook_id

In this case, I subsequently needed to eliminate the dash and space that prefixed the line. Using TRANSLATE, I am removing the ‘- ‘ with ”:
TRANSLATE ( SPLIT_PART(b.args, E'\n', 3), '- ','') AS task_workbook_id

And now I’ve just got 4477

Using PG_CRON In PostgreSQL

The pg_cron extension allows you to schedule tasks from within your database (or, to those who didn’t know it was a thing, it allows you to hide {really well} jobs that mutate or remove data leading to absolutely inexplicable database content). While the project documents how to create or remove a scheduled job, I had quite the time figuring out how to see what was scheduled.

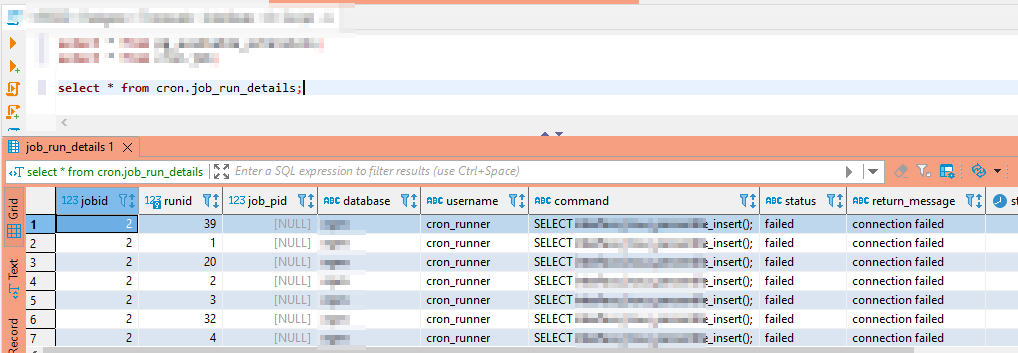
To see jobs scheduled in pg_cron:

To see the result of scheduled jobs:

PostgreSQL Wraparound

We had a Postgres server go into read-only mode — which provided a stressful opportunity to learn more nuances of Postgres internals. It appears this “read only mode” something Postgres does to save it from itself. Transaction IDs are assigned to each row in the database — the ID values are used to determine what transactions can see. For each transaction, Postgres increments the last transaction ID and assigns the incremented value to the current transaction. When a row is written, the transaction ID is stored in the row and used to determine whether a row is visible to a transaction.

Inserting a row will assign the last transaction ID to the xmin column. A transaction can see all rows where xmin is less than its transaction ID. Updating a row actually creates a new row — the old row then has an xmax value and the new row has the same number as its xmin — transactions with IDs newer than the xmax value will not see the row. Similarly, deleting a row updates the row’s xmax value — older transactions will still be able to see the row, but newer ones will not.

You can even view the xmax and xmin values by specifically asking for them in a select statement: select *, xmin, xmax from TableName;

The transaction ID is stored in a 32-bit number — making the possible values 0 through 4,294,967,295. Which can become a problem for a heavily I/O or long-running database (i.e. even if I only get a couple of records an hour, that adds up over years of service) because … what happens when we get to 4,294,967,295 and need to write another record? To combat this,  Postgres does something that reminds me of the “doomsday” Mayan calendar — this number range isn’t aligned on a straight line where one eventually runs into a wall. The numbers are arranged in a circle, so there’s always a new cycle and numbers are issued all over again. In the Postgres source, the wrap limit is “where the world ends”! But, like the Mayan calendar … this isn’t actually the end as much as it’s a new beginning.
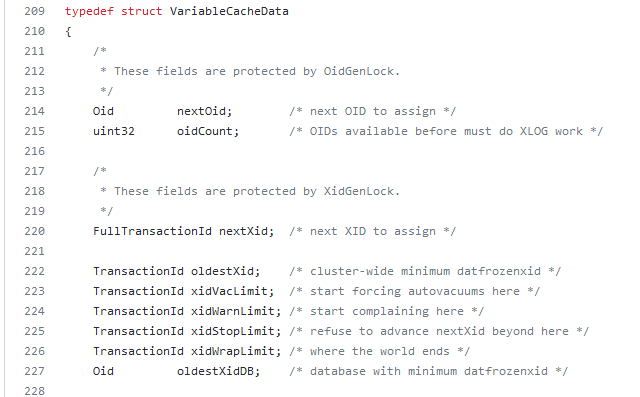
How do you know if transaction 5 is ‘old’ or ‘new’ if the number can be reissued? The database considers half of the IDs in the real past and half for future use. When transaction ID four billion is issued, ID number 5 is considered part of the “future”; but when the current transaction ID is one billion, ID number 5 is considered part of the “past”. Which could be problematic if one of the first records in the database has never been updated but is still perfectly legitimate. Reserving in-use transaction IDs would make the re-issuing of transaction IDs more resource intensive (not just assign ++xid to this transaction, but xid++;is xid assigned {if so, xid++ and check again until the answer is no}; assign xid to this transaction). Instead of implementing more complex logic, rows can be “frozen” — this is a special flag that basically says “I am a row from the past and ignore my transaction ID number”. In versions 9.4 and later, both committed and aborted hint bits are set to freeze a row — in earlier versions, used a special FrozenTransactionId index.

There is a minimum age for freezing a row — it generally doesn’t make sense to mark a row that’s existed for eight seconds as frozen. This is configured in the database as the vacuum_freeze_min_age. But it’s also not good to let rows sit around without being frozen for too long — the database could wrap around to the point where the transaction ID is reissued and the row would be lost (well, it’s still there but no one can see it). Since vacuuming doesn’t look through every page of the database on every cycle, there is a vacuum_freeze_table_age which defines the age of a transaction where vacuum will look through an entire table to freeze rows instead of relying on the visibility map. This combination, hopefully, balances the I/O of freezing rows with full scans that effectively freeze rows.

What I believe led to our outage — most of our data is time-series data. It is written, never modified, and eventually deleted. Auto-vacuum will skip tables that don’t need vacuuming. In our case, that’s most of the tables. The autovacuum_freeze_max_age parameter sets an ‘age’ at which vacuuming is forced. If these special vacuum processes don’t complete fully … you eventually get into a state where the server stops accepting writes in order to avoid potential data loss.

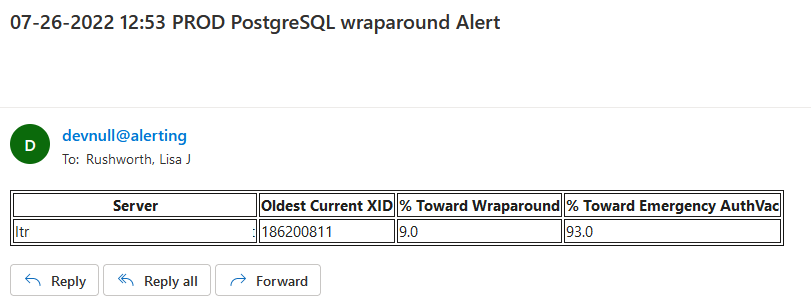
So monitoring for transaction IDs approaching the wraparound and emergency vacuum values is important. I set up a task that alerts us when we approach wraparound (fortunately, we’ve not gotten there again) as well as when we approach the emergency auto-vacuum threshold — a state which we reach a few times a week.

Using the following query, we monitor how close each of our databases is to both the auto-vacuum threshold and the ‘end of the world’ wrap-around point.

WITH max_age AS ( SELECT 2000000000 as max_old_xid
                        , setting AS autovacuum_freeze_max_age FROM pg_catalog.pg_settings 
                        WHERE name = 'autovacuum_freeze_max_age' )
         , per_database_stats AS ( SELECT datname , m.max_old_xid::int 
                        , m.autovacuum_freeze_max_age::int 
                        , age(d.datfrozenxid) AS oldest_current_xid 
                        FROM pg_catalog.pg_database d 
                        JOIN max_age m ON (true) WHERE d.datallowconn ) 

SELECT max(oldest_current_xid) AS oldest_current_xid 
      , max(ROUND(100*(oldest_current_xid/max_old_xid::float))) AS percent_towards_wraparound 
      , max(ROUND(100*(oldest_current_xid/autovacuum_freeze_max_age::float))) AS percent_towards_emergency_autovac FROM per_database_stats

If we are approaching either point, e-mail alerts are sent.
When a database approaches the emergency auto-vacuum threshold, we freeze data manually —  vacuumdb --all --freeze --jobs=1 --echo --verbose --analyze (or –jobs=3 if I want the process to hurry up and get done).

Postgresql – Querying Hot Standby Server

We hit our maximum connection limit on some PostgreSQL servers — which made me wonder why the hot standby servers weren’t being used … well, at all. They’re equally big, expensive servers with loads of disk space. But they’re just sitting there “in case”.

So we directed some traffic over to the standby server. I’m also going to tweak a few settings related to user limits — increase the max connections since these are dedicated hosts and have plenty of available I/O, memory, CPU, etc resources; increase the number of reserved connections since replication filled up all of the reserved slots; implement a per-user connection limit on one account that runs a lot of threads — but directing some people who were only trying to look at data over to the standby server seemed like a quick fix.

Now, we discovered something interesting about how queries against the standby interact with replication. It makes a lot of sense when you start thinking about it — if you query against the writable replica, there’s some blocking that goes on. The system isn’t going to vacuum data that you’re currently trying to use. The standby, however, doesn’t have any way to clue the writable replica in to the fact you are trying to use some data. So the writable replica gets a delete, does its thing to hide those rows from future queries, and eventually auto-vacuum comes through and cleans up those rows. All of this gets pushed over to the standby … and there goes the data you were trying to read.

Odds of this happening on a query that takes eight seconds? Incredibly low! Odds increase, however, the longer a query runs. So some of our super massive reports started seeing an error indicating that their query was cancelled “due to a conflict with recovery”

There are two solutions in the PostgreSQL documentation — one is to increase the max_standby_streaming_delay value (there’s also an archive delay, but we aren’t particularly concerned about clients querying the server during recovery operations) the other is to avoid vacuuming data too quickly — either by setting hot_standby_feedback on the standby or increasing vacuum_defer_cleanup_age on the primary.

There’s a third option too — don’t use the standby for long-running queries. That’s easily done in our case … and doesn’t require tweaking any PostgreSQL settings. Ad hoc reporting and direct user access really shouldn’t be implementing such substantial queries (it’s always good to have a SQL expert plan out and optimize complex queries if that’s an option).

Analyzing Postgresql Tmp Files

Postgresql stores temporary files for in-flight queries — these don’t normally hang around for long, but sorting a large amount of data or building a large hash can create a lot of temp files. A dead query that was sorting a large amount of data or …. well, we’ve gotten terabytes of temp files associated with multiple backend process IDs. The file names are algorithmic — a string “pgsql_tmp followed by the backend PID, a period, and then some other number. Thus, I can extract the PID from each file name and provide a summary of the processes associated with temp files.

To view a summary of the temp files within the pgsql_tmp folder, run the following command to print a count then a PID number:
ls /path/to/pgdata/base/pgsql_tmp | sed -nr 's/pgsql_tmp([0-9]*)\.[0-9]*/\1/p' | sort | uniq -c

A slightly longer command can be used to reverse the columns – producing a list of process IDs followed by the count of files for that PID – too:
ls /path/to/pgdata/base/pgsql_tmp | sed -nr 's/pgsql_tmp([0-9]*)\.[0-9]*/\1/p' | sort | uniq -c | sort -k2nr | awk '{printf("%s\t%s\n",$2,$1)}END{print}'