Category: Crafts

Halloween 2014 – Little Red Riding Hood

For Halloween this year, I made a cape for Anya’s Little Red Riding Hood costume. The process came from http://www.doityourselfdivas.com/2013/10/diy-little-red-riding-hood-costumecloak.html – but I made a fully lined cloak instead of just lining the hood. As a result, I needed two one yard pieces of fabric. There is a real lead-free pewter cloak clasp too, it is just hiding behind her mouse.

DSC_4803

It turned out beautifully, and we even managed to get her to wear it long enough to take a few photos 🙂

It was not difficult to sew … Mostly a couple of straight line seams. I had a lot of trouble with the top of the hood – too much bulk sewn by machine. Two failed attempts and I just stitched it up by hand. This way, there is not a ridge of fabric on top of her head.

Another gratuitous cute kid picture:

DSC_4822

Rainbow Skirt – Pattern

My mom sent me a picture of a fantastic pieced skirt:

RainbowCircleSkirt

It is similar to a pieced chevron skirt that we had seen on Project Run & Play (http://alittlegray.blogspot.com/2012/04/pr-week-1-piece-by-piece-chevron-skirt.html) — but the sections are parallel to the seam instead of creating the chevron pattern. I saved the original chevron too — it is another skirt I would like to make for Anya.

I’m trying to figure out if it is feasible to make something like this for Anya. How much fabric would be needed?

I want to use a 3.5″ radius for the waist (~22″ waist so there’s some gather at the waist and it can grow with her) and five color spectrum divisions. Which means each section is made at 72 degrees.

CircleSkirtMeasurements

Then I need to figure out how large of a rectangle of fabric is going to be needed to cut these arcs.

CircleSkirtCutSheet

So the largest arc requires fabric 8″ high (well, a little more for the seam allowance) and 16″ wide (again plus a little for the seam allowance). So an 40″x18″ half yard is plenty of fabric – even enough for two skirts so I can send fabric along to my mom. We can both have a 20″x18″ rectangle. Now I just need to find a fabric with fifteen shades that I like — a reasonably priced fabric.

You know, when I learnt to use AutoCAD, I never expected that it would be my tool of choice when creating patterns for my kid’s clothes … but the polar array made it so easy to section the circles!

Self Healing Cutting Mat

I wanted a huge cutting mat for sewing projects. The ones I find at craft stores … well, large means like two feet. I want to be able to lay a yard of fabric across the thing. Then I found Rhino mats — anything from a 2’x4′ not-so-large mat to a 6’x12′ enormous self healing cutting mat. And they’ve got grid underlays!

Star Blanket

(Continued from previous post) Here is the blanket I crochet for Anya before she was born — it took a very long time, and I had the hardest time finding the right yarn for ‘violet’. I think this is too dark, really, for the rest of the colors. But I was not going to use six divisions of the spectrum, and I certainly was not going to unravel enough to get rid of the orange!

PHOTO_20140227_122629

Of the purple yarns that I have, this is the color Scott preferred for the blanket. It’ll do. When she’s a little older, I’ll make a simpler rectangle blanket for her to use in the car seat. For now, she is so small that we’re using a tiny little rectangular ripple blanket that I made.

Valley Yarn’s Stockbridge yarn felts beautifully – I washed and dried the finished blanket several times and have a warm, thick blanket that retained the star shape perfectly. The stitches are not as well defined as the examples on the pattern’s page, but it is exactly what I wanted.

Anya’s First Blanket

I wanted to make a blanket for Anya before she was born. I never managed to knit well (slowly and poorly, but not well). I didn’t have a sewing machine at the time, so a quilt was out. I do, however, crochet well (and fairly quickly). After a lot of searching, I decided on a star-shaped pattern with rainbow stripes. Then I tried to find a series of yarn that had each color of the rainbow … never did manage that! Everything except the orange are Valley Yarn’s Stockbridge yarn.

The pattern is easy to work – pretty much just double crochet stitches. There are “shells” that expand the points of the star, and skips to form the V in the star. The biggest challenge I had was keeping track of how many stitches between the shell and the V for each row. I ended up with an Excel spreadsheet with a line for each ring.

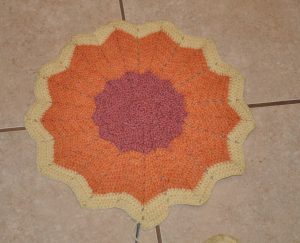
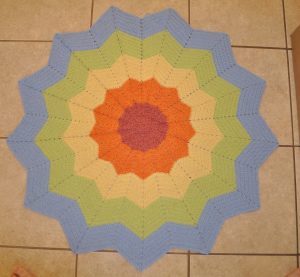
The first couple of rows (which ended up being the ‘red’ section for me) looks like a slightly malformed circle. I was concerned the finished blanket wouldn’t look anything like the examples on the Ravelry page; but as the orange section finished up, I could see the spikes of the star.

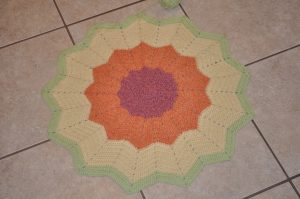
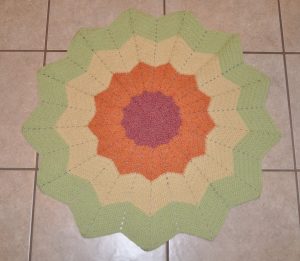
By the time the green ring was finished, the blanket looked awesome.

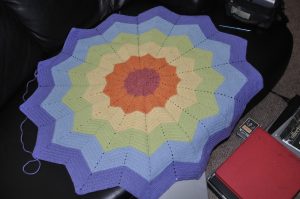
Finishing up the blue rings:


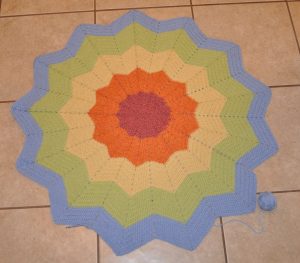
I used a purple-blue color for the ‘indigo’ rings.

At this point, we attended a baby/toddler CPR course. The instructor offhandedly mentioned that she hates to waste everyone’s time since we’ve all heard a hundred times now that babies aren’t supposed to have anything in their cribs. No pillows, no bumpers, no blankets, no toys … wait, no blankets?? So the blanket I’m making for Anya before she’s born cannot be used until she’s a year old?!? I did mention to the course instructor that, no she wasn’t wasting peoples time. I’d never heard such a thing.

Now that Anya is five months old … there are lots of places to use blankets other than baby beds. This blanket gets snuggled around her in the car-seat whenever we leave the house.

Finished blanket is in the next post.