Category: Crafts

Halloween 2017: Lion Costume – Furry Suit

I have Anya’s Halloween costume finished. I used a minky fur in camel for the body and a long-haired fur in camel for the mane and fur accents. The costume is just a shirt and pants made with minky fabric. For the pants, I used a free pattern from FunFleece — where the pattern says you can cut the pieces simultaneously on folded fabric, it should indicate that you need to cut two mirrored. If you cut on folded fabric, it is mirrored by design. If you cut two pieces separately … well, it won’t go together well, you’ll have to rip the seam, and then cut one the right way. No reason I know this 🙂 Once I had mirrored pieces, it was a quick job to serge it together, fold the waistband, insert elastic, and stitch the band together. The legs were quite long, so there is a 1.5″ folded hem at the bottom that can be let out as she grows.  The shirt is a pattern I drafted based on one of her long sleeved t-shirts.

The mane is a large rectangle with each side serged to keep the fur from shedding everywhere. It is serged together under her chin and tucked both sides of her forehead to fit the opening to her face. The back is opened so the mane pulls on easily. I used a few sewing clips to pull it together.

I cut small elongated trapezoids of the long fur fabric and serged them together to make a cuff. They just slip over her hand like a bracelet. Add the tail I made earlier, and we have a lion:

Somtimes a fierce lion with claws:

Peppermint Swirl Dress

I absolutely adore the peppermint swirl dress pattern, and would love to make one with a rainbow skirt. I haven’t the slightest idea what to do for the top … another colour looks out of place, but using one of the skirt colours in the top looks odd too. Then I saw a rainbow skirt where seven of the fourteen panels were black with a black top. It was an awesome look. Then I saw black stripes with a rainbow stained-glass. I would have made it, but the fabric was a limited run that became unavailable at the end of last month.

So I thought about designing my own rainbow fabric for the dress. https://www.spoonflower.com/designs/6869492-cubistrainbow2-by-lisa5 … split out with black strips, it looks like this:


Lion Costume – Mask

I started making Anya’s costume – this year, she wants to be a lion (took a while explaining that once we order fabric and stuff you cannot change your mind) with a mask on her face. Specifically, she wants a mask. Very important. So I had to figure out how to make a lion mask. I used Pepakura Designer to create a 3D model of a lion face and then unfold it into a series of printable shapes.

After printing the design, I clipped the paper to half-back (thin cardboard) that I use to store fabric. A straight-edge and x-acto knife helped in accurately cutting the pieces. They’re still a pain to assemble – a couple of extra hands would have helped. Problem is it needs so much tape to keep its shape, I have no idea how to paint the thing.

I’m thinking of using the cardboard mask as a base to apply papier-mâché. Then we’ll have a consistent surface to paint.

Halloween 2017: Lion Costume – Tail

To make Anya’s lion tail, I started with an elongated trapezoidal piece of furry fabric — not quite a rectangle because I wanted it thicker at the base of the tail and thinner at the end. I folded it in half length-wise, with the right sides together, and used the serger make a fabric tube. Turned it right side out and stitched the ‘tip’ of the tail closed. I used a bunch of poly-fil and slowly stuffed the tail (using big wads to stuff the tail made it look lumpy. I took small pinches of the stuff and pushed it to make a firm filling.). Then I hand-stitched a strip of long fur around the tip.

I wanted something Anya could put on by herself, so clipping the tail onto her clothes wouldn’t work. I decided to use an elastic band – cut a 4″ wide strip of the lion fur fabric about 6″ longer than Anya’s waist circumference, folded it in right sides together, and serged it into a tube but left a few inches at the end. I then inserted the tail into the tube and folded it so the top fabric of the tail was aligned with the top fabric of edges of the waistband fabric and finished serging the strip. I then turned the whole thing right-side out — so the tail was firmly held into the band and dangled down. I measured out a strip of elastic about 2″ bigger than Anya’s waist, threaded it through the band, and sewed the elastic together with a lot of overlap. My hypothesis is that I’ll be able to open the seam and make her bands bigger as she grows. Once I confirmed it was tight enough to hold the tail up on her waist, I hand-stitched the tube together at the ends to make a band. Voila, one lion tail!

Baseball T-Shirt: Completed

I finished Anya’s baseball t-shirt!

I sketched a quick heart in Photoshop, and drew in two lines of baseball-style stitching. The image was printed on Transfer EZE ‘paper’ using our laser printer (which answered the question: can you laser print on this stuff?). I then took a little scrap of quilt batting and laid it on the shirt. Placed a scrap of white satin on top, then stuck the Transfer Eze print onto the satin. It adhered quite well to satin – was a little concerned!

Put it in a hoop and embroidered the red stitching to hold the whole thing in place. I then trimmed the satin about a quarter inch outside of the heart’s lines; the batting was trimmed to be about a quarter inch smaller than the satin. Finishing the project was just needle turn appliqueing the heart to the shirt (using what amounts to a really short satin stitch).

The quilt batting really enhances the stitch definition for the red lines, and it makes the whole design puff out a bit from the shirt.

Baseball Shirt

Anya’s preschool class has “baseball day” on Friday, and they are to wear their baseball shirts. It’s an interesting assumption that everyone has a baseball shirt to wear. Three years ago, I happened across an Indians t-shirt on post-season clearance. It was a size too large, but she grows. Beyond my “you cannot go wrong with a 4$ t-shirt” purchase, we don’t have anything baseball related. I don’t particularly want to pay inflated MLB-licensed in-season (and the Indians are doing well) prices.

I picked up a bunch of blank t-shirts for embroidered designs, so I decided to make Anya a baseball themed shirt. She chose the green shirt, and I drew a heart and added baseball stitching. The black and white image was printed on this Transfer Eze paper that I love. Then I cut out a slightly larger heart of white satin and a same-sized heart from a very thin quilt batting. Laid out the t-shirt, centered the quilt backing, then affixed the Transfer Eze heart to the satin and laid it on top of the batting. Going with the quilting principal of working from the center out to avoid bubbles, I started with the red stitching. Now I’m using a satin stitch around the edge to needle turn appliqué the whole thing onto the t-shirt.

Calculating Cost Of Material For Craft Projects — Crocheting and Knitting

Calculating the cost of materials for a knitting or crocheting project is a little more complex than calculating soap material costs. Because there’s not a recipe. Your pattern may say 150 grams of a specific yarn, but you don’t use exactly 150 grams. You use what you use, and whatever is left over is left over.

As with soap oils, the price per skein of yarn may include a tax or shipping component. You can follow the same process to determine the yarn as a percentage of the order weight for prorated shipping and the yarn cost as a percentage of the order cost for prorated tax.

With yarn projects, though, you need to know how much yarn actually went into the project. How? Weigh the skeins. Weigh them before you use them or just accept the manufacturer’s weight as accurate. If you’ve got a little kitchen scale, weigh the yarns when you finish using it on the project (this assumes you don’t concurrently use the same yarn on multiple projects!). The difference is the amount of yarn in the project. You can then calculate the percentage of the yarn which was used ( (weight at start – weight at end) / weigh at start). The material cost is that percentage of the yarn cost (price per skein * number of skeins used). Add up the material cost for each yarn in the project, and you know the material cost for the project.

A spreadsheet is good for these sort of repetitive calculations. You can estimate a project’s total cost by entering 0 into column ‘G’ and basing column ‘C’ on the pattern’s yarn requirements.

The spreadsheet allows you to check out how different yarns will impact the project material cost too – what happens if I use a more expensive yarn? It’s nice to know before looking at your shopping cart total in absolute shock 🙂

Calculating Cost Of Material For Craft Projects — Soap

Tax accounting doesn’t require you to track per-item cost of materials. Money for inventory on a shelf v/s money for inventory used in products  – same diff. But if you want to know how much you are profiting for each sale, it helps to track the cost of goods per item.

Soap is fairly easy because there’s a recipe — you know how much of a certain oil you’ve used in the end product because you weighted it out to the nearest tenth gram to start with. You still have to know how much you paid for that oil (well, close enough – prices change and I’m not interested in the level of accuracy which would require knowing from *which* order the oil I’m using *this* time came). But did you pay shipping and/or tax? If not, then the cost per gram is simply the price you paid divided by the number of grams purchased. If you *did* pay shipping or tax — then you need to calculate each item as a percentage of the order. You can do this just as a percentage of the total order cost ($ for item / $ for total order) and use that for both tax (accurate) and shipping (accurate if shipping is assessed by order value, probably close enough if shipping is assessed by weight). Or you can calculate the percentage of total order cost and the percentage of order weight (item weight / sum of weight of all items ordered). Use the order cost % for for tax calculations and the order weight % for shipping calculations. Then multiply tax and shipping charges by their respective % values.

A 35# pail of coconut oil for 43.78$ with no shipping but 3.28$ in tax as the only item ordered = 47.06$. 35# is 560 ounces (I trust the supplier’s scale here). Which is 0.084 cents per ounce. My 20% superfat coconut oil soap recipe uses 66 ounces. That’s 5.54$ of coconut oil.

Lye cost is a more complex calculation because I order it along with other specialty items. It was 50$ for the whole order of lye. The lye was 85% of the previous order’s weight. Shipping was 17.79. So the lye’s portion of the shipping was 0.85 * 17.79 = 15.12$. The lye was 61% of the order’s value. Tax was 6.19. The lye’s portion of tax was 0.61 * 6.19 = 3.78$. The sum of these (50+15.12+3.78) is 68.9. Each container is 27 ounces of lye and I got 5 containers — 27 * 5 is 135 ounces. Divide the lye cost by ounces received, 68.9/135, and I paid 0.51$ per ounce of lye. There are 9.6 ounces of lye in my recipe, which adds 4.90$ for lye.

Lavender essential oil was 33.54$ for 16.6 ounces. 16.07$ shipping, and the EO was 7% of the order weight. That’s another 1.12$ for shipping. Total cost for the EO is 34.66. Divide by ounces and it is 2.03$ per ounce. I used 4 ounces of the EO – 8.37$

The lavender scented, uncoloured batch of my coconut oil soap costs 5.54 + 4.90 + 8.37 = 18.82$ to produce. Now this is a 6# batch of soap, 24 3-oz bars. To calculate a per-bar cost, divide the total batch cost by the number of bars cut. 18.82 / 24 = 0.78$.

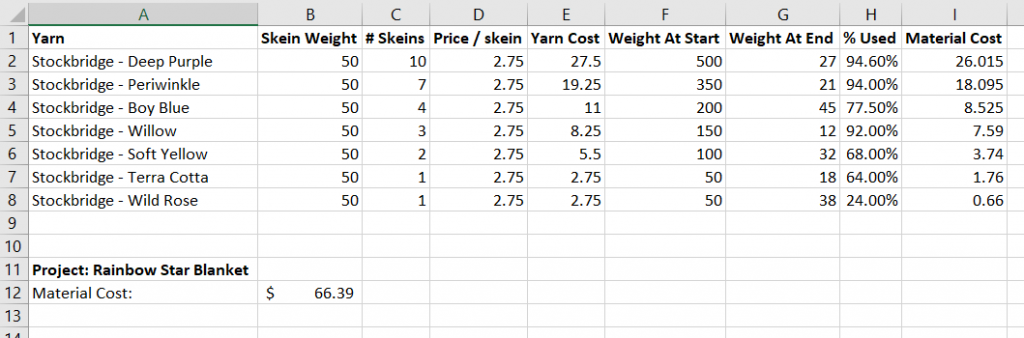
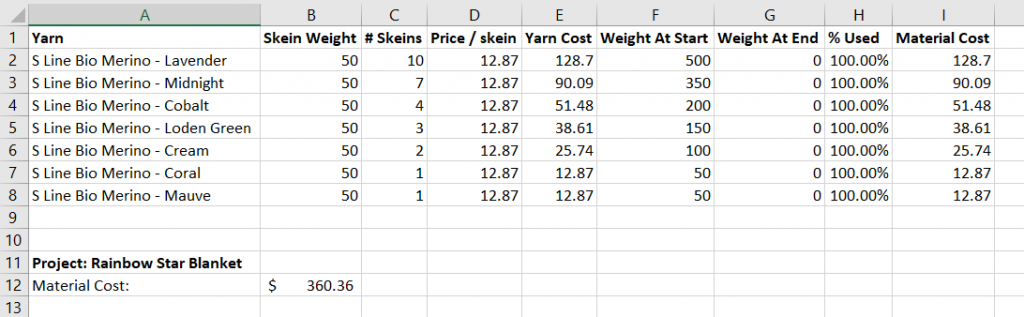
This is the sort of thing databases and spreadsheets are really good at doing. It’s the same formula over and over again. There are specialty accounting packages specifically for individual craft segments (i.e. a single piece of software that tracks inventory and unit cost thereof, recipes, sales and unit costs thereof and can analyze the data all sorts of ways). 100$ for the software, which is deductible against business income – it’s an investment in the business and saving yourself time. But for an initial foray into marketing a product, a simple spreadsheet will do. SoapCostCalculator is a spreadsheet I built to get an idea of how much each bar of soap was costing me.
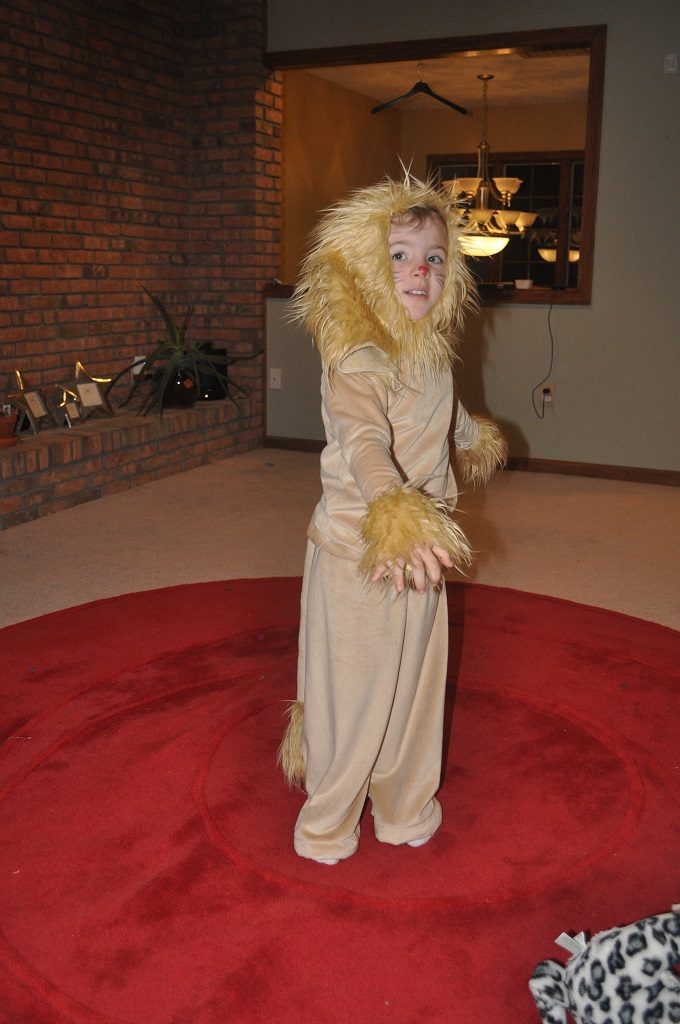
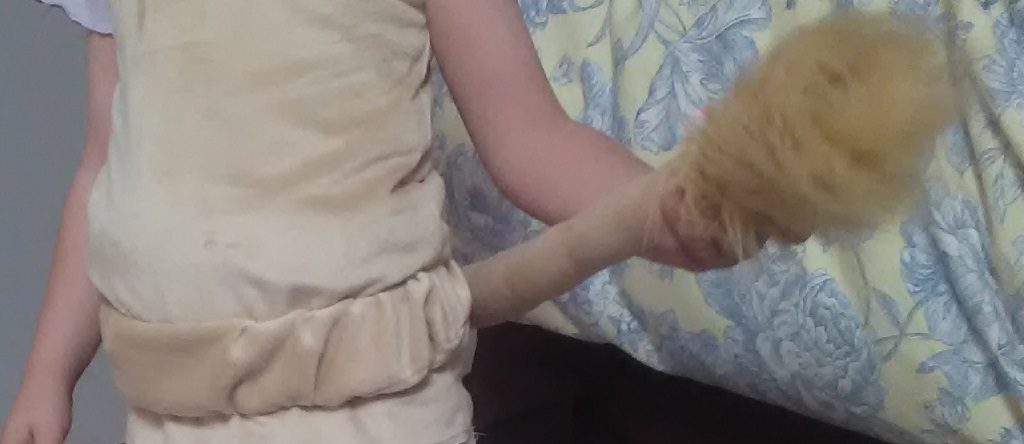
Peppermint Swirl Dress

I started cutting the peppermint swirl dress. I cannot wait until fabric can be 3D printed (yes, I’ve seen Electroloom … but they went under, so don’t really count. I totally would have purchased one and started a custom fabric business. In the solid color realm, you could do some amazing pre-cut kits. Or white and hand dyed the printouts). This dress would be so much easier to make if you didn’t have to cut twenty eight little swirl strips 🙂

Wow does this use a LOT of fabric! Especially if you don’t think about it for a second first and cut the fabric folded wrong sides together. *Not* symmetrical. D’oh! So now I have to order another yard of the cream fabric. I’ll get the rest of the cream cut, all of the blue cut, and start assembling the dress. It’ll be 75% done before I actually need that last cream strip. I’m curious to write an algorithm to place the pieces on a length of fabric. It seems like the S-shaped combination of the two strip pieces could be nested to decrease the length of fabric required to get seven sets. Haven’t yet, so I’m getting two sets from a 44″ wide piece of fabric — cut the fabric in half and laid them together with both right sides up. Important, that.