We were playing around with bevels this week – it’s pretty straight forward, the API lets you set the parameters you set through the GUI in a bevel modifier.
import bpy
# Clear all existing objects
for obj in list(bpy.data.objects):
bpy.data.objects.remove(obj, do_unlink=True)
# Set Units
scene = bpy.context.scene
scene.unit_settings.system = 'METRIC'
scene.unit_settings.scale_length = 0.001 # 1 BU = 1 mm
# Create rectangular cube
bpy.ops.mesh.primitive_cube_add(location=(0, 0, 0))
block = bpy.context.active_object
block.name = "Block"
# cube default size is 2x2x2, so set absolute dimensions
block.dimensions = (2.0, 20.0, 0.25)
bpy.context.view_layer.objects.active = block
block.select_set(True)
# Apply scale so booleans/bevel behave predictably
bpy.ops.object.transform_apply(location=False, rotation=False, scale=True)
# Create cylinder cutter
hole_diameter = 1.0
hole_radius = hole_diameter / 2.0
# Make it longer than the block thickness so it fully cuts through
cutter_depth = 5.0
bpy.ops.mesh.primitive_cylinder_add(
vertices=64,
radius=hole_radius,
depth=cutter_depth,
location=(0.0, 0.0, 0.0), # center of the block
rotation=(0.0, 0.0, 0.0)
)
cutter = bpy.context.active_object
cutter.name = "HoleCutter"
bpy.ops.object.transform_apply(location=False, rotation=False, scale=True)
# Boolean: cut hole
bpy.context.view_layer.objects.active = block
bool_mod = block.modifiers.new(name="Hole", type='BOOLEAN')
bool_mod.operation = 'DIFFERENCE'
bool_mod.solver = 'EXACT'
bool_mod.object = cutter
# Apply boolean
bpy.ops.object.modifier_apply(modifier=bool_mod.name)
# Hide cutter in viewport + renders
cutter.hide_set(True)
cutter.hide_render = True
# Bevel the block
bevel_width = 0.08
bevel_segments = 5
bevel_mod = block.modifiers.new(name="Bevel", type='BEVEL')
bevel_mod.width = bevel_width
bevel_mod.segments = bevel_segments
bevel_mod.limit_method = 'ANGLE'
bevel_mod.angle_limit = 0.523599 # 30 degrees in radians
# Apply bevel
bpy.ops.object.modifier_apply(modifier=bevel_mod.name)
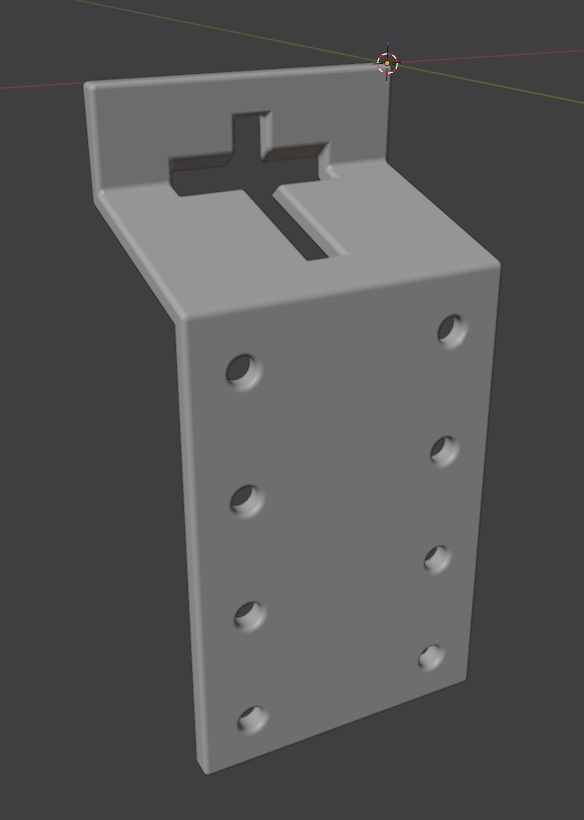
We spent a lot of the day trying to modify 3D models that we found online to work as a sign holder. Something like the bent metal plates you can buy at the tractor store. Since these are simple polygons, I thought it might be easier to script the build (plus making changes to the dimensions would just require tweaking variables).
Voila – hopefully it’s a T-post sign holder! It at least looks like one.
import bpy
import bmesh
import math
from mathutils import Vector
# -----------------------------
# Scene units (mm)
# -----------------------------
scene = bpy.context.scene
scene.unit_settings.system = 'METRIC'
scene.unit_settings.scale_length = 0.001 # 1 Blender unit = 1 mm
INCH = 25.4
def inch(x): return x * INCH
# -----------------------------
# PARAMETERS (mm)
# -----------------------------
thk = 10.0 # sheet thickness
width_x = 50.0 # bracket width (across the post)
# Leg lengths (side profile)
L_top = 15.0 # top flange length
L_web = 48.0 # drop/web height between bends
L_leg = 50.0 # long leg length (down the post)
# Bend included angles
bend1_included = 200.0 # top flange
bend2_included = 90.0 # web -> long leg
# If the long leg goes the wrong direction, flip this
flip_second_bend = False
# -----------------------------
# Punch hole on TOP FLANGE
# -----------------------------
do_punch = True
# T-post references
t_bar_w = inch(1.375) # crossbar width
t_bar_h = 12.0 # crossbar height (mm) <-- tune
t_stem_w = 12.0 # stem width (mm) <-- tune
t_stem_h = inch(1.625) # stem height
punch_clear = 1.0 # clearance added around each rectangle (mm)
# Position on top flange (Z from p0 end, and X across width)
punch_center_z = L_top * 0.55
punch_center_x = width_x * 0.50
# Vertical placement on top flange (Y=0 plane)
punch_center_y = 0.0
# -----------------------------
# Optional bevel to make edges look more formed
# -----------------------------
do_bevel = True
bevel_width = 0.6
bevel_segments = 2
# -----------------------------
# Cleanup
# -----------------------------
for n in ["BracketShape", "PunchBar", "PunchStem"]:
o = bpy.data.objects.get(n)
if o:
bpy.data.objects.remove(o, do_unlink=True)
# -----------------------------
# Helpers (YZ plane directions)
# Define 0° as +Z. +90° is +Y. -90° is -Y.
# -----------------------------
def unit_from_angle(deg_from_posZ):
a = math.radians(deg_from_posZ)
return Vector((0.0, math.sin(a), math.cos(a)))
def boolean_diff(target, cutter):
mod = target.modifiers.new(name=f"BOOL_{cutter.name}", type="BOOLEAN")
mod.operation = 'DIFFERENCE'
mod.solver = 'EXACT'
mod.object = cutter
bpy.context.view_layer.objects.active = target
bpy.ops.object.modifier_apply(modifier=mod.name)
cutter.hide_set(True)
def add_cube(name, size_xyz, location_xyz):
bpy.ops.mesh.primitive_cube_add(size=1, location=location_xyz)
obj = bpy.context.active_object
obj.name = name
obj.scale = (size_xyz[0]/2, size_xyz[1]/2, size_xyz[2]/2)
bpy.ops.object.transform_apply(scale=True)
return obj
# Convert included bend angles to turn angles
turn1 = 180.0 - bend1_included
turn2 = 180.0 - bend2_included
# Start along +Z (top flange)
theta0 = 0.0
d0 = unit_from_angle(theta0)
# After bend1, go "down" (toward -Y) by turning negative
theta1 = theta0 - turn1
d1 = unit_from_angle(theta1)
# After bend2, go toward +Z again (or flip if needed)
theta2 = theta1 + (turn2 if not flip_second_bend else -turn2)
d2 = unit_from_angle(theta2)
# Profile points (center surface)
p0 = Vector((0.0, 0.0, 0.0)) # free end of top flange
p1 = p0 + d0 * L_top # bend1 line
p2 = p1 + d1 * L_web # bend2 line
p3 = p2 + d2 * L_leg # end of long leg
# -----------------------------
# Build a single connected sheet surface:
# Create two polylines separated in X, then make quads between them.
# -----------------------------
mesh = bpy.data.meshes.new("BracketShapeMesh")
bracket = bpy.data.objects.new("BracketShape", mesh)
bpy.context.collection.objects.link(bracket)
bpy.context.view_layer.objects.active = bracket
bracket.select_set(True)
bm = bmesh.new()
x0, x1 = 0.0, width_x
# Left side (x0)
v0a = bm.verts.new((x0, p0.y, p0.z))
v1a = bm.verts.new((x0, p1.y, p1.z))
v2a = bm.verts.new((x0, p2.y, p2.z))
v3a = bm.verts.new((x0, p3.y, p3.z))
# Right side (x1)
v0b = bm.verts.new((x1, p0.y, p0.z))
v1b = bm.verts.new((x1, p1.y, p1.z))
v2b = bm.verts.new((x1, p2.y, p2.z))
v3b = bm.verts.new((x1, p3.y, p3.z))
# Faces (one per segment)
bm.faces.new((v0a, v0b, v1b, v1a)) # top flange
bm.faces.new((v1a, v1b, v2b, v2a)) # web
bm.faces.new((v2a, v2b, v3b, v3a)) # long leg
bm.normal_update()
bm.to_mesh(mesh)
bm.free()
# -----------------------------
# Solidify to thickness (sheet metal look)
# -----------------------------
solid = bracket.modifiers.new("Solidify", type="SOLIDIFY")
solid.thickness = thk
solid.offset = 0.0
bpy.ops.object.modifier_apply(modifier=solid.name)
# -----------------------------
# Punch the lowercase "t" on the top flange
# (Top flange is flat at Y=0; punch straight through Y)
# -----------------------------
if do_punch:
cutter_depth_y = thk * 6.0 # ensure it fully cuts through
# Crossbar rectangle
bar = add_cube(
"PunchBar",
size_xyz=(t_bar_w + 2*punch_clear, cutter_depth_y, t_bar_h + 2*punch_clear),
location_xyz=(punch_center_x, punch_center_y, punch_center_z)
)
# Stem rectangle (placed under the bar like a lowercase "t")
stem_center_z = punch_center_z - (t_bar_h*0.35) - (t_stem_h*0.5)
stem = add_cube(
"PunchStem",
size_xyz=(t_stem_w + 2*punch_clear, cutter_depth_y, t_stem_h + 2*punch_clear),
location_xyz=(punch_center_x, punch_center_y, stem_center_z)
)
#boolean_diff(bracket, bar)
#boolean_diff(bracket, stem)
# -----------------------------
# Optional bevel
# -----------------------------
if do_bevel:
bev = bracket.modifiers.new("Bevel", type="BEVEL")
bev.width = bevel_width
bev.segments = bevel_segments
bev.limit_method = 'ANGLE'
bev.angle_limit = math.radians(35)
bpy.context.view_layer.objects.active = bracket
bpy.ops.object.modifier_apply(modifier=bev.name)
import bpy
# Clear all existing objects
for obj in list(bpy.data.objects):
bpy.data.objects.remove(obj, do_unlink=True)
# Set Units
scene = bpy.context.scene
scene.unit_settings.system = 'METRIC'
scene.unit_settings.scale_length = 0.001 # 1 BU = 1 mm
# Create cylinder
bpy.ops.mesh.primitive_cylinder_add(
vertices=32, radius=10.0, depth=20.0,
end_fill_type='NGON', calc_uvs=True,
enter_editmode=False, align='WORLD',
location=(0.0, 0.0, -2.0), rotation=(0.0, 0.0, 0.0),
scale=(1, 1, 1)
)
# Name cylinder
obj = bpy.context.active_object
obj.name = "MyCylinder"
# Frame Selected
for area in bpy.context.window.screen.areas:
if area.type == 'VIEW_3D':
for region in area.regions:
if region.type == 'WINDOW':
with bpy.context.temp_override(area=area, region=region):
bpy.ops.view3d.view_selected(use_all_regions=False)
break
break
Found a neat pair of methods that were added in Python 2.5 — it’s like split/index except it handles breaking the string into two elements for you. A tuple is returned with the part before the separator, the separator, and the part after the separator. If the separator is not found, element 0 and 1 are empty strings.
C:\Users\lisa> python
Python 3.13.3
Type “help”, “copyright”, “credits” or “license” for more information.
>>> test = “This is a string | with pipe characters as | delimiters in the string”
>>> print(test.rpartition(“|”)[0])
This is a string | with pipe characters as
>>> print(test.partition(“|”)[0])
This is a string
>>>
I put together a quick program that creates a “fancy” QR code to a specified URL with the specified color and drops the desired “logo” file into the center of the code.
import qrcode
from PIL import Image
def generate_qr_code_with_custom_color_and_logo():
url = input("Please enter the URL for which you want to generate a QR code: ")
rgb_input = input("Please enter the RGB values for the QR code color (e.g. 0,0,0 for black): ")
try:
rgb_color = tuple(map(int, rgb_input.split(',')))
if len(rgb_color) != 3 or not all(0 <= n <= 255 for n in rgb_color):
raise ValueError("Invalid RGB color value.")
except Exception:
print("Error parsing RGB values. Please make sure to enter three integers separated by commas.")
return
qr = qrcode.QRCode(
version=1, # controls the size of the QR Code
error_correction=qrcode.constants.ERROR_CORRECT_H, # high error correction for image insertion
box_size=10,
border=4,
)
qr.add_data(url)
qr.make(fit=True)
# Generate the QR code with the specified RGB color
img = qr.make_image(fill_color=rgb_color, back_color="white")
# Load the logo image
logo_image_path = input("Please enter the logo for the center of this QR code: ")
try:
logo = Image.open(logo_image_path)
except FileNotFoundError:
print(f"Logo image file '{logo_image_path}' not found. Proceeding without a logo.")
img.save("qr_code_with_custom_color.png")
print("QR code has been generated and saved as 'qr_code_with_custom_color.png'.")
return
# Resize the logo image to fit in the QR code
img_width, img_height = img.size
logo_size = int(img_width * 0.2) # The logo will take up 20% of the QR code width
logo = logo.resize((logo_size, logo_size), Image.ANTIALIAS)
position = ((img_width - logo_size) // 2, (img_height - logo_size) // 2)
img.paste(logo, position, mask=logo.convert("RGBA"))
img.save("qr_code_with_custom_color_and_logo.png")
print("QR code with a custom color and a logo image has been generated and saved as 'qr_code_with_custom_color_and_logo.png'.")
if __name__ == "__main__":
generate_qr_code_with_custom_color_and_logo()
Like my script that pulls the AD site information – this lets me see what subnets are defined and which sites are assigned to those subnets. I was able to quickly confirm that the devices that had problems communicating with Active Directory don’t have a site defined. Way back in 2000, we created a “catch all” 10.0.0.0/8 subnet and assigned it to the user authentication site. New networks on a whole different addressing scheme don’t have a site assignment. It should still work, but the application in question has historically had issues with going the “Ok, list ’em all” route.
from ldap3 import Server, Connection, ALL, SUBTREE, Tls
import ssl
import getpass
# Attempt to import USERNAME and PASSWORD from config.py
try:
from config import USERNAME, PASSWORD
except ImportError:
USERNAME, PASSWORD = None, None
# Define constants
LDAP_SERVER = 'ad.example.com'
LDAP_PORT = 636
def get_subnets_and_sites(username, password):
# Set up TLS configuration
tls_configuration = Tls(validate=ssl.CERT_REQUIRED, version=ssl.PROTOCOL_TLSv1_2)
# Connect to the LDAP server
server = Server(LDAP_SERVER, port=LDAP_PORT, use_ssl=True, tls=tls_configuration, get_info=ALL)
connection = Connection(server, user=username, password=password, authentication='SIMPLE', auto_bind=True)
# Define the search base for subnets
search_base = 'CN=Subnets,CN=Sites,CN=Configuration,DC=example,DC=com' # Change this to match your domain's DN
search_filter = '(objectClass=subnet)' # Filter to find all subnet objects
search_attributes = ['cn', 'siteObject'] # Retrieve the common name and site object references
# Perform the search
connection.search(search_base, search_filter, SUBTREE, attributes=search_attributes)
# Extract and return subnets and their site assignments
subnets_sites = []
for entry in connection.entries:
subnet_name = entry.cn.value
site_dn = entry.siteObject.value if entry.siteObject else "No site assigned"
subnets_sites.append((subnet_name, site_dn))
return subnets_sites
def print_subnets_and_sites(subnets_sites):
if subnets_sites:
print("\nSubnets and their Site Assignments:")
for subnet, site in subnets_sites:
print(f"Subnet: {subnet}, Site: {site}")
else:
print("No subnets found in the domain.")
def main():
# Prompt for username and password if not available in config.py
username = USERNAME if USERNAME else input("Enter your LDAP username: ")
password = PASSWORD if PASSWORD else getpass.getpass("Enter your LDAP password: ")
subnets_sites = get_subnets_and_sites(username, password)
print_subnets_and_sites(subnets_sites)
if __name__ == "__main__":
main()
One down side of not administering the Active Directory domain anymore is that I don’t have the quick GUI tools that show you how “stuff” is set up. Luckily, the sites are all reflected in AD objects that can be read by authenticated users:
from ldap3 import Server, Connection, ALL, SIMPLE, SUBTREE, Tls
import ssl
import getpass
# Attempt to import USERNAME and PASSWORD from config.py
try:
from config import USERNAME, PASSWORD
except ImportError:
USERNAME, PASSWORD = None, None
# Define constants
LDAP_SERVER = 'ad.example.com'
LDAP_PORT = 636
def get_all_sites(username, password):
# Set up TLS configuration
tls_configuration = Tls(validate=ssl.CERT_REQUIRED, version=ssl.PROTOCOL_TLSv1_2)
# Connect to the LDAP server
server = Server(LDAP_SERVER, port=LDAP_PORT, use_ssl=True, tls=tls_configuration, get_info=ALL)
connection = Connection(server, user=username, password=password, authentication='SIMPLE', auto_bind=True)
# Define the search base for sites
search_base = 'CN=Sites,CN=Configuration,DC=example,DC=com' # Update to match your domain's DN structure
search_filter = '(objectClass=site)' # Filter to find all site objects
search_attributes = ['cn'] # We only need the common name (cn) of the sites
# Perform the search
connection.search(search_base, search_filter, SUBTREE, attributes=search_attributes)
# Extract and return site names
site_names = [entry['cn'].value for entry in connection.entries]
return site_names
def print_site_names(site_names):
if site_names:
print("\nAD Sites:")
for site in site_names:
print(f"- {site}")
else:
print("No sites found in the domain.")
def main():
# Prompt for username and password if not available in config.py
username = USERNAME if USERNAME else input("Enter your LDAP username: ")
password = PASSWORD if PASSWORD else getpass.getpass("Enter your LDAP password: ")
site_names = get_all_sites(username, password)
print_site_names(site_names)
if __name__ == "__main__":
main()
I write a lot of things down to save myself time the next time I need to do the same sort of thing — and publish this to the Internet in case I can save someone else time too. But this one is so specific, I’m not sure it’s an “ever going to encounter this again” sort of thing. Just in case, though — I have device data being stored in redis — because the device doesn’t know its throughput values, you need the last time and last value paired with the current device metrics to calculate throughput. OK. But, sporadically, the cached data is updated insomuch as a new record is posted with a new timestamp. But the actual values, other than timestamp, remain unchanged. With millions of interfaces, it’s challenging to identify these situations by spot-checking the visualizations. Instead, I need to monitor redis and identify when the tstamp is updated but no other values change.
import redis
import time
import re
import json
import os
# Configuration
redis_host = 'redishost.example.net'
redis_port = 6379
redis_password = 'P@5sw0rDG03sH3r3' # Replace with your Redis password
pattern = re.compile(r'INTERFACE_RAW_STATS_hostname\d\d\d\d_\d+_\d+')
output_file = 'changed_records.json'
# Connect to Redis
client = redis.StrictRedis(host=redis_host, port=redis_port, password=redis_password, decode_responses=True)
# Dictionary to track records
records = {}
matching_keys = []
def get_matching_keys():
"""
Retrieve keys from Redis matching the specified pattern.
Returns:
list: A list of keys that match the pattern.
"""
all_keys = client.keys()
matching_keys = [key for key in all_keys if pattern.match(key)]
return matching_keys
def process_keys():
"""
Process Redis keys to track changes in data.
Retrieves keys matching the pattern, gets their data using HGETALL,
and tracks changes. If only the 'tstamp' field has changed and all
other fields remain the same, the record is written to a file.
"""
global records
i = 0
for key in matching_keys:
i += 1
data = client.hgetall(key)
if i == 1 or i % 1000 == 0:
print(f"Processed {i} records")
if not data:
continue
collector_name = data.get('collectorName')
node_id = data.get('nodeId')
if_index = data.get('ifIndex')
tstamp = data.get('tstamp')
if not collector_name or not node_id or not if_index or not tstamp:
continue
unique_key = f"{collector_name}_{node_id}_{if_index}"
if unique_key in records:
previous_data = records[unique_key]
if previous_data['tstamp'] != tstamp:
# Check if all other values are the same
if all(data[k] == previous_data[k] for k in data if k != 'tstamp'):
print(f"***** Record changed: {json.dumps(data, indent=2)} *****")
write_to_file(data)
records[unique_key] = data # Update the record
else:
records[unique_key] = data
def write_to_file(data):
"""
Write the given data to a file.
Args:
data (dict): The data to write to the file.
"""
with open(output_file, 'a') as file:
file.write(json.dumps(data) + '\n')
if __name__ == "__main__":
# Ensure the output file is empty at the start
if os.path.exists(output_file):
os.remove(output_file)
# Retrieve the list of matching keys once
matching_keys = get_matching_keys()
while True:
process_keys()
print("Sleeping ... ")
time.sleep(300) # Sleep for 5 minutes
So, I know that Redis should be a data cache that can be repopulated … but we use it to calculate deltas (what was the value last time) … so repopulating the information makes the first half hour or so of calculations rather slow as the application tries redis, gets nothing, and fails back to a database query. Then we get a backlog of data to churn through, and it would just be better if the Redis cache hadn’t gone away in the first place. And if you own both servers and the files are in the same format, you could just copy the cache db from the old server to the new one. But … when you cannot just copy the file and you would really prefer the data not disappear and need to be repopulated … there’s a script for that! This python script reads all of the data from the “old” server and populates it into the “new” server.
import redis
def migrate_data(redis_source_host, redis_source_port, redis_source_db, redis_source_password,
redis_dest_host, redis_dest_port, redis_dest_db, redis_dest_password):
# Connect to the source Redis server
source_client = redis.StrictRedis(host=redis_source_host, port=redis_source_port, db=redis_source_db, password=redis_source_password)
# Connect to the destination Redis server
dest_client = redis.StrictRedis(host=redis_dest_host, port=redis_dest_port, db=redis_dest_db, password=redis_dest_password)
# Fetch all keys from the source Redis
keys = source_client.keys('*')
for key in keys:
# Get the type of the key
key_type = source_client.type(key).decode('utf-8')
if key_type == 'string':
value = source_client.get(key)
print("Setting string value in dest")
dest_client.set(key, value)
elif key_type == 'list':
values = source_client.lrange(key, 0, -1)
print("Setting list value in dest")
dest_client.delete(key) # Ensure the list is empty before pushing
for value in values:
dest_client.rpush(key, value)
elif key_type == 'set':
values = source_client.smembers(key)
print("Setting set value in dest")
dest_client.delete(key) # Ensure the set is empty before pushing
for value in values:
dest_client.sadd(key, value)
elif key_type == 'zset':
values = source_client.zrange(key, 0, -1, withscores=True)
print("Setting zset value in dest")
dest_client.delete(key) # Ensure the zset is empty before pushing
for value, score in values:
dest_client.zadd(key, {value: score})
elif key_type == 'hash':
values = source_client.hgetall(key)
print("Setting hash value in dest")
dest_client.delete(key) # Ensure the hash is empty before pushing
dest_client.hmset(key, values)
print("Data migration completed.")
if __name__ == "__main__":
# Source Redis server details
redis_source_host = 'oldredis.example.com'
redis_source_port = 6379
redis_source_db = 0
redis_source_password = 'SourceRedisPassword'
# Destination Redis server details
redis_dest_host = 'newredis.example.com'
redis_dest_port = 6379
redis_dest_db = 0
redis_dest_password = 'DestRedisPassword'
# Migrate data
migrate_data(redis_source_host, redis_source_port, redis_source_db, redis_source_password,
redis_dest_host, redis_dest_port, redis_dest_db, redis_dest_password)
As communication between development and production platforms is limited for security and data integrity reasons, this creates a challenge when testing changes in development: we cannot access “real world” data with which to perform tests. Having a limited set of data in development means testing may not illuminate issues that occur at high volume or on a large scale.
Solution
While limiting communication between the prod and dev systems is reasonable, it would be beneficial to be able to replay production-like data within our development systems for testing purposes. While it is not cost effective to buy large network devices with thousands of interfaces for testing, the Python module snmpsim provides “canned responses” that simulate real devise on the production network. For simplicity, I have a bash script that launches the SNMP responder.
This responder will replay data stored in the directory /opt/snmp/snmpsim/data – any file ending in snmprec will be included in the response, and the filename prior to .snmprec is the community string to access the response data. E.G. public.snmprec is the data for the public community string
The response files are in the format OID|TAG|VALUE where OID is the OID number of the SNMP object, TAG is an integer defined at https://pypi.org/project/snmpsim/0.2.3/
Valid tag values and their corresponding ASN.1/SNMP types are:
ASN.1/SNMP Type
Tag Value
Integer32
2
Octet String
4
Null
5
Object Identifier
6
IP Address
64
Counter32
65
Gauge32
66
Time Ticks
67
Opaque
68
Counter65
70
And the value is the data to be returned for the OID object. As an example:
1.3.6.1.2.1.1.3.0|67|2293092270
1.3.6.1.2.1.1.3.0 is the sysUpTime, the data type is TimeTicks, and the system up time is 2293092270 hundredths of a second. Or 6375 hours, 20 minutes, and 24 seconds.
Items within the response file need to be listed in ascending order.
Generating Response Data
There are two methods for creating the data provided to an SNMP GET request. A response file can be created manually, populated with OID objects that should be included in the response as well as sample data. Alternatively, a network trace can be gathered from the production network and parsed to create the response file.
Manually Generated Response File
While you can literally type data into a response file, but it is far easier to use a script to generate sample data. /opt/snmp/snmpsim/_genData.py is an example of creating a response file for about 1,000 interfaces
from datetime import datetime
import random
iRangeMax = 1000
dictTags = {'Integer': '2', 'OctetString': '4', 'NULL': '5', 'ObjectIdentifier': '6', 'IPAddress': '64', 'Counter32': '65', 'Gauge32': '66', 'TimeTicks': '67', 'Opaque': '68','Counter64': '70'} # Valid tags per https://pypi.org/project/snmpsim/0.2.3/
today = datetime.now()
iftable_snmp_objects = [
('1.3.6.1.2.1.2.2.1.1', 'Integer', lambda i: i), # ifIndex
('1.3.6.1.2.1.2.2.1.2', 'OctetString', lambda i: f"SampleInterface{i}"), # ifDescr
('1.3.6.1.2.1.2.2.1.3', 'Integer', lambda i: 6), # ifType
('1.3.6.1.2.1.2.2.1.4', 'Integer', lambda i: 1500), # ifMtu
('1.3.6.1.2.1.2.2.1.5', 'Gauge32', lambda i: 100000000), # ifSpeed
('1.3.6.1.2.1.2.2.1.6', 'OctetString', lambda i: f"00:00:00:00:{format(i, '02x')[:2]}:{format(i, '02x')[-2:]}"), # ifPhysAddress
('1.3.6.1.2.1.2.2.1.7', 'Integer', lambda i: 1), # ifAdminStatus
('1.3.6.1.2.1.2.2.1.8', 'Integer', lambda i: 1), # ifOperStatus
('1.3.6.1.2.1.2.2.1.9', 'TimeTicks', lambda i: int((datetime.now() - datetime(2024, random.randint(1, today.month), random.randint(1, today.day))).total_seconds()) * 100), # ifLastChange
('1.3.6.1.2.1.2.2.1.10', 'Counter32', lambda i: random.randint(3, i*50000)), # ifInOctets
('1.3.6.1.2.1.2.2.1.11', 'Counter32', lambda i: random.randint(3, i*50000)), # ifInUcastPkts
('1.3.6.1.2.1.2.2.1.12', 'Counter32', lambda i: random.randint(0, 80)), # ifInNUcastPkts
('1.3.6.1.2.1.2.2.1.13', 'Counter32', lambda i: random.randint(0, 80)), # ifInDiscards
('1.3.6.1.2.1.2.2.1.14', 'Counter32', lambda i: random.randint(0, 80)), # ifInErrors
('1.3.6.1.2.1.2.2.1.15', 'Counter32', lambda i: random.randint(3, i*50000)), # ifInUnknownProtos
('1.3.6.1.2.1.2.2.1.16', 'Counter32', lambda i: random.randint(3, i*50000)), # ifOutOctets
('1.3.6.1.2.1.2.2.1.17', 'Counter32', lambda i: random.randint(3, i*50000)), # ifOutUcastPkts
('1.3.6.1.2.1.2.2.1.18', 'Counter32', lambda i: random.randint(3, i*50000)), # ifOutNUcastPkts
('1.3.6.1.2.1.2.2.1.19', 'Counter32', lambda i: random.randint(0, 80)), # ifOutDiscards
('1.3.6.1.2.1.2.2.1.20', 'Counter32', lambda i: random.randint(0, 80)), # ifOutErrors
]
ifxtable_snmp_objects = [
('1.3.6.1.2.1.31.1.1.1.1', 'OctetString', lambda i: f"SampleInterface{i}"), # ifName
('1.3.6.1.2.1.31.1.1.1.15', 'Gauge32', lambda i: "100"), # ifHighSpeed
('1.3.6.1.2.1.31.1.1.1.6', 'Counter32', lambda i: random.randint(3, i*50000)), # ifHCInOctets
('1.3.6.1.2.1.31.1.1.1.10', 'Counter32', lambda i: random.randint(3, i*60000)), # ifHCOutOctets
]
# Print IFTable data
for oid_base, tag_type, value_func in iftable_snmp_objects:
for i in range(1, iRangeMax+1):
value = value_func(i)
print(f"{oid_base}.{i}|{dictTags.get(tag_type)}|{value}")
# IP-MIB objects for managing IP addressing
# ipAdEntAddr: The IP address to which this entry's addressing information pertains
print(f"1.3.6.1.2.1.4.20.1.1|{dictTags.get('IPAddress')}|10.5.5.5")
# ipAdEntIfIndex: The index value which uniquely identifies the interface to which this entry is applicable
print(f"1.3.6.1.2.1.4.20.1.2|{dictTags.get('OctetString')}|1")
# ipAdEntNetMask: The subnet mask associated with the IP address of this entry
print(f"1.3.6.1.2.1.4.20.1.3|{dictTags.get('OctetString')}|255.255.255.0")
# hrSWRunIndex: An index uniquely identifying a row in the hrSWRun table
print(f"1.3.6.1.2.1.25.4.2.1.1.1|{dictTags.get('Integer')}|1")
# hrSWRunName: The name of the software running on this device
print(f"1.3.6.1.2.1.25.4.2.1.2.1|{dictTags.get('OctetString')}|LJRSNMPAgent")
# hrSWRunID: The product ID of the software running on this device
print(f"1.3.6.1.2.1.25.4.2.1.3.1|{dictTags.get('ObjectIdentifier')}|1.3.6.1.4.1.25709.55")
# hrSWRunPath: The path of the software running on this device
print(f"1.3.6.1.2.1.25.4.2.1.4.1|{dictTags.get('OctetString')}|/opt/snmp/snmpsim/_agent.sh")
# hrSWRunParameters: Operational parameters for the software running on this device
print(f"1.3.6.1.2.1.25.4.2.1.5.1|{dictTags.get('OctetString')}|-L")
# hrSWRunType: The type of software running (e.g., operating system, application)
print(f"1.3.6.1.2.1.25.4.2.1.6.1|{dictTags.get('Integer')}|4")
# hrSWRunStatus: The status of this software (running, runnable, notRunnable, invalid)
print(f"1.3.6.1.2.1.25.4.2.1.7.1|{dictTags.get('Integer')}|1")
for oid_base, tag_type, value_func in ifxtable_snmp_objects:
for i in range(1, iRangeMax+1):
value = value_func(i)
print(f"{oid_base}.{i}|{dictTags.get(tag_type)}|{value}")
Network Capture
Even better, parse a network capture file.
Capture Data
On the server that gathers SNMP data from the host we want to simulate, use a network capture utility to gather the SNMP communication between the server and the desired device.
tcpdump -i <interface> -w <filename>.pcap
E.G. to record the communication with 10.5.171.114
tcpdump ‘host 10.5.171.114 and (tcp port 161 or tcp port 162 or udp port 161 or udp port 162)’ -w /tmp/ar.pcap
Note – there Is no benefit to capturing more than one cycle of SNMP responses. If data is captured immediately, that means the devices were in the middle of a cycle. End the capture and start a new one shortly. There should be no packets captured for a bit, then packets during the SNMP polling cycle, and then another pause until the next cycle.
Parsing The Capture Data Into A Response File
The following script parses the capture file into an snmprec response file – note, I needed to use 2.6.0rc1 of scapy to parse SNMP data. The 2.5.0 release version failed to parse most of the packets which I believe is related to https://github.com/secdev/scapy/issues/3900
from scapy.all import rdpcap, SNMP
from scapy.layers.inet import UDP
from scapy.packet import Raw
from scapy.layers.snmp import SNMP, SNMPvarbind, SNMPresponse, SNMPbulk
from scapy.all import conf, load_layer
from scapy.utils import hexdump
from scapy.all import UDP, load_contrib
from scapy.packet import bind_layers
import os
from datetime import datetime
import argparse
# Ensure Scapy's SNMP contributions are loaded
load_contrib("snmp")
def sort_by_oid(listSNMPResponses):
"""
Sorts a list of "OID|TAG|Value" strings by the OID numerically and hierarchically.
:param listSNMPResponses: A list of "OID|TAG|Value" strings.
:return: A list of "OID|TAG|Value" strings sorted by OID.
"""
# Split each element into a tuple of (OID list, original string), converting OID to integers for proper comparison
oid_tuples = [(list(map(int, element.split('|')[0].split('.'))), element) for element in listSNMPResponses]
# Sort the list of tuples by the OID part (the list of integers)
sorted_oid_tuples = sorted(oid_tuples, key=lambda x: x[0])
# Extract the original strings from the sorted list of tuples
sorted_listSNMPResponses = [element[1] for element in sorted_oid_tuples]
return sorted_listSNMPResponses
parser = argparse.ArgumentParser(description='This script converts an SNMP packet capture into a snmpsim response file')
parser.add_argument('--filename', '-f', help='The capture file to process', required=True)
args = parser.parse_args()
strFullCaptureFilePath = args.filename
strCaptureFilePath, strCaptureFileName = os.path.split(strFullCaptureFilePath)
# Valid tags per https://pypi.org/project/snmpsim/0.2.3/
dictTags = {'ASN1_INTEGER': '2', 'ASN1_STRING': '4', 'ASN1_NULL': '5', 'ASN1_OID': '6', 'ASN1_IPADDRESS': '64', 'ASN1_COUNTER32': '65', 'ASN1_GAUGE32': '66', 'ASN1_TIME_TICKS': '67', 'Opaque': '68','ASN1_COUNTER64': '70'}
listSNMPResponses = []
listSNMPResponses.append("1.3.6.1.2.1.25.4.2.1.1.1|2|1")
listSNMPResponses.append("1.3.6.1.2.1.25.4.2.1.2.1|4|LJRSNMPAgent")
listSNMPResponses.append("1.3.6.1.2.1.25.4.2.1.3.1|6|1.3.6.1.4.1.25709.55")
listSNMPResponses.append("1.3.6.1.2.1.25.4.2.1.4.1|4|/opt/snmp/snmpsim/_agent.sh")
listSNMPResponses.append("1.3.6.1.2.1.25.4.2.1.5.1|4|-L")
listSNMPResponses.append("1.3.6.1.2.1.25.4.2.1.6.1|2|4")
listSNMPResponses.append("1.3.6.1.2.1.25.4.2.1.7.1|2|1")
i = 0
if True:
packets = rdpcap(strFullCaptureFilePath)
# Packets are zero indexed, so packet 1 in script is packet 2 in Wireshark GUI
#for i in range(0,4):
for packet in packets:
print(f"Working on packet {i}")
i = i + 1
if SNMP in packet:
snmp_layer = packet[SNMP]
if isinstance(packet[SNMP].PDU,SNMPresponse):
snmp_response = snmp_layer.getfield_and_val('PDU')[1]
if hasattr(snmp_response, 'varbindlist') and snmp_response.varbindlist is not None:
for varbind in snmp_response.varbindlist:
strOID = varbind.oid.val if hasattr(varbind.oid, 'val') else str(varbind.oid)
strValue = varbind.value.val if hasattr(varbind.value, 'val') else str(varbind.value)
strType = type(varbind.value).__name__
if dictTags.get(strType):
iType = dictTags.get(strType)
else:
iType = strType
if isinstance(strValue, bytes):
print(f"Decoding {strValue}")
strValue = strValue.decode('utf-8',errors='ignore')
print(f"OID: {strOID}, Type: {strType}, Tag: {iType}, Value: {strValue}")
listSNMPResponses.append(f"{strOID}|{iType}|{strValue}")
else:
print(f"Not a response -- type is {type(packet[SNMP].PDU)}")
elif Raw in packet:
print(f"I have a raw packet at {i}")
else:
print(dir(packet))
print(f"No SNMP or Raw in {i}: {packet}")
# Sort by OID numbers
listSortedSNMPResponses = sort_by_oid(listSNMPResponses)
f = open(f'/opt/snmp/snmpsim/data/{datetime.now().strftime("%Y%m%d")}-{strCaptureFileName.rsplit(".", 1)[0]}.deactivated', "w")
for strSNMPResponse in listSortedSNMPResponses:
print(strSNMPResponse)
f.write(strSNMPResponse)
f.write("\n")
f.close()
This will create an snmpsim response file at /opt/snmp/snmpsim/data named as the capture file prefixed with the current year, month, and date. I.E. My ar.cap file results are /opt/snmp/snmpsim/data/20240705-ar.deactivated – you can then copy the file to whatever community string you want – cp 20240705-ar.deactivated CommunityString.snmprec