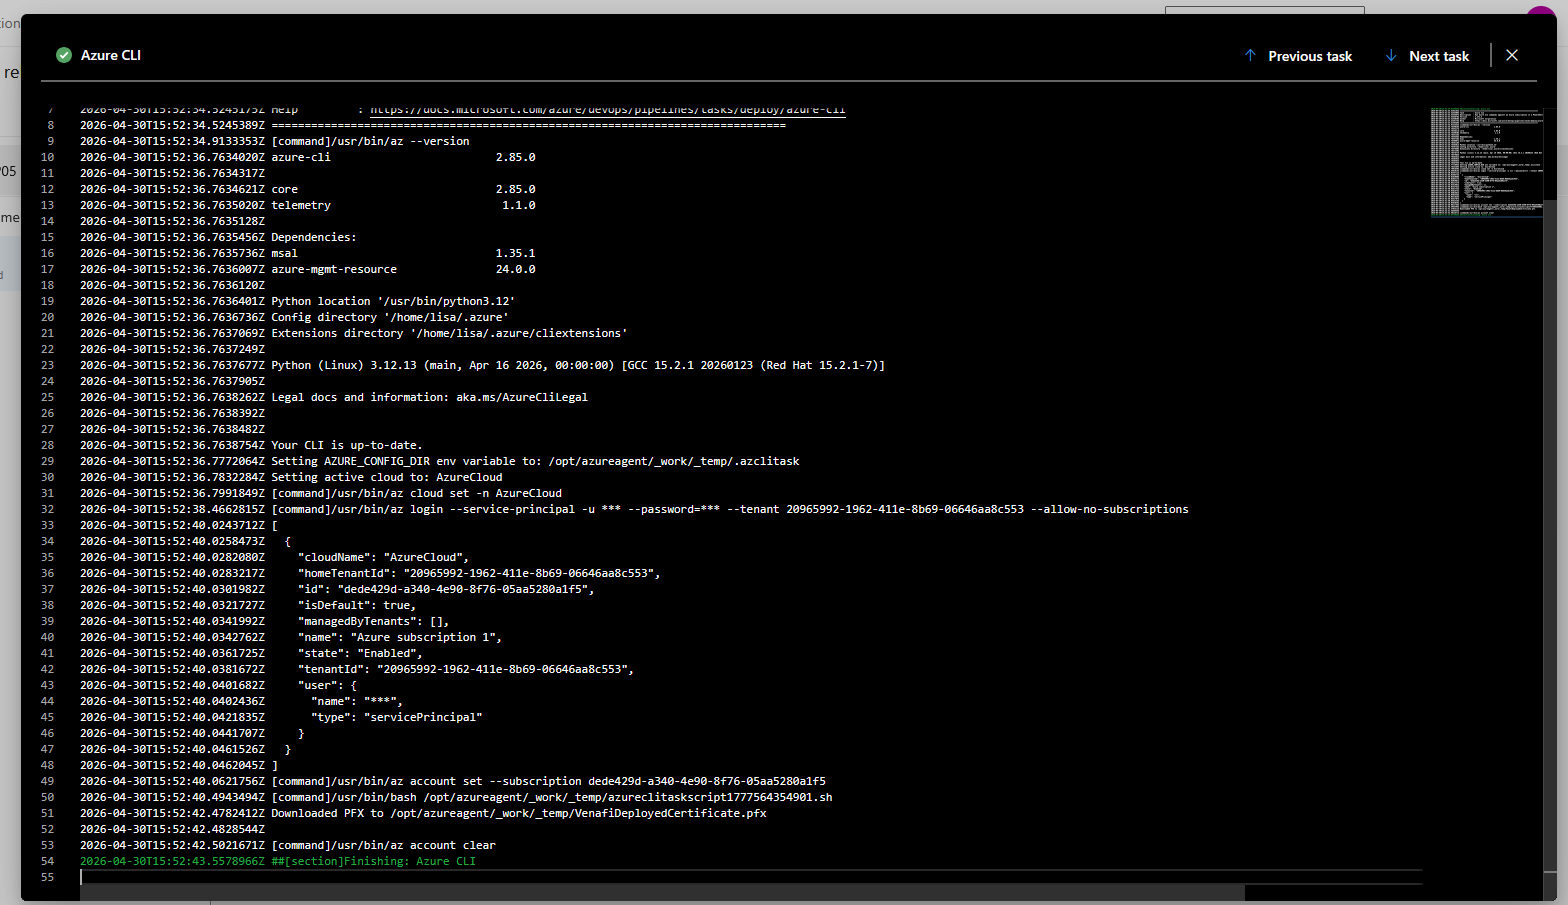
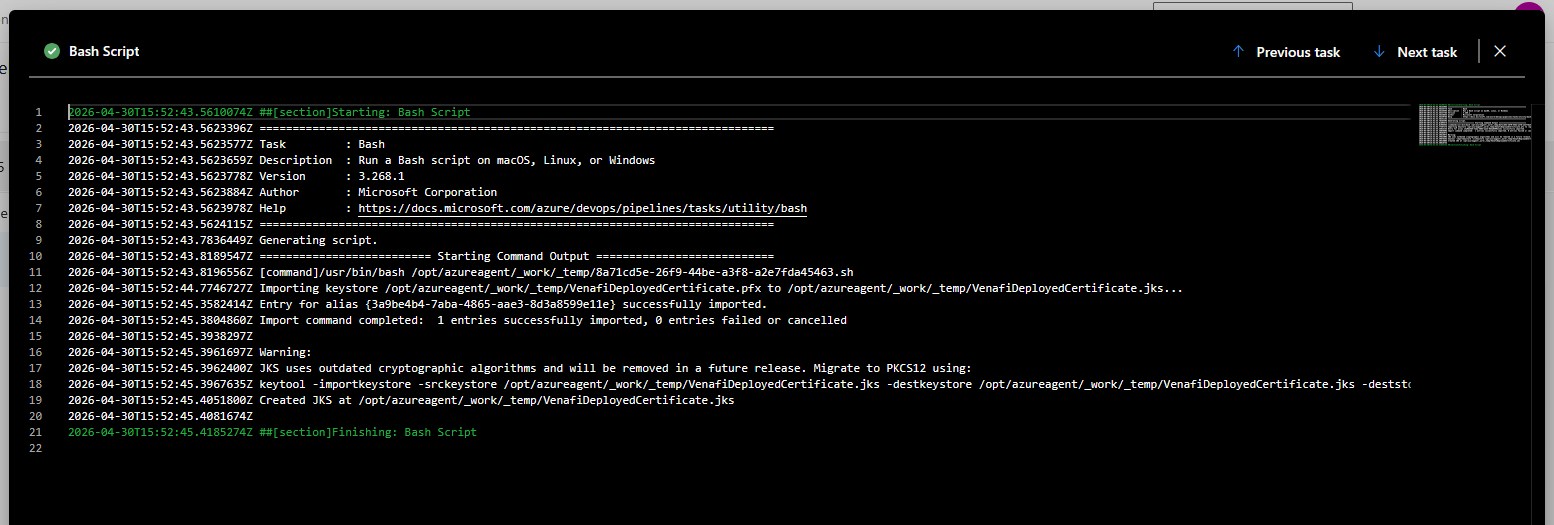
Category: Technology

Blender API: Playing with Cylinders

This script was mostly made to play around with rotation on cylinders.

import bpy
import math

# Delete all existing objects
for obj in list(bpy.data.objects):
    bpy.data.objects.remove(obj, do_unlink=True)

for i in range(4):
    bpy.ops.mesh.primitive_cylinder_add(
        radius=0.5,
        depth=10.0,
        location=(0, 0.0, 0.0),
        rotation=((i * 5.5), 0.0, 0.0)
    )

    cyl = bpy.context.active_object
    cyl.name = f"DemoCylinderX{i}"

for i in range(4):
    bpy.ops.mesh.primitive_cylinder_add(
        radius=0.5,
        depth=10.0,
        location=(0, 0.0, 0.0),
        rotation=(0.0, (i * 5.5), 0.0)
    )

    cyl = bpy.context.active_object
    cyl.name = f"DemoCylinderY{i}"

# cyl.rotation_euler = (15.0,13.0,12.0)

# Or single-axis rotation
# Rotate 45 degrees about X axis
#cyl.rotation_euler[0] = math.radians(45.0)


Querying the RPC Endpoint Mapper

A lot of RPC services start out on a standard port (TCP port 135) and then move over to a dynamically allocated port. Fortunately, there’s a way to ask the RPC endpoint mapper what services are available and what port(s) have been assigned to that service. It uses the portqry command:

C:\PortQryV2>portqry -n host2043.servers.example.com -e 135 -p tcp -v

Note: the -v option only displays extra data in local mode

Querying target system called:

 host2043.servers.example.com

Attempting to resolve name to IP address...


Name resolved to 10.237.73.103

querying...

TCP port 135 (epmap service): LISTENING

Using ephemeral source port
Querying Endpoint Mapper Database...
Server's response:

UUID: 04eeb297-cbf4-466b-8a2a-bfd6a2f10bba EFSK RPC Interface
ncacn_np:host2043.servers.example.com[\\pipe\\efsrpc]

UUID: 367abb81-9844-35f1-ad32-98f038001003
ncacn_ip_tcp:host2043.servers.example.com[50007]

UUID: 91ae6020-9e3c-11cf-8d7c-00aa00c091be
ncacn_np:host2043.servers.example.com[\\pipe\\cert]

UUID: 91ae6020-9e3c-11cf-8d7c-00aa00c091be
ncacn_ip_tcp:host2043.servers.example.com[50006]

UUID: 29770a8f-829b-4158-90a2-78cd488501f7
ncacn_np:host2043.servers.example.com[\\pipe\\SessEnvPublicRpc]

UUID: 29770a8f-829b-4158-90a2-78cd488501f7
ncacn_ip_tcp:host2043.servers.example.com[50004]

UUID: 7f1343fe-50a9-4927-a778-0c5859517bac DfsDs service
ncacn_np:host2043.servers.example.com[\\PIPE\\wkssvc]

UUID: f6beaff7-1e19-4fbb-9f8f-b89e2018337c Windows Event Log
ncacn_np:host2043.servers.example.com[\\pipe\\eventlog]

UUID: f6beaff7-1e19-4fbb-9f8f-b89e2018337c Windows Event Log
ncacn_ip_tcp:host2043.servers.example.com[50002]

UUID: 1ff70682-0a51-30e8-076d-740be8cee98b
ncacn_np:host2043.servers.example.com[\\PIPE\\atsvc]

UUID: 378e52b0-c0a9-11cf-822d-00aa0051e40f
ncacn_np:host2043.servers.example.com[\\PIPE\\atsvc]

UUID: 33d84484-3626-47ee-8c6f-e7e98b113be1
ncacn_np:host2043.servers.example.com[\\PIPE\\atsvc]

UUID: 86d35949-83c9-4044-b424-db363231fd0c
ncacn_np:host2043.servers.example.com[\\PIPE\\atsvc]

UUID: 86d35949-83c9-4044-b424-db363231fd0c
ncacn_ip_tcp:host2043.servers.example.com[50003]

UUID: 3a9ef155-691d-4449-8d05-09ad57031823
ncacn_np:host2043.servers.example.com[\\PIPE\\atsvc]

UUID: 3a9ef155-691d-4449-8d05-09ad57031823
ncacn_ip_tcp:host2043.servers.example.com[50003]

UUID: c9ac6db5-82b7-4e55-ae8a-e464ed7b4277 Impl friendly name
ncacn_hvsocket:host2043.servers.example.com[F58797F6-C9F3-4D63-9BD4-E52AC020E586]

UUID: 76f226c3-ec14-4325-8a99-6a46348418af
ncacn_np:host2043.servers.example.com[\\PIPE\\InitShutdown]

UUID: d95afe70-a6d5-4259-822e-2c84da1ddb0d
ncacn_np:host2043.servers.example.com[\\PIPE\\InitShutdown]

UUID: d95afe70-a6d5-4259-822e-2c84da1ddb0d
ncacn_ip_tcp:host2043.servers.example.com[50001]

UUID: 12345778-1234-abcd-ef00-0123456789ac
ncacn_np:host2043.servers.example.com[\\pipe\\lsass]

UUID: 12345778-1234-abcd-ef00-0123456789ac
ncacn_ip_tcp:host2043.servers.example.com[50000]

UUID: 0b1c2170-5732-4e0e-8cd3-d9b16f3b84d7 RemoteAccessCheck
ncacn_np:host2043.servers.example.com[\\pipe\\lsass]

UUID: 0b1c2170-5732-4e0e-8cd3-d9b16f3b84d7 RemoteAccessCheck
ncacn_ip_tcp:host2043.servers.example.com[50000]

UUID: 0b1c2170-5732-4e0e-8cd3-d9b16f3b84d7 RemoteAccessCheck
ncacn_ip_tcp:host2043.servers.example.com[50005]

UUID: 0b1c2170-5732-4e0e-8cd3-d9b16f3b84d7 RemoteAccessCheck
ncacn_np:host2043.servers.example.com[\\pipe\\lsass]

UUID: 0b1c2170-5732-4e0e-8cd3-d9b16f3b84d7 RemoteAccessCheck
ncacn_ip_tcp:host2043.servers.example.com[50000]

UUID: 0b1c2170-5732-4e0e-8cd3-d9b16f3b84d7 RemoteAccessCheck
ncacn_ip_tcp:host2043.servers.example.com[50005]

UUID: b25a52bf-e5dd-4f4a-aea6-8ca7272a0e86 KeyIso
ncacn_np:host2043.servers.example.com[\\pipe\\lsass]

UUID: b25a52bf-e5dd-4f4a-aea6-8ca7272a0e86 KeyIso
ncacn_ip_tcp:host2043.servers.example.com[50000]

UUID: b25a52bf-e5dd-4f4a-aea6-8ca7272a0e86 KeyIso
ncacn_ip_tcp:host2043.servers.example.com[50005]

UUID: 8fb74744-b2ff-4c00-be0d-9ef9a191fe1b Ngc Pop Key Service
ncacn_np:host2043.servers.example.com[\\pipe\\lsass]

UUID: 8fb74744-b2ff-4c00-be0d-9ef9a191fe1b Ngc Pop Key Service
ncacn_ip_tcp:host2043.servers.example.com[50000]

UUID: 8fb74744-b2ff-4c00-be0d-9ef9a191fe1b Ngc Pop Key Service
ncacn_ip_tcp:host2043.servers.example.com[50005]

UUID: 51a227ae-825b-41f2-b4a9-1ac9557a1018 Ngc Pop Key Service
ncacn_np:host2043.servers.example.com[\\pipe\\lsass]

UUID: 51a227ae-825b-41f2-b4a9-1ac9557a1018 Ngc Pop Key Service
ncacn_ip_tcp:host2043.servers.example.com[50000]

UUID: 51a227ae-825b-41f2-b4a9-1ac9557a1018 Ngc Pop Key Service
ncacn_ip_tcp:host2043.servers.example.com[50005]

UUID: df1941c5-fe89-4e79-bf10-463657acf44d EFS RPC Interface
ncacn_np:host2043.servers.example.com[\\pipe\\efsrpc]

Total endpoints found: 38


==== End of RPC Endpoint Mapper query response ====


Blender Scripting Lesson of the Week: Beveling

We were playing around with bevels this week – it’s pretty straight forward, the API lets you set the parameters you set through the GUI in a bevel modifier.

import bpy

# Clear all existing objects
for obj in list(bpy.data.objects):
    bpy.data.objects.remove(obj, do_unlink=True)

# Set Units
scene = bpy.context.scene
scene.unit_settings.system = 'METRIC'
scene.unit_settings.scale_length = 0.001  # 1 BU = 1 mm

# Create rectangular cube
bpy.ops.mesh.primitive_cube_add(location=(0, 0, 0))
block = bpy.context.active_object
block.name = "Block"

# cube default size is 2x2x2, so set absolute dimensions
block.dimensions = (2.0, 20.0, 0.25)
bpy.context.view_layer.objects.active = block
block.select_set(True)

# Apply scale so booleans/bevel behave predictably
bpy.ops.object.transform_apply(location=False, rotation=False, scale=True)

# Create cylinder cutter
hole_diameter = 1.0
hole_radius = hole_diameter / 2.0

# Make it longer than the block thickness so it fully cuts through
cutter_depth = 5.0

bpy.ops.mesh.primitive_cylinder_add(
    vertices=64,
    radius=hole_radius,
    depth=cutter_depth,
    location=(0.0, 0.0, 0.0),   # center of the block
    rotation=(0.0, 0.0, 0.0)
)
cutter = bpy.context.active_object
cutter.name = "HoleCutter"

bpy.ops.object.transform_apply(location=False, rotation=False, scale=True)

# Boolean: cut hole
bpy.context.view_layer.objects.active = block
bool_mod = block.modifiers.new(name="Hole", type='BOOLEAN')
bool_mod.operation = 'DIFFERENCE'
bool_mod.solver = 'EXACT'
bool_mod.object = cutter

# Apply boolean
bpy.ops.object.modifier_apply(modifier=bool_mod.name)

# Hide cutter in viewport + renders
cutter.hide_set(True)
cutter.hide_render = True

# Bevel the block
bevel_width = 0.08 
bevel_segments = 5

bevel_mod = block.modifiers.new(name="Bevel", type='BEVEL')
bevel_mod.width = bevel_width
bevel_mod.segments = bevel_segments
bevel_mod.limit_method = 'ANGLE'
bevel_mod.angle_limit = 0.523599  # 30 degrees in radians

# Apply bevel
bpy.ops.object.modifier_apply(modifier=bevel_mod.name)

Blender Scripting – T-Post Sign Holder

We spent a lot of the day trying to modify 3D models that we found online to work as a sign holder. Something like the bent metal plates you can buy at the tractor store. Since these are simple polygons, I thought it might be easier to script the build (plus making changes to the dimensions would just require tweaking variables).

Voila – hopefully it’s a T-post sign holder! It at least looks like one.

import bpy
import bmesh
import math
from mathutils import Vector

# Clear all existing objects
for obj in list(bpy.data.objects):
    bpy.data.objects.remove(obj, do_unlink=True)

# -----------------------------
# Scene units (mm)
# -----------------------------
scene = bpy.context.scene
scene.unit_settings.system = 'METRIC'
scene.unit_settings.scale_length = 0.001  # 1 Blender unit = 1 mm

INCH = 25.4
def inch(x): return x * INCH

# -----------------------------
# PARAMETERS (mm)
# -----------------------------
bracket_thickness = inch(0.25)   # sheet thickness
bracket_width = inch(3)   # bracket width (across the post)

# Leg lengths (side profile)
bracket_top_length = inch(1)        # bracket segment 1 length
bracket_middle_length = inch(2)     # bracket segment 2 length
bracket_bottom_length = inch(4.5)   # bracket segment 3 length

# Bend included angles
bend1_angle_included = 105.0   # top flange
bend2_angle_included = 255.0   # web -> long leg

# If the long leg goes the wrong direction, flip this
flip_second_bend = True

# -----------------------------
# Punch hole
# -----------------------------
do_punch = True

# T-post size references
tpost_horizontal_hole_height = inch(0.25)
tpost_horizontal_hole_width = inch(1.5)
tpost_vertical_hole_height = inch(2)
tpost_vertical_hole_width = inch(0.25)
punch_clearance = 1.0 # clearance added around each rectangle (mm)

# Position of t-post before rotation (Z from p0 end, and X across width)
punch_center_z = inch(1)
punch_center_x = bracket_width / 2

# Vertical placement on top flange (Y=0 plane)
punch_center_y = -inch(0.5)

# -----------------------------
# Optional bevel to make edges25ook more formed
# -----------------------------
do_bevel = True

bevel_width = inch(0.05)
bevel_segments = 25

# -----------------------------
# Cleanup
# -----------------------------
#for n in ["BracketShape", "PunchBar", "PunchStem", "HoleRight1", "HoleRight2", "HoleRight3", "HoleRight4", "HoleLeft1", "HoleRLeft2", "HoleLeft3", "HoleLeft4"]:
#    o = bpy.data.objects.get(n)
#    if o:
#        bpy.data.objects.remove(o, do_unlink=True)

# -----------------------------
# Helpers (YZ plane directions)
# Define 0° as +Z. +90° is +Y. -90° is -Y.
# -----------------------------
def unit_from_angle(deg_from_posZ):
    a = math.radians(deg_from_posZ)
    return Vector((0.0, math.sin(a), math.cos(a)))

def boolean_diff(target, cutter):
    mod = target.modifiers.new(name=f"BOOL_{cutter.name}", type="BOOLEAN")
    mod.operation = 'DIFFERENCE'
    mod.solver = 'EXACT'
    mod.object = cutter
    bpy.context.view_layer.objects.active = target
    bpy.ops.object.modifier_apply(modifier=mod.name)
    cutter.hide_set(True)

def add_cube(name, size_xyz, location_xyz, rotation_xyz):
    bpy.ops.mesh.primitive_cube_add(size=1, location=location_xyz, rotation=rotation_xyz)
    obj = bpy.context.active_object
    obj.name = name
    obj.scale = (size_xyz[0], size_xyz[1], size_xyz[2])
    bpy.ops.object.transform_apply()
    return obj

def add_cylinder(name, radius, length, location_xyz, rotation_xyz):
    bpy.ops.mesh.primitive_cylinder_add(radius=radius, depth=length, location=location_xyz, rotation=rotation_xyz)
    obj = bpy.context.active_object
    obj.name = name
    bpy.ops.object.transform_apply()
    return obj

# Convert included bend angles to turn angles
angle_top = 180.0 - bend1_angle_included
angle_bottom = 180.0 - bend2_angle_included

# Start along +Z (top flange)
theta0 = 0.0
d0 = unit_from_angle(theta0)

# After bend1, go "down" (toward -Y) by turning negative
theta1 = theta0 - angle_top
d1 = unit_from_angle(theta1)

# After bend2, go toward +Z again (or flip if needed)
theta2 = theta1 + (angle_bottom if not flip_second_bend else - angle_bottom)
d2 = unit_from_angle(theta2)

# Profile points (center surface)
p0 = Vector((0.0, 0.0, 0.0))      # free end of top flange
p1 = p0 + d0 * bracket_top_length       # bend1 line
p2 = p1 + d1 * bracket_middle_length    # bend2 line
p3 = p2 + d2 * bracket_bottom_length    # end of long leg

# -----------------------------
# Build a single connected sheet surface:
# Create two polylines separated in X, then make quads between them.
# -----------------------------
mesh = bpy.data.meshes.new("BracketShapeMesh")
bracket = bpy.data.objects.new("BracketShape", mesh)
bpy.context.collection.objects.link(bracket)
bpy.context.view_layer.objects.active = bracket
bracket.select_set(True)

bm = bmesh.new()

x0, x1 = 0.0, bracket_width

# Left side (x0)
v0a = bm.verts.new((x0, p0.y, p0.z))
v1a = bm.verts.new((x0, p1.y, p1.z))
v2a = bm.verts.new((x0, p2.y, p2.z))
v3a = bm.verts.new((x0, p3.y, p3.z))

# Right side (x1)
v0b = bm.verts.new((x1, p0.y, p0.z))
v1b = bm.verts.new((x1, p1.y, p1.z))
v2b = bm.verts.new((x1, p2.y, p2.z))
v3b = bm.verts.new((x1, p3.y, p3.z))

# Faces (one per segment)
bm.faces.new((v0a, v0b, v1b, v1a))  # top flange
bm.faces.new((v1a, v1b, v2b, v2a))  # web
bm.faces.new((v2a, v2b, v3b, v3a))  # long leg

bm.normal_update()
bm.to_mesh(mesh)
bm.free()

# -----------------------------
# Solidify to thickness (sheet metal look)
# -----------------------------
solid = bracket.modifiers.new("Solidify", type="SOLIDIFY")
solid.thickness = bracket_thickness
solid.offset = 0.0
bpy.ops.object.modifier_apply(modifier=solid.name)

# -----------------------------
# Punch the lowercase "t" on the top flange
# (Top flange is flat at Y=0; punch straight through Y)
# -----------------------------
if do_punch:
    tpost_length_y = bracket_thickness * 5  # ensure it fully cuts through

    # Crossbar rectangle
    horizontal_hole = add_cube(
        "PunchBar",
        size_xyz=(tpost_horizontal_hole_width + 2 * punch_clearance, tpost_length_y, tpost_horizontal_hole_height + 2 * punch_clearance),
        location_xyz=(punch_center_x, 13 + punch_center_y, punch_center_z),
        rotation_xyz=(math.radians(90 - bend1_angle_included / 2), math.radians(0), math.radians(0))
    )

    # Stem rectangle (placed under the bar like a lowercase "t")
    vertical_hole = add_cube(
        "PunchStem",
        size_xyz=(tpost_vertical_hole_width + 2 * punch_clearance, tpost_length_y, tpost_vertical_hole_height + 2 * punch_clearance),
        location_xyz=(punch_center_x, punch_center_y, punch_center_z),
        rotation_xyz=(math.radians(90), math.radians(0), math.radians(0))
        #rotation_xyz=(math.radians(90 - bend1_angle_included / 2), math.radians(0), math.radians(0))
    )
    boolean_diff(bracket, vertical_hole)
    boolean_diff(bracket, horizontal_hole)


for hole in range(4):
    right_hole = add_cylinder(
        "HoleRight{}".format(hole),
        radius=inch(0.125),
        length=100,
        location_xyz=(inch(0.5), -inch(2), inch(2) + inch(1.175) * hole),
        rotation_xyz=(math.radians(90), 0, 0)
    )
    left_hole = add_cylinder(
        "HoleLeft{}".format(hole),
        radius=inch(0.125),
        length=100,
        location_xyz=(inch(2.5), -inch(2), inch(2) + inch(1.175) * hole),
        rotation_xyz=(math.radians(90), 0, 0)
    )
    boolean_diff(bracket, right_hole)
    boolean_diff(bracket, left_hole)

# -----------------------------
# Optional bevel
# -----------------------------
if do_bevel:
    bev = bracket.modifiers.new("Bevel", type="BEVEL")
    bev.width = bevel_width
    bev.segments = bevel_segments
    bev.limit_method = 'ANGLE'
    #bev.angle_limit = math.radians(35)
    bev.use_clamp_overlap = False
    bpy.context.view_layer.objects.active = bracket
    bpy.ops.object.modifier_apply(modifier=bev.name)

API Documentation Links:

https://docs.blender.org/api/current/bpy.ops.mesh.html
https://docs.blender.org/api/current/bmesh.ops.html

Setting Windows Dynamic Port Range

In case anyone else ever needs to set a windows dynamic port range for magic RPC “stuff” — there’s a minimum range size of 255. If you make the range to small, you get an incredibly vague and not-useful “the parameter is incorrect” error. Increase num to at least the min value, and you don’t be going in circles trying to figure out what in your command doesn’t match the parameters in the documentation!


Blender Scripting Lesson of the Week: Cylinders

Quick script for creating a cylinder using bpy

import bpy

# Clear all existing objects
for obj in list(bpy.data.objects):
    bpy.data.objects.remove(obj, do_unlink=True)

# Set Units
scene = bpy.context.scene
scene.unit_settings.system = 'METRIC'
scene.unit_settings.scale_length = 0.001  # 1 BU = 1 mm

# Create cylinder
bpy.ops.mesh.primitive_cylinder_add(
    vertices=32, radius=10.0, depth=20.0,
    end_fill_type='NGON', calc_uvs=True,
    enter_editmode=False, align='WORLD',
    location=(0.0, 0.0, -2.0), rotation=(0.0, 0.0, 0.0),
    scale=(1, 1, 1)
)

# Name cylinder
obj = bpy.context.active_object
obj.name = "MyCylinder"

# Frame Selected 
for area in bpy.context.window.screen.areas:
    if area.type == 'VIEW_3D':
        for region in area.regions:
            if region.type == 'WINDOW':
                with bpy.context.temp_override(area=area, region=region):
                    bpy.ops.view3d.view_selected(use_all_regions=False)
                break
        break

Venafi Cert Issuance Fails after Windows 2022 Upgrade

Certificate Issuance Fails

After requesting a certificate, the request immediately fails with the error:

Failed to post CSR with error: Unknown certificate profile type.

I think it is just a coincidence, but wanted to document the scenario in case it comes up again. The application makes web calls to a vendor API to issue certs. The API calls, after the upgrade, were failing.

In this scenario, a call was being made to {base_url}/api/ssl/v1/types, the connection failed. Since the list of valid certificate profiles could not be retrieved, the request failed saying the certificate profile was unknown.

GET https://hard.cert-manager.com/api/ssl/v1/types?organizationId=####

Looking at a debug trace, the following flow was observed:

  • Authentication headers sent: login=<REDACTED>, password=<REDACTED>, customerUri=<REDACTED>
  • Transport-level failure (no HTTP status returned on the failing attempt)
    • Symptoms: “Decrypt failed with error 0X90317” followed by “The underlying connection was closed: The connection was closed unexpectedly.”
    • Context: Revocation checks reported “revocation server was offline,” then the client proceeded; long idle/keep-alive reuse likely contributed to the close.


Connection reuse vs server keep-alive: Apache is advertising Keep-Alive: timeout=3. The .NET client is reusing long-idle TLS connections via the proxy; by the time it sends application data, the server/proxy has already closed the session, leading to “underlying connection was closed” errors.

Revocation checks through the proxy: The .NET trace shows “revocation server was offline” before proceeding. That extra handshake work plus proxy blocking CRL/OCSP can increase latency and contribute to idle reuse issues.

.NET SChannel quirks: Older HttpWebRequest/ServicePoint behaviors (Expect100-Continue, connection pooling) can interact poorly with short keep-alive servers/proxies.

Luckily, this is a .NET application, and you can create custom configuration files for .NET apps. In the file with the binary, look for a text file named BinaryName.exe.config

If none exists, create one. The following disables the proxy:

<?xml version=”1.0″ encoding=”utf-8″?>
<configuration>
<system.net>
<!– Turn off use of the system proxy for this app –>
<defaultProxy enabled=”true”>
<proxy usesystemdefault=”false” />
</defaultProxy>
</system.net>
</configuration>


Client Connections to HTTPS IIS Site Fail After Upgrade to Windows Server 2022

Client connections to the HTTPS IIS site failed with the following error:

Secure Connection Failed

An error occurred during a connection to certmgr-dev.uniti.com.

PR_CONNECT_RESET_ERROR

Error code: PR_CONNECT_RESET_ERROR

The page you are trying to view cannot be shown because the authenticity of the received data could not be verified. Please contact the website owners to inform them of this problem.


The IIS site was set to “accept” client certificates.

  • Client Certificates = Accept means IIS/HTTP.sys will try to retrieve a client certificate only if the app touches Request.ClientCertificate (or a module that maps/validates client certs). That retrieval is done via TLS renegotiation in TLS 1.2.
  • On Server 2022, browsers prefer TLS 1.3. TLS 1.3 does not support the old renegotiation used to fetch a client cert mid‑request. When your app/module at “/” accesses the client cert, IIS attempts renegotiation, fails, and the connection is reset.

Setting Client Certificates to “Ignore” prevents IIS from attempting to renegotiate, so the site loads. This obviously isn’t a solution if you want to use client certificates to authenticate … but we’re authenticating through Ping, so don’t actually need the client certs.

Apache OIDC Authentication to PingFederate (or PingID) Using OIDC

This is kind of a silly update to my attempt to document using mod_auth_openidc in Apache. At the time, I didn’t know who set up the PingFederate side of the connection, so I just used Google as the authentication provider. Five years later, I am one of the people setting up the connections and can finally finish the other side. So here is an update — now using PingFederate as the OIDC/OAUTH provider.

OAUTH Client Setup – Apache

First, make sure mod_auth_openidc is installed

In your Apache config, you can add authentication to the entire site or just specific paths under the site. In this example, we are creating an authenticated sub-directory at /authtest

In the virtual host, I am adding an alias for the protected path as /authtest, configuring the directory, and configuring the location to require valid-user using openid-connect. I am then configuring the OIDC connection.

The OIDCClientID and OIDCClientSecret will be provided to you after the connection is set up in PingID. Just put placeholders in until the real values are known.

The OIDCRedirectURI needed to be a path under the protected directory for me – the Apache module handles the callback. Provide this path on the OIDC connection request.

The OIDCCryptoPassphrase just needs to be a long pseudo-random string. It can include special characters.

# Serve /authtest from local filesystem
Alias /authtest "/var/www/vhtml/sandbox/authtest/"

<Directory "/var/www/vhtml/sandbox/authtest">
Options -Indexes +FollowSymLinks
AllowOverride None
Require all granted
</Directory>

# mod_auth_openidc configuration for Ping (PingFederate/PingID)
# The firewall will need to be configured to allow web server to communicate with this host
OIDCProviderMetadataURL https://login-dev.windstream.com/.well-known/openid-configuration

# The ID and secret will be provided to you
OIDCClientID d5d53555-7525-4555-a565-b525c59545d5
OIDCClientSecret p78…Q2kxB

# Redirect/callback URI – provide this in the request form for the callback URL
OIDCRedirectURI https://www.rushworth.us/authtest/callback

# Session/cookie settings – you make up the OIDCCryptoPassphrase
OIDCCryptoPassphrase "…T9y"
OIDCCookiePath /authtest
OIDCSessionInactivityTimeout 3600
OIDCSessionMaxDuration 28800

# Scopes and client auth
OIDCScope "openid profile email"
OIDCRemoteUserClaim preferred_username
OIDCProviderTokenEndpointAuth client_secret_basic

# If Ping's TLS cert at https://localhost:9031 isn't trusted by the OS CA store,
# install the proper CA chain, or temporarily disable validation (not recommended long-term):
# OIDCSSLValidateServer Off

# Protect the URL path with OIDC
<Location /authtest>
AuthType openid-connect
Require valid-user
OIDCUnAuthAction auth
</Location>

Sample web code for the “protected” page if you want to use the user’s ID. The user’s email is found at $_server[‘OIDC_CLAIM_email’]

[lisa@fedora conf.d]# cat /var/www/vhtml/sandbox/authtest/index.php
<?php
     if( isset($_SERVER['OIDC_CLAIM_iss']) && $_SERVER['OIDC_CLAIM_iss'] == "https://login-dev.windstream.com"){
          echo "I trust you are " . $_SERVER['OIDC_CLAIM_username'] . "\n";
     }

else{
     print "Not authenticated ... \n";
     print "<UL>\n";
     foreach($_SERVER as $key_name => $key_value) {
          print "<LI>" . $key_name . " = " . $key_value . "\n";
     }
     
     print "</UL>\n";
}
?>

Results on the web page – user will be directed to PingID to authenticate, and you will verify that login-dev.windstream.com (or login.windstream.com in production) has authenticated them as the OIDC_CLAIM_username value:

OAUTH Client Setup – PingID

Client auth, add redirect URLs