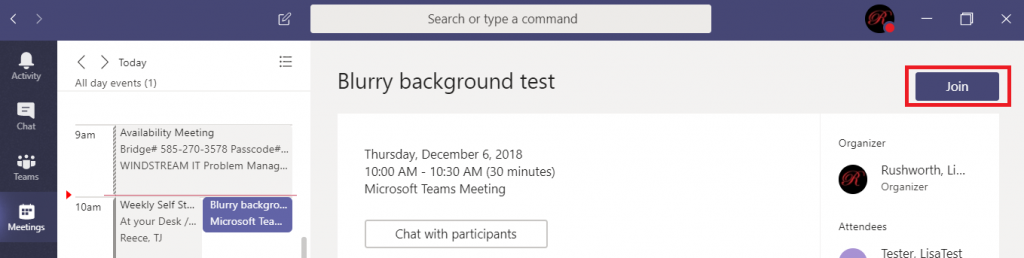
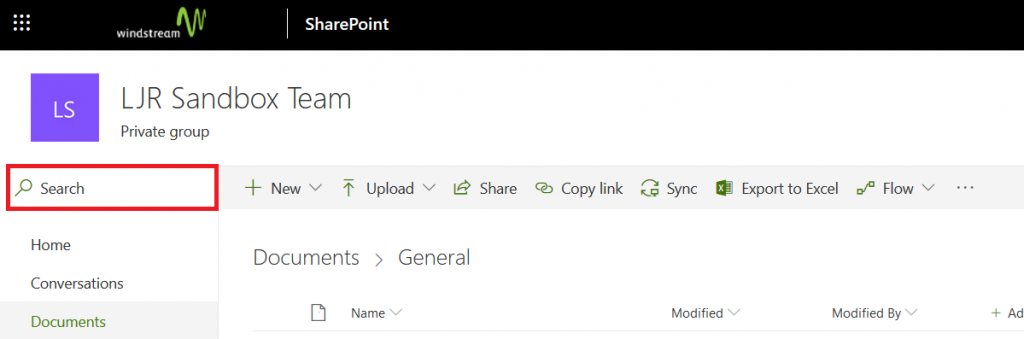
Do you have a two-foot-high stack of papers on the desk behind you? Does your whiteboard contain information that isn’t quite ready to be broadcast? Or maybe you are working from the aeroport and your camera is facing the main terminal hallway – all of those people running past can be distracting. Video meetings humanize participants, but what’s behind you isn’t always something you want to share with others. When you join a scheduled Teams meeting, you can use a video filter to blur all of that stuff.
Click to join a meeting.
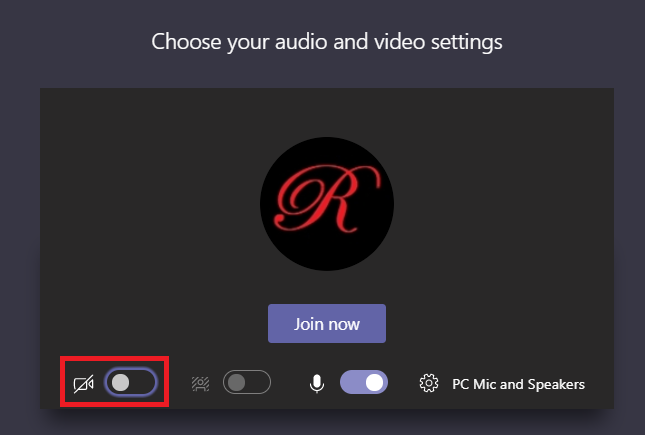
Click the slider next to the video camera to join the
meeting with video.
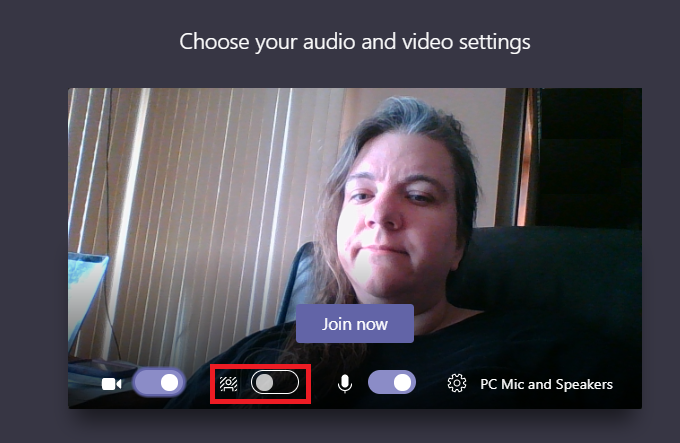
You will see a video preview. Click the middle slider to activate
the background blurring filter.
The video preview shows the changes. If the blur
sufficiently obfuscates whatever you didn’t want to show, click ‘Join now’ and
join the meeting. If your desk still looks a mess … move your stuff 😊
The blur effect is not applied to things the filter considers to be in the “foreground”
… so you might be able to achieve
more blurring by pushing an object farther from the camera.
It does! You can share your screen within a meeting, or you can share your screen in a chat (screen sharing with chats is currently being rolled out — it is available in the Teams desktop client, but may not appear in your web client yet).
Screen Sharing In A Chat:
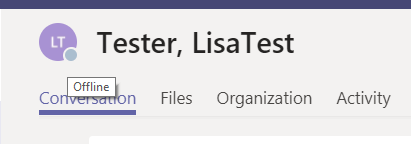
While you are able to chat with someone who is offline, they’ll need to be online before you can share your screen with them. Check the circle before their name — a little gray circle in it means they are offline (or hover your mouse over the larger circle to see their presence in text).
Once the person is online, click the “start sharing your screen” button to start sharing your screen.
Select what you want to share – “Desktop” will share everything you have active on your desktop. Selecting an individual application listed under “Window” will only share your screen when that application is active – convenient if you’ve got confidential information in other desktop applications, as you cannot inadvertently display it within the screen share.
Screen Sharing In A Meeting:
In a meeting, you can begin sharing before others arrive. After you have joined a meeting, click the “Open share tray” button.
Select what you want to share – as in the chat-based screen sharing, you can share your entire desktop or select a specific window. You can also share a PowerPoint presentation or a virtual white-board.
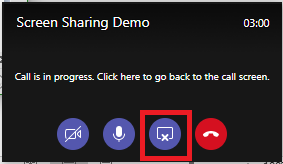
Using Screen Sharing:
When you are sharing your screen, the shared content will be outlined with a red box (the red box in the screenshot below isn’t something I drew in) to remind you that your screen is being shared.
You can move your mouse to the top of the screen to reveal a screen sharing control bar. From this bar, you can give another person control of your mouse and keyboard (or take back control).
Select the person to whom you want to give control
You can also stop sharing your screen with the “Stop presenting” button. There is also a meeting control window that appears in the lower right-hand corner of your screen – you can click the “Stop sharing” button there to stop sharing your screen too. If you were in a meeting, you’ll still be in your meeting … .just not sharing your screen. If you were in a chat, you’ll be returned to your chat.
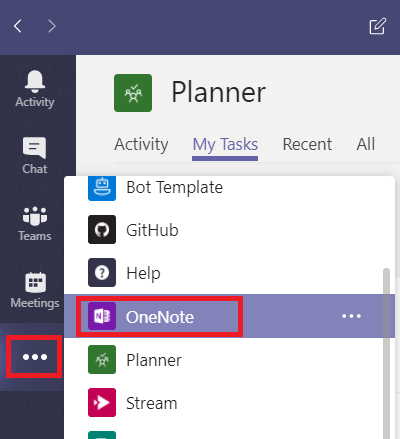
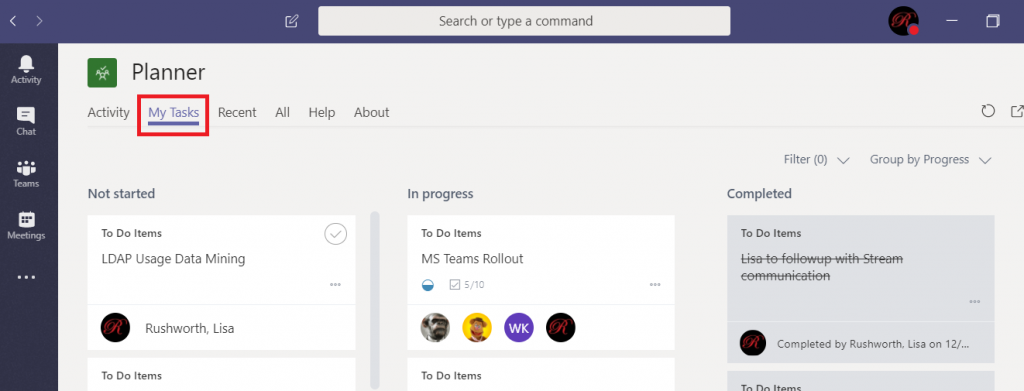
Adding a Planner board to Teams spaces is a great way to manage tasks within a group or for a project, but it can be a little difficult as an individual to keep track of tasks scattered across various Teams. Microsoft Teams also provides a view of your tasks.
Click on “More apps” on the left-hand toolbar and select “Planner”
Click on “My Tasks”. You will see tasks in any Planner board that have been assigned to you. You can edit task content, change labels, and change the completion status from within this view.
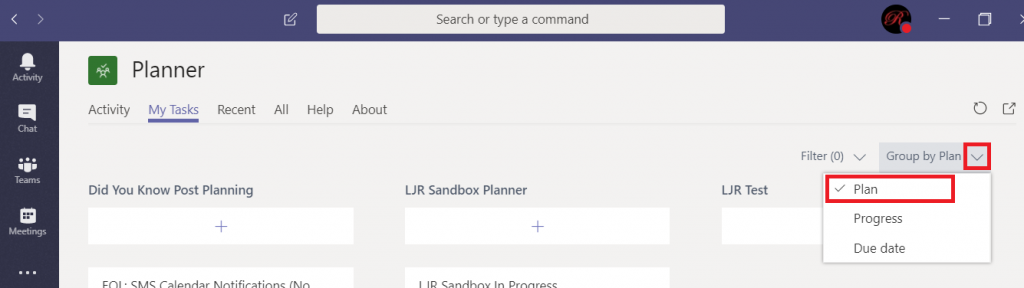
Although you can edit most of the Task details, you cannot drag it between buckets on the Planner board. To do that, you need to open the containing Planner board. Currently, there’s no way to navigate directly to the Planner board from within this view. You can click the inverted caret next to “Group by …” and select “Plan” to see the name of the Planner board that contains your task. You can then find the board on https://tasks.office.com
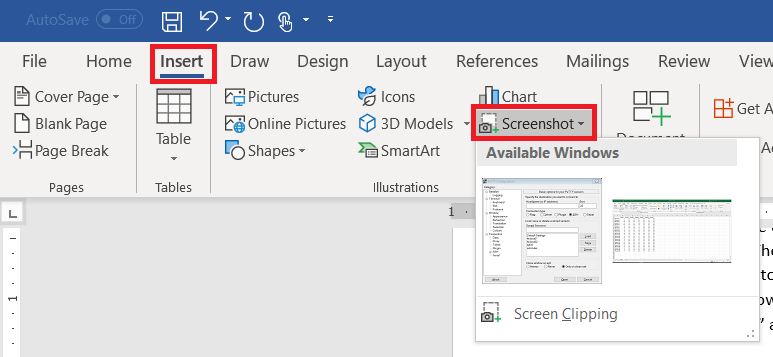
You’ve encountered some odd error in an application and need to send IT support a picture. Or you’rewriting documentation. There are lots of reasons you need a picture of your computer screen. You can hit the “Print Screen” button on your keyboard (even hold Alt and hit print-screen to isolate the image to the active window). But did you know Microsoft Office programs can do that for you? On the ribbon bar, select “Insert” and locate “Screenshot”
Click on one of the “Available Windows”, and an image of the window will be inserted into your Word document, Excel spreadsheet, Outlook e-mail, or PowerPoint presentation.
Use the “Screen Clipping”selection to grab part of a window. Minimize all of your Windows. Bring up the Window of which you want an image. Now bring up the Office document into which you want the image inserted. Use Insert => Screenprint => Screen Clipping, and wait a minute. Your Office document will be minimized, your screen will get washed out, and you’ll have a cross-hair instead of a mouse pointer. Click and drag to draw a rectangle around something. When you release the mouse, whatever is in that rectangle will be pasted into your Office document.
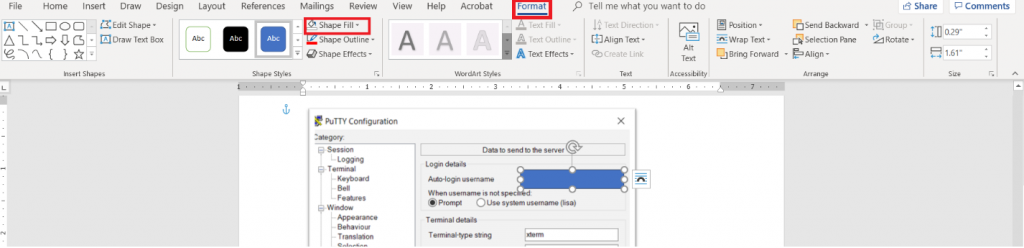
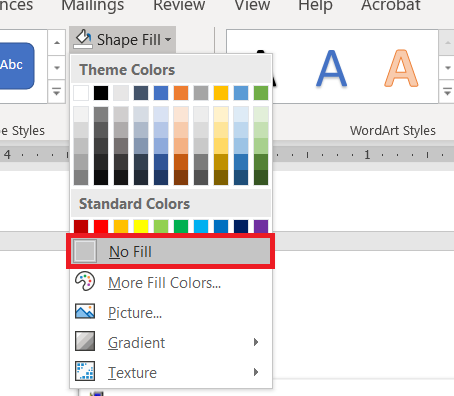
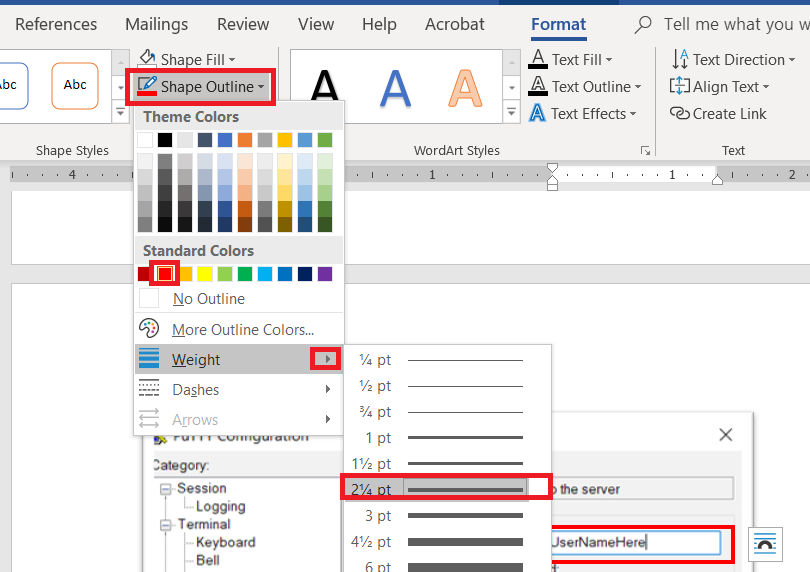
Wait – what about those rectangles I use to highlight the image? From the ribbon bar, select “Insert”and “Shapes”. I took a University course where debugging screen shots had to have the “important bit” highlighted with a red square – that stuck with me. You’ve got an array of shapes and colours available. Pick one. Draw the shape over your image – yes, it looks like the shape covers the important part. Draw it anyway. While the shape is still selected, click “Format” in the ribbon bar. Select “Shape Fill”
Select “No Fill” (you could also use a highly transparent fill colour if you’d prefer).
Click “Shape Outline” – pick a colour, and if the line is not thick enough select “Weight” to increase the line width.
When I’m writing documentation with a lot of images, I’ll still use an image editor and ‘print screen’. There are filters that just don’t exist in the Office image editors – sometimes I want to selectively blur screen text so my work conversations are not included in documentation. Sometimes I want to create a composite image. But for small documents – showing someone the error I get on their web site, “click here, type this” – using a single application is efficient.
We purchased a house full of Z-wave dimmers (Leviton VRMX-1LZ and DZSM-1LZ) as a Christmas season special from Leviton two years ago. We were really happy to have dimmers throughout the house — we could use the existing lighting as nightlights, have movie nights with a little pathway lighting … and then we installed a few dimmers and realized the bulbs dimmed. But not DIM dimmed. It was a massive bummer, and significantly diminished the couple hundred bucks we’d dropped on these smart dimmers.
We even called Leviton & got a paper they publish with how different bulbs dim with their various dimmers. And realized that all of the bulbs that went down to 1 or 2% were discontinued. Another bummer! The paper is updated periodically, but even the early 2018 iteration failed to yield any in-production well-dimming bulbs.
Over the summer, I came across a review of various dimmable LED light bulbs. The guy had an integrating sphere rigged up and was measuring output and colour — seemed like he put a lot of effort into it (and I’d LOVE to find that write-up again!). His write-up indicated that Home Depot’s “house brand” bulbs, EcoSmart, dimmed down to basically nothing. I added EcoSmart 60W bulbs to my “next time you’re at Home Depot” list and finally remembered to pick them up in September. Except there were two types — plastic ones and glass ones that can be used in closed fixtures. The plastic ones dimmed well — way better than any of the Cree, Phillips, or Lighting Science bulbs we’d tried. But the glass ones — they dimmed to the point of being off. We had to go through and change what the dimmers consider zero because these bulbs were TOO dim. And they didn’t hum, buzz, or flicker. I was thrilled — swapped out the downstairs hallway bulbs with these glass EcoSmart LEDs and the light fixtures have become nightlights.
I wanted to get bulbs for the other hallway, bedrooms, and bathrooms. So I ordered the bulbs online & they showed up. Replaced one set of bedroom bulbs, dimmed them … and they’re about on par with the Cree bulbs we had. Huh? Upon investigation, while the bulbs we got delivered had the exact same part number, they had a different UPC. And a different product code above the UPC. Even odder — the energy draw and estimated annual cost were different. Apparently there are different revisions of the bulbs, and the 02 revision doesn’t dim any better than every other bulb out there.
We returned the bulbs and checked the light bulb aisle at the store for any with UPC 693690563636 and product code ABA19A60WESD01 — and found a bunch on the shelves. They also had the 02 revision and a 03 revision. Since the 01 ones were a known quantity, we bought them. And they dim down to nothing! It’s been just about two years, but the dimmers we’ve put in are finally PERFECT.
I store a lot of code in Git-based systems, and I read through parts of my state’s Revised Code on occasion. But it never occurred to me to store the Revised Code in a Git-based system. Washington, DC has started doing exactly that.
First, some basic terminology from GitHub — a “commit” is a change. In this case, a change to the revised code text. An “Issue” is where someone points out a problem with the existing code or proposes an enhancement — in this case, someone either pointing out a typo or suggesting a new law. And a “Pull Request” (aka a “PR”) is used to accept a commit into the code — in this case, applying the change to the revised code text.
Imagine being able to comment on a pull request and have your commentary considered during the public hearings for the proposed change. Sure, there’s elitism to assuming everyone’s got a computer and time to peruse proposed changes. But not more than assuming everyone’s got an hour to head over to Town Hall and attend the public hearing. And resident-initiated changes could be proxied through a third party — city government staff, for instance.
The process could increase transparency — GitHub users can subscribe to get notifications when issues and PRs are entered into the system. An issue could be created when discussion over a proposed change begins. Links to public meetings and even discussion about the proposed changes could be available online. A pull request created by government officials finalizes the changes and commits them into the online revised code.
The git storage system retains history — a resident who is convinced an auxiliary building was totally in compliance of zoning regs when it was built could run through the history and identify exactly when the setback requirements changed.
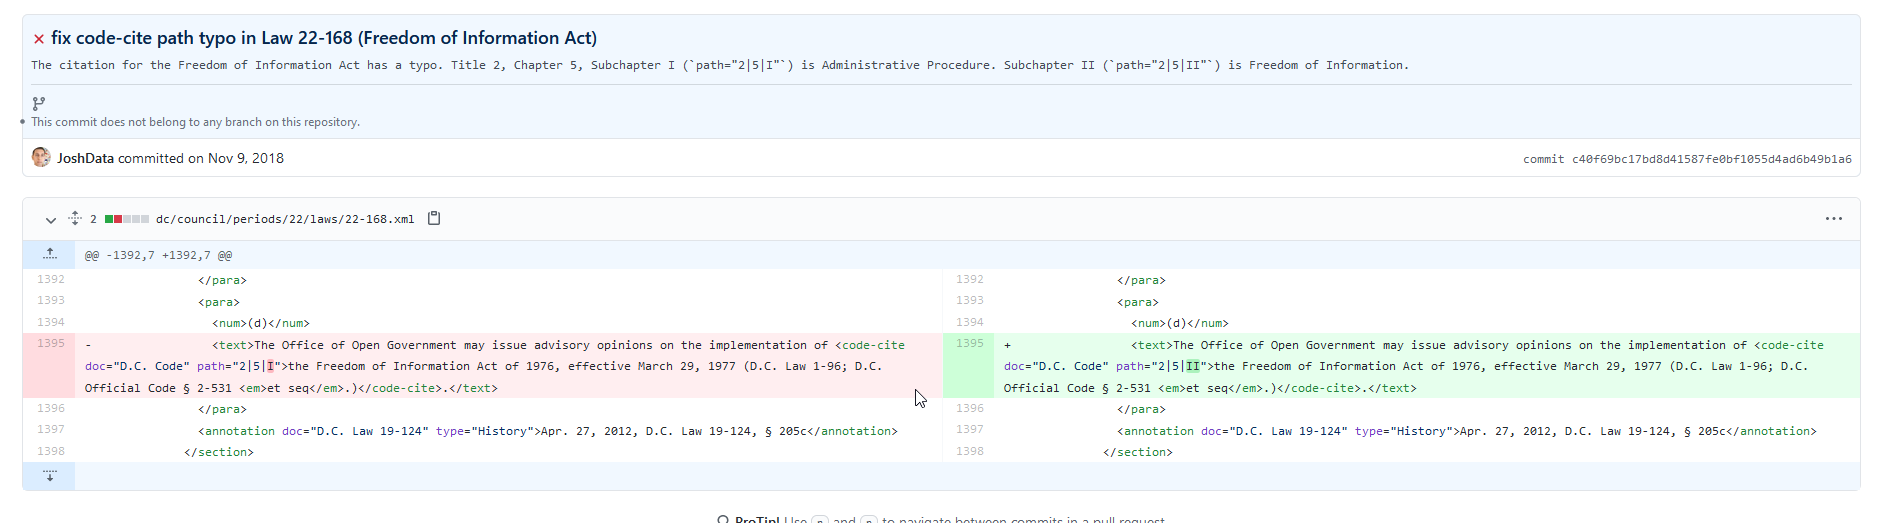
Clicking into a specific “commit” will show you what changed — the left-hand column is the old version and the right-hand column is the new version. Something that was removed is highlighted in red; something added is highlighted in green.
From a procedural standpoint, there are some challenges. Their code is now maintained in XML, which isn’t necessarily something that will edit well in your favorite word processing program (Word, as an example, has some limitations when it comes to editing XML and, in my experience, generates really sloppy code — multiple style elements that all cancel each other out). Build automation is now a requirement of legal documents — a process that ingests changes to the XML and spits out an HTML web site or a PDF file. These challenges require someone with technical knowledge to maintain the revised code.
Logistically, it might be challenging to convince residents — especially those who don’t work as software developers — to use what is a software development tool to interact with local government. Even without citizen interactions, I think having a change history is an incredible advantage to using GitHub to store the revised code. It would be interesting to chat with the people who implemented this in DC and determine if (1) they get a lot of malicious submissions and (2) actually see citizens propose changes through GitHub.
Document retention implications would need to be considered as well — user comments, maliciously entered issues or PRs, etc may be undesired. It’s possible to restrict “interactions” (comments, issue creation, PR creation) to an approved list of individuals. But there’s an advantage to allowing residents to copy edit the code and to propose changes to code.
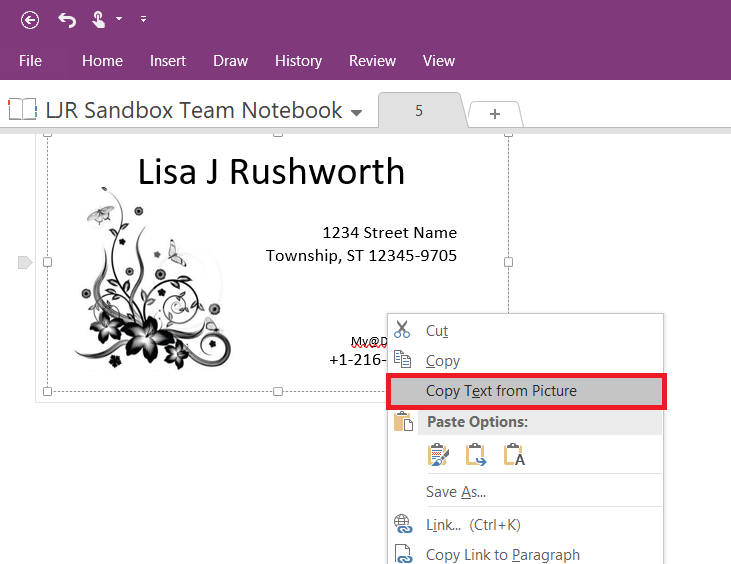
You’ll need to use the application, not the OneNote website.
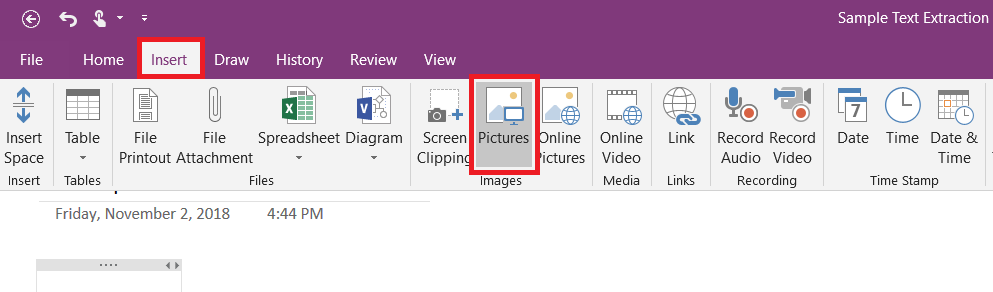
Insert the picture – from the ribbon bar, select “Insert” then “Pictures”.
Select the image you want and click OK.
Right-click on the image. “Copy Text from Picture” does
exactly that – if your image is low resolution or really blurry, it’ll take a minute for this option to be available.
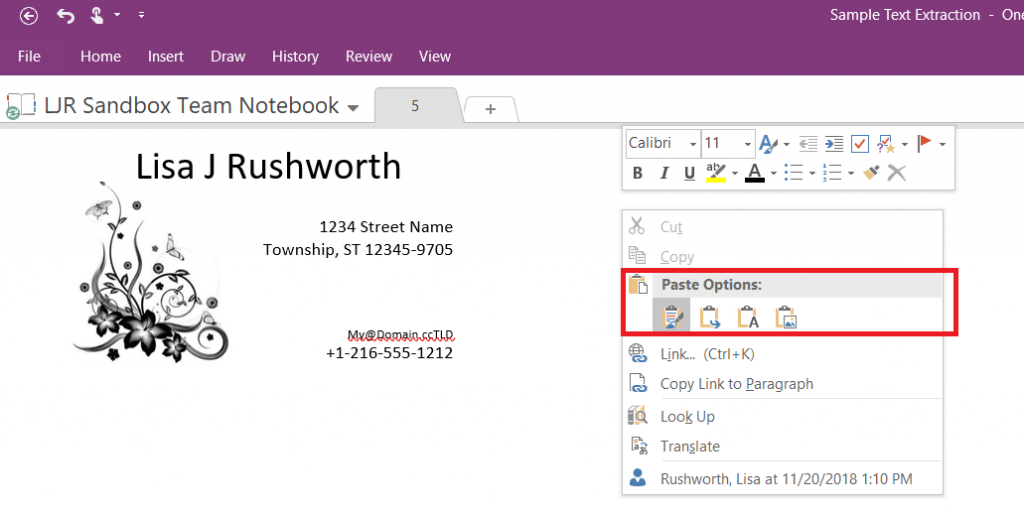
Wait a bit and right-click again.
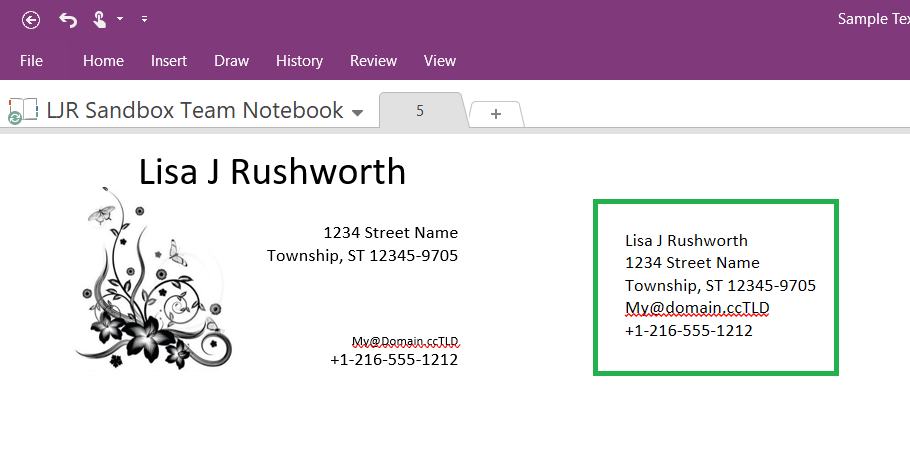
The text from the image is now in your clipboard. I’m
pasting it into the same OneNote page, but you can paste it anywhere.
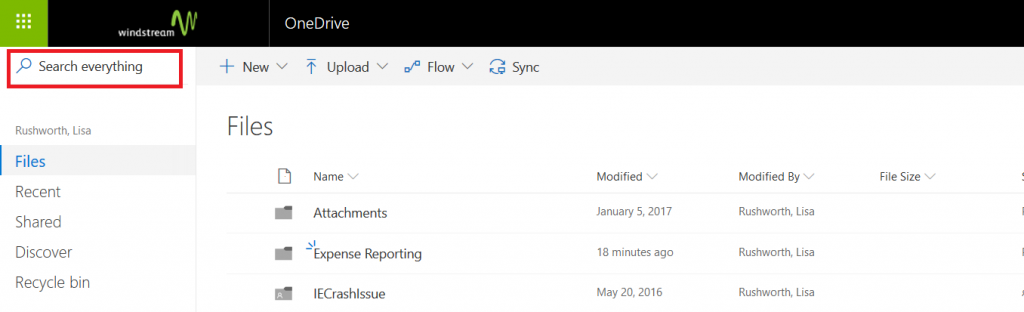
It can! Store pictures of business cards and you can search for names. Take pictures of installations and find a set of photos by the business signage. Search through your expense reporting receipts for a specific restaurant. You don’t even to do anything except save an image file on OneDrive for Business to enable this feature.
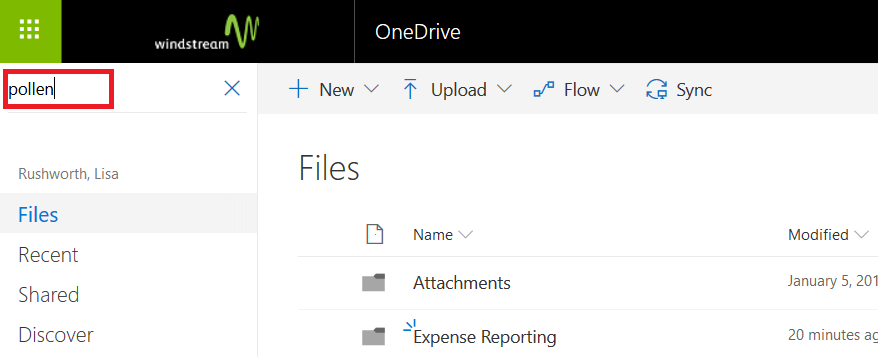
To find an image containing specific text, open OneDrive from WinAnywhereand use the search dialogue.
In this example, I’m looking for the receipt from a meal –but I haven’t included the restaurant name on the receipt images. But I can search for the restaurant name – type part of the name and hit enter.
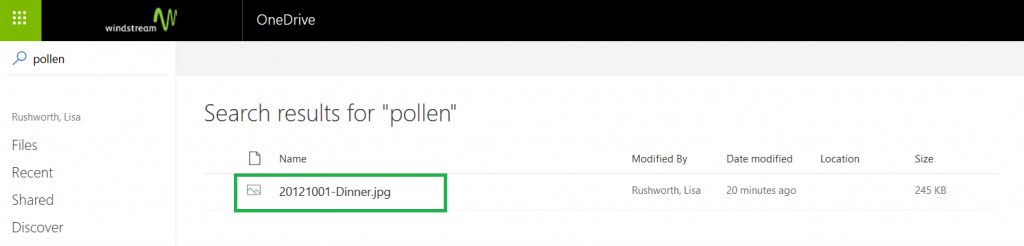
The search result set include an image file:
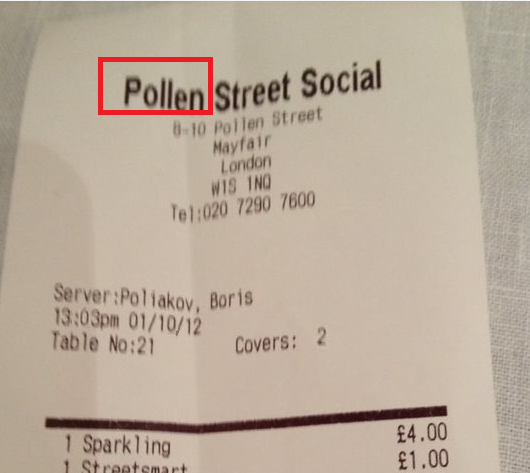
And that’s exactly the receipt I needed!
Text indexing is performed on image files like bmp, png,jpg/jpeg, gif, tiff, and even raw. Slightly blurry out-of-focus pictures snapped in poor lighting are indexed too 😊
* Text is not immediately indexed upon upload – it took about twelve minutes before I was able to search for the image I had uploaded.
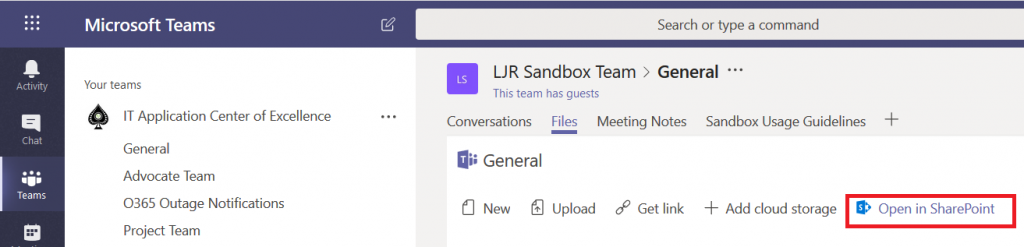
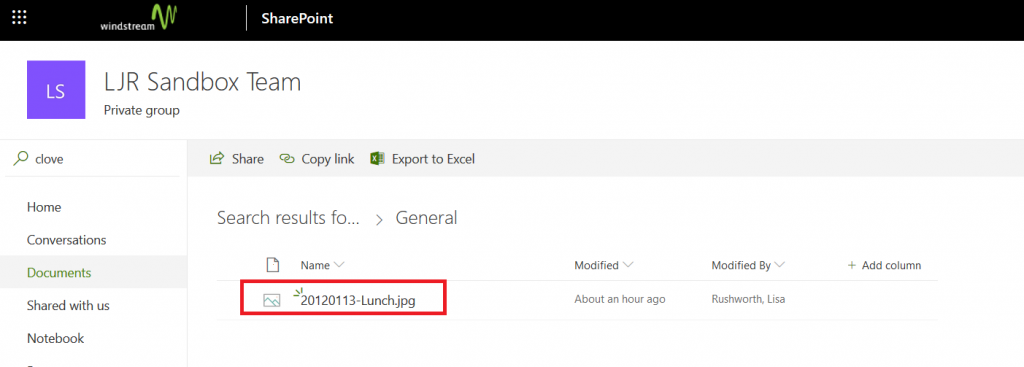
It’s just as easy in SharePoint Online, but did you know that the Teams “Files” are SharePoint Online document repositories? This means you can search your Teams files for text contained in images as well. From your Teams channel, select the “Files” tab and click “Open in SharePoint” to see your Files in their SharePoint Online document repository.
Use the SharePoint Online search dialog to search for text contained within images stored in the site.
The search results will include any images that contain the search text.
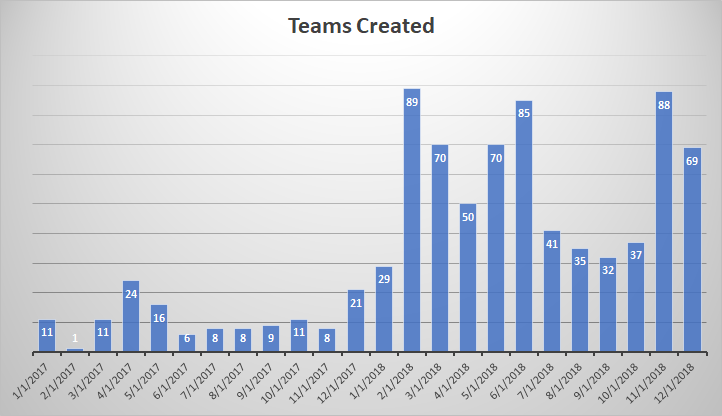
I’ve been generating reports to track our Microsoft Teams adoption – how many people are using Teams, how many messages are being sent in Teams, how many Teams are there. Some of these metrics have easily visualized count-per-unit-time summaries available. Some, like the number of Teams, do not.
Team
Created On
Directory Services
1/19/2017
App Proxy
1/19/2017
LDAP
1/19/2017
ADFS
1/19/2017
Nagios
1/19/2017
File Cluster
1/19/2017
Exchange Online
1/19/2017
Active Directory
1/19/2017
Commvault
1/19/2017
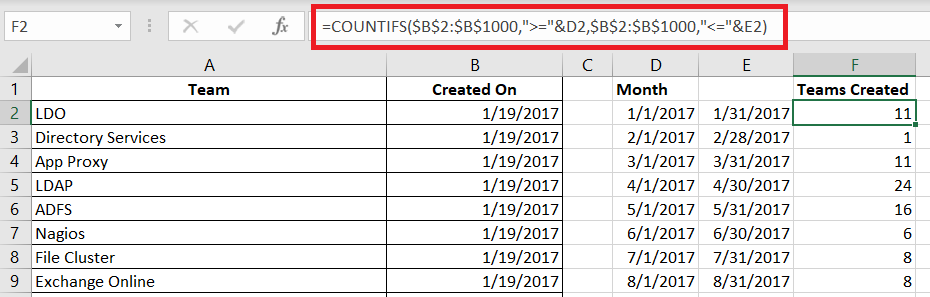
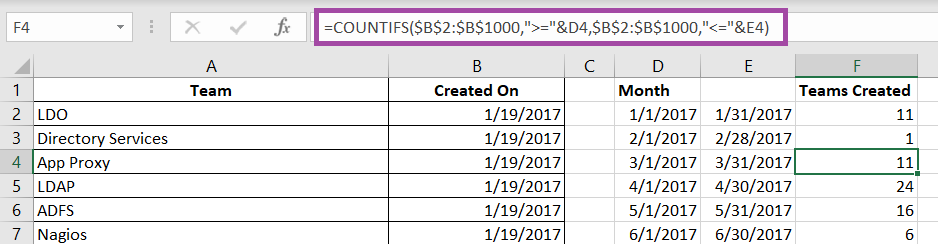
But it’s easy to turn a list of groups and creation dates into visualizable data. Paste the data into Excel. To find the number of items where “Created On” falls in a range, we need to be able to define that range. 01 January 2017 is easy enough, but how do you get the end of January? Excel has a function, EOMONTH, that returns the last day of a month.
Date is any date object. Offset is an integer number of months prior (negative numbers) or after (positive numbers) Date for which you want the last day of the month. I can list the dates to start and end quarters with =EOMonth(Date,2). With 01 January 2017 in cell D2, the last day of January is =EOMonth(D2,0)
I don’t want to type01 Feb, Mar, April … flash fill and the fill handle need a few values before they can figure out the rest of a sequence. But I can use the last day of the month to get the first day of the next month – just add one! With 31 January 2017 in cell E2, I want =E2 + 1 in cell D3. (Yes, there are other ways to do this – probably dozens.)
Now that we’ve got a formula for the start and end of the month, just fill down to produce the ranges we need to see how many Teams were created each month. Then we just need a formula to do the counting for us. I use the COUNTIFS function.
Have you ever gotten data where the column headers are along the left-hand side and each record is a column? I’m sure there are people who prefer each record to be a column too, and they probably hate my data where the headers run along the top and each row is a record. Did you know Excel can swap between these two formats?
Here I have a spreadsheet where each column is a record. Highlight and copy the records. Yes you can use ctrl-c to copy … but there’s no way to make a screen-print of my keyboard actions.
Click elsewhere – below the data you copied, on a new sheet, even a new spreadsheet. Right-click & expand “Paste Special” – find the icon for Transpose and click it.
Look – now each row is a record, just like I wanted. You can even delete the original data if you want – the pasted information will still be there.