Category: Technology

Did you know … there are keyboard shortcuts in Microsoft Teams?

I know modern software is driven by graphical user interfaces, but as an old-school Unix admin (there were loads of interface choices – Bourne shell, c shell, korn shell, bash shell!) it’s weird to take my hand away from my keyboard just to turn a bit of text bold or move to a new field. And Microsoft has done a decent job of standardizing keyboard shortcuts across their applications – ctrl-b will toggle “bold” pretty much anywhere (even Teams!)

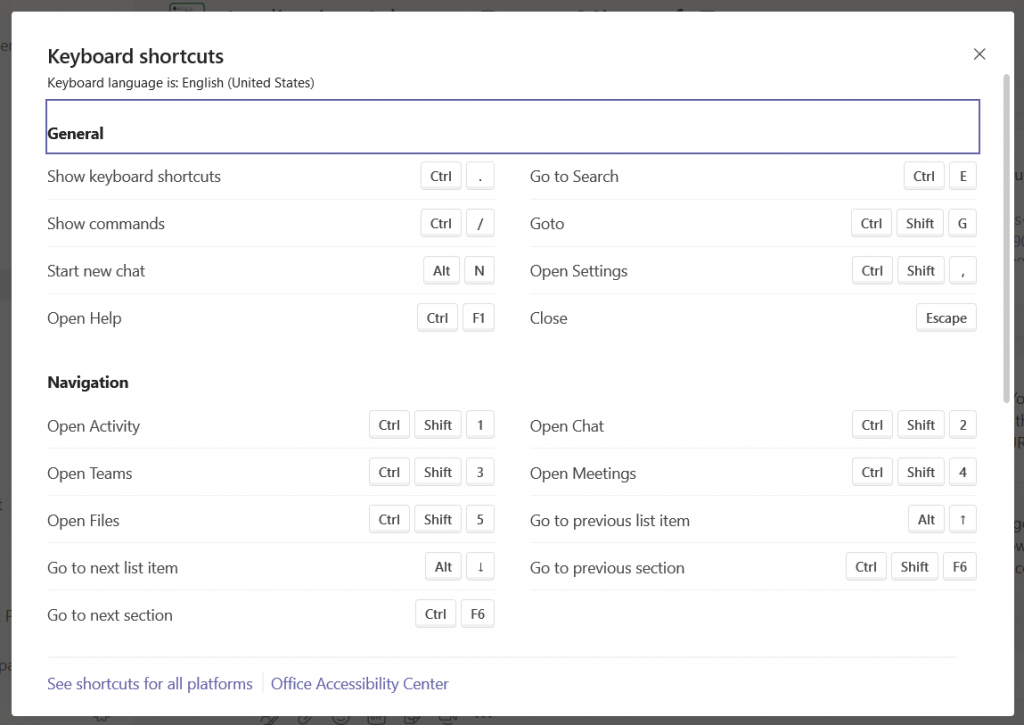
But … within your Teams client (even the web client) hold the “Ctrl” key and type a full stop (.) and look – special keyboard shortcuts!

There’s even a link at the bottom for all of the shortcuts on Windows and Mac. I can hit ctrl-shift-1 to flip over to my Activity feed; ctrl-shift-3 puts me back in the Teams chat section.

Did you know … there’s version history for Microsoft Teams files too?

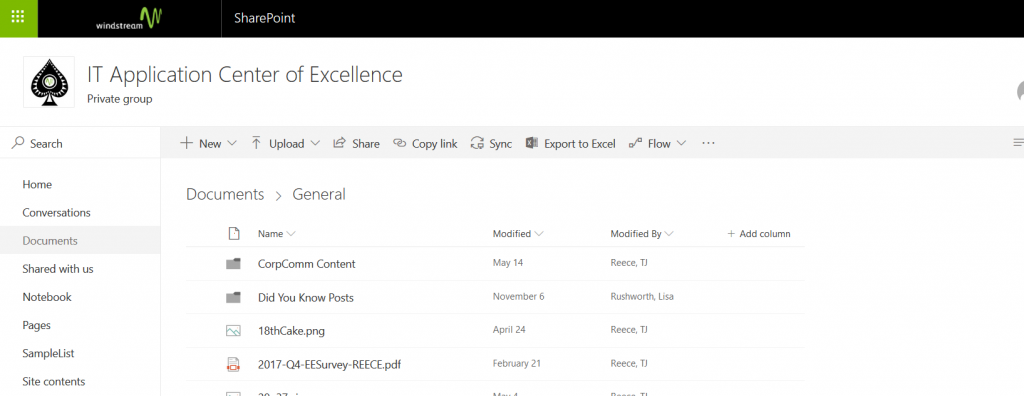
There is — which is obvious once you start thinking about how Teams data is stored. The “Files” tab is a pretty front end for a SharePoint document library, and document libraries store version history. The problem is I didn’t know a good way to walk an end user through accessing that document library. I’d generally do a screen sharing session with the user & navigate them to the right place myself. And then I saw this — on the Files tab, there is an “Open in SharePoint” button. You don’t need to drill down to find the specific file you want to revert – as long as you are on the proper channel, we’ll be able to get to the document.

Voila! A new tab opens and shows you the SharePoint document library that underpins the Teams Files tab. Now drill down until you find the file for which you are looking.

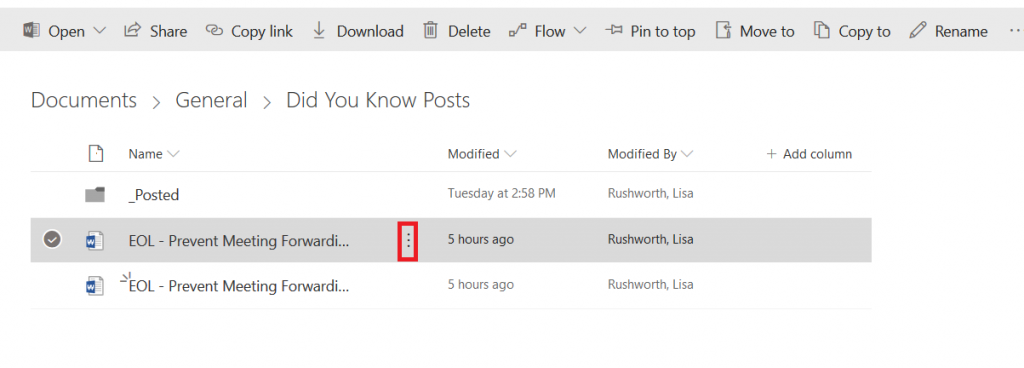
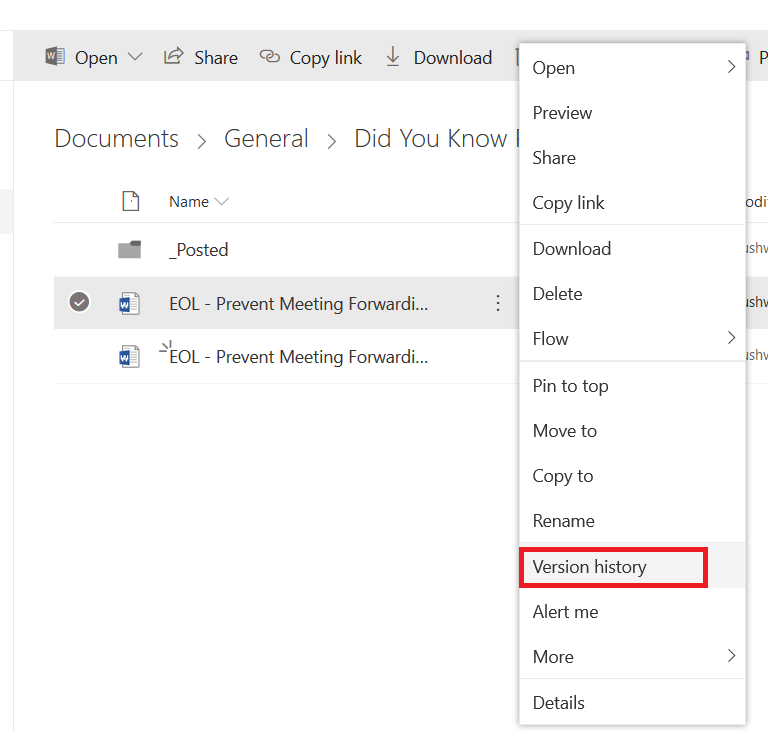
Click on the not-quite-a hamburger menu – the one between the file name and modify time.

Select “Version History”

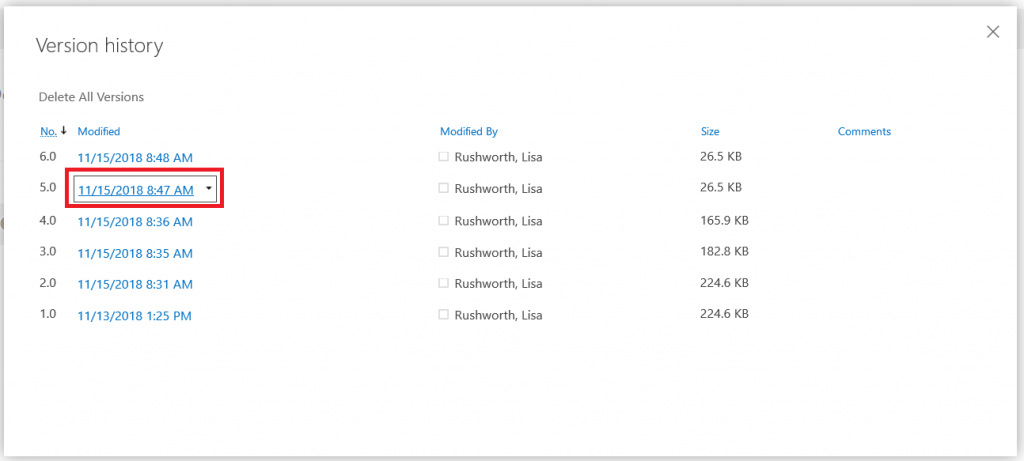
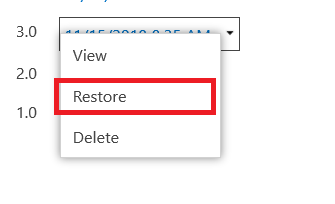
To view the previous version, click on the hyperlinked modify timestamp. To restore the previous version, hover your mouse over the modify timestamp of the iteration you want.

On this menu, “View” will show you some information about the file – not actually view the file. Select restore “Restore” to replace the current version (the one that shows up in Teams) with the selected – you’ll be asked to confirm that you want to overwrite the current version.

Once the document has been restored, you’ll have a new entry on the version history pane – so you can even revert your document reversion if needed.


Did you know … Screen Sharing in Teams Chats Is Rolling Out!

I’ve been tracking an RFE for screen sharing in Teams chat — it’s super-simple in Skype, and while it’s possible in Teams (schedule a meeting), it isn’t a one-click simple process. But today, we’ve got a new button in our chat sessions — start sharing your screen!

I don’t see the option in the web client on Firefox or Chrome, but I hope it is coming there too.

Did you know … Excel can change the case of text?

But before we go there, did you know you can have Excel show your formulae instead of data? It’s great for showing how you’ve done something in Excel 😊 On the “Formulas” ribbon bar, click “Show Formulas”.

I get information with all sorts of strange caPitAlizaTioN –often the “I didn’t know I had my caps lock on when I hit caps lock to give you all upper case” lISA RUSHWORTH casing. Or the “I didn’t bother to hit shift so it’s all in lower case” lisa rushworth. And even the “I had caps lock on when I fixed something, but the rest is in lower case” lisa rusHWorth.

It’s not aesthetically pleasing, but some systems have case sensitive sorting – Sally is alphabetically before lisa. Some systems use case sensitive strings to collate – and “lisa rushworth”and “Lisa Rushworth” are two distinct records. And have I mentioned it’s not aesthetically pleasing?

But I’ve got an Excel formula that will create consistently capitalized data.

See:

In addition to using LOWER(), UPPER(), and PROPER(), you can combine these with LEFT() and RIGHT() to convert different parts of the string to different cases – as in my example of setting just the first letter capital.

Left(A14,1) takes the first character from the left of the value in A14. LEN(A14)-1 is the length of the value in A14 minus one.RIGHT(A14(LEN(A14)-1)) then takes one less than the entire string length from the right of A14 (i.e. everything except the first character).

Did you know … you can organize your Microsoft Teams list?

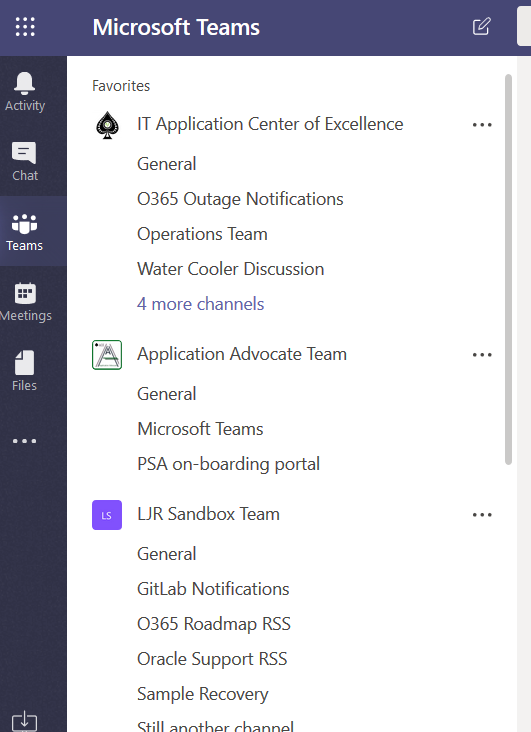
You’ve been using Teams for a while, created a few Teams, been added to even more … and you realize that all of these Teams and channels have created clutter of their own. Teams are listed in the order you joined them. Channels are listed in the order they were created. And those first couple of Teams spaces you played around with? All at the top!

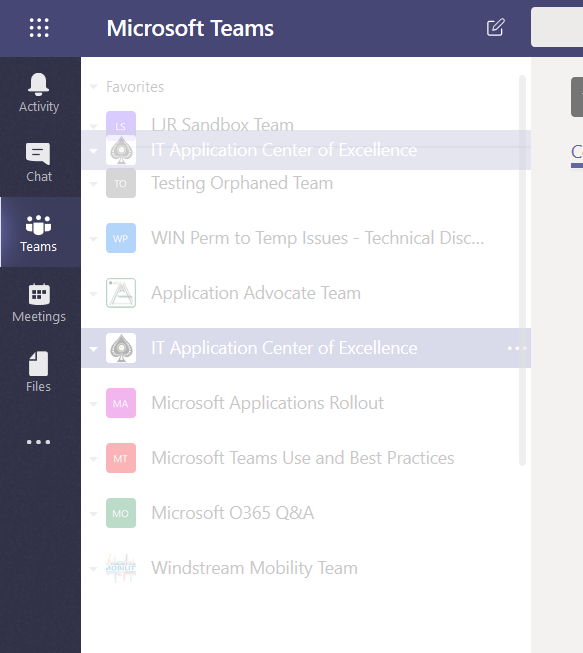
But the Teams interface – both the client and the website – allow you to drag Teams around to reorder them. Simply click and hold over the Teams listing you want to move and drag your mouse – there will be a “ghost” listing that tells you where the Teams listing will appear when you release the mouse button.

OK, that’s a little better – now the Teams spaces for my groups are at the top.

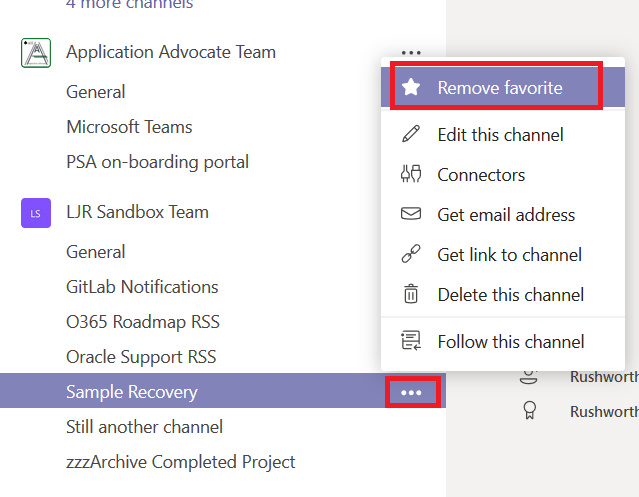
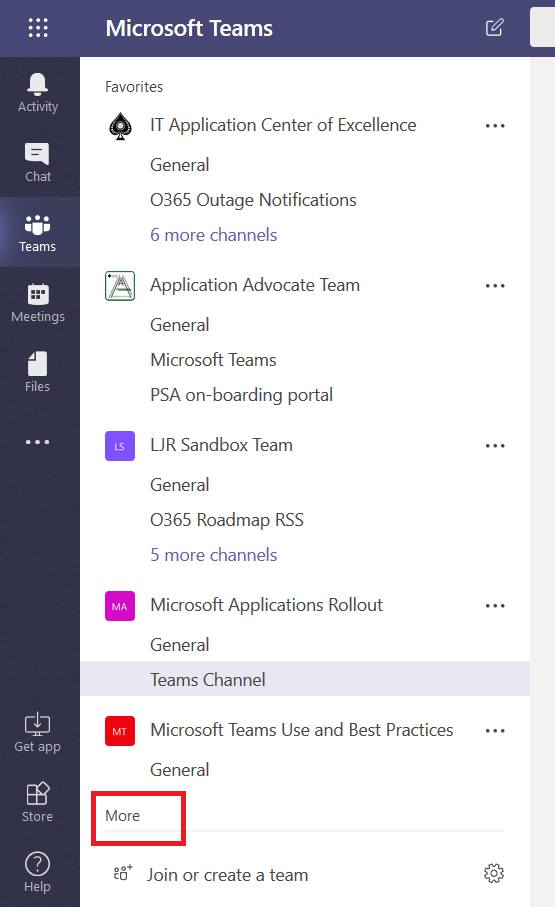
That’s still a lot of channels, though. If you remove ‘favorite’ designation from a channel, it will collapse into an expandable menu. Click the hamburger menu next to the channel, then click “Remove favorite”

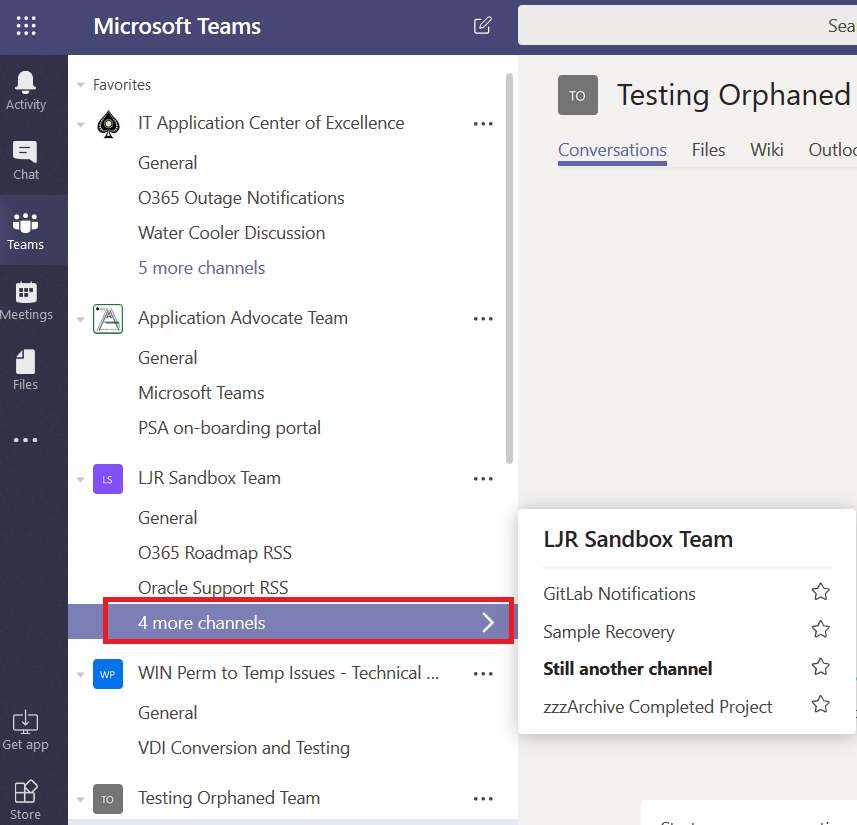
That’s a LOT better – those channels are still available, just click on “# more channels”

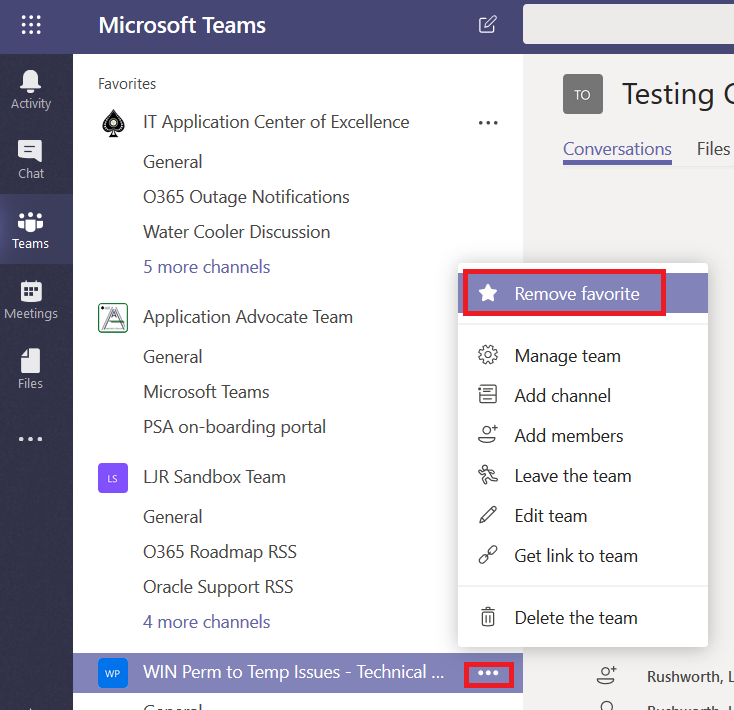
You can remove the favorite designation from a Teams space as well – it will no longer be so prominently displayed in your Teams list. Click on the hamburger menu next to the Teams space listing and click “Remove favorite”

Down to one page! If you want to check one of the hidden Teams, just click “More”

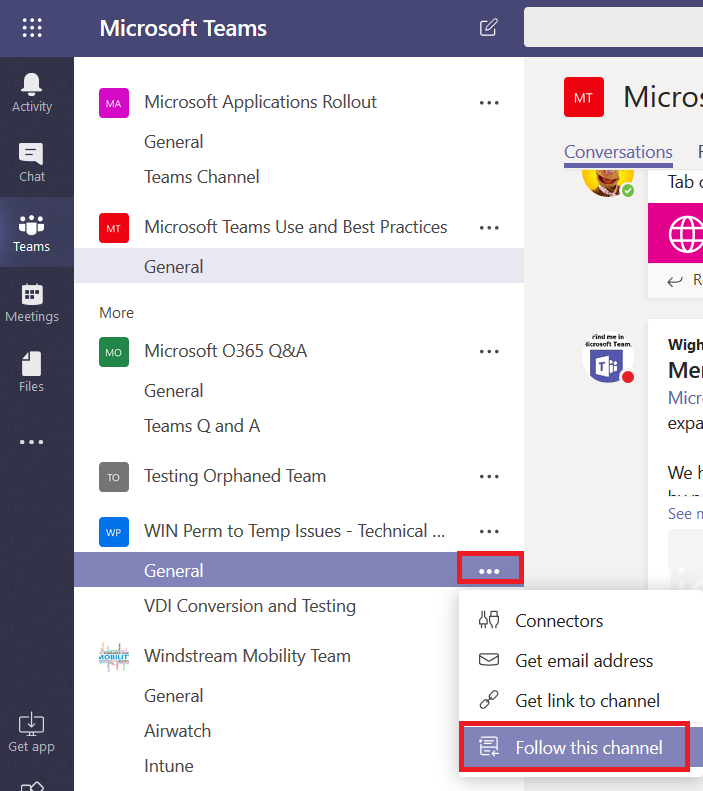
And if you want to get notifications when an important-but-infrequently-used channel has some activity, click the hamburger menu next to the channel and select “Follow this channel”. New posts will be listed in your Activity feed (and e-mailed to you if you’ve set up e-mail notification for followed channels).

OUD 11g Failure

Ran out of disk space on the OUD partition (don’t let people turn on debug logging!!). Easily fixed — stop service, remove big log file, start again. Unfortunately that “start again” wasn’t as easy as it could have been. Server startup fails. It says the cryptomanager failed to publish the instance-key-pair in ADS …. which, Oracle says means you get to recreate the single instance. Honestly, this isn’t a horrible process since I’ve got a backup of the directory. But I’d rather not spend the next hour messing around with the server.

The underlying problem is that the admin partition didn’t dump out to its storage file (full disk), so admin-backend.ldif is a 0-byte file. Now, had the directory been running when I noticed this … I could have dumped the cn=admin data partition to another volume and copied the file in once I cleared up disk space. But I have a file-level backup … and it was easy enough to pull the file from last night back. Voila, one server online in a couple of minutes. And a good reminder for the future that a shutdown with a full disk … no good. I probably want to find something to free up a couple meg of space prior to shutting down the server. Extra-cautious option would be the MS Exchange approach of creating a few 5-meg files to ensure there’s space that can be freed up.


Added 06 Feb 2020: One of my colleagues encountered this problem again today, and it turns out you can copy the admin-backend.ldif from another server too. It may not be 100% — he cannot log into the server through the admin console. But he’s got a directory being served & no users complaining about an outage. It can get sorted properly later.

Did you know … you can use markdown in Teams messages?

Teams supports markdown within messages – type something like this

And you actually see this:

You’ll know it’s working because the markdown is converted as you type it (pasting a marked down string into Teams doesn’t work — you’ll have the literal characters and not the implied formatting)

You can even type a backtick (`)

To get an inline code block

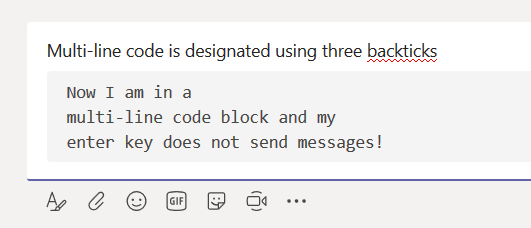
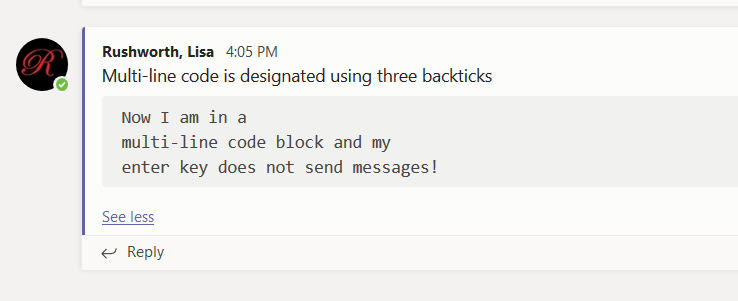
You can insert multi-line code blocks as well. It’s a little trickier to get a code block in a message since you’ve got to use shift-enter to move to a new line then type three back ticks.

After you type the three back ticks, your cursor will be in the code block. Enter will now move to a new line instead of sending the post.

They’ve got a bug where you cannot do anything after the multi-line code block … but you can always reply to your post if you’ve got something to add.

As of this writing, you cannot paste markdown text into the message and have the formatting rendered. You can paste content into the multi-line code block composer, but you cannot paste *things* with ~markdown in them~ and see “`
pretty output

Did you know … you can edit the tag for Teams @ mentions?

Well, you can ? Not generally worthwhile if you are only mentioning one or two people, but if you need to flag half a dozen people, the list of names starts getting REALLY long.

Click in the middle of the name – your cursor will be placed within the name element.

Use backspace or delete to remove one of the name components – backspace will remove the surname and comma, delete will remove the given name.

The links are maintained, so the individual gets flagged with the post.

Does it matter if there are three Bob’s on there? In the previous case, no – I’m trying to garner the attention of a bunch of people and direct them all to the same text. But if you have a bunch of people in your Teams group with the same name … it’s probably better to leave their full name in place or delete the given name!

Did you know … you can push GitLab notifications to Microsoft Teams?

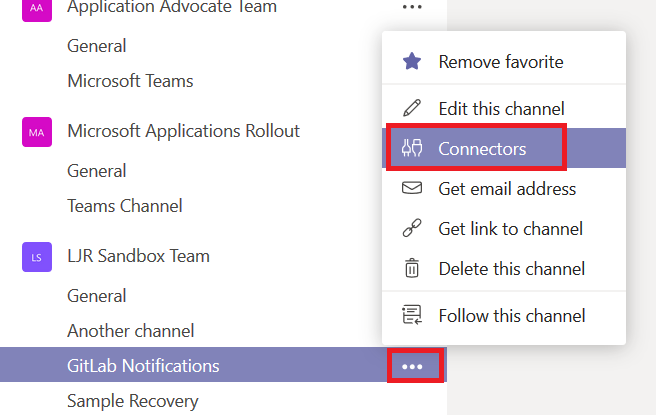
Microsoft Teams offers a lot of connectors which allow you to see external notifications right in a Teams channel, and you can push GitLab notifications to Teams. Determine the channel into which you want the notifications posted – I decided to make a new channel just for GitLab notifications, but you can use an existing channel too. Click the hamburger menu next to the channel name and select “Connectors”

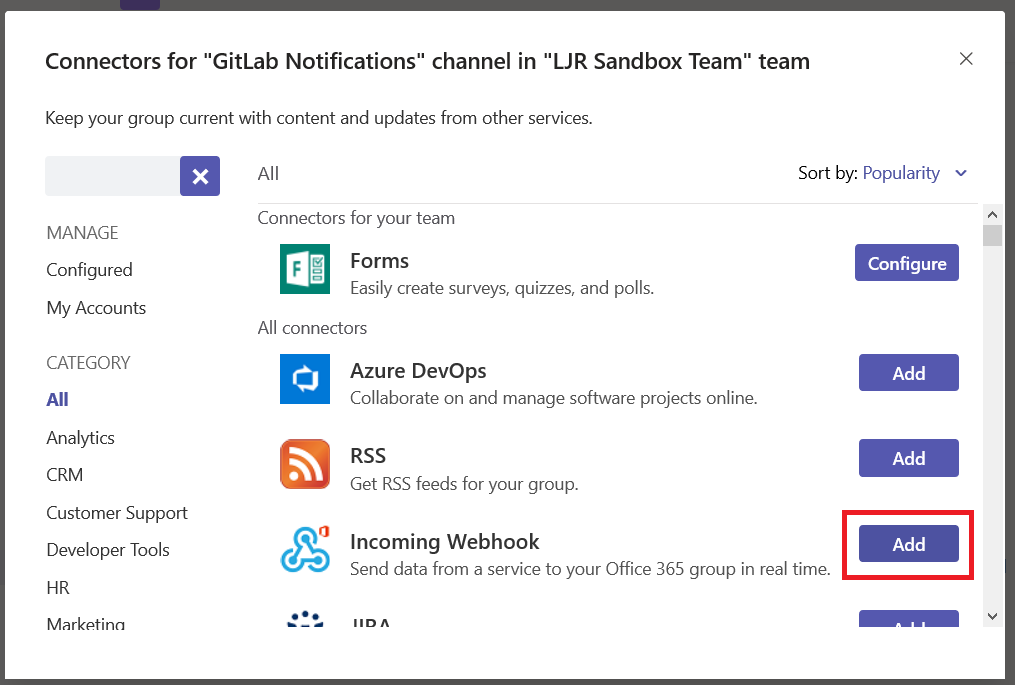
Locate “Incoming Webhook” and click “Add” next to it

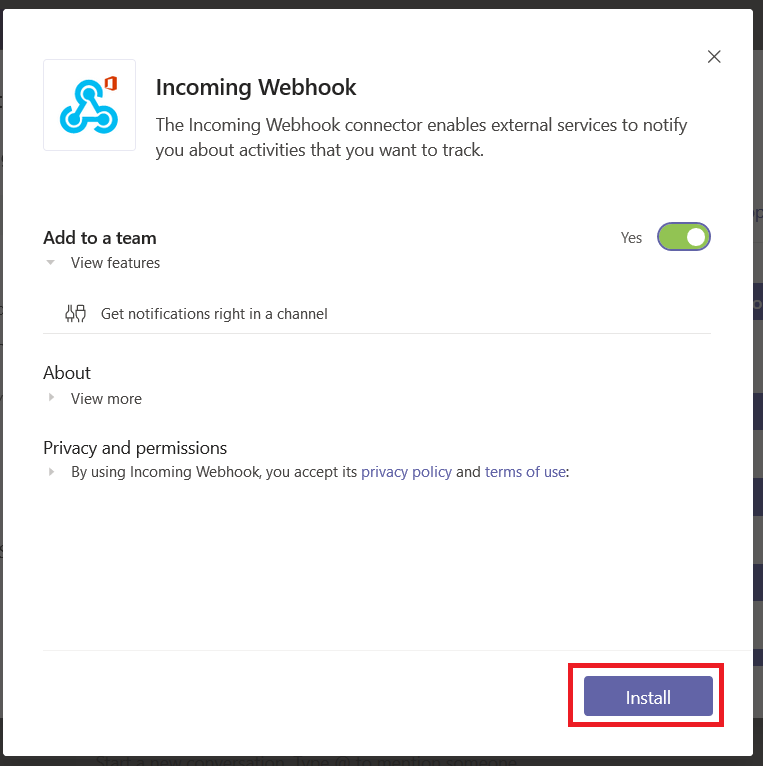
There’s not much to see here – just click “Install”

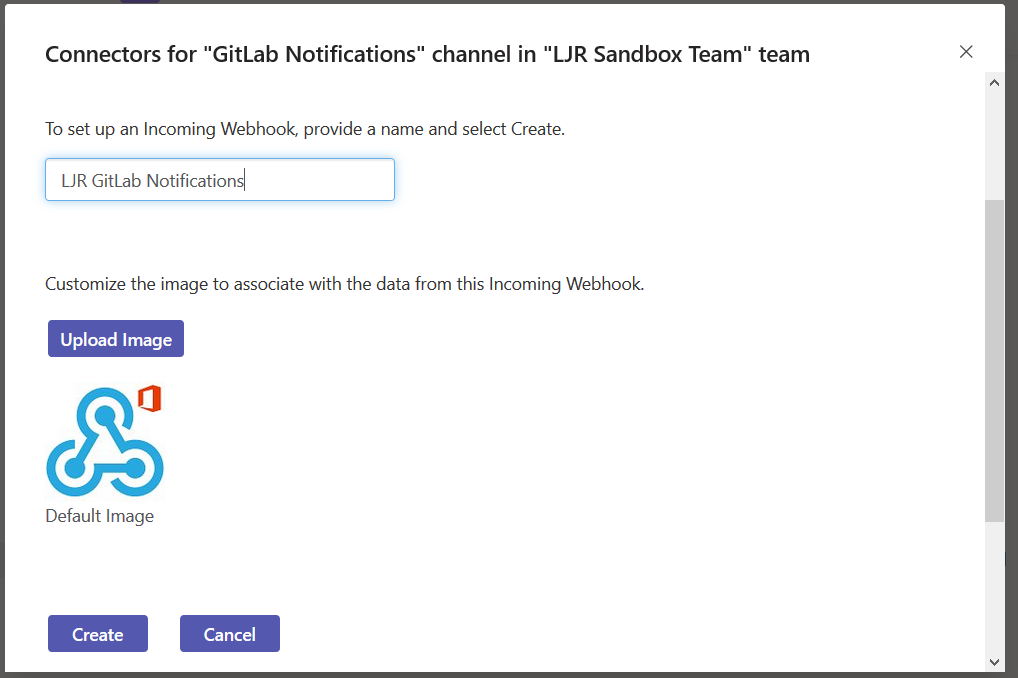
Provide a descriptive name for the webhook and click “Create”

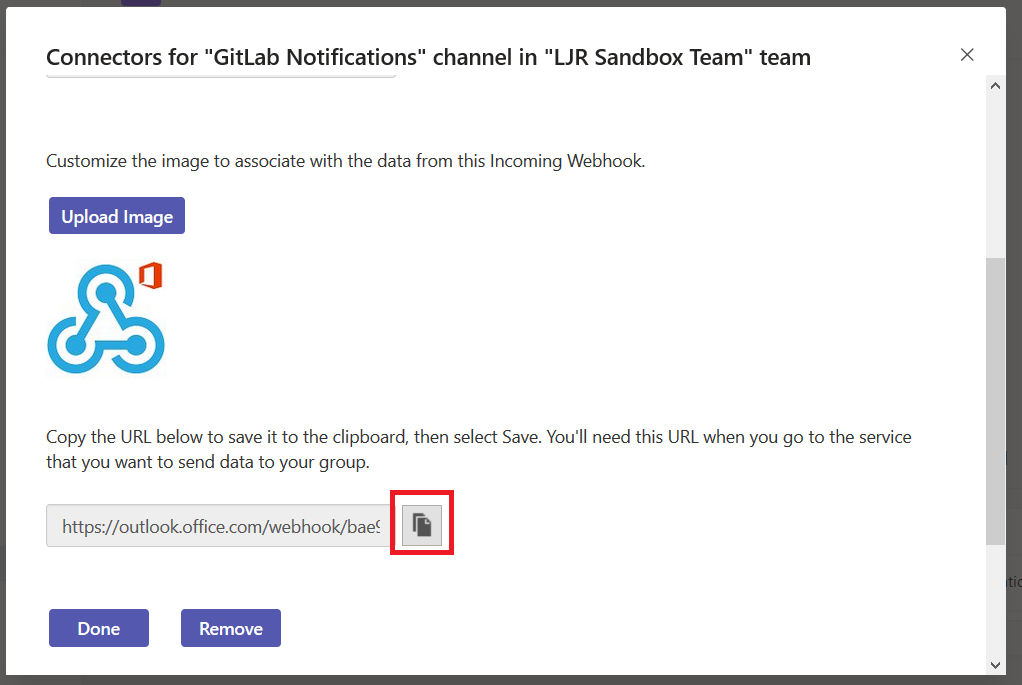
Scroll down and copy the webhook URL

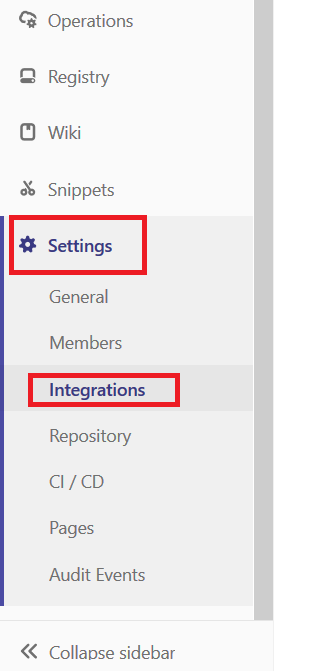
Click “Done”. Now go to your GitLab project. On the sidebar, scroll down to “Settings” and select “Integrations”

Scroll down to the “Project services” section.

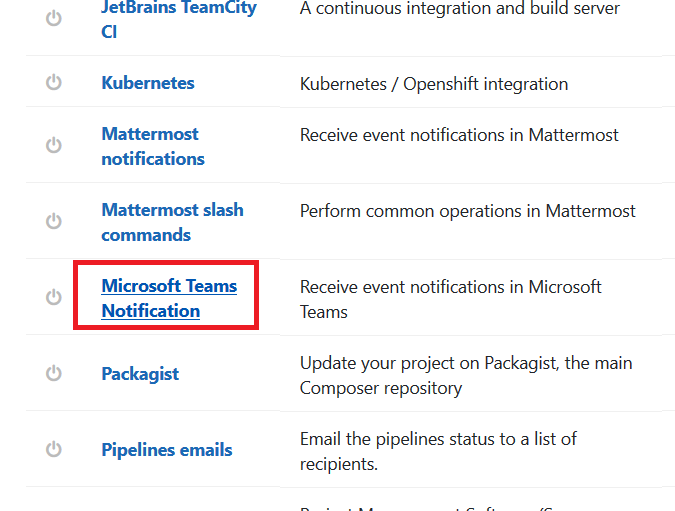
Locate “Microsoft Teams Notification” and click on it

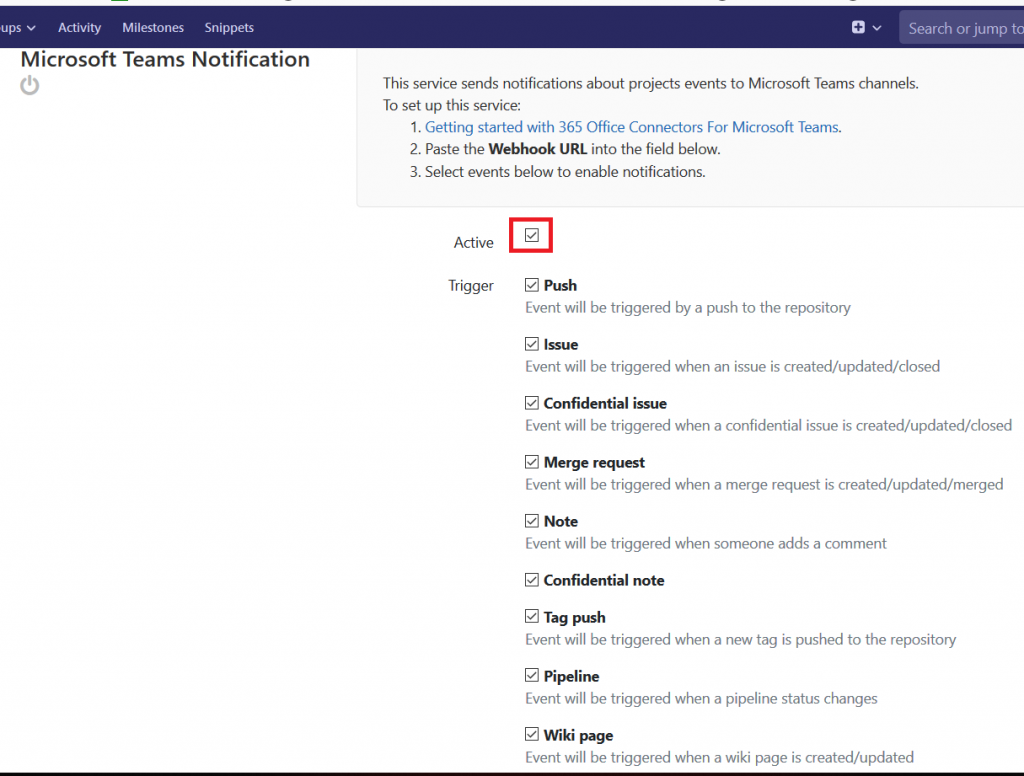
Check the box to activate the integration. Select the events for which you want information pushed to Teams

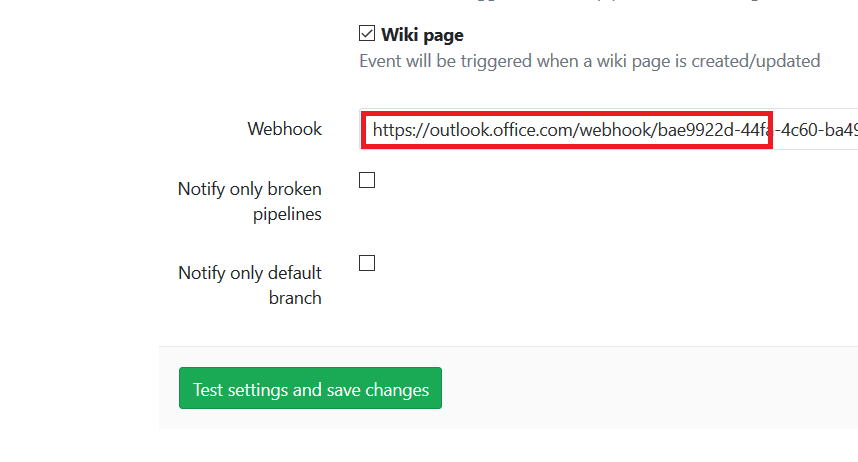
Remember that URL we copied? Well, here’s where you paste it in. You can elect to receive notifications for only the default branch or all branches. You can elect to receive all pipeline notifications or only broken pipeline notifications. Click “Test settings and save changes”

If everything worked, you will see a banner indicating that the Microsoft Teams Notification was activated.

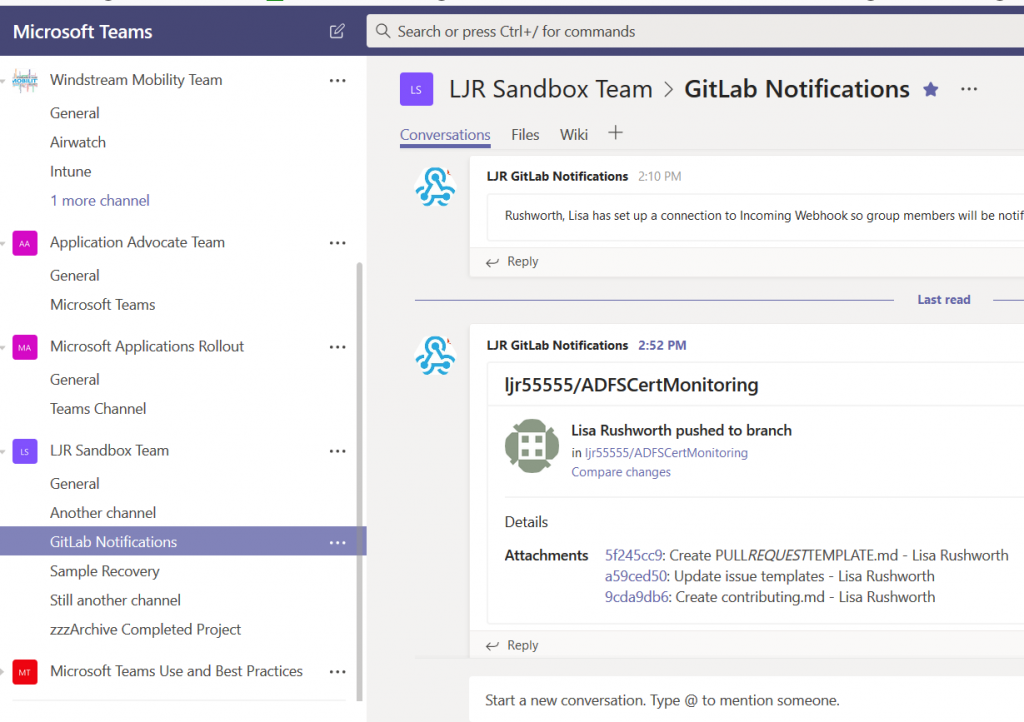
Now do something in your GitLab project – commit a code update, create an issue, add a page to the Wiki … anything that you’ve selected to trigger notifications.

And … check out your Teams channel:

Did you know … you can send a “receipt” for Microsoft Forms submissions?

I had a maths professor who mused that, back when he was an undergrad, calculators were a newfangled thing that kids only halfway trusted. You’d complete your test; and, time permitting, you would power on that calculator and see if it agreed. Decades later, kids didn’t even do a mental check that the calculator’s results were halfway reasonable. As a technology becomes more familiar, innate trust is built. In the interim … trust but verify. Beyond trust, it’s nice to have a copy of what you’ve submitted when discussing your submissions with someone else. Or, for a periodic survey, to remind you what you said last time. Or because you are particularly proud of a particular turn of phrase and would like to use that one again. For whatever reason you want to create a “receipt” for Forms submissions, you can do it.

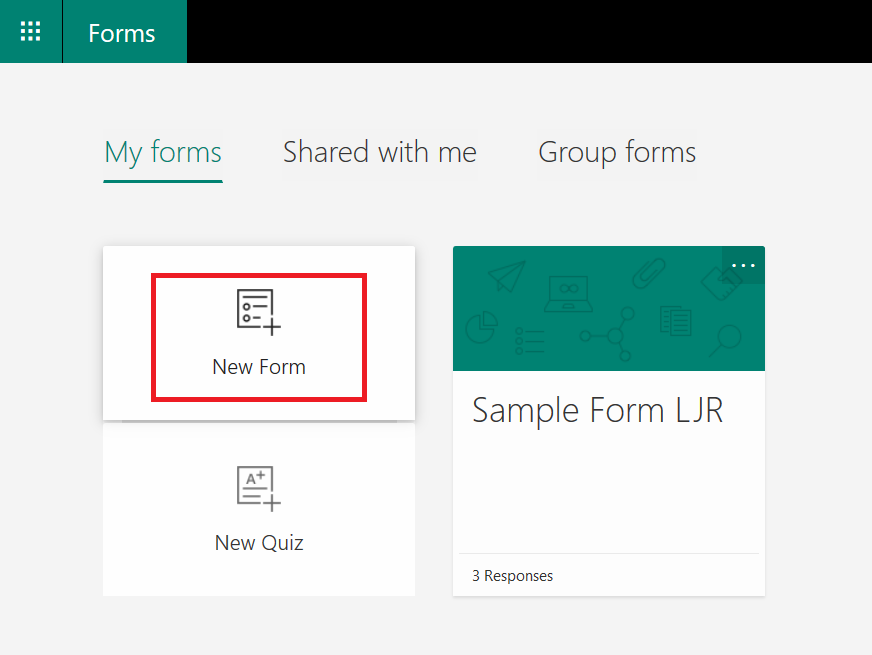
The first thing you need is a Form created under your user ID. Go to https://forms.office.com/ and click “New Form”
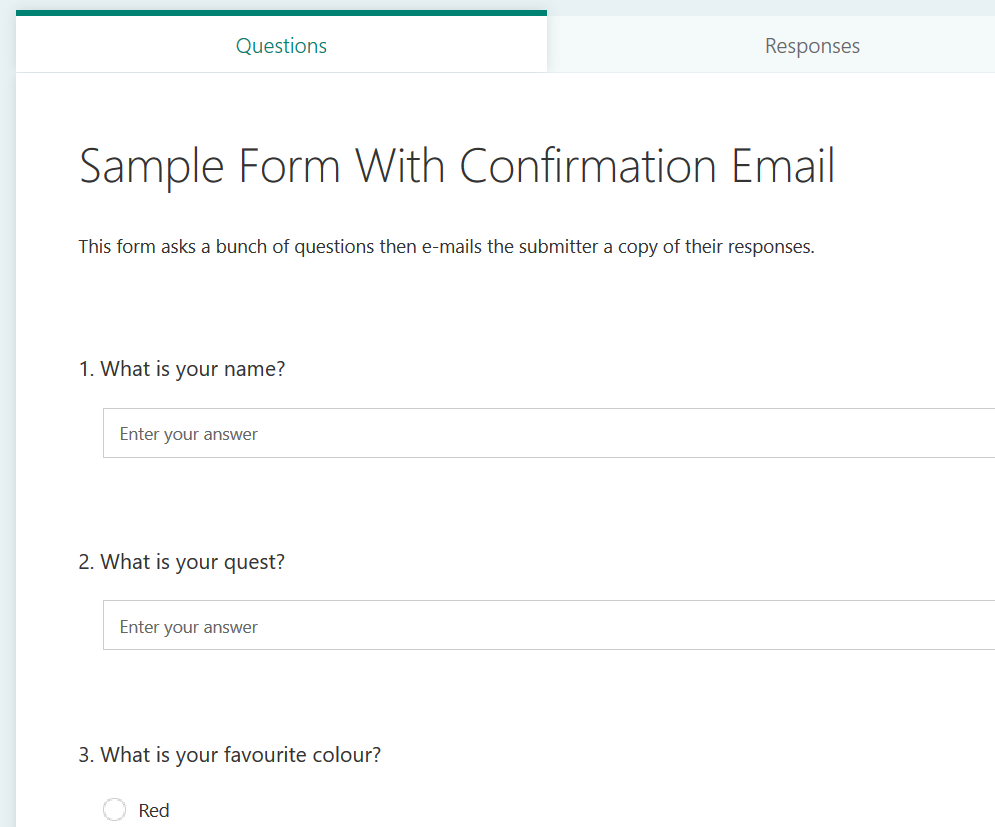
Give your form a name and add some questions
From the hamburger menu in the upper right-hand corner, select “Settings”

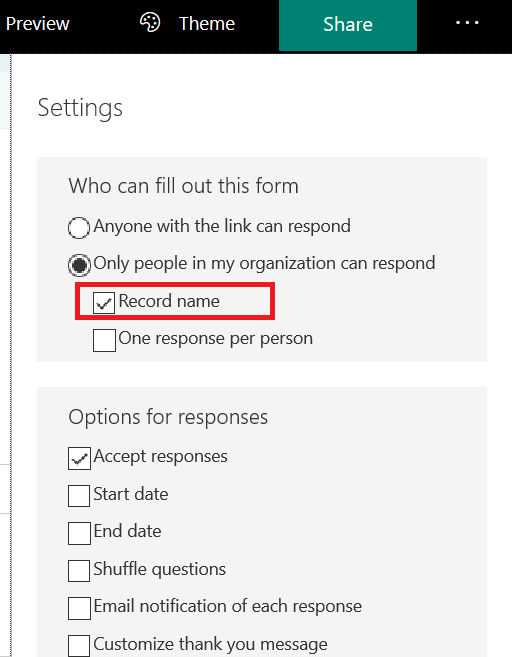
Verify that the form is restricted to “people in my organization” and “Record name” is selected.

** If the form needs to be available to individuals outside of the organization, you would need a form field to request their e-mail address … otherwise we don’t know where to send the receipt.
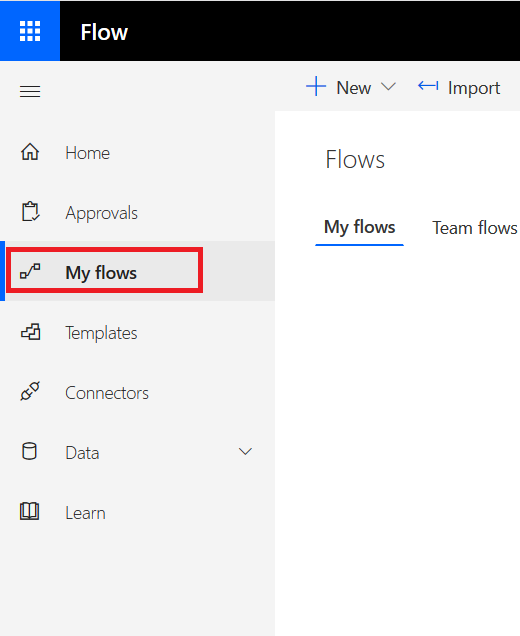
OK, we’ve got a form. Now we need to add a workflow to send the submitter a copy of their responses. Go to https://flow.microsoft.com and select the “My Flows” tile
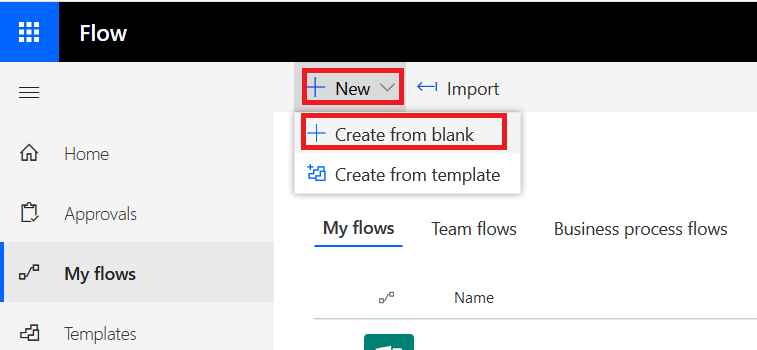
Click on “New” and “Create from blank” to begin creating the workflow.
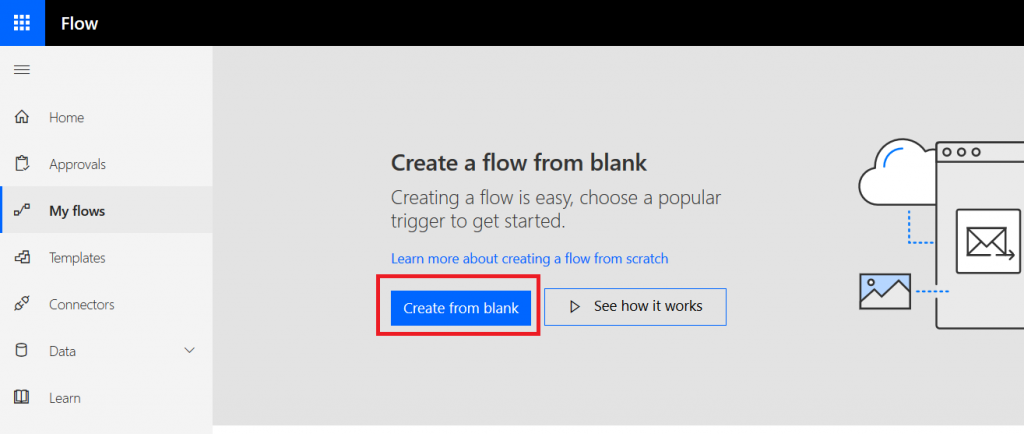
Click “Create from blank” again to confirm you really don’t want one of their templates
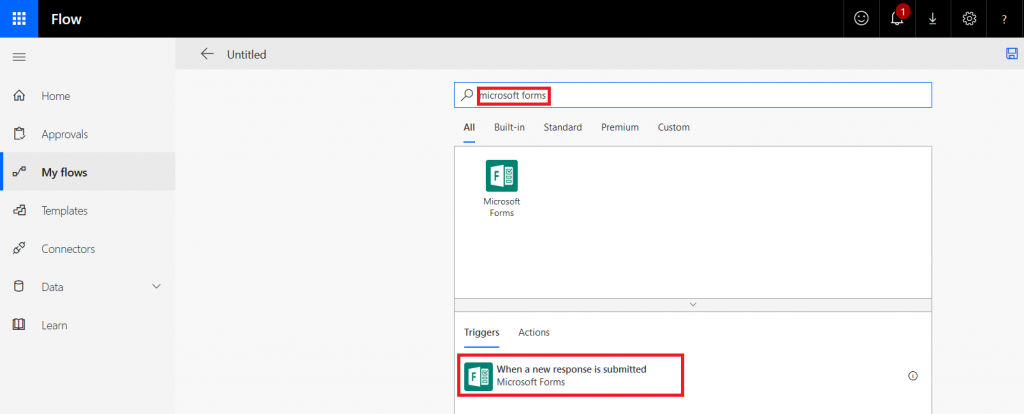
In the search field, type “Microsoft forms” and select the trigger “When a new response is submitted”
Select the form for which you want to generate a receipt – in my case, the form I just created.

Select “New Step”

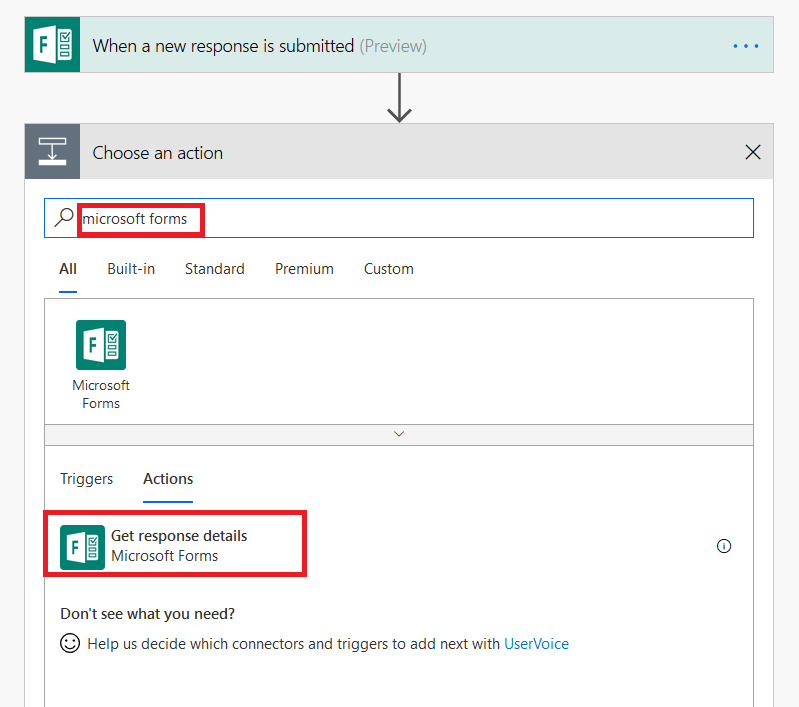
Type “Microsoft forms” in the search dialogue again, and select “Get response details”.
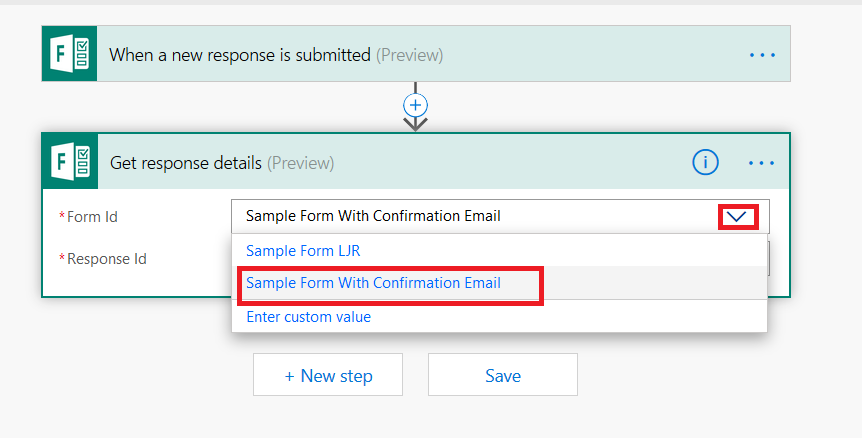
Click the inverted caret for “Form Id” and select your form again.
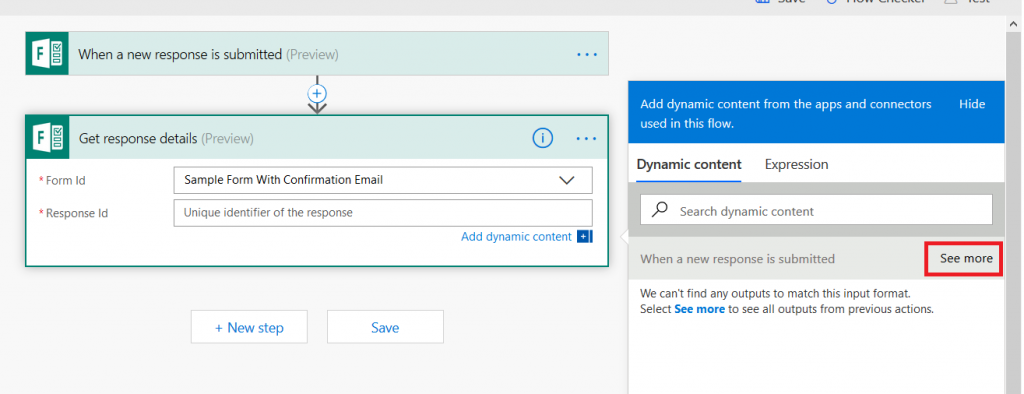
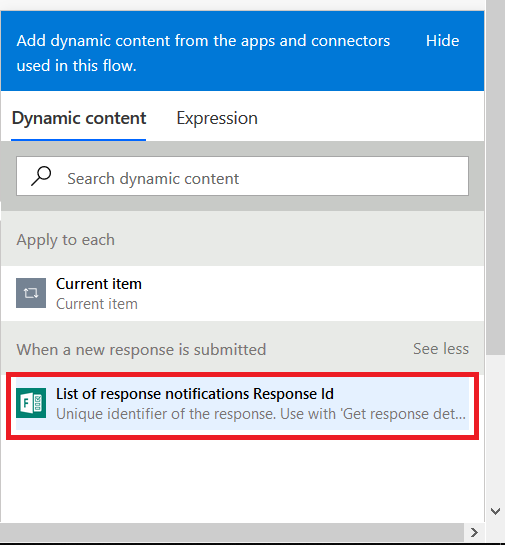
Click in the “Response Id” field – a new pane will appear to the right of your workflow. Click the “See more” button across from “When a new response is submitted”
Select “List of response notification Response Id”
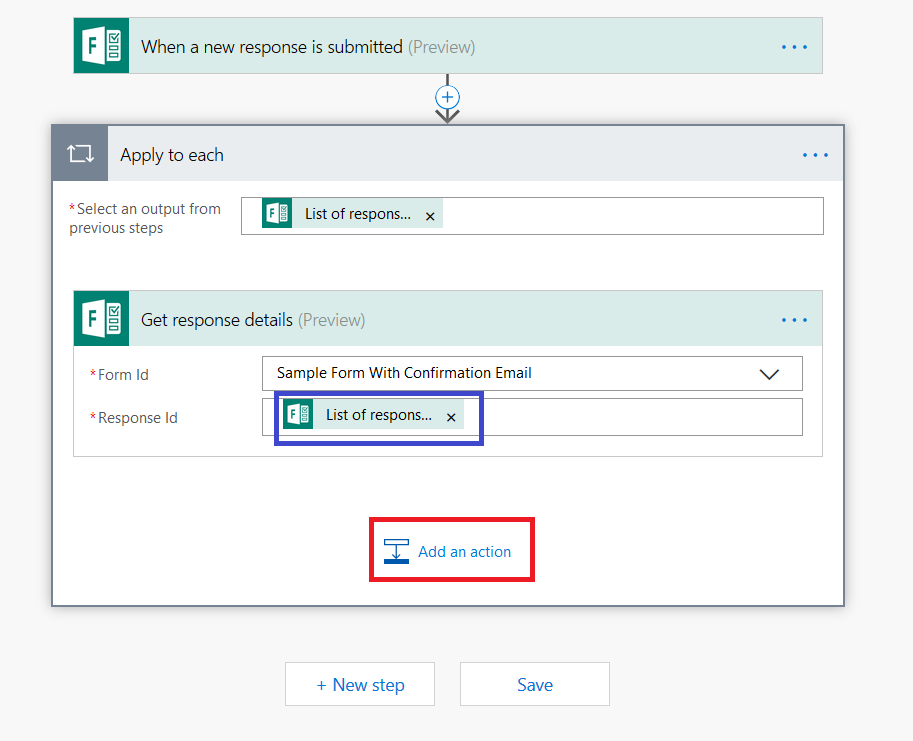
You’ll see the selection populated in the “Response Id” section. Click “Add an action”
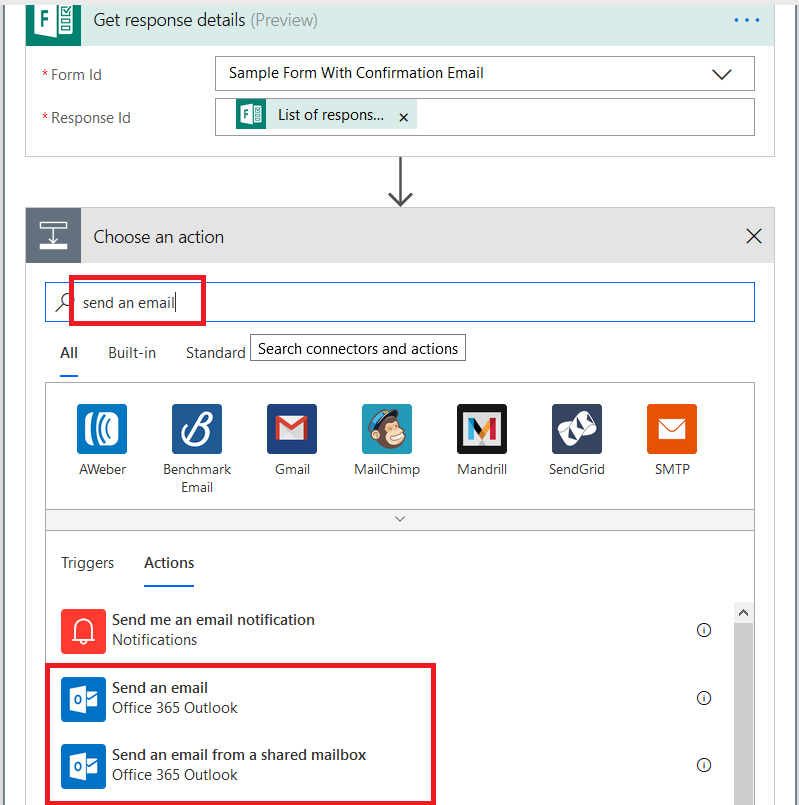
In the search dialog, type “send an email”. To send the receipt from your mailbox, select “Send an email” – to send the receipt from a generic mailbox to which you have send-as access select “Send an email from a shared mailbox”.
Click in the “To” field – the dynamic content pane will appear on the right again. Click “See more” across from “Get response details”. If this form is locked down to submitters within the organization and the submitter’s name is recorded, you can select “Responders’ email”, otherwise select the form question where you’re quested the submitter’s e-mail address (warning – since there’s nothing verifying the individual actually owns the e-mail address, forms that take freeform e-mail address submissions can be used to “spam” others).
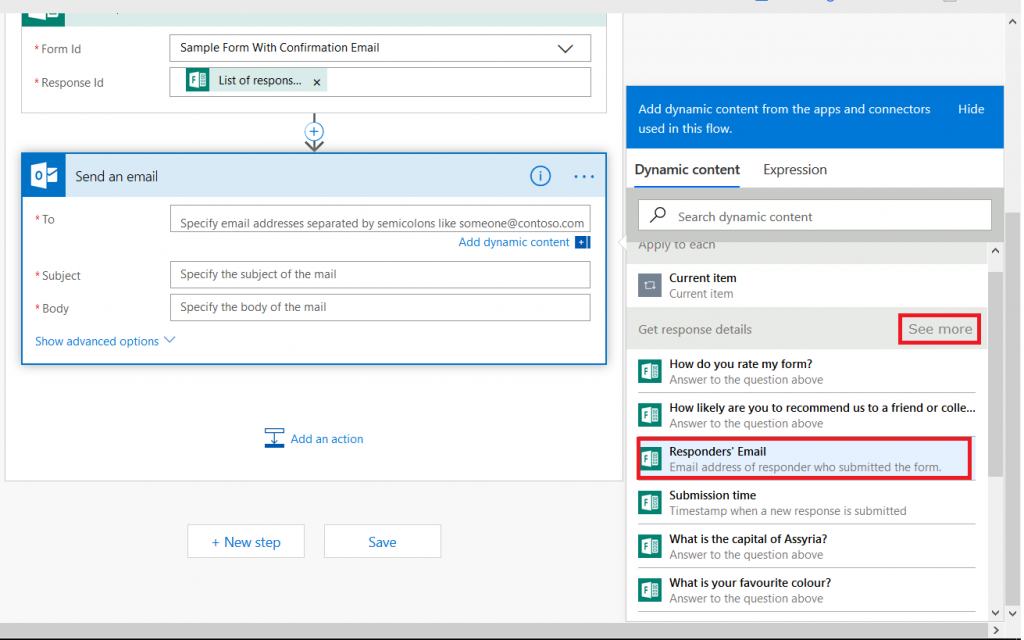
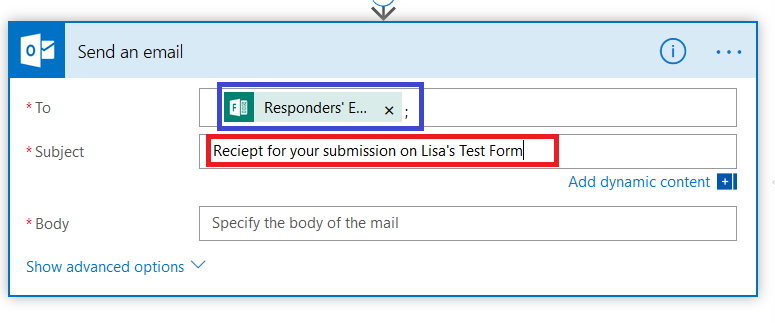
You’ll see “Responders’ E…” populated into the “To” field. Type in a reasonably descriptive subject for your message.
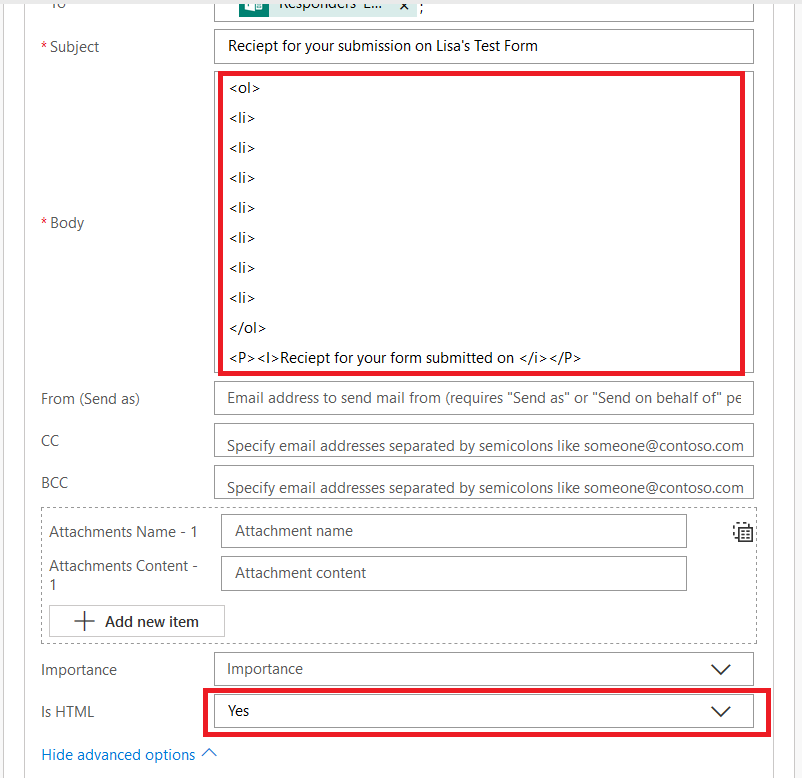
I start by creating my message template – pretty messages will require HTML, so click to “Show advanced options” and set “Is HTML” to yes.
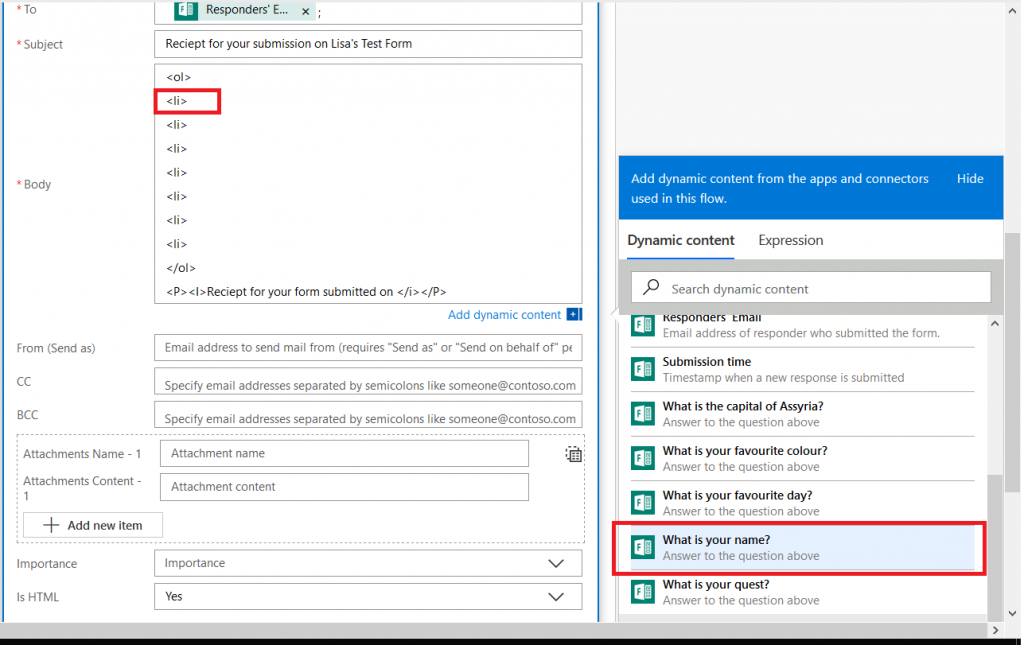
Now’s the part where we include the individual’s response data – click back into the “Body” field and you’ll see the dynamic content pane again. Within the message body, click where you want the response to appear (here, it’s after my first “<LI>” tag. Then select the question whose response you want to insert into that position.
It’s generally helpful to type something before the answer to remind the person what the question was – it’s freeform text, and pretty much anything you can do in HTML is acceptable here.
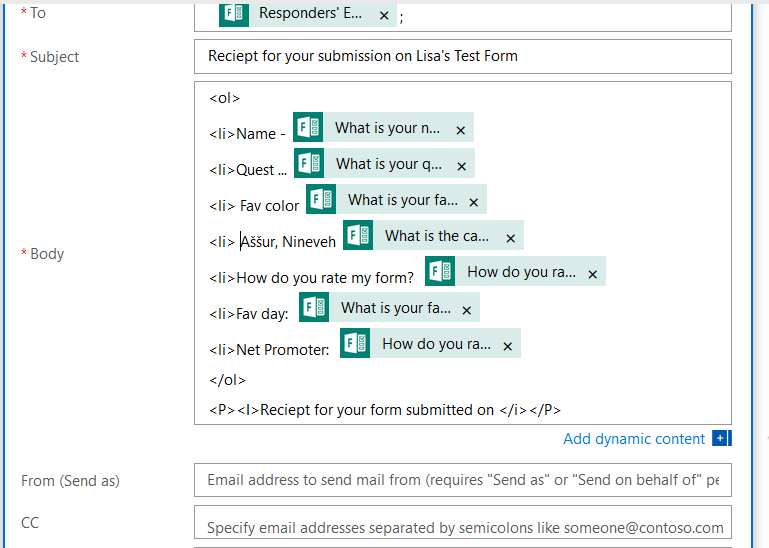
Once you have finished creating your message template, scroll down to the bottom and click “Save”
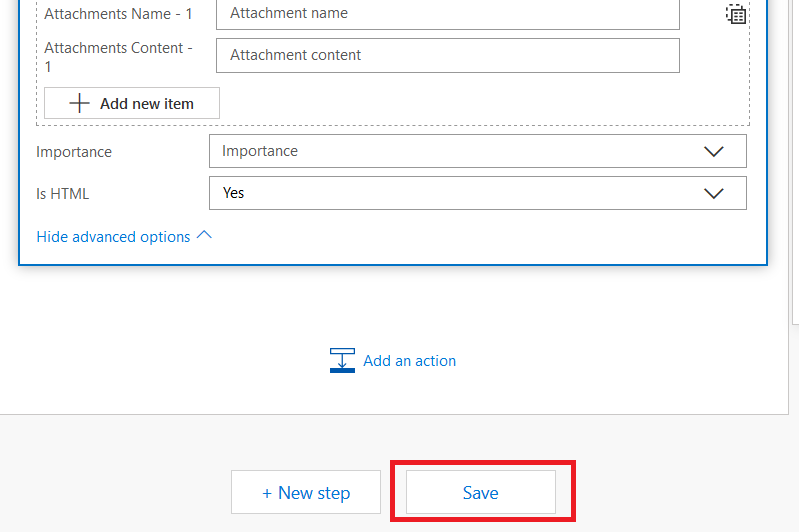
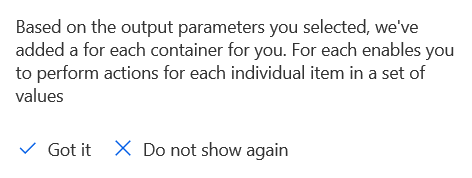
You may get a warning that a “for each” container has been added for you … that’s good, we want to generate a receipt for each submission!
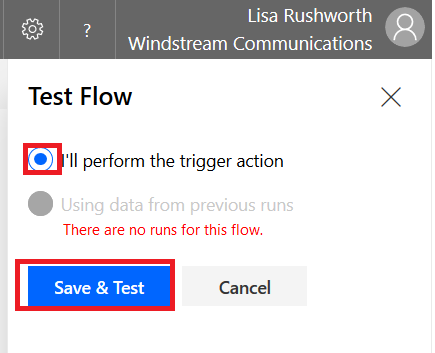
Now that your workflow has been saved, click “Test”

Select “I’ll perform the trigger action” and then click “Save & Test”
Return to your form and click “Preview”. Complete your form and click submit.

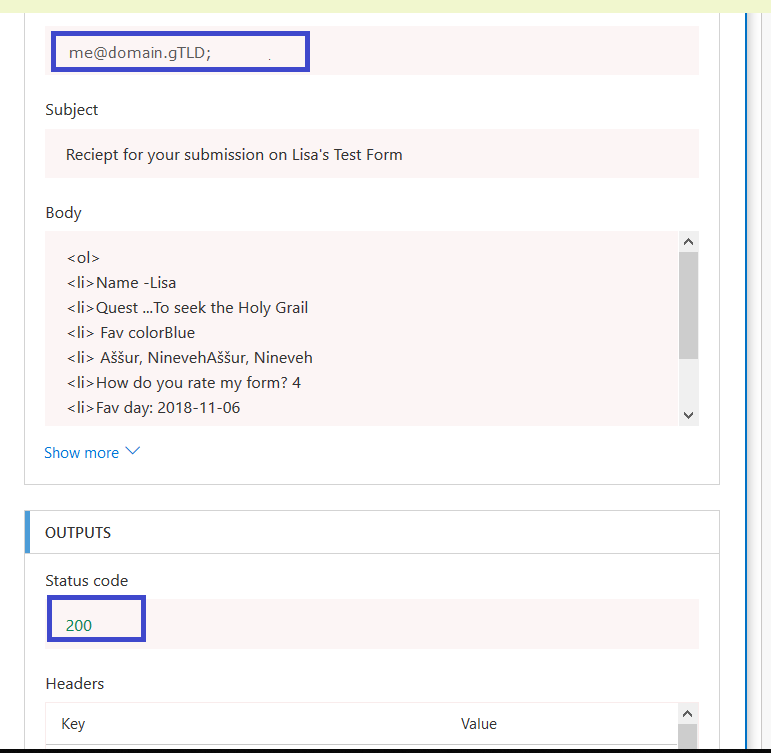
Return to Flow. If you are quick enough, you’ll see a message that your flow is running. Wait. Eventually you’ll see the results. You can click on the “Send an email” section to see detailed results.
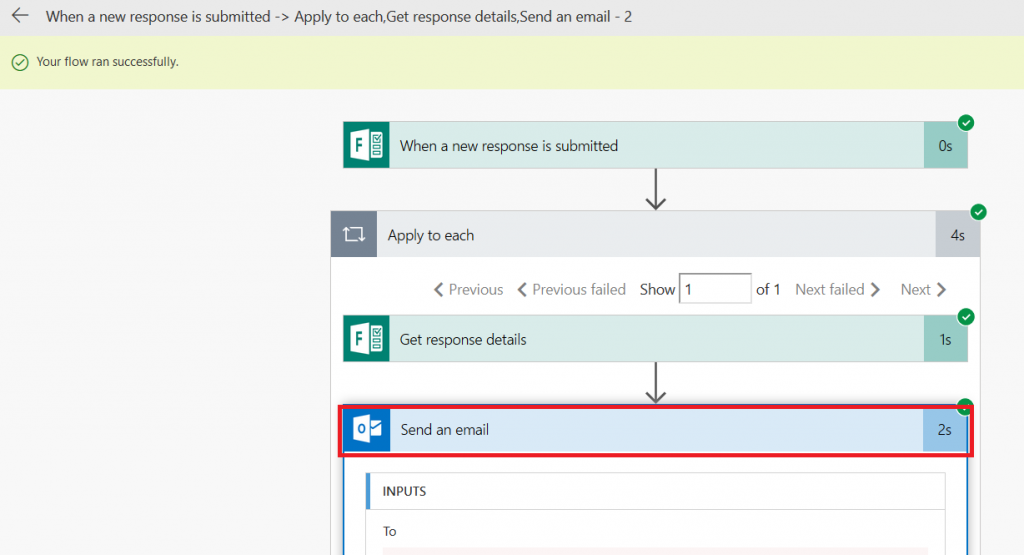
Including the e-mail address to which the receipt was sent and the status code (200 is good).
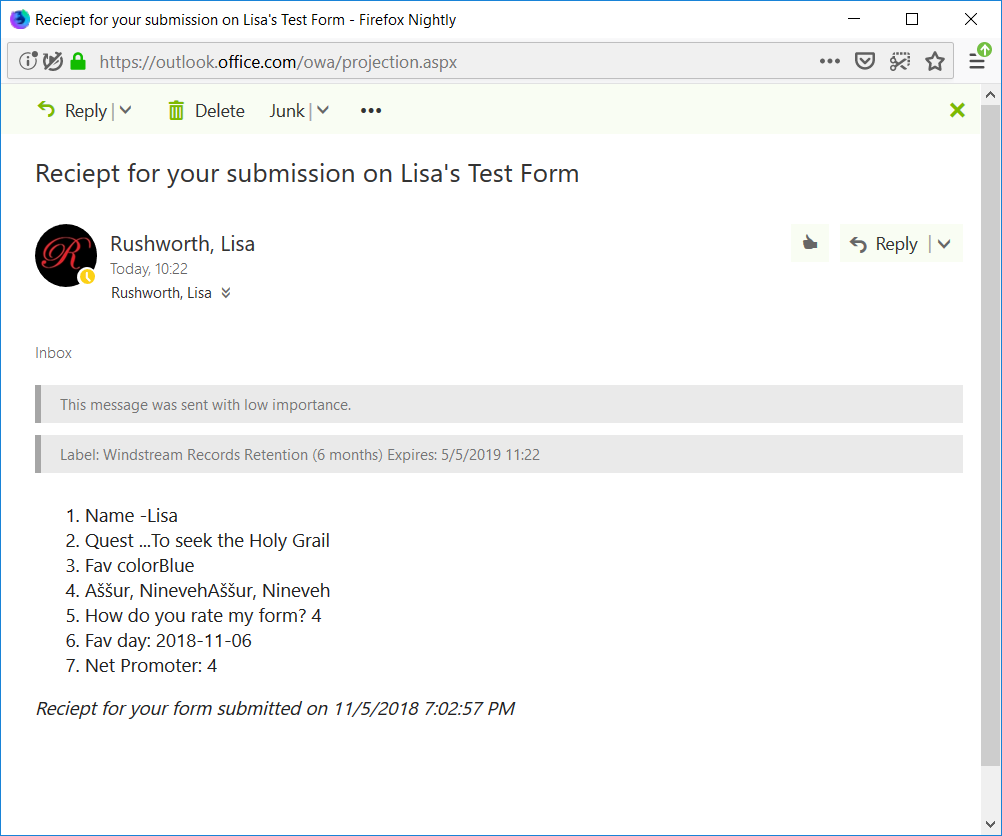
Check your mailbox too – you should have a message: