Category: Technology

Backing up (and restoring) *All* Data in MongoDB

The documentation on Mongo’s website tells you to use mongodump with a username, password, destination, and which database you want to back up. Except I wanted to back up and restore everything. Users, multiple databases, I don’t really know what else is in there hence I want everything instead of enumerating the things I want.

Turns out you can just omit the database name and it dumps everything

mongodump --uri="mongodb://<host URL/IP>:<Port>" -u $STRMONGODBUSER -p $STRMONGODBPASS

And restore with

mongorestore --uri="mongodb://<host URL/IP>:<Port>"

Since it’s a blank slate with no authentication or users defined yet.

Redis High Availability — Options

The two primary approaches to high availability with Redis are Redis Sentinel and Redis Cluster. There are also third-party solutions, but the provided budget is zero dollars. That … limiting.

Sentinel is the official high availability solution provided by Redis. It monitors Redis instances, detecting failures, and automatically handling failover to a replica. It also provides monitoring/alerting to advise administrators when a problem has been detected.

Sentinel does not provide much in the way of scalability (it adds additional ‘read only’ copies, but there is a single master) but this architecture better ensures consistency (i.e. the same data is present on all nodes). It does, however, promote a read replica to master in the event the master fails, so high availability is achieved.

More than half of the Sentinels need to consider a master down to invoke failover (quorum) – so we would want at least three nodes. We experienced issues with two-node Microsoft quorum-based clustering when the two nodes were unable to communicate. Each node considered its partner to be ‘down’ and decided to be the server in charge. And having two servers in charge corrupts data. With three nodes, should they all become separated … they cannot reach a quorum of two servers agreeing on states.

Cluster automatically distributes data across multiple Redis nodes (called shards). Doing so allows more data to be processed in parallel. Redis Cluster also supports replication and automatic failover.

Since clustering provides both high availability and scaling, if the write load is a consideration, this may be a preferred option; but distributed data means inconsistent data values may be encountered. If data consistency is paramount, clustering may be undesirable. Additionally, not all Redis clients support communicating with a clustered environment. We would need to have our vendor confirm that the application could use a clustered solution.

The minimum recommended environment for production is larger – six servers. This constitutes three master nodes and three replica nodes.

MongoDB: Basics

We inherited a system that uses MongoDB, and I managed to get the sandbox online without actually learning anything about Mongo. The other environments, though, have data people care about set up in a replicated cluster of database servers. That seems like the sort of thing that’s going to require knowing more than “it’s a NoSQL database of some sort”.

It is a NoSQL database — documents are organized into ‘collections’ within the database. You can have multiple databases hosted on a server, too. A document is a group of key/value pairs with dynamic schema (i.e. you can just make up keys as you go).

There are GUI clients and a command-line shell … of course I’m going with the shell 🙂 There is a db function for basic CRUD operations using db.nameOfCollection then the operation type:

db.collectionName.insert({"key1": "string1", "key2" : false, "key3": 12345})
db.collectionName.find({key3 : {$gt : 10000} })
db.collectionName.update({key1 : "string1"}, {$set: {key3: 100}})
db.collectionName.remove({key1: "string1"});

CRUD operations can also be performed with NodeJS code — create a file with the script you want to run, then run “node myfile.js”

Create a document in a collection

var objMongoClient = require('mongodb').MongoClient;
var strMongoDBURI = "mongodb://mongodb.example.com:27017/";
  
objMongoClient.connect(strMongoDBURI, function(err, db) {
  if (err) throw err;
    var dbo = db.db("dbNameToSelect");
    var objRecord = { key1: "String Value1", key2: false };
    dbo.collection("collectionName").insertOne(objRecord, function(err, res) {
         if (err) throw err;
         console.log("document inserted");
         db.close();
    });
}); 

Read a document in a collection

var objMongoClient = require('mongodb').MongoClient;
var strMongoDBURI = "mongodb://mongodb.example.com:27017/";

objMongoClient.connect(strMongoDBURI, function(err, db) {
  if (err) throw err;
    var dbo = db.db("dbNameToSelect");
    var objQuery = { key1: "String Value 1" };
    dbo.collection("collectionName").find(objQuery).toArray(function(err, result) {
     if (err) throw err;
     console.log(result);
     db.close();
  });
}); 

Update a document in a collection

var objMongoClient = require('mongodb').MongoClient;
var strMongoDBURI = "mongodb://mongodb.example.com:27017/";

objMongoClient.connect(strMongoDBURI, function(err, db) {
if (err) throw err;
  var dbo = db.db("dbNameToSelect");
  var objRecord= { key1: "String Value 1" };
  dbo.collection("collectionName").deleteOne(objRecord, function(err, obj) {
    if (err) throw err;
    console.log("Record deleted");
    db.close();
});
}); 

Delete a document in a collection

var objMongoClient = require('mongodb').MongoClient;
var strMongoDBURI = "mongodb://mongodb.example.com:27017/";

objMongoClient.connect(strMongoDBURI, function(err, db) {
if (err) throw err;
  var dbo = db.db("dbNameToSelect");
  var objQuery = { key1: "String Value 1" };
  var objNewValues = { $set: {key3: 12345, key4: "Another string value" } };
  dbo.collection("collectionName").updateOne(objQuery, objNewValues , function(err, res) {
    if (err) throw err;
    console.log("Record updated");
    db.close();
   });
}); 
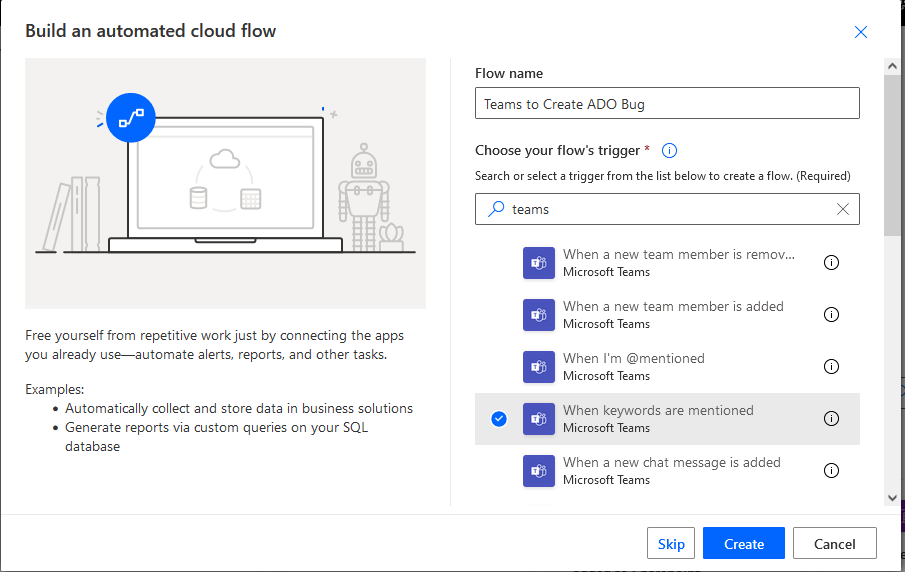
Tableau – Data Source Connection Info and Workbooks

I think I finally have a query that links workbooks where data sources are used and the connection information from the data_connections table!

-- Query to find all data sources and where they are used
select system_users.email
, datasources.id, datasources.name, datasources.created_at, datasources.updated_at, datasources.db_class, datasources.db_name, datasources.site_id
, data_connections.server, data_connections.dbclass
, sites.name as SiteName, projects.name as ProjectName, workbooks.name as WorkbookName
from datasources
left outer join data_connections on data_connections.datasource_id = datasources.id
left outer join users on users.id = datasources.owner_id
left outer join system_users on users.system_user_id = system_users.id
left outer join sites on datasources.site_id = sites.id
left outer join projects on datasources.project_id = projects.id
left outer join workbooks on datasources.parent_workbook_id = workbooks.id
order by datasources.name
;

Creating an Azure DevOps Work Item From a Teams Message

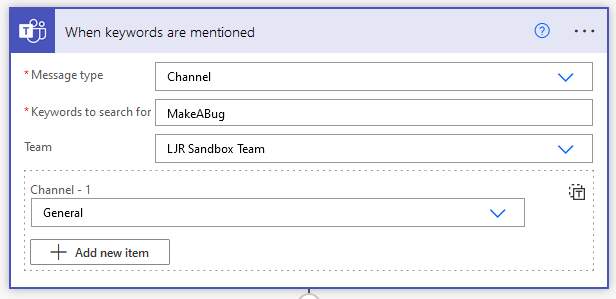
You can use Power Automate to create an ADO work item (bug, user story, etc) when a user posts into specific Teams channel.

Log into Power Automate and create a new workflow. Find a Teams trigger that suits your need – in my case, I wanted to use a key word (you could even use different key words to create work items in different projects or with different content). Note that automation cycles accrue based on execution — so if you elect to link up to a busy Teams channel and filter for keywords to indicate you want an ADO item created, you may be “wasting” workflow cycles. In our case, I have a “user group” Teams space and set up a special channel where users can submit bug and feature requests. This means workflow cycles are accrued when someone specifically wishes to create an ADO item not when messages are posted into the user group’s general chat channels.

You can source messages from channels or group chats in the “Message type” selection. You cannot use hash-tags as key words! The workflow execution reports a gateway error. Select the Team and channel(s) that you want the workflow to monitor.

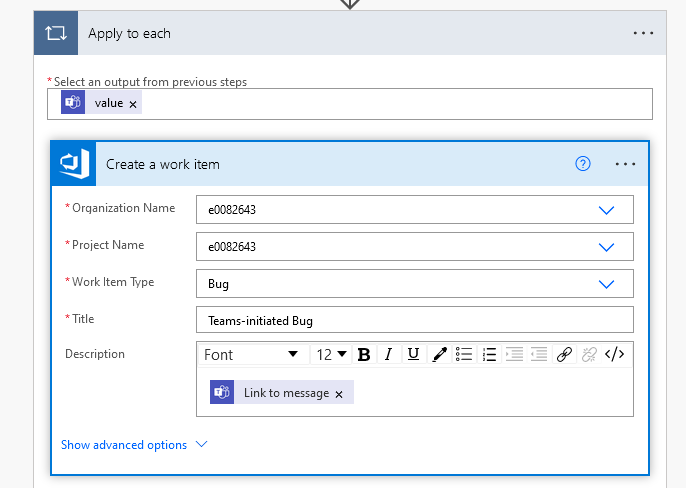
Add a new step to “create a work item” from Azure DevOps

Configure the project into which you want to create the work item – the organization and project name, the type of work item, and content of the work item.

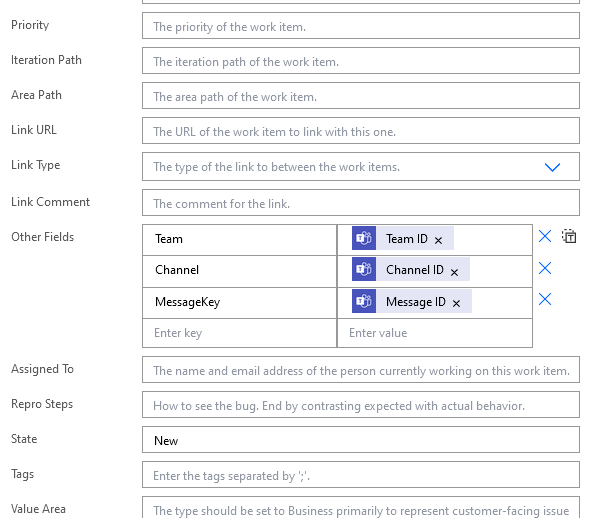
If you want to set priority, add an assignment, etc – click on “Show advanced options”. I added a few fields to provide a clue as to where the bug report came from.

Save the workflow and post a message in your channel with the key word. Go into the ADO project work items; your Teams-initiated bug should be there.


Verifying Connectivity From Locked Down Windows Desktop or Server

We frequently encounter individuals who cannot use something from their server or desktop — but their IT group has Windows locked down so they cannot just telnet to the destination on the port and check if it’s connecting. Windows doesn’t have a whole lot of useful tools of its own. Fortunately, I’ve found that nmap.org publishes a local install zip file for Windows.

Download latest Win32 zip file from https://nmap.org/dist/ — on 8/8/2023, that is https://nmap.org/dist/nmap-7.92-win32.zip


Extract the zip file contents somewhere (I use tmp, right in downloads works, whatever)
Open command prompt and change directory (cd) into the folder where nmap was extracted — e.g. cd /d c:\tmp\nmap-7.92

— A quick trick for opening a command prompt to a directory location: If you have a file explorer window open to the location, click into the header where the file path is shown and remove the text that appears there

Type cmd and hit enter

And voila — a command prompt opened to the same location you were viewing

In the command prompt, run an map command to test a specific port (-p) and host. Since some hosts do not return ICMP requests, I also include -P0 instructing nmap not to attempt pinging the host first. This example verifies we have connectivity to google.com on port 443 (https)


Linux: Disabling Wild Local DNS Server Thing (i.e. systemd-resolved)

I am certain there is some way to configure systemd-resolved to actually use internal DNS servers so you can resolve your local hostnames. But nothing I’ve tried have worked, and I don’t actually need this wild local DNS thing.

Here’s the problem — systemd-resolved creates an /etc/resolv.conf file that uses a localhost address as the nameserver — and that may very well forward requests out to Internet DNS servers. Which don’t have any clue about your internal DNS zones — thus you can no longer resolve local hostnames. Whenever I see 127.0.0.53 in /etc/resolv.conf, I know systemd-resolved is at work.

[lisa@linux ~]# cat /etc/resolv.conf
# This is /run/systemd/resolve/stub-resolv.conf managed by man:systemd-resolved(8).
# Do not edit.
#
# This file might be symlinked as /etc/resolv.conf. If you're looking at
# /etc/resolv.conf and seeing this text, you have followed the symlink.
#
# This is a dynamic resolv.conf file for connecting local clients to the
# internal DNS stub resolver of systemd-resolved. This file lists all
# configured search domains.
#
# Run "resolvectl status" to see details about the uplink DNS servers
# currently in use.
#
# Third party programs should typically not access this file directly, but only
# through the symlink at /etc/resolv.conf. To manage man:resolv.conf(5) in a
# different way, replace this symlink by a static file or a different symlink.
#
# See man:systemd-resolved.service(8) for details about the supported modes of
# operation for /etc/resolv.conf.

nameserver 127.0.0.53
options edns0 trust-ad
search example.com

To disable this local name resolution, stop and disable systemd-resolved, unlink the /etc/resolv.conf file it created, and restart NetworkManager

[lisa@linux ~]# systemctl stop systemd-resolved.service
[lisa@linux ~]# systemctl disable systemd-resolved.service
[lisa@linux ~]# unlink /etc/resolv.conf
[lisa@linux ~]# systemctl restart NetworkManager
Removed /etc/systemd/system/multi-user.target.wants/systemd-resolved.service.
Removed /etc/systemd/system/dbus-org.freedesktop.resolve1.service.

Voila, /etc/resolv.conf is now populated with reasonable internal DNS servers, and you can resolve local hostnames.

[lisa@linux ~]# cat /etc/resolv.conf
# Generated by NetworkManager
search example.com
nameserver 10.1.2.33
nameserver 10.1.2.66

Cisco Aironet — Unable to Access Wireless Device That Moved to Different Access Point

I think this is a fairly esoteric issue — something that happens frequently enough but doesn’t actually impact functionality so anyone notices. We got a new WiFi doorbell that we set up inside (and could access it), took outside (and could access it) … but, when we went back inside? We could not access the doorbell. No HTTPS, no RTSP, no ICMP. Nothing.

Cisco access points maintain a list of associated wireless clients. These may also be kept in an arp table, although arp caching appears to be disabled by default. So device was on AP1, moved to AP2. Clients on AP2 (or AP3, or AP4) were able to access it since the switch has it registered on the port for AP2. Anything on AP1, however, cannot access the device. The MAC address still appeared in the associations table for AP1. You can set a lower activity timeout — the default was one day — to clear devices out more promptly. But … if the device communicates outside of its new WAP, how frequently is it going to be talking to a device on its old WAP? Generally, we’re talking to our servers (wired) or the Internet (also wired). So technically … Scott’s cell phone couldn’t reach my cell phone when I go from the bedroom to the office. But we never notice because we have minimal peer to peer communication. It’s not like doorbells are going to go walking about normally … but it was good to know a quick AP reboot would allow our cell phones to pull up the doorbell’s video feed.

Zoneminder – Don’t forget to set the server

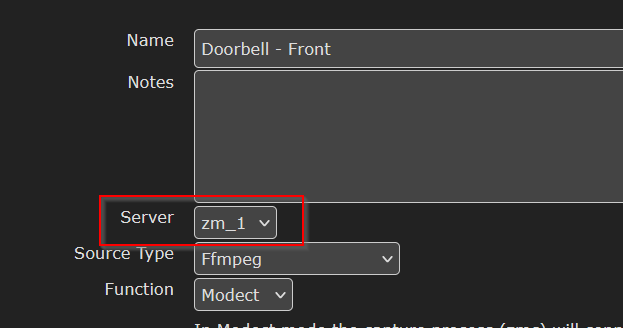
We got some new IP cameras — devices that support direct RTSP access to the video stream — but I could not get them to work with Zoneminder. No matter what I tried, it reported that shm is not connected. My /dev/shm directory wasn’t full, the permissions were fine. In short, there was no reason that the memory map file couldn’t have been created. I could not figure it out — and, in trying to delete a 2 GB log file so it would be more readable … the server crashed and would only boot in recovery mode.

Sigh! Fortunately, I was able to repair the file system and get the server back online. I was working, so Scott looked at the cameras and had them working almost immediately. Turns out the default, when you add a new device, is that the server is set to ‘None’ … which evidently leads to the “unable to connect to monitor”, “Monitor shm is not connected”, and “Can’t open memory map file” errors I was seeing. He just selected the zoneminder server from the dropdown, saved it, and voila — a camera stream.

Reolink Wireless Doorbell – First Impressions

A friend of Scott’s got a Eufy doorbell on sale from Amazon, so we started checking out camera/doorbell devices again. Eufy didn’t seem to allow local access to the video stream. We found three companies that did offer direct access to the RTSP stream: Doorbird, Amcrest, and Reolink. The Doorbird ones were like a thousand dollars … and, for way under a grand, I could DIY something. Amcrest looked like a viable solution, but Amazon had the Reolink ones for sixty bucks less — including a $10 “prime member” discount price. We bought two and set them up inside the house.

The physical hardware is an oval shaped plastic box with a camera & IR ring near the top and a glowing button (you can turn the LED light off in the config) for visitors to press. I wish the logo wasn’t printed onto the plastic, though.

Once you enable RTSP under the advanced network settings, you can access the primary (high resolution) video feed at rtsp://username:password@doorbell.example:554/h264Preview_01_main and the secondary (640×480) video feed at rtsp://username:password@doorbell.example:554/h265Preview_01_sub

I like that you can set up a “read only” user — our Zoneminder installation doesn’t need to be able to configure the devices. It will also grab a photo to make a time lapse series — while seeing the driveway over time might not be too interesting, having a time lapse of our front yard will be really cool. This requires adding an SD card to the doorbell, but still very cool.

5GHz worked fine in the house, but we had a lot of drop-outs once it was mounted at the door.

You can upload your own key pair for the web server, so visiting the https page doesn’t throw an invalid certificate error. This is a personal thing that really bothers me with a lot of IoT implementations. It’s such a simple thing — there’s already a locally generated key pair, why not let me upload my own with a hostname or SAN that matches what I will be accessing. Even if you don’t have your own CA — you can get a free cert from Let’s Encrypt.

The fisheye camera catches a large field — we can see the entire front entrance — although I now understand why there are dual-camera doorbells with a “package camera”. If the camera is angled so you can see the face of someone pressing the button, you cannot see their feet. Or the ground where a package would be placed.

I don’t like that there doesn’t appear to be any way to ring the house door chime. There also doesn’t seem to be a way to use different tones for different doorbells. While we’ll get motion alerts from Zoneminder and be able to view both doorbell video feeds to see where the ring occurred … it would be nice to assign unique chimes to each doorbell.