Category: System Administration

Using Screen to Access Console Port

We needed to console into some Cisco access points — RJ45 to USB to plug into the device console port and the laptop’s USB port? Check! OK … now what? Turns out you can use the screen command as a terminal emulator. The basic syntax is screen <port> <baud rate> — since the documentation said to use 9600 baud and the access point showed up on /dev/ttyUSB0, this means running:


screen /dev/ttyUSB0 9600

More completely, screen <port> <baud rate>,<7 or 8 bits per byte>,<enable or disable sending flow control>,<enable or disable rcving flow control>,<keep or clear the eight bit in each byte>

screen /dev/ttyUSB0 9600,cs8,ixon,ixoff,istrip 
- or - 
screen /dev/ttyUSB0 9600,cs7,-ixon,-ixoff,-istrip

NGINX Auth Proxy

This example uses Kerberos for SSO authentication using Docker-ized NGINX. To instantiate the sandbox container, I am mapping the conf.d folder into the container and publishing ports 80 and 443

docker run -dit --name authproxy -v /usr/nginx/conf.d:/etc/nginx/conf.d -p 80:80 -p 443:443 -d centos:latest

Shell into the container, install Kerberos, and configure it to use your domain (in this example, it is my home domain.

docker exec -it authproxy bash

# Fix the repos – this is a docker thing, evidently …
cd /etc/yum.repos.d/
sed -i 's/mirrorlist/#mirrorlist/g' /etc/yum.repos.d/CentOS-*
sed -i 's|#baseurl=http://mirror.centos.org|baseurl=http://vault.centos.org|g' /etc/yum.repos.d/CentOS-*
# And update everything just because
dnf update
# Install required stuff
dnf install vim wget git gcc make pcre-devel zlib-devel krb5-devel

Install NGINX from source and include the spnego-http-auth-nginx-module module

wget http://nginx.org/download/nginx-1.21.6.tar.gz
gunzip nginx-1.21.6.tar.gz
tar vxf nginx-1.21.6.tar
cd nginx-1.21.6/
git clone https://github.com/stnoonan/spnego-http-auth-nginx-module.git
dnf install gcc make pcre-devel zlib-devel krb5-devel
./configure --add-module=spnego-http-auth-nginx-module
make
make install

Configure Kerberos on the server to use your domain:

root@aadac0aa21d5:/# cat /etc/krb5.conf
includedir /etc/krb5.conf.d/
[logging]
default = FILE:/var/log/krb5libs.log
kdc = FILE:/var/log/krb5kdc.log
admin_server = FILE:/var/log/kadmind.log
[libdefaults]
dns_lookup_realm = false
ticket_lifetime = 24h
renew_lifetime = 7d
forwardable = true
rdns = false
default_realm = EXAMPLE.COM
# allow_weak_crypto = true
# default_tgs_enctypes = arcfour-hmac-md5 des-cbc-crc des-cbc-md5
# default_tkt_enctypes = arcfour-hmac-md5 des-cbc-crc des-cbc-md5
default_ccache_name = KEYRING:persistent:%{uid}
[realms]
EXAMPLE.COM= {
   kdc = DC01.EXAMPLE.COM
   admin_server = DC01.EXAMPLE.COM
}

Create a service account in AD & obtain a keytab file:

ktpass /out nginx.keytab /princ HTTP/docker.example.com@example.com -SetUPN /mapuser nginx /crypto AES256-SHA1 /ptype KRB5_NT_PRINCIPAL /pass Th2s1sth3Pa=s -SetPass /target dc01.example.com

Transfer the keytab file to the NGINX server. Add the following to the server{} section or location{} section to require authentication:

auth_gss on;
auth_gss_keytab /path/to/nginx/conf/nginx.keytab;
auth_gss_delegate_credentials on;

You will also need to insert header information into the nginx config:

proxy_pass http://www.example.com/authtest/;
proxy_set_header Host "www.example.com"; # I need this to match the host header on my server, usually can use data from $host
proxy_set_header X-Original-URI $request_uri; # Forward along request URI
proxy_set_header X-Real-IP $remote_addr; # pass on real client's IP
proxy_set_header X-Forwarded-For "LJRAuthPrxyTest";
proxy_set_header X-Forwarded-Proto $scheme;
proxy_set_header Authorization $http_authorization;
proxy_pass_header Authorization;
proxy_set_header X-WEBAUTH-USER $remote_user;
proxy_read_timeout 900;

Run NGINX: /usr/local/nginx/sbin/nginx

In and of itself, this is the equivalent of requiring authentication – any user – to access a site. The trick with an auth proxy is that the server must trust the header data you inserted – in this case, I have custom PHP code that looks for X-ForwardedFor to be “LJRAuthPrxyTest” and, if it sees that string, reads X-WEBAUTH-USER for the user’s logon name.

In my example, the Apache site is configured to only accept connections from my NGINX instance:

<RequireAll>
     Require ip 10.1.3.5
</RequireAll>

This prevents someone from playing around with header insertion and spoofing authentication.

Some applications allow auth proxying, and the server documentation will provide guidance on what header values need to be used.


Using urandom to Generate Password

Frequently, I’ll use password generator websites to create some pseudo-random string of characters for system accounts, database replication,etc. But sometimes the Internet isn’t readily available … and you can create a decent password right from the Linux command line using urandom.

If you want pretty much any “normal” character, use tr to pull out all of the other characters:

'\11\12\40-\176'

Or remove anything outside of upper case, lower case, and number characters using

a-zA-Z0-9

Pass the output to head to grab however many characters you actually want. Voila — a quick password.

Linux Disk Utilization – Reducing Size of /var/log/sa

We occasionally get alerted that our /var volume is over 80% full … which generally means /var/log has a lot of data, some of which is really useful and some of it not so useful. The application-specific log files already have the shortest retention period that is reasonable (and logs that are rotated out are compressed). Similarly, the system log files rotated through logrotate.conf and logrotate.d/* have been configured with reasonable retention.

Using du -sh /var/log/ showed the /var/log/sa folder took half a gig of space.

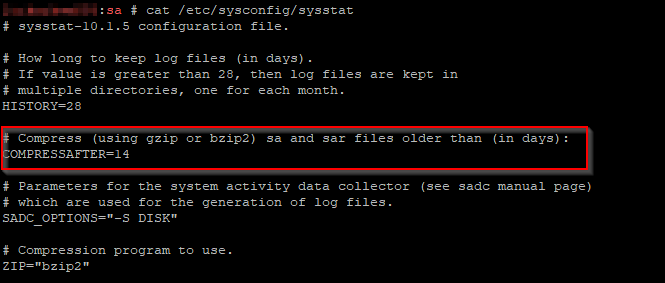
This is the daily output from sar (a “daily summary of process accounting” cron’d up with /etc/cron.d/sysstat). This content doesn’t get rotated out with the expected logrotation configuration. It’s got a special configuration at /etc/sysconfig/sysstat — changing the number of days (or, in my case, compressing some of the older files) is a quick way to reduce the amount of space the sar output files consume).

Certbot — Plugin Not Found

I got a certificate expiry warning this morning — an oddity because I’ve had a cron task renewing our certificates for quite some time. Running the cron’d command manually … well, that would do it! The plug-in for my DNS registrar isn’t found.

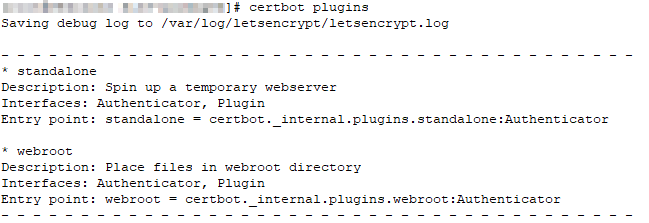
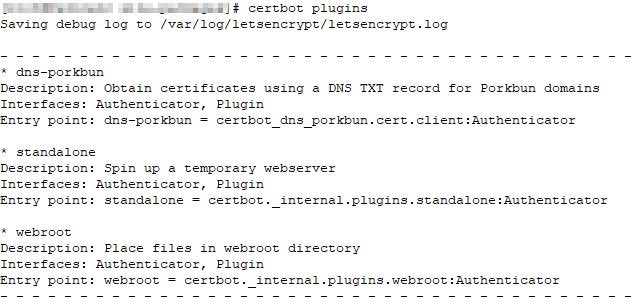
Checking the registered plugins, well … it’s not there.

Except it’s there — running “pip install certbot-dns-porkbun” (and even trying pip3 just to make sure) tells me it’s already installed. Looking around for the files, this turns out to be one of those things that there’s obviously a right way to solve and a quick way to solve. For some reason, /usr/local/lib is not being searched for packages even though it’s included in my PYTHONPATH. The right thing to do is figure out why this is happening. Quick solution? Symlink the things into where they need to be

ln -s /usr/local/lib/python3.10/site-packages/certbot_dns_porkbun /usr/lib/python3.10/site-packages/
ln -s /usr/local/lib/python3.10/site-packages/pkb_client /usr/lib/python3.10/site-packages/
ln -s /usr/local/lib/python3.10/site-packages/filelock /usr/lib/python3.10/site-packages/
ln -s /usr/local/lib/python3.7/site-packages/tldextract /usr/lib/python3.10/site-packages/
ln -s /usr/local/lib/python3.10/site-packages/requests_file /usr/lib/python3.10/site-packages/

ln -s /usr/local/lib/python3.10/site-packages/certbot_dns_porkbun-0.2.1.dist-info /usr/lib/python3.10/site-packages/
ln -s /usr/local/lib/python3.10/site-packages/filelock-3.6.0.dist-info /usr/lib/python3.10/site-packages/
ln -s /usr/local/lib/python3.10/site-packages/pkb_client-1.2.dist-info /usr/lib/python3.10/site-packages/
ln -s /usr/local/lib/python3.7/site-packages/tldextract-3.0.2.dist-info/ /usr/lib/python3.10/site-packages/
ln -s /usr/local/lib/python3.10/site-packages/requests_file-1.5.1.dist-info /usr/lib/python3.10/site-packages/

Voila, the plug-in exists again (and my cron task successfully renews the certificate)

Linux – Clearing Caches

I encountered some documentation at work that provided a process for clearing caches. It wasn’t wrong per se, but it showed a lack of understanding of what was being performed. I enhanced our documentation to explain what was happening and why the series of commands was redundant. Figured I’d post my revisions here in case they’re useful for someone else.

Only clean caches can be dropped — dirty ones need to be written somewhere before they can be dropped. Before dropping caches, flush the file system buffer using sync — this tells the kernel to write dirty cache pages to disk (or, well, write as many as it can). This will maximize the number of cache pages that can be dropped. You don’t have to run sync, but doing so optimizes your subsequent commands effectiveness.

Page cache is memory that’s held after reading a file. Linux tends to keep the files in cache on the assumption that a file that’s been read once will probably be read again. Clear the pagecache using echo 1 > /proc/sys/vm/drop_caches — this is the safest to use in production and generally a good first try.

If clearing the pagecache has not freed sufficient memory, proceed to this step. The dentries (directory cache) and inodes cache are memory held after reading file attributes (run strace and look at all of those stat() calls!). Clear the dentries and inodes using echo 2 > /proc/sys/vm/drop_caches — this is kind of a last-ditch effort for a production environment. Better than having it all fall over, but things will be a little slow as all of the in-flight processes repopulate the cached data.

You can clear the pagecache, dentries, and inodes using echo 3 > /proc/sys/vm/drop_caches — this is a good shortcut in a non-production environment. But, if you’re already run 1 and 2 … well, 3 = 1+2, so clearing 1, 2, and then 3 is repetitive.


Another note from other documentation I’ve encountered — you can use sysctl to clear the caches, but this can cause a deadlock under heavy load … as such, I don’t do this. The syntax is sysctl -w vm.drop_caches=1 where the number corresponds to the 1, 2, and 3 described above.


Analyzing Postgresql Tmp Files

Postgresql stores temporary files for in-flight queries — these don’t normally hang around for long, but sorting a large amount of data or building a large hash can create a lot of temp files. A dead query that was sorting a large amount of data or …. well, we’ve gotten terabytes of temp files associated with multiple backend process IDs. The file names are algorithmic — a string “pgsql_tmp followed by the backend PID, a period, and then some other number. Thus, I can extract the PID from each file name and provide a summary of the processes associated with temp files.

To view a summary of the temp files within the pgsql_tmp folder, run the following command to print a count then a PID number:
ls /path/to/pgdata/base/pgsql_tmp | sed -nr 's/pgsql_tmp([0-9]*)\.[0-9]*/\1/p' | sort | uniq -c

A slightly longer command can be used to reverse the columns – producing a list of process IDs followed by the count of files for that PID – too:
ls /path/to/pgdata/base/pgsql_tmp | sed -nr 's/pgsql_tmp([0-9]*)\.[0-9]*/\1/p' | sort | uniq -c | sort -k2nr | awk '{printf("%s\t%s\n",$2,$1)}END{print}'