Category: Coding

HTML Opacity v/s Alpha

I am building a page that allows employees to search for public MS Teams groups — for some reason, Teams uses a ‘starts with’ search, and our staff rarely manages to find the public Teams that are out there. I wanted the list of teams and descriptions to have a visible line separation, and a table border looked bad with the enterprise color scheme. I decided to use even/odd table rows to display a slightly lighter background color. I set an opacity on the background so the actual background image is still visible.

My font colors changed! The opacity applied to the text as well.

tr:nth-child(even) {background-color: rgb(52,52,52); opacity: 0.5;}

Instead of setting an opacity on the row, I added an alpha channel to the row background color without impacting the text within table cells.

tr:nth-child(even) {background-color: rgba(52,52,52,0.5);}


List locally installed Python modules

I’ve been helping someone else get an Azure bot running on their system … which involves a lot of “what do I have that you don’t” … for which listing locally installed python modules is incredibly helpful.

python -c “import pkg_resources; print([(d.project_name, d.version) for d in pkg_resources.working_set])”


[lisa@cent6 ljr]# python -c “import pkg_resources; print([(d.project_name, d.version) for d in pkg_resources.working_set])”
[(‘scipy’, ‘1.2.0’), (‘scikit-learn’, ‘0.20.2’), (‘PyYAML’, ‘3.13’), (‘PyMySQL’, ‘0.9.3’), (‘pycares’, ‘2.4.0’), (‘numpy’, ‘1.16.0’), (‘multidict’, ‘4.5.2’), (‘Cython’, ‘0.29.4’), (‘coverage’, ‘4.5.2’), (‘aiohttp’, ‘3.0.9’), (‘yarl’, ‘1.3.0’), (‘wrapt’, ‘1.11.1’), (‘vcrpy’, ‘2.0.1’), (‘typing’, ‘3.6.6’), (‘sklearn’, ‘0.0’), (‘singledispatch’, ‘3.4.0.3’), (‘sharepy’, ‘1.3.0’), (‘requests-toolbelt’, ‘0.9.1’), (‘requests-oauthlib’, ‘1.2.0’), (‘pytest’, ‘4.1.1’), (‘pytest-cov’, ‘2.6.1’), (‘pytest-asyncio’, ‘0.10.0’), (‘PyJWT’, ‘1.7.1’), (‘py’, ‘1.7.0’), (‘pluggy’, ‘0.8.1’), (‘oauthlib’, ‘3.0.1’), (‘nltk’, ‘3.4’), (‘msrest’, ‘0.4.29’), (‘more-itertools’, ‘5.0.0’), (‘isodate’, ‘0.6.0’), (‘ConfigArgParse’, ‘0.14.0’), (‘certifi’, ‘2018.11.29’), (‘botframework-connector’, ‘4.0.0a6’), (‘botbuilder-schema’, ‘4.0.0a6’), (‘botbuilder-azure’, ‘4.0.0a6’), (‘azure-devtools’, ‘1.1.1’), (‘azure-cosmos’, ‘3.0.0’), (‘attrs’, ‘18.2.0’), (‘atomicwrites’, ‘1.2.1’), (‘async-timeout’, ‘2.0.1’), (‘aiodns’, ‘1.2.0’), (‘botbuilder-core’, ‘4.0.0a6’), (‘systemd-python’, ‘234’), (‘smartcols’, ‘0.3.0’), (‘setools’, ‘4.1.1’), (‘rpm’, ‘4.14.2.1’), (‘gpg’, ‘1.11.1’), (‘cryptography’, ‘2.3’), (‘cffi’, ‘1.11.5’), (‘urllib3’, ‘1.24.1’), (‘SSSDConfig’, ‘2.0.0’), (‘slip’, ‘0.6.4’), (‘slip.dbus’, ‘0.6.4’), (‘six’, ‘1.11.0’), (‘setuptools’, ‘40.4.3’), (‘sepolicy’, ‘1.1’), (‘requests’, ‘2.20.0’), (‘PySocks’, ‘1.6.8’), (‘pyparsing’, ‘2.2.0’), (‘pyOpenSSL’, ‘18.0.0’), (‘pykickstart’, ‘3.16’), (‘PyGObject’, ‘3.30.4’), (‘pycparser’, ‘2.14’), (‘ply’, ‘3.9’), (‘pip’, ‘18.1’), (‘ordered-set’, ‘2.0.2’), (‘isc’, ‘2.0’), (‘IPy’, ‘0.81’), (‘iotop’, ‘0.6’), (‘iniparse’, ‘0.4’), (‘idna’, ‘2.7’), (‘distro’, ‘1.3.0’), (‘decorator’, ‘4.3.0’), (‘chardet’, ‘3.0.4’), (‘asn1crypto’, ‘0.24.0’)]

Did you know … you can perform CRUD operations on SharePoint Lists?

Not crud like “ugg, that’s a bunch of crud … let’s load it up in a SharePoint list to store it forever!” – that wouldn’t make sense at all. In programming-speak, CRUD is an abbreviation for Create, Update, Read, Delete – the basic types of operations for data storage. And you can create, update, read, and delete SharePoint list items through the REST API.

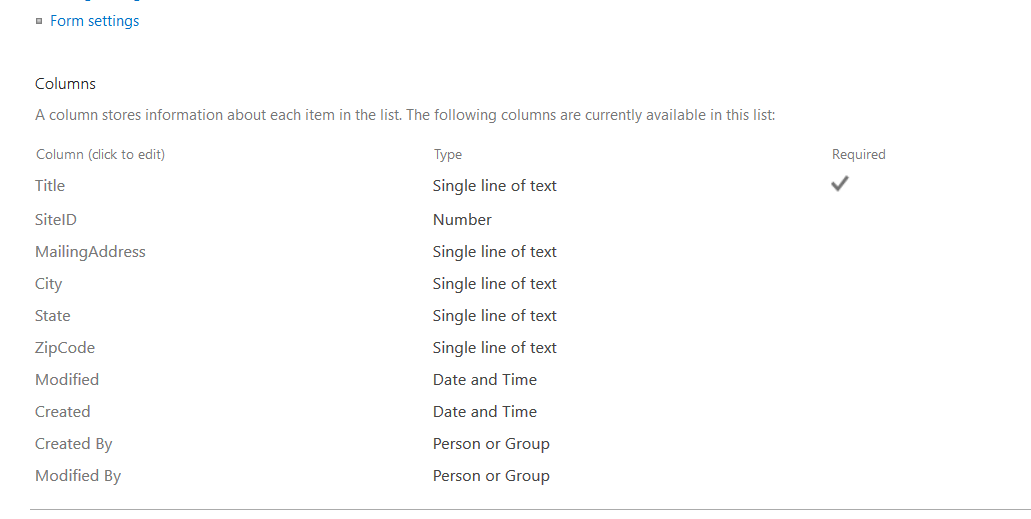
First, you’ll need a list. Here, I am using a sample list that has columns for SiteID, MailingAddress, City, State, and ZipCode – the usual information if you’re going to use a LOOKUP column to correlate a location in a record with address details for the location (i.e. there’s no reason to type 1925 Enterprise Parkway and such in every order you want to ship to the Twinsburg office).

And you need some sort of code that communicates with the REST API – something that sends HTTPS calls. In the example code, I am using Python. Functions, along with example code to use those functions can be found at https://github.com/ljr55555/spoRestAPICRUD. Clone the repository locally.

You will find a config.sample – I use this as a template for storing user-specific configuration parameters. Copy config.sample to config.py and edit config.py. The actual config.py is included in the .gitignore file, so retrieving updates from the repository won’t wipe our your settings.

There are a handful of values you will need to set. Most of the values you can get from your list’s web address. Open your list in the web browser of your choice and find the information in the address line:

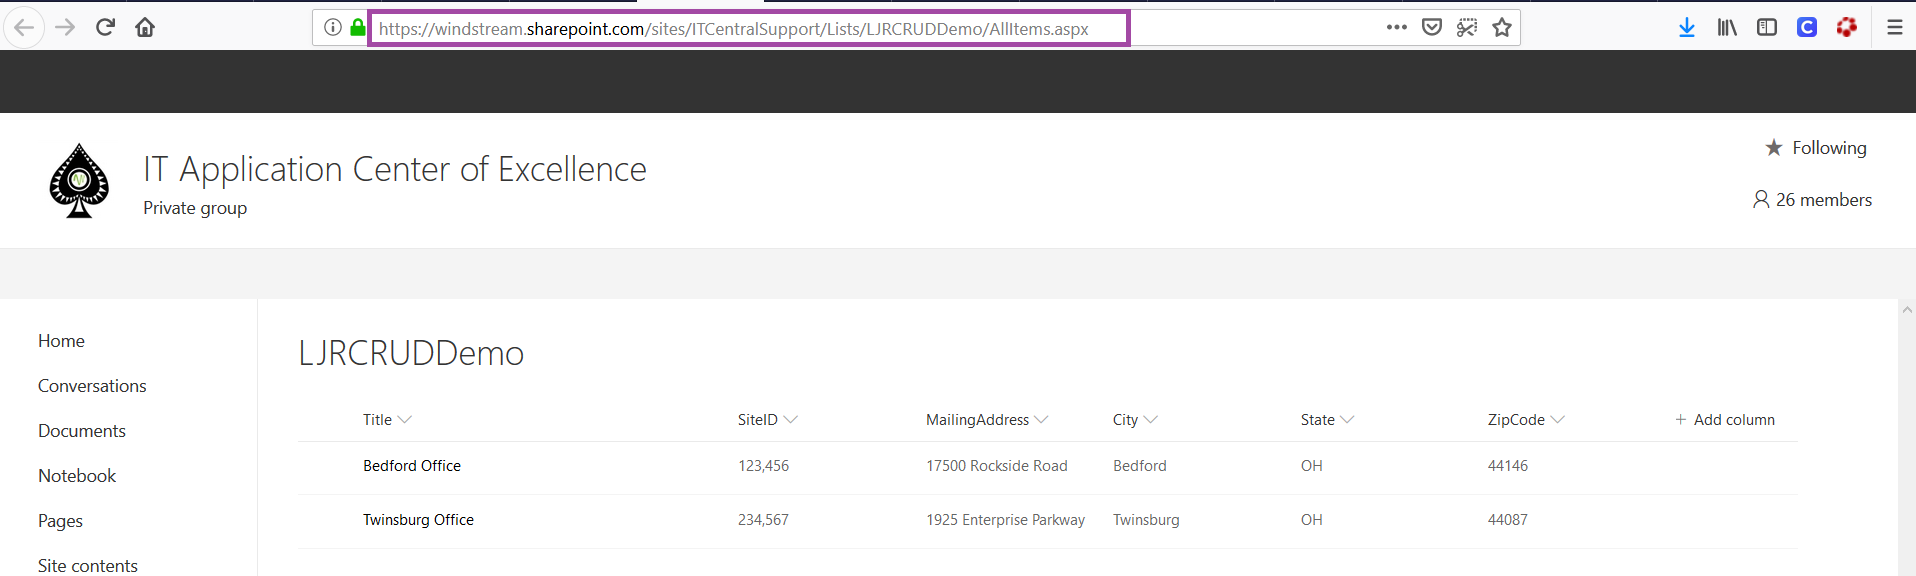
There are three values we need to extract from this URL – the SharePoint tenant address, your SharePoint site name, and the list name

Edit config.py and modify the following variables with your list-specific information

strConnectURL = “tenant.sharepoint.com

strContextURI = “https://tenant.sharepoint.com/sites/SiteName/_api/contextinfo”

strListInfoURI = “https://tenant.sharepoint.com/sites/SiteName/_api/web/lists/GetByTitle(‘ListName‘)”

Then you need some credentials – this config file will need to be updated when the account password changes, so you may wish to use a non-user account with a very long password that changes less often.

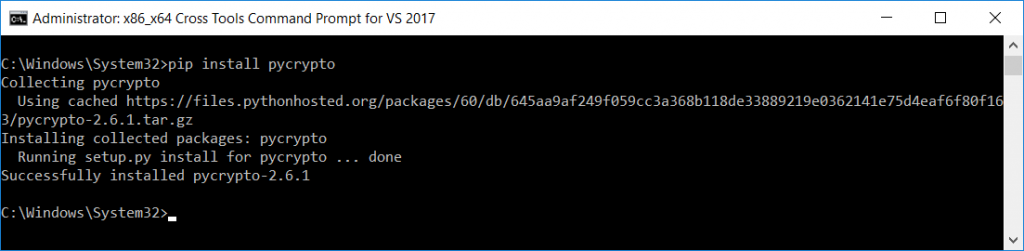
Obviously, typing a username and password in clear text is a bad idea. I’m using simplecrypt to keep an encrypted password in the config file which is decrypted using a key in the script file. Anyone who obtains both files can decrypt the password – in my production code, the key comes from another location to reduce the probability of someone accessing the key file.

Use stashStringForConfig.py to generate the string to use for the username and password values – change strKey to match whatever you are using for your key, and change strString to your user id. Run the script and copy the output into your config.py file. Change strString to your password and repeat the process.

C:\ljr\git\spoRestAPICRUD>python stashStringForConfig.py

b’c2MAAnHWW1nqXuc4bO+pt8q1FjTG6Q5CYNz1O5ORHnJxl8vBOpGKj0HxVSYdGa1o+Ij/VicrQLTWTyU7P0StspMEJ7zBe/qtFWuHGrfEvnLO5dU=’

That’s it for configuration – at this point, if you have a list with the same columns I do, you can run the script.
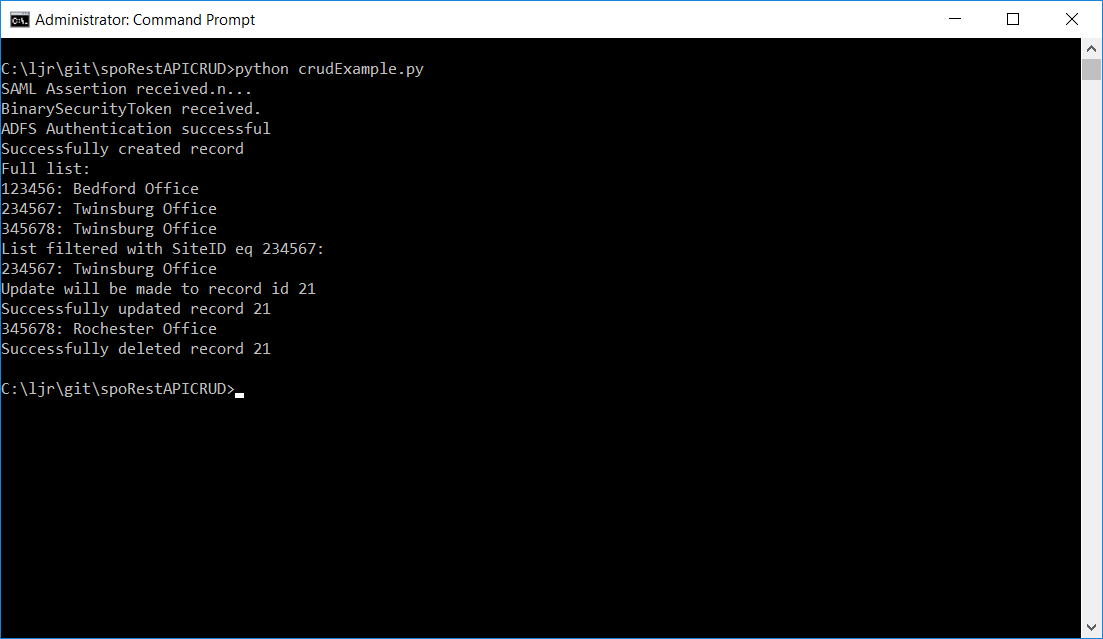
Voila, records!

What’s the script doing? Well – CRUD, of course!

Connecting To SharePoint Online – I am using a modified version of sharepy which can be found in the develop branch of my fork of the repository. This is a requests wrapper that handles authentication to SharePoint Online. The connection, in my script, is named spoConnection. The arguments supplied are sourced from config.py

spoConnection = sharepy.connect(strConnectURI,strUID,strPass)

Creation – You need a dictionary with your data. The required metadata type value is retrieved from your list. The remaining key:value pairs in the dictionary are the column names and record values, respectively.

{“__metadata”: { “type”: strListItemEntityTypeFullName}, “Title”: “Bedford Office”, “SiteID”: ‘123456’, “MailingAddress”: “17500 Rockside Road”, “City”: “Bedford”, “State”: “OH”, “ZipCode”: “44146”}

The writeNewRecord function will insert the record into your list. The dictionary containing my record is called strBody (because it ends up being the HTTP POST body).

iNewRecordResult = writeNewRecord(spoConnection, strContextURI, strListDataURI, strBody)

Read – Now that we have records, we can retrieve the full list or filter to find specific records. To find all records, run findSPRecord – the arguments are the SharePoint connection and the URI for the list.

jsonResult = findSPRecord(spoConnection, strListDataURI)

If you want to return a filtered subset of data, add the column on which to filter, the filter operator, and the value. You can construct more complex ODATA filters – see the ODATA query operations supported in the SharePoint REST API for more information.

jsonResult = findSPRecord(spoConnection, strListDataURI, “SiteID”, “eq”, “234567”)

Update – I intentionally included incorrect data in one of my create lines – the Twinsburg office isn’t in Rochester NY! To update a record, you need it’s internal ID number. The findSPRecordID function has the same parameters as findSPRecord, but instead of returning the full record, it returns the integer record ID.

iRecordToUpdate = findSPRecordID(spoConnection, strListDataURI, “SiteID”, “eq”, “345678”)

Now that we have a record number, we also need a dictionary with the new values. Values that are not changing do not need to be included – just anything value you want to update. As with the record creation, the metadata type is determined programmatically.

dictRecordPatch = {“__metadata”: { “type”: strListItemEntityTypeFullName}, ‘Title’: “Rochester Office”}

And then updateRecord is called to write the new information into the selected record.

iRecordPatchResult = updateRecord(spoConnection, strContextURI, strListDataURI, dictRecordPatch)

Delete – Delete operations are similar to update operations – you need to find the internal record ID number to delete it. There’s no validation – nothing checks that the City for item #x is Rochester.

iDeletionResult = deleteRecord(spoConnection, strContextURI, strListDataURI, iRecordToDelete)

By combining CRUD operations, you can use a SharePoint list as a user-created and user-administered database. SharePoint still stores its information in a Microsoft SQL database, and going through the REST API to interact with your data adds overhead … so this isn’t a good approach for someone with an enormous data set where views would speed up data access or complex join operations are warranted. But for someone with fairly straight-forward database requirements, you may be able to do-it-yourself using SharePoint lists.


Installing pycrypto On WIN10 with Visual Studio 2017

Yes, I know it’s old and no longer maintained … but it’s also what my function already uses, and I don’t want to take a few hours to get moved over to pycryptodome. You can install pycrypto on Windows 10 running Visual Studio 2017. But there’s a trick. Find the location of stdint.h in your VS installation.

Open x86_x64 Cross Tools Command Prompt For VS 2017

Run:

set CL=-FI"C:\Program Files (x86)\Microsoft Visual Studio\2017\Enterprise\VC\Tools\MSVC\14.14.26428\include\stdint.h"

where the bit in quotes is the path to your stdint.h (VS build version may differ, which will change the path).

Now, from within the Cross Tools Command Prompt, run:

pip install pycrypto

Voila — it installs:

SharePoint Column Naming Inconsistency

I have been interfacing with SharePoint list data via the REST API and assumed the name I typed onto the column was, well, the column’s name. It’s not!

In the ‘normal’ view, click ‘Add column’ and add a column.

Switch to “Quick edit” view.

Add a column using the “+” symbol.

What do we have? The columns look like they have the names I’ve supplied through either method. But … hover your mouse over the column and check out the URL for the column.

While the ones added using “Add Column” are named exactly what I typed, the ones added in quick edit have four-character pseudo-random strings instead of the name I typed.

https://tenant.sharepoint.com/sites/SiteName/_layouts/15/FldEdit.aspx?List=%2MZQ472C3%2F5P5D%2M3M4%2P9T5%2DJ3K5CE52M9I1%7D&Field=AddedViaAddColumn

https://tenant.sharepoint.com/sites/SiteName/_layouts/15/FldEdit.aspx?List=%9MZQ472C3%9F5P5D%2M3M4%2P9T5%2DJ3K5CE52M9I1%7D&Field=dwev

https://tenant.sharepoint.com/sites/SiteName/_layouts/15/FldEdit.aspx?List=%9MZQ472C3%9F5P5D%2M3M4%2P9T5%2DJ3K5CE52M9I1%7D&Field=fqkm

https://tenant.sharepoint.com/sites/SiteName/_layouts/15/FldEdit.aspx?List=%9MZQ472C3%9F5P5D%2M3M4%2P9T5%2DJ3K5CE52M9I1%7D&Field=NumberViaAddColumn

For GUI access to your data, this is immaterial – the friendly name displays on forms; but, when you are accessing data via the REST API, you must use the internal field name and not the display name you think is assigned to the column. It took me a long time to figure out why my REST call kept saying there was no field “uid” when I could clearly see a column with that name in my list.


SharePoint Rest API Does Not Allow Unindexed Queries

I’ve been developing code templates for CRUD operations (that’s a real acronym — Create, Read, Update, Delete) against SharePoint — we need to use SharePoint lists to replace database tables. Retrieving information worked fine until I tried to filter the data through the REST call. SharePoint throws a generic error about exceeding some admin-set limit. (1) I know the limit, I can see the limit. The limit is 5,000, and I know my filtered result set is 121 records. WAY lower than 5,000. Oh, and (2) I can run the query without the filter — I’m paging it! — and read all 29,887 records so what does the limit have to do with anything? Reasoning with an HTTP response … well, doesn’t work. No matter how unassailable my argument is, the API call still returned:

{"error":
    {"code":"-2147024860, Microsoft.SharePoint.SPQueryThrottledException",
     "message":{"lang":"en-US",
       "value":"The attempted operation is prohibited because it exceeds the list 
                view threshold enforced by the administrator."}}}

It is, it turns out, a poorly worded error. I started thinking about the query limits on my LDAP servers — we have hard limits to operations and also require most people perform queries against indexed attributes. It’s computationally expensive to search through unindexed attributes (and the Right Thing To Do, generally speaking, is add an index for something that is a frequent query target). I wondered if there was an analogous “no unindexed queries” setting in SharePoint. Quick enough to test — add an index on the column(s) you use in the filter. In the site content listing, click the sideways hamburger menu by the list name. Select “Settings”

Scroll down to Index Columns and click the hyperlink.

Click ‘Create a new index’

Wait for the index process to complete, then try the filtered request again … I’ve got data! Evidently SharePoint ODATA filter queries to the REST API need to be performed against indexed columns. I’m sure Microsoft has that documented somewhere but quite a bit of Googling didn’t get me anywhere … so I’m posting this in case anyone else encounters the same error.

Using AI For Lead Qualification & Cost Reduction

Microsoft posted an overview of how they use AI (and a bot) to score leads in their sales process — Microsoft IT Showcase/Microsoft increases sales by using AI for lead qualification. My personal ‘most interesting thing’ is that they’re using scikit-learn in Python for some of the analysis — I’m using similar components in a custom-written spam filter at home. Their idea of running the text through a spell checker first is interesting — I want to try running my e-mails through Aspell and see if there are statistically significant changes in classifications.


They’ve previously detailed reducing energy usage through machine learning — that’s something I’d love to see more companies doing. Energy can be a significant operating cost, and reducing energy use has a positive environmental impact.

Creating An Azure Bot – Internally Hosted

While hosting a bot on the Azure network allows you to use pre-built solutions or develop a bot without purchasing dedicated hardware, the bots we’ve deployed thus far do not have access to internally-housed data. And program execution can be slow (expensive, or a combination of the two) depending on the chosen pricing plan. But you can build an Azure bot that is essentially a proxy to a self-hosted bot.

This means you can host the bot on your private network (it needs to be accessible from the Azure subnets) and access internal resources from your bot code. Obviously, there are security implications to making private data available via an Azure bot – you might want to implement user authentication to verify the bot user’s identity, and I wouldn’t send someone their current credit card information over a bot even with authentication.

How to Communicate with a Self-hosted Bot from Azure:

Register an Azure bot. From https://portal.azure.com, select “Create a resource”. Search for “bot” and select “Bot Channels Registration”.

On the pane which flies out to the right, click “Create” (if you will be deploying multiple self-hosted bots to Azure, click the little heart so you can find this item on “My Saved List” when creating a new resource).

Provide a unique name for your Azure bot. If you have not yet created a resource group, you will need to create one. Make sure the hosting location is reasonable for your user base – East Asia doesn’t make sense for something used on the East coast of the US!

Select the pricing tier you want – I use F0 (free) which allows unlimited messages in standard channels (Teams, Skype, Cortana) and 10,000 messages sent/received in premium channels (direct user interaction … which I specifically don’t want in this case). Then provide the endpoint URL to interact with your locally hosted bot.

Click “Create” and Azure will begin deploying your new resource. You can click the “Notifications” bell icon in the upper right-hand portion of the page to view deployment progress.

When deployment completes, click “Go to resource” to finish configuring your Azure bot.

Select “Settings” from the left-hand navigation menu, then find the application ID. Click “Manage”.

This will open a new portal – you may be asked to sign in again. You are now looking at the application registration in Microsoft’s developer application registration portal. There’s already an application secret created but beyond the first few letters … what is it? No idea! I’m a cautious person, and I don’t know if MS has embedded this secret somewhere within the bot resource. Since an application can have two secrets simultaneously, I do not delete the automatically-created secret and click “Generate New Password”.

A new pane will appear with your new secret – no, the one in the picture isn’t real. Copy that and store it somewhere – you’ll need to add it to your bot code later.

Close the application registration tab and return to the Azure portal tab. Click on “Channels” in your bot and add channels for any interactions you want to support. In this case, I want to publish my bot to Teams. There aren’t really settings* for teams – just click to create the channel.

* You can publish a bot to the Microsoft App Source … but is your bot something that should be available to the Internet at large? It depends! If you’re writing a bot to provide enterprise customers another support avenue, having the bot available through App Source makes sense. If you’re creating a bot to answer employee-specific questions, then you probably want to keep the bot out of App Source

Once the channel has been created, click on the “Get bot embed codes” hyperlink to obtain the bot URL.

Individuals can use the hyperlink provided to add your bot to their Teams chat.

Ok, done! Except for one little thing – you need something to answer on that endpoint we entered earlier. You need a bot! Microsoft publishes an SDK and tools for building your bot in .NET, JavaScript, Python, and Java.

In this example, I am using a sample Python bot. For convenience, I am handling SSL on my reverse proxy instead of using an ssl wrapper in my Python service. Grab the BotBuilder package from git (https://github.com/Microsoft/botbuilder-python.git)

Install the stuff:

pip3 install -e ./libraries/botframework-connector

pip3 install -e ./libraries/botbuilder-schema

pip3 install -e ./libraries/botbuilder-core

pip3 install -r ./libraries/botframework-connector/tests/requirements.txt

In the ./samples/ folder, you’ll find a few beginner bots. Rich-Cards-Bot requires msrest that has some async functionality and the branch in requirements.txt doesn’t exist. Tried a few others and never got anything that worked properly. Same problem with EchoBot-with-State. I am using Echo-Connector-Bot because it doesn’t have this msrest problem, and I can add my own state support later.

Edit main.py and add your Azure bot application id & secret to APP_ID and APP_PASSWORD

APP_ID = ”

APP_PASSWORD = ”

PORT = 9000

SETTINGS = BotFrameworkAdapterSettings(APP_ID, APP_PASSWORD)

ADAPTER = BotFrameworkAdapter(SETTINGS)

I stash my personal information in a config.py file and added an import to main.py:

from config import strDBHostname, strDBUserName, strDBPassword, strDBDatabaseName, strDBTableName, APP_ID, APP_PASSWORD

Tweak the code however you want – add natural language processing, make database connections to internal resources to determine responses, make calls to internal web APIs. I also added console output so I could debug bot operations.

When you’ve completed your changes, launch your bot by running “python main.py”

Now return to the Azure portal and select “Test in Web Chat” – this will allow you to test interactions with your bot. Ask questions – you should see your answers returned.

Once you confirm the bot is functioning properly, use the URL from the Teams channel to interact with your bot within Teams —

URL for my bot in Teams: https://teams.microsoft.com/l/chat/0/0?users=28:9699546d-fc09-41bf-b549-aed33280693a

The answer is served out of our home automation database – data that is only accessible on our private network.

Security – as I said earlier, you’ll probably want to take some measures to ensure access to your locally hosted bot is coming from legit sources. The app ID and secret provide one level of protection. If a connection does not supply the proper app ID & secret (or if you’ve mis-entered those values in your code!), you’ll get a 401 error.


But I don’t want the entire Internet DDoS’ing by bot either, and there is no reason for anyone outside of Microsoft Azure subnets should be accessing my locally hosted bot. My bot is hosted in a private container. The reverse proxy allows Internet-sourced traffic in to the private bot resource. Since communication from Azure will be sourced from a known set of networks, you can add a source IP restriction that prevents the general public from accessing your bot directly. See https://azurerange.azurewebsites.net/ for a convenient-to-use list of addresses.


Ugh! MFA

I am trying to use Microsoft Graph to read/write an Excel spreadsheet stored in SharePoint. It’s an ugly process to start with — they don’t exactly make it easy to find the right ID numbers so you can reference the spreadsheet in the first place, but I finally got the proper URL. And then I tried to do the password-based token authentication.

{“error”:”invalid_grant”,”error_description”:”AADSTS70002: Error validating credentials. AADSTS50126: Invalid username or password\r\nTrace ID: b43d1973-c253-4889-8756-354e5bd77200\r\nCorrelation ID: 9cf94602-9d72-4790-8dcc-6cf0471058f9\r\nTimestamp: 2019-01-08 00:01:47Z”,”error_codes”:[70002,50126],”timestamp”:”2019-01-08 00:01:47Z”,”trace_id”:”b43d1973-c253-4889-8756-354e5bd77200″,”correlation_id”:”9cf94602-9d72-4790-8dcc-6cf0471058f9″}

Hint: the password isn’t wrong. I’ve seen a lot of comments online about this meaning the secret is wrong — which seemed reasonable, since I’m not seeing any auth traffic against the user account. But if you put in a known bad secret, there is a different invalid secret error.

{“error”:”invalid_client”,”error_description”:”AADSTS70002: Error validating credentials. AADSTS50012: Invalid client secret is provided.\r\nTrace ID: 59f4c7c8-73ab-4adb-bf15-10250a190d00\r\nCorrelation ID: 0a95810c-19e2-4fc6-a7be-c0ca7235d824\r\nTimestamp: 2019-01-08 00:00:37Z”,”error_codes”:[70002,50012],”timestamp”:”2019-01-08 00:00:37Z”,”trace_id”:”59f4c7c8-73ab-4adb-bf15-10250a190d00″,”correlation_id”:”0a95810c-19e2-4fc6-a7be-c0ca7235d824″}

But we use MFA … and I’ve got no way to perform the MFA validation. Sigh!

Microsoft Teams: Creating A Bot

Before you start, understand how billing works for Microsoft’s cloud services. There are generally free tiers for selections, but they are resource limited. When you first start with the Azure magic cloudy stuff, you get a 200$ credit. A message indicating your remaining credit is shown when you log into the Azure portal. Pay attention to that message – if you think you are using free tiers for everything but see your credit decreasing …you’ll need to investigate. Some features, like usage analytics, cost extra too.

Microsoft Teams uses Azure bots – so you’ll need to create an Azure bot to get started. From https://portal.azure.com, click on ‘Create a resource’. Search for “bot” and find the bots you are looking for. To host your bot on Azure, select either the “Functions Bot’ or “Web App Bot”. Functions bots use Azure functions, which are C# scripts, for logic processing; WebApp bots use WebAPI App Service for logic processing (C# or NodeJS). To host your bot elsewhere, select “Bot Channels Registration”. In this example, we are using a “Web App Bot”.

Give your bot a name– there will be a green check if the name is unique. Pick your language – C# or Node.JS – and then decide if you want an Echo bot (which gives you a starting place if you’re new to developing bots) or a blank slate (basic bot). Don’t forget to click “Select” otherwise you’ll be back to the defaults. You’ll need to create a resource group. Click on “Bot template” and select what you want to use as the basis for your bot. As of 14 Dec 2018, use v3 unless you need something new in v4 – there’s a lot more available there, and the Bot Builder extensions only work with v3 (https://github.com/OfficeDev/BotBuilder-MicrosoftTeams)

You may need to create a service plan

And storage configuration. Once you have completed the bot configuration, click “Create” and Azure will deploy resources for your bot.

You’ll see a deployment process message, and your messages will have a similar notification. Wait a minute or three.

Return to the dashboard & you’ll see your bot services. Go into the bot that you just created.

Select “Build” – you can use the online code editor or use an existing source repository and configure a continuous integration. I will be setting up a continuous integration – don’t click the link under “Publish”, it goes to an old resource. Click to download the source code – it takes a minute to generate a zip file for download.

Once the download link is available, download and extract the file – this will be the base of your project. Put it somewhere – in this example, I’ll be using a GitHub project. Extract the zip file and get the content into your source repository. 

Return to your dashboard and open the App Service for your bot. Select the “Deployment Center”.

Select the appropriate source repository. When GitHub is used, you will need to sign in and grant access for Azure to use your GitHub account. Click “Continue” once the repository has been set up.

Select the build provider – Kudu or Azure Pipelines. Which one – that’s a personal preference. Azure Pipelines can deploy code stored in git (at least GitHub, never tried other Git services). Kudu can build code housed in Azure DevOps. Kudu has a debugging console that I find useful, and I’ve successfully linked Kudu up with GitLab to manage the build process elsewhere. Azure Pipelines is integrated with the rest of the Azure DevOps (hosted TFS) stuff, which is an obvious advantage to anyone already using Azure DevOps. It uses WebDeploy to deploy artifacts to your Azure websites (again, an advantage to anyone already doing this elsewhere).

The two build environments can be different – MS doesn’t concurrently update SDK’s in each environment, so there can be version differences. It’s possible to have a build fail in one that works in the other. Settings defined in one platform don’t have any meaning if you switch to the other platform (i.e. you’ll be moving app settings into a Build Definition file if you want to switch from Kudu to Azure Pipelines) so it’s not always super quick to swing over to the other build provider, but it might be an option.

I prefer Kudu, so I’ll be using it here.

Select your repository name from the drop-down, then select the project and branch you want to use for deployment. In my repository, the master branch has functional code and there is a working branch for making and testing changes.

Review the summary and click “Finish”.

In GitHub, you confirm a webhook has been added to your project on push events. From your project’s settings tab, select “Webhooks” and look for a azurewebsites URL that includes your bot name. You can view the results of these webhook calls by clicking “Edit” and scrolling down to “Recent deliveries”.

Add the interactions you want – information needs to be accessible from the Azure network, otherwise your bot won’t be able to get there. You can test your bot from the Azure portal to identify anything that works fine from your local computer but fails from the cloud. From the Web App Bot (*note* we are no longer in the App Service on the Azure portal — you need to select the bot resource), select “Test in Web Chat” and interact with your bot.

Once you have your bot working, you need to add the Teams channel to allow the bot to be used from Teams. Select “Channels” and click on the Teams logo.

There’s not much to set up for a bot – messaging is enabled by default. I don’t want IVR or real-time media functionality … but if you do click on the “Calling” tab. The “Publish” tab is to publish your bot in the Windows store – this might be a consideration, for instance, if you wanted to create a customer service interaction bot that enterprise customers could add to their Teams spaces (i.e. something you want random people to find and use). Since I am answering employee specific questions, I do not want to publish this bot to the Internet. Click “Save” when you have configured the channel as needed (in my case, just click ‘save’ without doing anything).

Review the publication terms and privacy statement. If these are agreeable, click “Agree”.

You’ll be returned to the Channels overview. Click on the hyperlinked “Microsoft Teams” – this will open a new URL that is your bot.

You can copy the URL here – others can use the same URL to use your bot. Either open the link in the Teams app

Or cancel and click “Use the web app instead” at the bottom of the screen.

Wait for it … your bot is alive!

That’s great … how do I interact with company resources? Quick answer is “you don’t” – this bot uses resources available on the Internet. To interact with private sources, the magic cloudy Microsoft network must be able to get there. Personally, I’d host my own bot engine. Expose the bot to the Internet and create a “Bot Channels Registration” instead.