Category: Coding

Open Password Filter (OPF) Detailed Overview

When we began allowing users to initiate password changes in Active Directory and feed those passwords into the identity management system (IDM), it was imperative that the passwords set in AD comply with the IDM password policy. Otherwise passwords were set in AD that were not set in the IDM system or other downstream managed directories. Microsoft does not have a password policy that allows the same level of control as the Oracle IDM (OIDM) policy, however password changes can be passed to DLL programs for farther evaluation (or, as in the case of the hook that forwards passwords to OIDM – the DLL can just return TRUE to accept the password but do something completely different with the password like send it along to an external system). Search for secmgmt “password filters” (https://msdn.microsoft.com/en-us/library/windows/desktop/ms721882(v=vs.85).aspx) for details from Microsoft.

LSA makes three different API calls to all of the DLLs listed in the NotificationPackages registry hive. First, InitializeChangeNotify(void) is called when LSA loads. The only reasonable answer to this call is “true” as it advises LSA that your filter is online and functional.

When a user attempts to change their password, LSA calls PasswordFilter(PUNICODE_STRING AccountName, PUNICODE_STRING FullName, PUNICODE_STRING Password, BOOLEAN SetOperation) — this is the mechanism we use to enforce a custom password policy. The response to a PasswordFilter call determines if the password is deemed acceptable.

Finally, when a password change is committed to the directory, LSA calls PasswordChangeNotify(PUNICODE_STRING UserName, ULONG RelativeId, PUNICODE_STRING NewPassword) — this is the call that should be used to synchronize passwords into remote systems (as an example, the Oracle DLL that is used to send AD-initiated password changes into OIDM). In our password filter, the function just returns ‘0’ because we don’t need to do anything with the password once it has been committed.

Our password filter is based on the Open Password Filter project at (https://github.com/jephthai/OpenPasswordFilter). The communication between the DLL and the service is changed to use localhost (127.0.0.1). The DLL accepts the password on failure (this is a point of discussion for each implementation to ensure you get the behaviour you want). In the event of a service failure, non-compliant passwords are accepted by Active Directory. It is thus possible for workstation-initiated password changes to get rejected by the IDM system. The user would then have one password in Active Directory and their old password will remain in all of the other connected systems (additionally, their IDM password expiry date would not advance, so they’d continue to receive notification of their pending password expiry).

While the DLL has access to the user ID and password, only the password is passed to the service. This means a potential compromise of the service (obtaining a memory dump, for example) will yield only passwords. If the password change occurred at an off time and there’s only one password changed in that timeframe, it may be possible to correlate the password to a user ID (although if someone is able to stack trace or grab memory dumps from our domain controller … we’ve got bigger problems!

The service which performs the filtering has been modified to search the proposed password for any word contained in a text file as a substring. If the case insensitive banned string appears anywhere within the proposed password, the password is rejected and the user gets an error indicating that the password does not meet the password complexity requirements.

Other password requirements (character length, character composition, cannot contain UID, cannot contain given name or surname) are implemented through the normal Microsoft password complexity requirements. This service is purely analyzing the proposed password for case insensitive matches of any string within the dictionary file.

Shell Script: Path To Script

We occasionally have to re-home our shell scripts, which means updating any static path values used within scripts. It’s quick enough to build a sed script to convert /old/server/path to /new/server/path, but it’s still extra work.

The dirname command works to provide a dynamic path value, provided you use the fully qualified path to run the script … but it fails spectacularly whens someone runs ./scriptFile.sh and you’re trying to use that path in, say, EXTRA_JAVA_OPTS. The “path” is just . — and Java doesn’t have any idea what to do with “-Xbootclasspath/a:./more/path/goes/here.jar”

Voila, realpath gives you the fully qualified file path for /new/server/path/scriptFile.sh, ./scriptFile.sh, or even bash scriptFile.sh … and the dirname of a realpath is the fully qualified path where scriptFile.sh resides:

#!/bin/bash
DIRNAME=`dirname $(realpath "$0")`
echo ${DIRNAME}

Hopefully next time we’ve got to re-home our batch jobs, it will be a simple scp & sed the old crontab content to use the new paths.

LDAP Auth With Tokens

I’ve encountered a few web applications (including more than a handful of out-of-the-box, “I paid money for that”, applications) that perform LDAP authentication/authorization every single time the user changes pages. Or reloads the page. Or, seemingly, looks at the site. OK, not the later, but still. When the load balancer probe hits the service every second and your application’s connection count is an order of magnitude over the probe’s count … that’s not a good sign!

On the handful of sites I’ve developed at work, I have used cookies to “save” the authentication and authorization info. It works, but only if the user is accepting cookies. Unfortunately, the IT types who typically use my sites tend to have privacy concerns. And the technical knowledge to maintain their privacy. Which … I get, I block a lot of cookies too. So I’ve begun moving to a token-based scheme. Microsoft’s magic cloudy AD via Microsoft Graph is one approach. But that has external dependencies — lose Internet connectivity, and your app becomes unusable. I needed another option.

There are projects on GitHub to authenticate a user via LDAP and obtain a token to “save” that access has been granted. Clone the project, make an app.py that connects to your LDAP directory, and you’re ready.

from flask_ldap_auth import login_required, token
from flask import Flask
import sys

app = Flask(__name__)
app.config['SECRET_KEY'] = 'somethingsecret'
app.config['LDAP_AUTH_SERVER'] = 'ldap://ldap.forumsys.com'
app.config['LDAP_TOP_DN'] = 'dc=example,dc=com'
app.register_blueprint(token, url_prefix='/auth')

@app.route('/')
@login_required
def hello():
return 'Hello, world'

if __name__ == '__main__':
app.run()

The authentication process is two step — first obtain a token from the URL http://127.0.0.1:5000/auth/request-token. Assuming valid credentials are supplied, the URL returns JSON containing the token. Depending on how you are using the token, you may need to base64 encode it (the httpie example on the GitHub page handles this for you, but the example below includes the explicit encoding step).

You then use the token when accessing subsequent pages, for instance http://127.0.0.1:5000/

import requests
import base64

API_ENDPOINT = "http://127.0.0.1:5000/auth/request-token"
SITE_URL = "http://127.0.0.1:5000/"

tupleAuthValues = ("userIDToTest", "P@s5W0Rd2T35t")

tokenResponse = requests.post(url = API_ENDPOINT, auth=tupleAuthValues)

if(tokenResponse.status_code is 200):
jsonResponse = tokenResponse.json()
strToken = jsonResponse['token']
print("The token is %s" % strToken)

strB64Token = base64.b64encode(strToken)
print("The base64 encoded token is %s" % strB64Token)

strHeaders = {'Authorization': 'Basic {}'.format(strB64Token)}

responseSiteAccess = requests.get(SITE_URL, headers=strHeaders)
print(responseSiteAccess.content)
else:
print("Error requesting token: %s" % tokenResponse.status_code)

Run and you get a token which provides access to the base URL.

[lisa@linux02 flask-ldap]# python authtest.py
The token is eyJhbGciOiJIUzI1NiIsImV4cCI6MTUzODE0NzU4NiwiaWF0IjoxNTM4MTQzOTg2fQ.eyJ1c2VybmFtZSI6ImdhdXNzIn0.FCJrECBlG1B6HQJKwt89XL3QrbLVjsGyc-NPbbxsS_U:
The base64 encoded token is ZXlKaGJHY2lPaUpJVXpJMU5pSXNJbVY0Y0NJNk1UVXpPREUwTnpVNE5pd2lhV0YwSWpveE5UTTRNVFF6T1RnMmZRLmV5SjFjMlZ5Ym1GdFpTSTZJbWRoZFhOekluMC5GQ0pyRUNCbEcxQjZIUUpLd3Q4OVhMM1FyYkxWanNHeWMtTlBiYnhzU19VOg==
Hello, world

A cool discovery I made during my testing — a test LDAP server that is publicly accessible. I’ve got dev servers at work, I’ve got an OpenLDAP instance on Docker … but none of that helps anyone else who wants to play around with LDAP auth. So if you don’t want to bother populating directory data within your own test OpenLDAP … some nice folks provide a quick LDAP auth source.

Using Microsoft Graph

Single Sign-On: Microsoft Graph

End Result: This will allow in-domain computers to automatically log in to web sites and applications. Computers not currently logged into the company domain will, when they do not have an active authenticated session, be presented with Microsoft’s authentication page.
Requirements: The application must be registered on Microsoft Graph.

Beyond that, requirements are language specific – I will be demonstrating a pre-built Python example here because it is simple and straight-forward. There are examples for a plethora of other languages available at https://github.com/microsoftgraph

Process – Application Development:
Application Registration

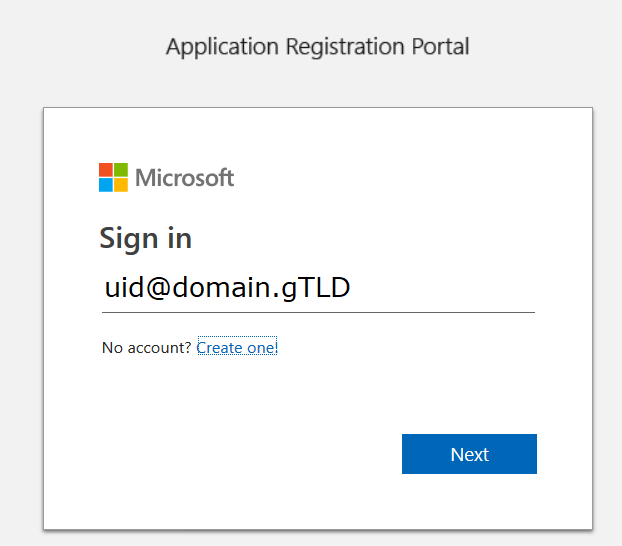
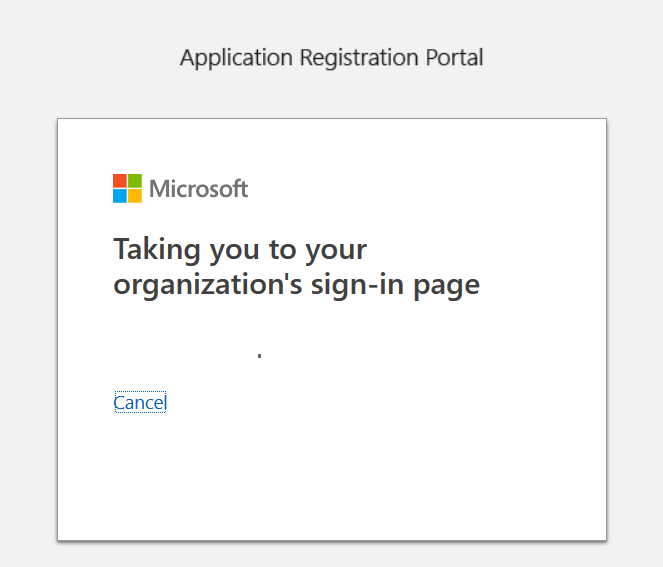
To register your application, go to the Application Registration Portal (https://apps.dev.microsoft.com/). Elect to sign in with your company credentials.

You will be redirected to the company’s authentication page

If ADSF finds a valid token for you, you will be directed to the application registration portal. Otherwise you’ll get the same logon page you see for many other MS cloud-hosted apps. Once you have authenticated, click “Add an app” in the upper right-hand corner of the page.

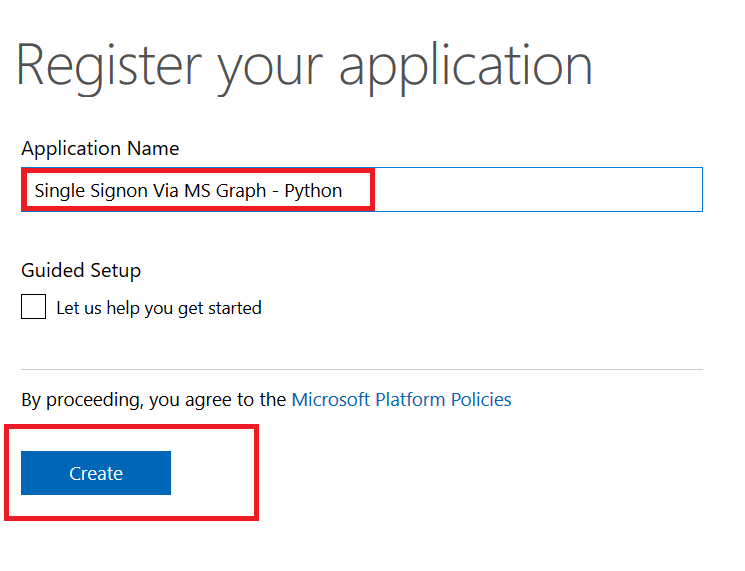
Provide a descriptive name for the application and click “Create”

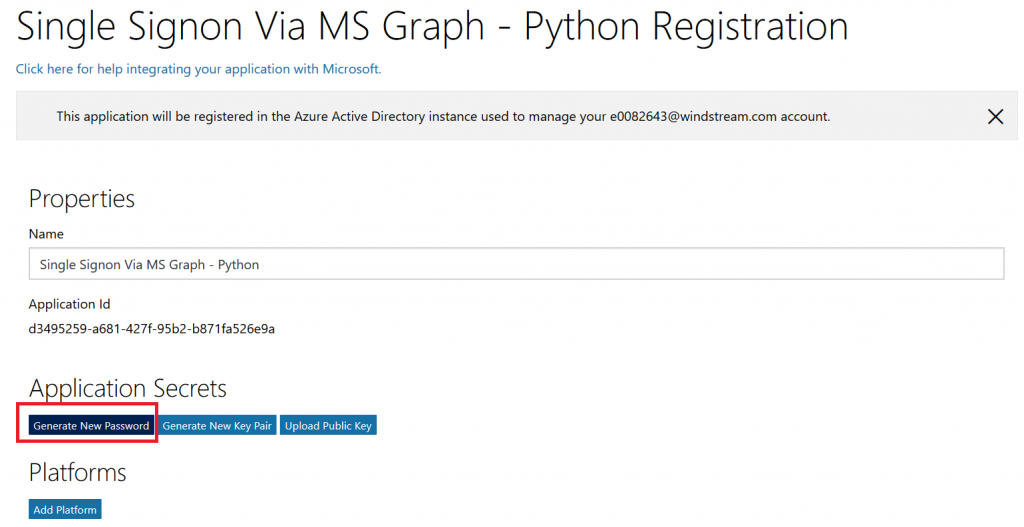
Click “Generate New Password” to generate a new application secret. Copy it into a temporary document. Copy the “Application Id” into the same temporary document.

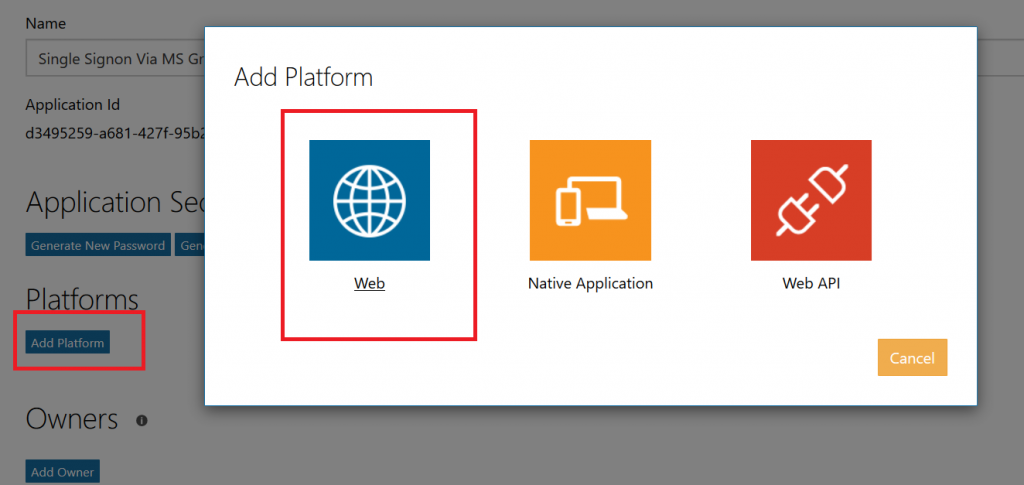
Click “Add Platform” and select “Web”

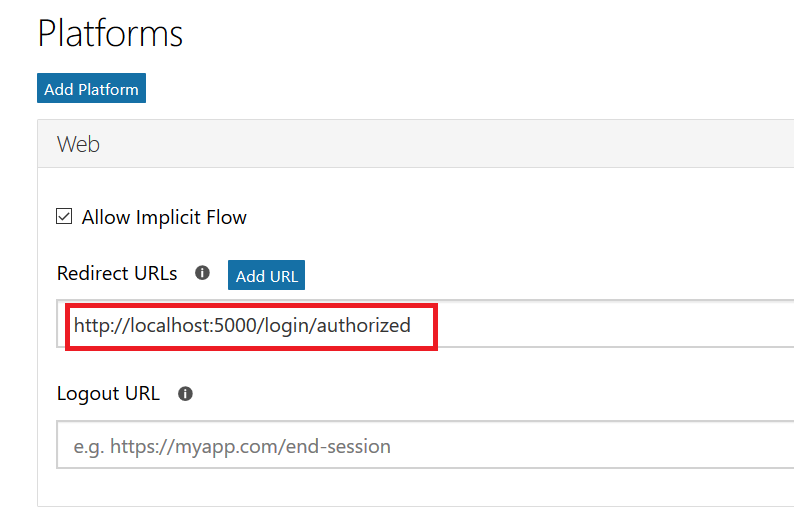
Enter the appropriate redirect/logout URLs (this will be application specific – in the pre-built examples, the post-authentication redirect URL is http://localhost:5000/login/authorized

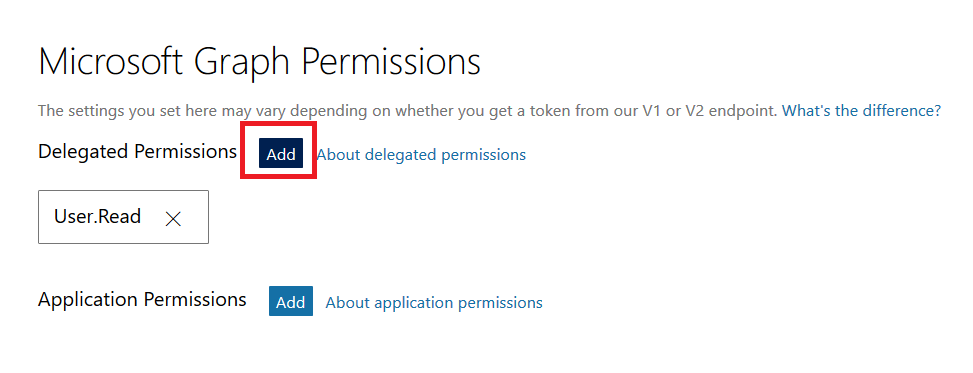
Delegated permissions impersonate the signed in user, application permissions use the application’s credentials to perform actions. I use delegated permissions, although there are use cases where application permissions would be appropriate (batch jobs, for instance).

Add any permissions your app requires – for simple authentication, the default delegated permission “User.Read” is sufficient. If you want to perform additional actions – write files, send mail, etc – then you will need to click “Add” and select the extra permissions.

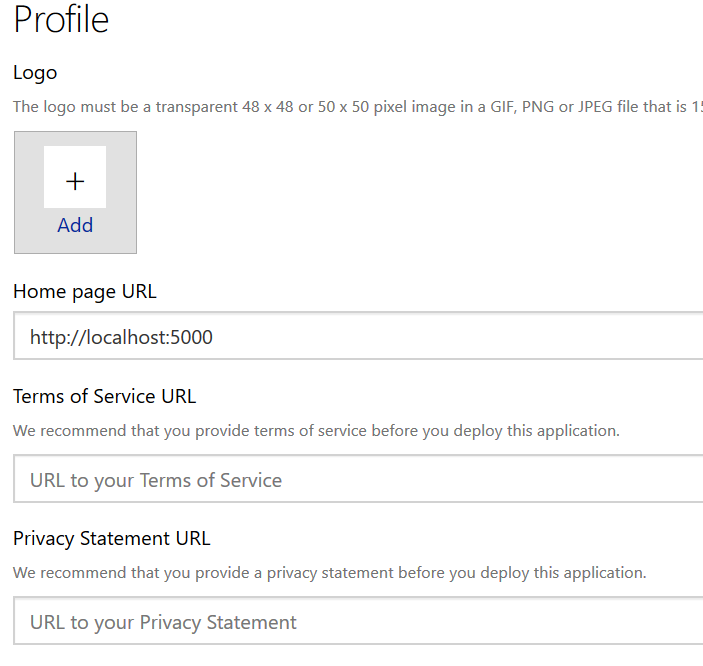
Profile information does not need to be entered, but I have entered the “Home page URL” for all of my applications so I am confident that I know which registered app corresponds with which deployed application (i.e. eighteen months from now, I can still figure out site is using the registered “ADSF Graph Sample” app and don’t accidentally delete it when it is still in use).

Click Save. You can return to your “My Applications” listing to verify the app was created successfully.

Application Implementation:

To use an example app from Microsoft’s repository, clone it.

git clone https://github.com/microsoftgraph/python-sample-auth.git

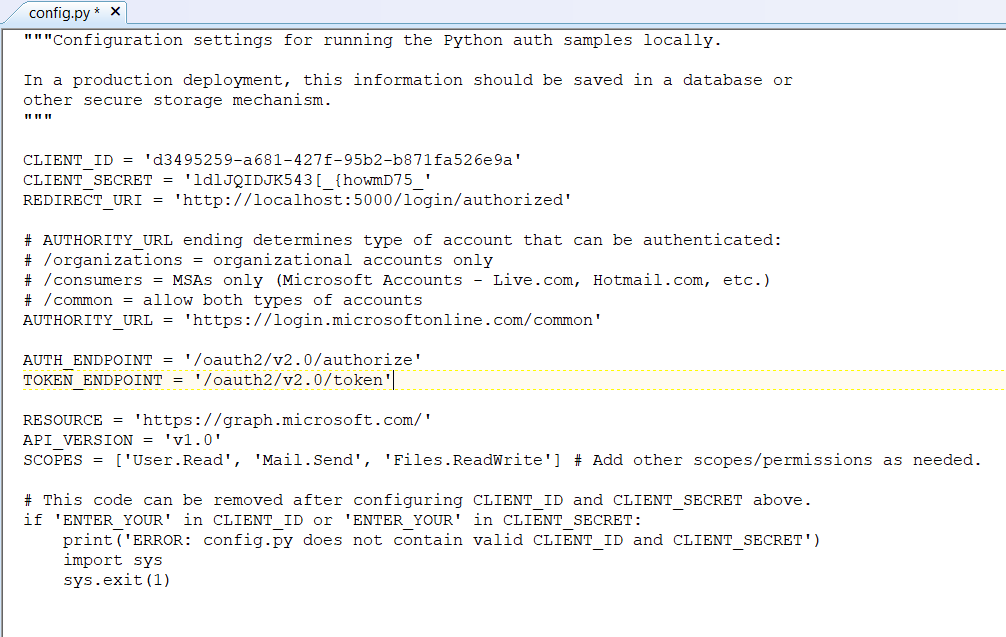
Edit the config.py file and update the “CLIENT_ID” variable with your Application Id and update the “CLIENT_SECRET” variable with your Application Secret password. (As they note, in a production implementation you would hash this out and store it somewhere else, not just drop it in clear text in your code … also if you publish a screen shot of your app ID & secret somewhere, generate a new password or delete the app registration and create a new one. Which is to say, do not retype the info in my example, I’ve already deleted the registration used herein.)

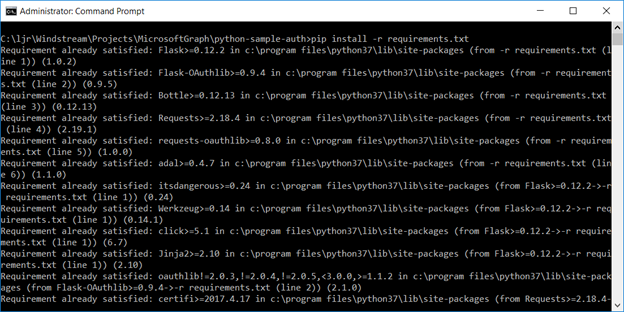
Install the prerequisites using “pip install -r requirements.txt”

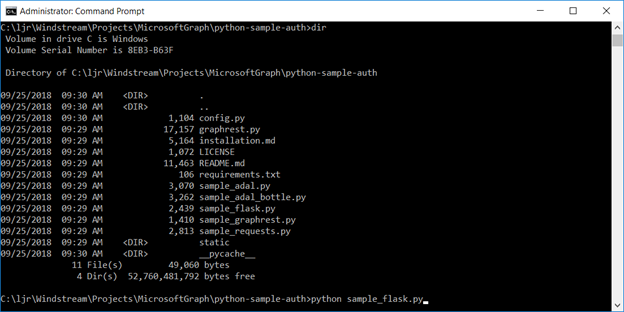
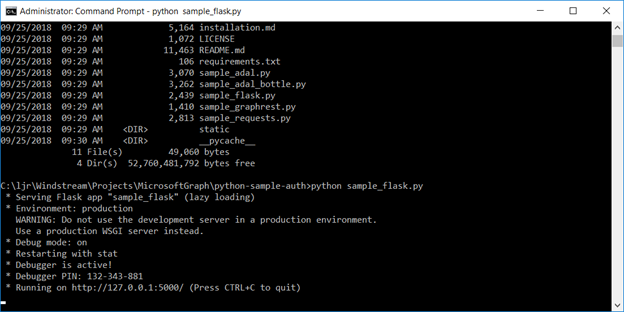
Then run the application – in the authentication example, there are multiple web applications that use different interfaces. I am running “python sample_flask.py”

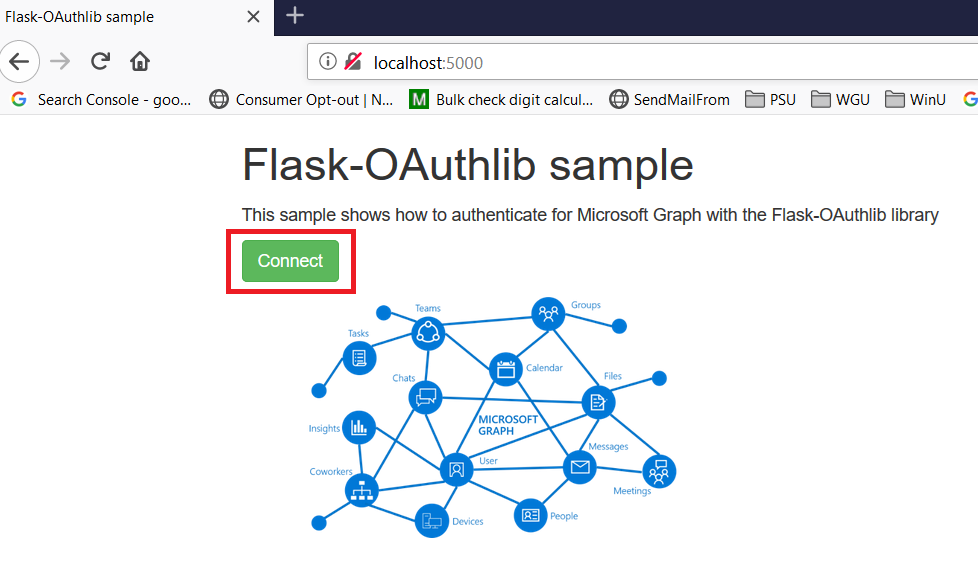
Once it is running, access your site at http://localhost:5000

The initial page will load; click on “Connect”

Enter your company user ID and click “Next”

This will redirect to the company’s sign-on page. For in-domain computers or computers that have already authenticated to ADSF, you won’t have to enter credentials. Otherwise, you’ll be asked to logon (and possibly perform the two-factor authentication verification).

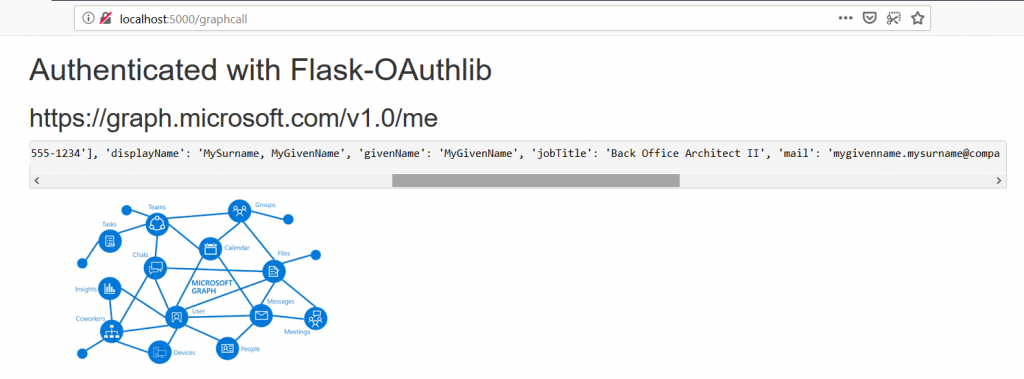
Voila, the user is authenticated and you’ve got access to some basic directory info about the individual.

Process – Tenant Owner:
None! Any valid user within the tenant is able to register applications.
Implementation Recommendations:
There is currently no way to backup/restore applications. If an application is accidentally or maliciously deleted, a new application will need to be registered. The application’s code will need to be updated with a new ID and secret. Documenting the options selected when registering the application will ensure the application can be re-registered quickly and without guessing values such as the callback URL.

There is currently no way to assign ownership of orphaned applications. If the owner’s account is terminated, no one can manage the application. The application continues to function, so it may be some time before anyone realizes the application is orphaned. For some period of time after the account is disabled, it may remain in the directory — which means a directory administrator could re-enable the account and set the password to a known value. Someone could then log into the Microsoft App Registration Portal under that ID and add new owners. Even if the ID has been deleted from the directory, it exists as a tombstone and can be restored for some period of time. Eventually, though, the account ceases to exist — at which time the only option would be to register a new app under someone else’s ID and change the code to use the new ID and secret. Ensure multiple individuals are listed as the application owner helps avoid orphaned applications.

Edit the application and click the “Add Owner” button.

You can enter the person’s logon ID or their name in “last, first” format. You can enter their first name – with a unique first name, that may work. Enter “Robert” and you’re in for a lot of scrolling! Once you find the person, click “Add” to set them up as an owner of the application. Click “Save” at the bottom of the page to commit this change.

I have submitted a feature request to Microsoft both for reassigning orphaned applications within your tenant and for a mechanism to restore deleted applications — apparently their feature requests have a voting process, so it would be helpful if people would up-vote my feature request.

Ongoing Maintenance:
There is little ongoing maintenance – once the application is registered, it’s done.

Updating The Secret:

You can change the application secret via the web portal – this would be a good step to take when an individual has left the team, and can be done as a proactive security step as a routine. Within the application, select “Generate New Password” and create a new secret. Update your code with the new secret, verify it works (roll-back is to restore the old secret to the config – it’s still in the web portal and works). Once the application is verified to work with the new secret, click “Delete” next to the old one. Both the create time and first three characters of the secret are displayed on the site to ensure the proper one is removed.

Maintaining Application Owners:

Any application owner can remove other owners – were I to move to a different team, the owners I delegated could revoke my access. Just click the “X” to the far right of the owner you wish to remove.


DevOps Alternatives

While many people involved in the tech industry have a wide range of experience in technologies and are interested in expanding the breadth of that knowledge, they do not have the depth of knowledge that a dedicated Unix support person, a dedicated Oracle DBA, a dedicated SAN engineer person has. How much time can a development team reasonably dedicate to expanding the depth of their developer’s knowledge? Is a developer’s time well spent troubleshooting user issues? That’s something that makes the DevOps methodology a bit confusing to me. Most developers I know … while they may complain (loudly) about unresponsive operational support teams, about poor user support troubleshooting skills … they don’t want to spend half of their day diagnosing server issues and walking users through basic how-to’s.

The DevOps methodology reminds me a lot of GTE Wireline’s desktop and server support structure. Individual verticals had their own desktop support workforce. Groups with their own desktop support engineer didn’t share a desktop support person with 1,500 other employees in the region. Their tickets didn’t sit in a queue whilst the desktop tech sorted issues for three other groups. Their desktop support tech fixed problems for their group of 100 people. This meant problems were generally resolved quickly, and some money was saved in reduced downtime. *But* it wasn’t like downtime avoidance funded the tech’s salary. The business, and the department, decided to spend money for rapid problem resolution. Some groups didn’t want to spend money on dedicated desktop support, and they relied on corporate IT. Hell, the techs employed by individual business units relied on corporate IT for escalation support. I’ve seen server support managed the same way — the call center employed techs to manage the IVR and telephony system. The IVR is malfunctioning, you don’t put a ticket in a queue with the Unix support group and wait. You get the call center technologies support person to look at it NOW. The added advantage of working closely with a specific group is that you got to know how they worked, and could recommend and customize technologies based on their specific needs. An IM platform that allowed supervisors and resource management teams to initiate messages and call center reps to respond to messages. System usage reporting to ensure individuals were online and working during their prescribed times.

Thing is, the “proof” I see offered is how quickly new code can be deployed using DevOps methodologies. Comparing time-to-market for automated builds, testing, and deployment to manual processes in no way substantiates that DevOps is a highly efficient way to go about development. It shows me that automated processes that don’t involve waiting for someone to get around to doing it are quick, efficient, and generally reduce errors. Could similar efficiency be gained by having operation teams adopt automated processes?

Thing is, there was a down-side to having the major accounts technical support team in PA employ a desktop support technician. The major accounts technical support did not have broken computers forty hours a week. But they wanted someone available from … well, I think it was like 6AM to 10PM and they employed a handful of part time techs, but point remains they paid someone to sit around and wait for a computer to break. Their techs tended to be younger people going to school for IT. One sales pitch of the position, beyond on-the-job experience was that you could use your free time to study. Company saw it as an investment – we get a loyal employee with a B.S. in IT who moved into other orgs, college kid gets some resume-building experience, a chance to network with other support teams, and a LOT of study time that the local fast food joint didn’t offer. The access design engineering department hired a desktop tech who knew the Unix-based proprietary graphic workstations they used within the group. She also maintained their access design engineering servers. She was busier than the major accounts support techs, but even with server and desktop support she had technical development time.

Within the IT org, we had desktop support people who were nearly maxed out. By design — otherwise we were paying someone to sit around and do nothing. Pretty much the same methodology that went into staffing the call center — we might only expect two calls overnight, but we’d still employ two people to staff the phones between 10P and 6A *just* so we could say we had a 24×7 tech support line. During the day? We certainly wouldn’t hire two hundred people to handle one hundred’s worth of calls. Wouldn’t operations teams be quicker to turn around requests if they were massively overstaffed?

As a pure reporting change, where you’ve got developers and operations people who just report through the same structure to ensure priorities and goals align … reasonable. Not cost effective, but it’s a valid business decision. In a way, though, DevOps as a vogue ideology is the impetus behind financial decisions (just hire more people) and methodology changes (automate it!) that would likely have similar efficacy if implemented in silo’d verticals.


Shell Scripting: “File Exist” Test With Wildcards

Determining if a specific file exists within a shell script is straight-forward:

if [ -f filename.txt ]; then DoSomething; fi

The -f verifies that a regular file exists. You might want -s (exists and size is greater than zero), -w (exists and is writable), -e (a regular or special file exists), etc. But the test comes from the “CONDITIONAL EXPRESSIONS” section of the bash man page and is simply used in an if statement.

What if you don’t know the exact name of the file? Using the text “if [ -f *substring*.xtn ]” seems like it works. If there is no matching file, the condition evaluates to FALSE. If there is one matching file the condition evaluates to TRUE. But when there are multiple matching files, you get an error because there are too many parameters

[lisa@fc test]# ll
total 0
[lisa@fc test]# if [ -f *something*.txt ]; then echo "The file exists"; fi
[lisa@fc test]# touch 1something1.txt
[lisa@fc test]# if [ -f *something*.txt ]; then echo "The file exists"; fi
The file exists
[lisa@fc test]# touch 2something2.txt
[lisa@fc test]# if [ -f *something*.txt ]; then echo "The file exists"; fi
-bash: [: 1something1.txt: binary operator expected

Beyond throwing an error … we are not executing the code-block meant to be run when the condition is TRUE. In a shell script, execution will continue past the block as if the condition evaluated to FALSE (i.e. the script does not just abnormally end on the error, making the failure more obvious).

To test for the existence of possibly multiple files matching a pattern, we can evaluate the number of files returned from ls. I include 2>/dev/null to hide the error which will otherwise be displayed when there are zero matching files.

[lisa@fc test]# ll
total 0
[lisa@fc test]# if [ $(ls *something*.txt 2>/dev/null | wc -l) -gt 0 ]; then echo "Some matching files are found."; fi
[lisa@fc test]# touch 1something1.txt
[lisa@fc test]# if [ $(ls *something*.txt 2>/dev/null | wc -l) -gt 0 ]; then echo "Some matching files are found."; fi
Some matching files are found.
[lisa@fc test]# touch 2something2.txt
[lisa@fc test]# if [ $(ls *something*.txt 2>/dev/null | wc -l) -gt 0 ]; then echo "Some matching files are found."; fi
Some matching files are found.
[lisa@fc test]#

Now we have a test that evaluates to TRUE when there are one or more matching files in the path.

OUD Returning Some DirectoryString Syntax Values As UTF-8 Encoded Bytes

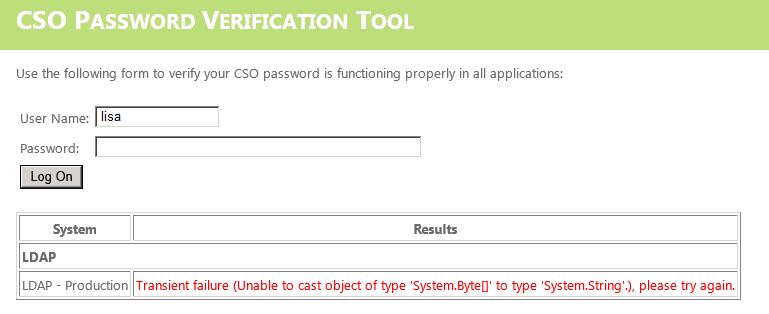
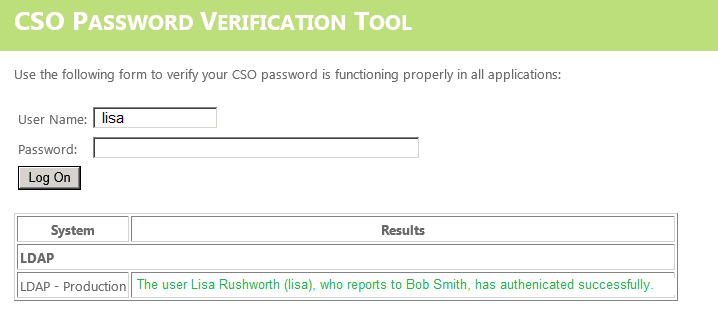
We are still in the process of moving the last few applications from DSEE to OUD 11g so the DSEE 6.3 directory can be decommissioned. Just two to go! But the application, when pointed to the OUD servers, gets “Unable to cast object of type ‘System.Byte[]’ to type ‘System.String'” when retrieving values for a few of our DirectoryString syntax custom schema.

This code snippet works fine with DSEE 6.3.

string strUserGivenName = (String)searchResult.Properties["givenName"][0]; 
string strUserSurame = (String)searchResult.Properties["sn"][0]; 
string strSupervisorFirstName = (String)searchResult.Properties["positionmanagernamefirst"][0]; 
string strSupervisorLastName = (String)searchResult.Properties["positionmanagernamelast"][0];

Direct the connection to the OUD 11g servers, and an error is returned.


The attributes use the same syntax – DirectoryString, OID 1.3.6.1.4.1.1466.115.121.1.15.

00-core.ldif:attributeTypes: ( 2.5.4.41 NAME ‘name’ EQUALITY caseIgnoreMatch SUBSTR caseIgnoreSubstringsMatch SYNTAX 1.3.6.1.4.1.1466.115.121.1.15{32768} X-ORIGIN ‘RFC 4519’ ) 
00-core.ldif:attributeTypes: ( 2.5.4.4 NAME ( ‘sn’ ‘surname’ ) SUP name X-ORIGIN ‘RFC 4519’ ) 
00-core.ldif:attributeTypes: ( 2.5.4.42 NAME ‘givenName’ SUP name X-ORIGIN ‘RFC 4519’ ) 

99-user.ldif:attributeTypes: ( positionManagerNameMI-oid NAME ‘positionmanagernamemi’ DESC ‘User Defined Attribute’ SYNTAX 1.3.6.1.4.1.1466.115.121.1.15 SINGLE-VALUE X-ORIGIN ‘user defined’ ) 
99-user.ldif:attributeTypes: ( positionManagerNameFirst-oid NAME ‘positionmanagernamefirst’ DESC ‘User Defined Attribute’ SYNTAX 1.3.6.1.4.1.1466.115.121.1.15 SINGLE-VALUE X-ORIGIN ‘user defined’ ) 
99-user.ldif:attributeTypes: ( positionManagerNameLast-oid NAME ‘positionmanagernamelast’ DESC ‘User Defined Attribute’ SYNTAX 1.3.6.1.4.1.1466.115.121.1.15 SINGLE-VALUE X-ORIGIN ‘user defined’ ) 

I’ve put together a quick check to see if the returned value is an array, and if it is then get a string from the decoded byte array.

string strUserGivenName = (String)searchResult.Properties["givenName"][0]; 
string strUserSurame = (String)searchResult.Properties["sn"][0]; 

string strSupervisorFirstName = "";
string strSupervisorLastName = "";
if (searchResult.Properties["positionmanagernamefirst"][0].GetType().IsArray){
    strSupervisorFirstName = System.Text.Encoding.UTF8.GetString((byte[])searchResult.Properties["positionmanagernamefirst"][0]);
}
else{
    strSupervisorFirstName = searchResult.Properties["positionmanagernamefirst"][0].ToString();
}

if (searchResult.Properties["positionmanagernamelast"][0].GetType().IsArray){
    strSupervisorLastName = System.Text.Encoding.UTF8.GetString((byte[])searchResult.Properties["positionmanagernamelast"][0]);
}
else{
    strSupervisorLastName = searchResult.Properties["positionmanagernamelast"][0].ToString();
}

Voila

The outstanding question is if we need to wrap *all* DirectoryString syntax attributes in this check to be safe or if there’s a reason core schema attributes like givenName and sn are being returned as strings whilst our add-on schema attributes have been encoded.

Gathering Android Log Files

A friend has an Android application that isn’t functioning properly. On Windows or Unix, I know how to stack-trace and debug apps … so she figured I’d be all set up to do the same thing on Android too. Except I’ve never encountered a problem that required debugging Android apps. Consult the universal archive of all IT knowledge (a.k.a. Google).

I don’t have the Android developer kit installed, nor do I need it, so I elected to use “Minimal ADB and Fastboot” to grab the log data. My device did not show up without a Windows driver for the debug bridge. Once the driver was installed and the adb server restarted, my device appeared.


C:\Users\lisa>"c:\program files (x86)\Minimal ADB and Fastboot\adb.exe" kill-server

C:\Users\lisa>"c:\program files (x86)\Minimal ADB and Fastboot\adb.exe" start-server
* daemon not running; starting now at tcp:5037
* daemon started successfully

C:\Users\lisa>"c:\program files (x86)\Minimal ADB and Fastboot\adb.exe" devices
List of devices attached
g142ef0c        device

Something interesting about the adb log data – it can include an hour or more of history. Which is awesome if your app crashed a few minutes ago and you want to capture historic data, but for a reproducible error … well, there’s no need to slog through thousands of lines to find where the problem actually started. Clear the log buffers first then start capturing the adb log data:

"c:\program files (x86)\Minimal ADB and Fastboot\adb.exe" logcat -b main -b system ^
-b radio -b events -c&&"c:\program files (x86)\Minimal ADB and Fastboot\adb.exe" logcat ^
-v threadtime -f "C:\temp\SessionLog.txt"


Git Pull Requests

I have finally run through the process of submitting a pull request to suggest changes to a Git repository. Do the normal ‘stuff’ either to make a new project or to clone an existing project to your computer. Create a new branch and check out that branch.

C:\ljr\git>git clone https://github.com/ljr55555/SampleProject

Cloning into ‘SampleProject’…

remote: Counting objects: 4, done.

remote: Compressing objects: 100% (3/3), done.

remote: Total 4 (delta 0), reused 0 (delta 0), pack-reused 0

Unpacking objects: 100% (4/4), done.

C:\ljr\git>cd SampleProject

C:\ljr\git\SampleProject>git branch newEdits

C:\ljr\git\SampleProject>git checkout newEdits

Switched to branch ‘newEdits’

Make some changes and commit them to your branch

C:\ljr\git\SampleProject>git add helloworld.pl

C:\ljr\git\SampleProject>git commit -m “Added hello world script”

C:\ljr\git\SampleProject>git push origin newEdits

Counting objects: 3, done.

Delta compression using up to 4 threads.

Compressing objects: 100% (3/3), done.

Writing objects: 100% (3/3), 408 bytes | 408.00 KiB/s, done.

Total 3 (delta 0), reused 0 (delta 0)

To https://github.com/ljr55555/SampleProject

 * [new branch]      newEdits -> newEdits

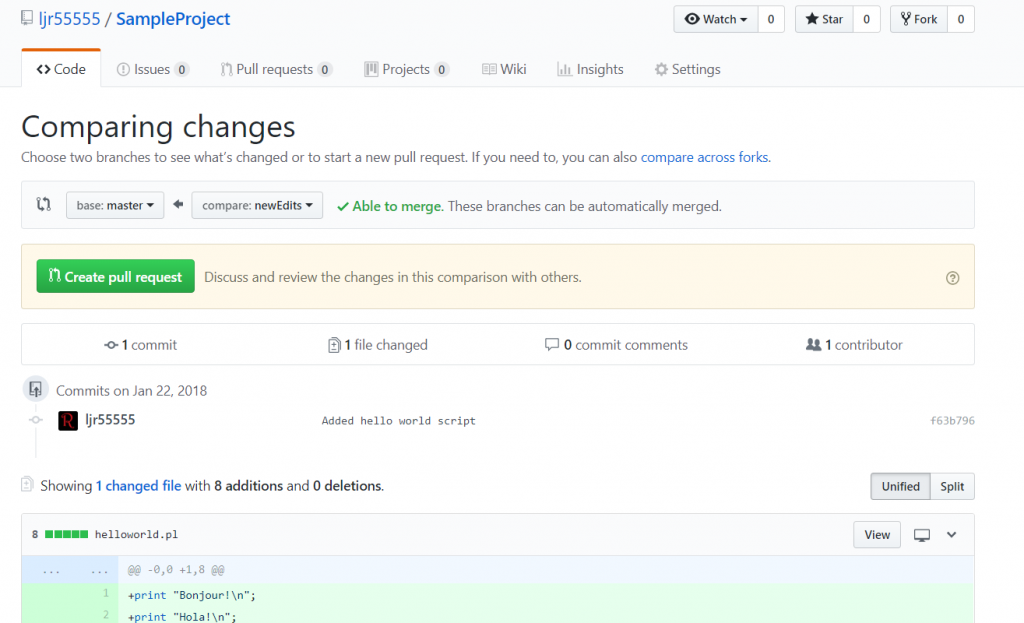
On the GitHub site, click the “new pull request” button. Since you select the two branches within the pull request, it doesn’t seem to matter which branch’s “Pull request” tab you select.

Select the source branch and the one with your changes. Verify you can merge the branches (otherwise you’ve got a problem and need to resolve conflicts). Review the changes, then click “Create pull request”

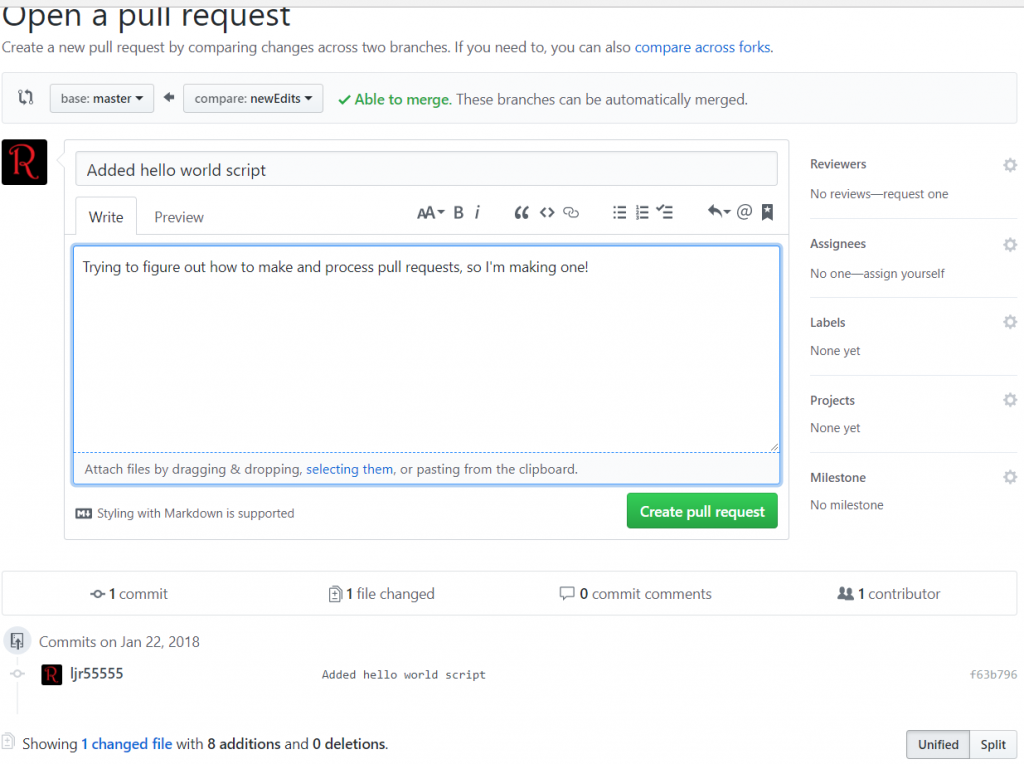
Here’s another place for comments – comments on the pull request, not the commit comments. Click “Create pull request”.

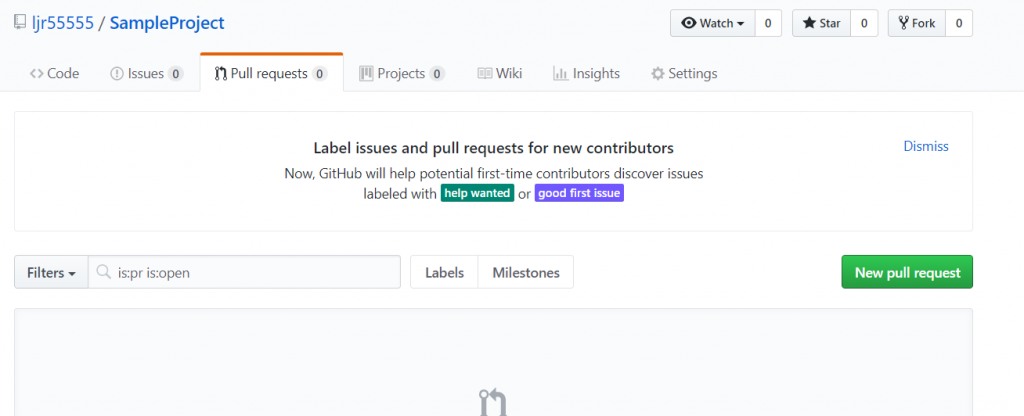
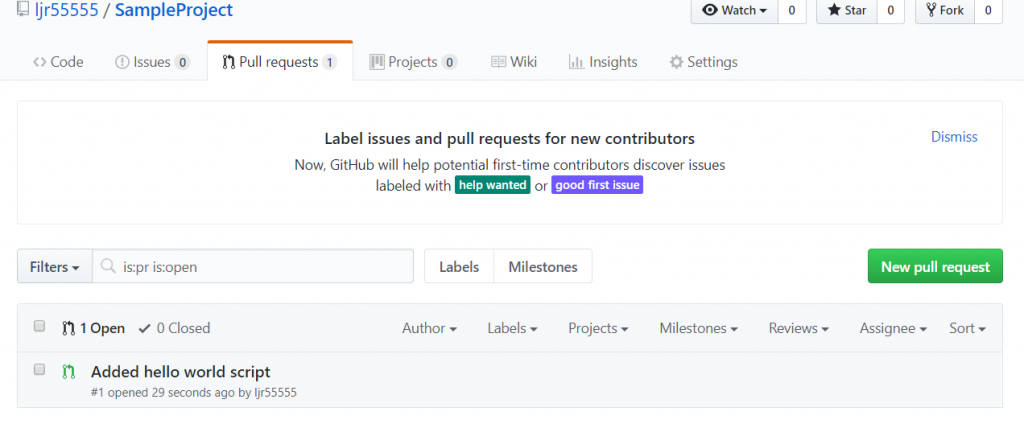
Click “Create pull request” and you’ve got one! Now what do we do with it (i.e. if you’re the repository owner and receive a pull request). If you check the “Pull request” tab on your project, you should see one now.

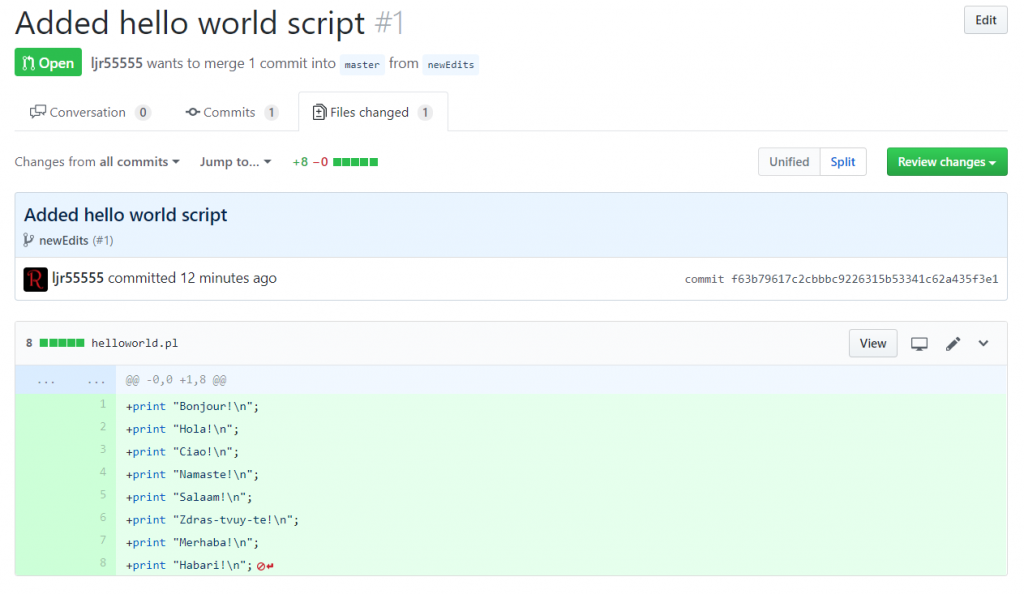
Click on it to explore the changes that have been made – the “Commits” tab will have the commits, and the “Files changed” tab will show you the specific changes that have been made.

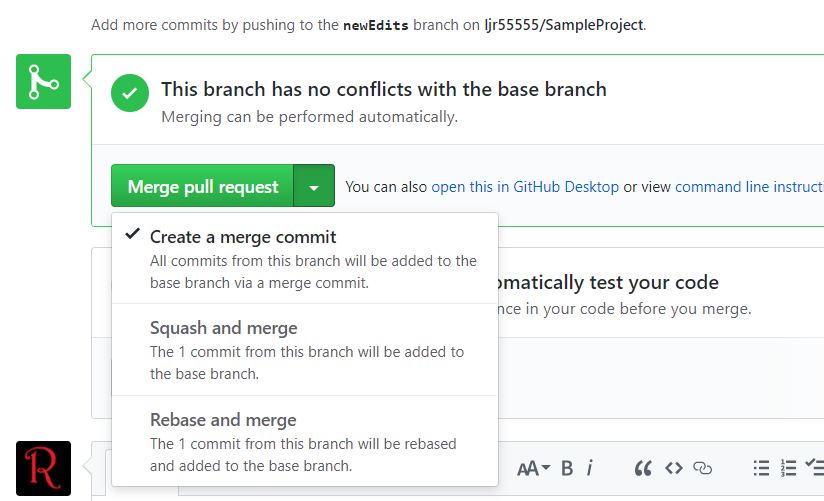
You could just comment and close the pull request (if, for instance, there was a reason you had not implemented the project that way and do not wish to incorporate the changes into your master branch). Assuming you do wish to incorporate the code, there are a couple of ways you can merge the new code into your base branch. The default is generally a good, or read the doc at https://help.github.com/articles/about-pull-request-merges/

Select the appropriate merge type and click the big green button. You have an opportunity to edit the commit message at this point, or just click “Confirm merge”

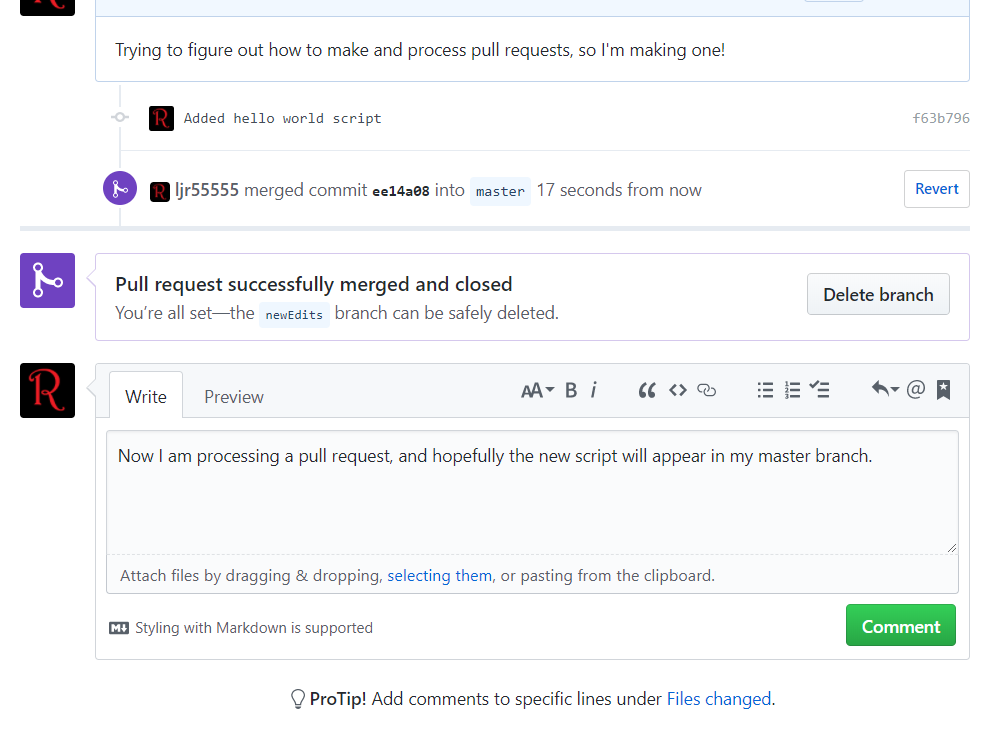
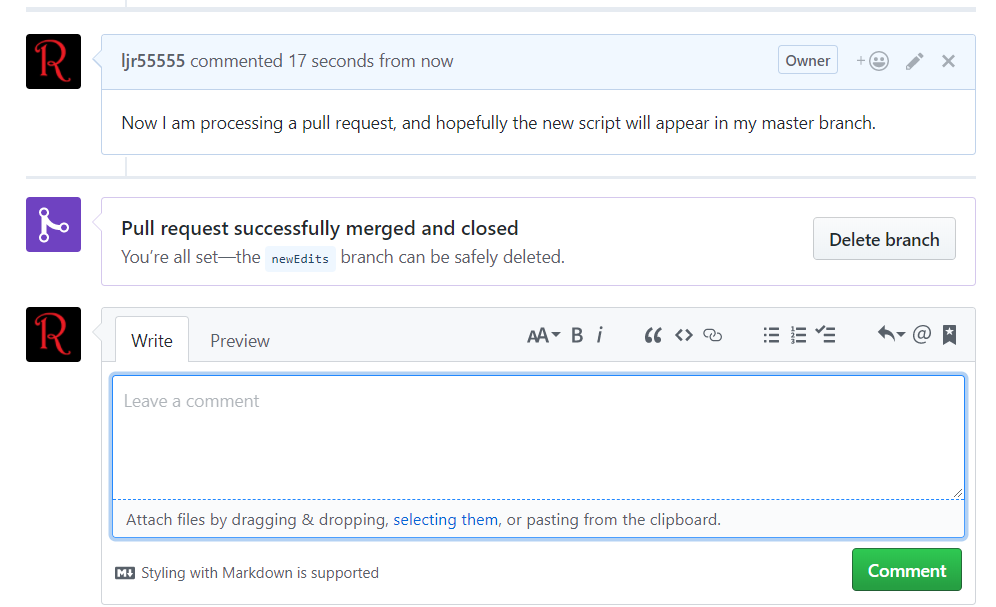
Voila, it is merged in. You can write some comment to close out the pull request.

There is a notification that the request was completed and the branch can be deleted.

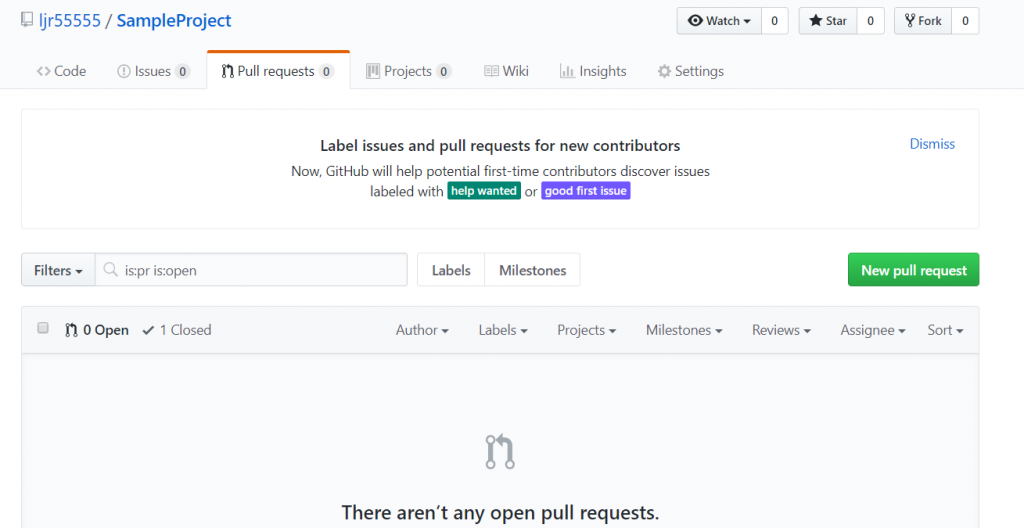
And the project no longer has any open pull requests (you can remove the “is open” filter and see the request again).

And finally, someone should delete the branch. Is that the person who created the branch? Is that the person who maintains the repository? No idea! I’d delete my own, to keep things tidy … but I wouldn’t be offended if the maintainer deleted it either.


Load Runner And Statistical Analysis Thereof

I had offhandedly mentioned a statistical analysis I had run in the process of writing and implementing a custom password filter in Active Directory. It’s a method I use for most of the major changes we implement at work – application upgrades, server replacements, significant configuration changes.

To generate the “how long did this take” statistics, I use a perl script using the Time::HiRes module (_loadsimAuthToCentrify.pl) which measures microsecond time. There’s an array of test scenarios — my most recent test was Unix/Linux host authentication using pure LDAP authentication and Centrify authentication, so the array was fully qualified hostnames. Sometimes there’s an array of IDs on which to test — TestID00001, TestID00002, TestID00003, …., TestID99999. And there’s a function to perform the actual test.

I then have a loop to generate a pseudo-random number and select the test to run (and user ID to use, if applicable) using that number

my $iRandomNumber = int(rand() * 100);
$iRandomNumber = $iRandomNumber % $iHosts;
my $strHost = $strHosts[$iRandomNumber];

The time is recorded prior to running the function (my $t0 = [gettimeofday];) and the elapsed time is calculated when returning from the function (my $fElapsedTimeAuthentication = tv_interval ($t0, [gettimeofday]);). The test result is compared to an expected result and any mismatches are recorded.

Once the cycle has completed, the test scenario, results, and time to complete are recorded to a log file. Some tests are run multi-threaded and across multiple machines – in which case the result log file is named with both the running host’s name and a thread identifier. All of the result files are concatenated into one big result log for analysis.

A test is run before the change is made, and a new test for each variant of the change for comparison. We then want to confirm that the general time to complete an operation has not been negatively impacted by the change we propose (or select a route based on the best performance outcome).

Each scenario’s result set is dropped into a tab on an Excel spreadsheet (CustomPasswordFilterTiming – I truncated a lot of data to avoid publishing a 35 meg file, so the numbers on the individual tabs no longer match the numbers on the summary tab). On the time column, max/min/average/stdev functions are run to summarize the result set. I then break the time range between 0 and the max time into buckets and use the countif function to determine how many results fall into each bucket (it’s easier to count the number under a range and then subtract the numbers from previous buckets than to make a combined statement to just count the occurrences in a specific bucket).

Once this information is generated for each scenario, I create a summary tab so the data can be easily compared.

And finally, a graph is built using the lower part of that summary data. Voila, quickly viewed visual representation of several million cycles. This is what gets included in the project documentation for executive consideration. The whole spreadsheet is stored in the project document repository – showing our due diligence in validating user experience should not be negatively impacted as well as providing a baseline of expected performance should the production implementation yield user experience complaints.