Category: Containerized Development and Deployment

ADO Notifications

I’ve been underwhelmed with the notifications I get from Azure DevOps – there are a lot of build-centric notifications, but I don’t use ADO for builds or deployment apart from playing around. And I really don’t care if the silly test project I set up to build and deploy a website worked, failed, or whatever. I was thinking about hooking whatever they’re calling Flow this week up to ADO and building notification workflows.

Fortunately, a coworker mentioned that you can customize notifications in ADO … which, I’d spent a few seconds poking around and didn’t see anything. But I spent more than a few seconds this time and happened across this little ellipsis on the card that pops up when I click the circle with my initials in it. More options!

A new menu flies out; and, look, there’s “Notifications”

Exactly as I’ve observed, there are a lot of build-centric alerts. So I created a new subscription.

Here’s a subscription that I hope will notify me when items assigned to me have updates to activity or comments.

Docker for Windows: Using Built-in k8s

I just started using k8s built into Docker for Windows, but I couldn’t connect because the target machine actively refused the connection.

C:\Users\lisa>kubectl version
Client Version: version.Info{Major:"1", Minor:"14", GitVersion:"v1.14.6", GitCommit:"96fac5cd13a5dc064f7d9f4f23030a6aeface6cc", GitTreeState:"clean", BuildDate:"2019-08-19T11:13:49Z", GoVersion:"go1.12.9", Compiler:"gc", Platform:"windows/amd64"}
Unable to connect to the server: dial tcp [::1]:8080: connectex: No connection could be made because the target machine actively refused it.

No idea — it’s all internal traffic, but I resorted to turning off my firewall anyway just to see what would happen. Nothing. Turns out I need a KUBECONFIG environment variable pointing to the config file

C:\Users\lisa>set | grep KUB
KUBECONFIG=C:\Users\lisa.RUSHWORTH.000\.kube\config

Applied the yaml file and started the proxy

C:\Users\lisa>kubectl apply -f https://raw.githubusercontent.com/kubernetes/dashboard/v1.10.1/src/deploy/recommended/kubernetes-dashboard.yaml
secret/kubernetes-dashboard-certs created
serviceaccount/kubernetes-dashboard created
role.rbac.authorization.k8s.io/kubernetes-dashboard-minimal created
rolebinding.rbac.authorization.k8s.io/kubernetes-dashboard-minimal created
deployment.apps/kubernetes-dashboard created
service/kubernetes-dashboard created

C:\Users\lisa>kubectl proxy
Starting to serve on 127.0.0.1:8001

Working! Get the token from

kubectl -n kube-system describe secret default

And access the dashboard.


A reminder for myself — the totally not obvious package name for the kubeadm binary on the CHANGELOG link list is Node. Go figure!

Docker Hub

Docker Official Images: Official images won’t have a publisher listed, and they will be tagged with “Official Image”.

Docker Official Images are a set of images curated by Docker. They’re generally recommended for new users as Docker has a team that reviews and publishes these images. Beyond Docker’s verification, you can see how an individual image was built. Navigate to the GitHub image library. Find the file corresponding with the image, and you’ll see a GitRepo line. Navigate to that URL to find the Dockerfiles that were used to build the image.

Docker Certified: Other images will be certified by Docker – these are published by someone other than Docker but have been tested & scanned for vulnerabilities, they come from a reputable source, and comply with best practice guidelines.

If you click on the hyperlinked organization name, they are listed as a verified publisher – this means someone put a little effort into ensuring “Oracle” is actually the corporation everyone thinks of when they hear “Oracle”

Other Images: You’ll also find containers that are not certified that have been published by un-verified parties. Don’t use these without some investigation.

We happen to interact with OpenHAB developers and “know” the guy who builds these images. I trust him and do run this image on my home network. I also know where to go to view his Dockerfiles, and I know how his images are built. https://github.com/openhab/openhab-docker

But there are images posted by random Internet denizens – I run Docker on my personal Windows laptop and needed to access the underlying MobyVM. The image justincormack/nsenter1 will do it … but I have no idea who this person is. A quick search of the Internet yielded a Dockerfile for this image, but there’s nothing that ensures the image on Docker Hub is actually built with this file. It’s safer to use the Dockerfile to build your own version of the image.

GitLab – Using the Docker Executor for Testing

Setting up gitlab-runner to use a Docker executor: You need Docker running on the gitlab-runner host. In my sandbox, I have GitLab running as a Docker container. Instead of installing Docker in Docker, I have mounted the host Docker socket to the GitLab container. You’ll need to add the –privileged flag, and since I’m using Windows … my mount path is funky. But it works.

docker run –detach –hostname gitlab.rushworth.us –publish 443:443 –publish 80:80 –publish 22:22 –name gitlab -v //var/run/docker.sock:/var/run/docker.sock –privileged gitlab/gitlab-ee:latest

Register the runner using “docker-runner register”. I always specify the image in my CI YAML file, so the default image is immaterial … but I’ve encountered groups with an image that mirrors the production servers who set that image as the default.

Edit /etc/gitlab-runner/config.toml and change “privileged = false” to true.

Start the runner (docker-runner start). In the GitLab Admin Area, navigate to Overview => Runners and select the one we just created. When a project is updated, tags can be used to select an appropriate runner. Because most of my testing is done with the shell executor, the runner which uses the shell executor has no tags and the runner which uses the Docker executor is tagged with “runner-docker”. You can require all jobs include a tag to select the appropriate runner (which avoids someone accidentally forgetting a tag and having their project processed through the wrong runner).

An image – you’ll need an image. You can use base images from the Docker Hub registry or create your own image. You can add components in the before_script or use a Dockerfile to build an image from the parent image.

Now we’re ready to use the Docker executor! Create your CI YAML file.

If you are not using the default image, start with “image: <the image you want>”.

We don’t want phpunit in the running image, but I use it for testing. Thus, I need a before_script component to install the phpunit package.

If you’ve used a tag to restrict what is run in your Docker-executor based runner, add the appropriate tag. Include the tester command line.

.gitlab.yml:

image: gitlab.rushworth.us:4567/lisa/ljtestproject-dockerexecutor
stages:
- test

before_script:
# Install dependencies
- bash ci/docker_InstallReqs.sh

test_job:
stage: test
tags:
- runner-docker
script:
- phpunit --configuration phpunit_myapp.xml

Docker_InstallReqs.sh

#!/bin/bash
yum install php-phpunit-PHPUnit

Now when you commit changes to the repository, the Docker-executor based runner will be used for the CI/CD pipeline. A transient Docker container will be created with the image, your before_script will be executed, and then the test script will be run within the container.


Building a Docker Image From a Parent Image

Docker maintains a registry of pre-built images that may be all you need. Put some thought into it, though – don’t just trust any image you find on the registry. When a pre-built image doesn’t meet your needs, you can make your own image based on any base image.

I create a new folder to hold the build instructions, additional configuration files, and notes about the build process. In that folder, create a file named “Dockerfile” which controls the image build.

You’ll need to specify the base image for your build using the FROM directive. I have examples here for installing sqlite3 on both a CentOS and Ubuntu base image. Add LABELs indicating the purpose of the image and who maintains it. Use the “RUN” directives to provide instructions to modify the base image to your needs – install what you want, create folders or files, clean up anything you don’t want.

The ENTRYPOINT is what runs when the container starts – it can be an executable, as in this case, or a script file.

If you need to expose ports for inter-container communication, add a list of ports to expose. SQLite is self-contained, but a microservice environment may have “EXPOSE 21443” to allow other containers to communicate with it on port 21443. Note this is different than binding the container port to a host – my Apache web server container has 443 bound; but that’s done in the “docker run” line where the container is built, not in the Dockerfile for the image.

Example – SQLite3 on CentOS

FROM centos:latest

LABEL "version": "latest"
LABEL "description": "CentOS server running SQLite3"
LABEL "maintainer": "DockerImages@lisa.rushworth.us"

RUN yum -y install glibc.i686
RUN yum -y install zlib.i686
RUN yum -y install wget
RUN yum -y install unzip

RUN cd /root && wget https://sqlite.org/2019/sqlite-tools-linux-x86-3290000.zip && unzip -j -d /usr/bin -o /root/sqlite-tools-linux-x86-3290000.zip && rm -f /root/sqlite-tools-linux-x86-3290000.zip

RUN rm -rf /var/lib/apt/lists/* /tmp/* /var/tmp/*

RUN mkdir -p /db

WORKDIR /db

ENTRYPOINT [ "sqlite3" ]

Example – SQLite3 on Ubuntu

FROM ubuntu:latest

LABEL "version": "latest"
LABEL "description": "Ubuntu server running SQLite3"
LABEL "maintainer": "DockerImages@lisa.rushworth.us"

RUN DEBIAN_FRONTEND=noninteractive apt-get -yq update

RUN DEBIAN_FRONTEND=noninteractive apt-get -yq install sqlite3

RUN rm -rf /var/lib/apt/lists/* /tmp/* /var/tmp/*

RUN mkdir -p /db

WORKDIR /db

ENTRYPOINT [ "sqlite3" ]

Save your Dockerfile and build your container using “docker build -t image/name .”

Use “docker images” to confirm the image has been successfully created.

And start a container using your image:

docker run -it --name ljrimagetest ljr/sqllite3

If you are having problems starting your container, change the entrypoint to something like “/bin/bash” – this will drop you to the host’s command line instead of the application. From there, you can troubleshoot your launch problems and sort the problem. The CentOS sqlite install, as an example, required glib and zlib components to run. Rather than trying something, rebuilding the image, launching a container, and looping until sqlite3 launched … I used bash as my entrypoint, installed packages until the application ran, and then modified the Dockerfile and rebuilt the image.

At this point, you can tag the image and upload it to a registry. I use my GitLab server to store Docker images. There is a DockerImages repository

To tag the image, use

docker tag ljr/sqllite3 gitlab.rushworth.us:4567/lisa/dockerimages/sqllite3:latest

And upload the image to your registry (you may need to authenticate first)

docker push gitlab.rushworth.us:4567/lisa/dockerimages/sqllite3:latest

If you are using GitLab as your registry, navigate to the repository. Select Packages => Container Registry

Here’s my Sqlite3 image


GitLab – Using the built-in Docker Registry

GitLab has a built-in Docker registry that you can use for projects. With the Omnibus install (or a container based on the official Docker image), enabling the registry is as simple as adding a config line to your gitlab.rb (this assumes you have a SSL key at /etc/gitlab/ssl named with the fully qualified hostname and using .crt for the public key and .key for the private key

registry_external_url ‘https://gitlab.example.com:4567’

Then just tag an image to a project’s repository URL

docker tag ossautomation/cent68php56 gitlab.example.com:4567/lisa/ljtestproject-dockerexecutor

Log in and push the image:

D:\git\ljtestproject-dockerexecutor>docker login gitlab.example.com:4567
Username: lisa
Password:
Login Succeeded

D:\git\ljtestproject-dockerexecutor>docker push gitlab.example.com:4567/lisa/ljtestproject-dockerexecutor
The push refers to repository [gitlab.example.com:4567/lisa/ljtestproject-dockerexecutor]
45c3e2f5d139: Pushing [=> ] 33.31MB/1.619GB

Accessing MobyVM (And adding an exposed port to an existing Docker container)

I needed to map an addition port into an existing Docker container. Now I know the right thing to do is to create a new container and do it right this time but GitLab’s container has problems running on the Windows Docker Desktop. Permission-based problems that I’m not particularly included to attempt to sort out just to run a simple sandbox. Which means I’d need to drop my config file back in place & recreate my sandbox projects. And since I’m using CI/CD variables which don’t export … recreating the sandbox projects is a bit of a PITA.

On Linux, I can fix this by editing the config.v2.json and hostconfig.json files … but this is Windows running a funky Hyper-V Linux. And it turns out you can access the files on this MobyVM.

docker run -it --rm --privileged --pid=host justincormack/nsenter1

Now I’m able to cd into /var/lib/docker/containers, find the full ID for my GitLab container and cd into it, and edit the two config files. If it is running, you need to stop the container prior to editing the config files.

config.v2.json — add the port to “ExposedPorts”

chStdin”:false,”AttachStdout”:false,”AttachStderr”:false,”ExposedPorts”:{“22/tcp”:{},”443/tcp”:{},”80/tcp”:{},”4567/tcp”:{}},”Tty”:fal…

hostconfig.json — add the port to “PortBindings”

ult”,”PortBindings”:{“22/tcp”:[{“HostIp”:””,”HostPort”:”22″}],”443/tcp”:[{“HostIp”:””,”HostPort”:”443″}],”80/tcp”:[{“HostIp”:””,”HostPort”:”80″}],”4567/tcp”:[{“HostIp”:””,”HostPort”:”4567″}]},”Res…


Stop the Windows Docker service, start it, then start the container again. Voila! The new port for the container registry is there without recreating the container.

Docker Desktop for Windows – Bind Mounts

I’ve been trying to set up a Docker container running an older CentOS, Apache, and PHP version as a sandbox for work. This would allow me to update code on my local computer, test changes, and then pull the changes to the development server for UAT testing. Setting up the base container was easy enough — installed a VM, tar’d off the system, and imported it as a Docker image. There’s a lot of optimization that could/should be done, but I was aiming for proof of concept at this stage.

I am using bind mounts for the website configuration and code — the website conf file in conf.d, the SSL certificates, and the vhtml folder which houses the web code. This means I can tweak the site config & code in my IDE, reload Apache in Docker, and validate my changes. It worked great until I connected to the company VPN. Attempting to access the mounted data just hangs. Nothing. Drop the VPN, and the files are there again.

There are two problems — firstly, the default VPN configuration does not allow access to local network resources. And, it seems, the Docker NAT is a local network resource. We use Cisco AnyConnect. In the settings, I checked off “Allow local (LAN) access when using VPN (if configured)”. Note the if configured — the server-side settings need to allow use of local resources when connected via VPN. Fortunately, people with WiFi printers complained about having to disconnect the VPN every time they wanted to print something; and accessing local resources is permitted in our profile.

Unfortunately, I still couldn’t access files on my mount points. Docker Desktop shared out my drive, and the server network mounts the CIFS share. With my domain credentials. An Active Directory domain which is most certainly not registered in the VPN DNS servers.

[root@5542506m1a5e /]# mount
overlay on / type overlay (rw,relatime,lowerdir=/var/lib/docker/overlay2/l/QMCCTMGPBHQFW66ARPWHSQMWQL:/var/lib/docker/overlay2/l/IQ2YIH47ZXTN55PGH3BWUKFPTT,upperdir=/var/lib/docker/overlay2/d072c94532976a4196174751c57359139501739001e7b9d50de59041c768a307/diff,workdir=/var/lib/docker/overlay2/d072c94532976a4196174751c57359139501739001e7b9d50de59041c768a307/work)
proc on /proc type proc (rw,nosuid,nodev,noexec,relatime)
...
//10.0.75.1/D on /etc/httpd/certs type cifs (rw,relatime,vers=3.02,sec=ntlmsspi,cache=strict,username=myuid,domain=mydomain,uid=0,noforceuid,gid=0,noforcegid,addr=10.0.75.1,file_mode=0755,dir_mode=0777,iocharset=utf8,nounix,serverino,mapposix,nobrl,mfsymlinks,noperm,rsize=1048576,wsize=1048576,echo_interval=60,actimeo=1)
...
tmpfs on /sys/firmware type tmpfs (ro,relatime)

To use the share when connected via the VPN, I needed to use the credentials of a local account here. Beyond creating a local administator-level account, you may need to add read/write permissions for that new account to your %userprofile% directory — inheritence is generally disabled & only the individual user has access to the folder.

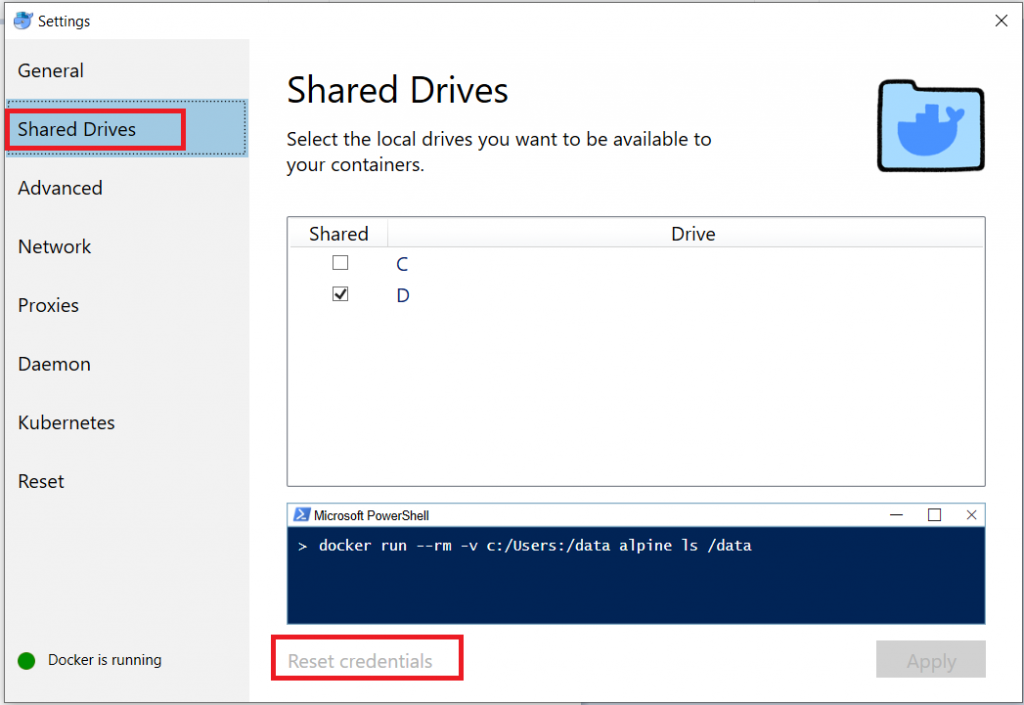
Once there’s a local account set up to work, you’ve got to tell Docker to use it. In the settings, select “Shared Drives”. Use “Reset credentials” to open a prompt for the logon credentials that will be used to mount the shared volume.

o

Start the Docker container, VPN into the company network, and I’ve got a fully functional sandbox in a Docker container.

Cleaning Up Unused Docker Images

I’ve been using Docker for quite some time, but never had unused container images. This is partially because I installed a new hard drive and started from a blank slate, but also because I haven’t needed to use many different images to build my containers.

I’ve changed jobs recently and wanted to set up a container to mirror our web server. Which meant trying to get a CentOS 6.8 container going. Except there isn’t one from Cent anymore. And I don’t exactly trust random-dude-from-the-Internet’s OS. Download it and poke around without running it, sure … but that’s not a platform on which I can do my development.

And that means I’ve got a few images that I do not need. To view the list of images, use “docker images -a”


D:\docker>docker images -a
REPOSITORY TAG IMAGE ID CREATED SIZE
openhab/openhab snapshot 8a4749c86ff3 4 weeks ago 527MB
docker4w/nsenter-dockerd latest 2f1c802f322f 9 months ago 187kB
centos/php-56-centos7 latest 92ed8b3a7cb4 15 months ago 617MB

13652604711/centos6.8-ssh latest 59ab169b5158 2 years ago 289MB

Then use “docker rmi imagename” to remove any unnecessary ones.

D:\docker>docker rmi centos/php-56-centos7
Untagged: centos/php-56-centos7:latest
Untagged: centos/php-56-centos7@sha256:f3c95020fa870fcefa7d1440d07a2b947834b87bdaf000588e84ef4a599c7546
Deleted: sha256:92ed8b3a7cb4d56d3a1c58386d966f22736010a292a81a72dddbc4ffc7cae3fd
Deleted: sha256:bdcb229c59ed69d26750cd0d24362670e1fa2ae9be6ef19aa3e7c5571a4a8503
Deleted: sha256:90eb7fca62f6c0febd9cc21544269029ff231f39f16054ba6b0ca93ec1037d97
Deleted: sha256:cdcf05e149fc6cb2801f7f93dce3acb54465fe6c46a16dd6135aa74d79bedffa
Deleted: sha256:139498a5907a4d17cf07b1400bdbdb4db5e9f1ac4e3985aac2b374eaa712d5fb
Deleted: sha256:5f0780b14e43db37e84162e0045657203ac1e9fb531cc3e879fa464eda013e79
Deleted: sha256:7e117241875497974bb56f09e6340e142a9acaa11af76917afab345acc25b5c1
Deleted: sha256:4b170488c295918f4d7618c2cd0b9b428d55ec952dd6a715593e3af34e538d94
Deleted: sha256:1e889f7360c52d1b20f93335382290445e4f257f08ccef01694837572842e95f
Deleted: sha256:43e653f84b79ba52711b0f726ff5a7fd1162ae9df4be76ca1de8370b8bbf9bb0

D:\docker>docker rmi 13652604711/centos6.8-ssh
Untagged: 13652604711/centos6.8-ssh:latest
Untagged: 13652604711/centos6.8-ssh@sha256:41bbe66ac18f199efac325d0d4bcb5d0390ec501ca82d6d1ce223df8a050be3a
Deleted: sha256:59ab169b5158a172079e2a89442936bc49292ea951f2eb9acb688a0ee34f95e1
Deleted: sha256:12d850520660ec9de87e84735a7067e663db282245502820f09dae5c937a93d2
Deleted: sha256:6b5c6954e3d511934786375730a068d0f013dcc99356a341a8c5d268a3b1cf3d

Did you know … you can open files in VSCode over SSH!?

The plug-in is a preview and you need to use VS Code Insiders to install it … but you can open files and folders directly from a *n?x server via SSH. This is a great way to circumvent Samba quirks (changing the case of a file name, filemode differences between the Samba share and the local files causing all files to be marked as changed, etc) – and can even eliminate the need to load file sharing servers like Samba in the first place.

Once the plug-in is installed, a “Remote – SSH” icon appears in the left-hand menu bar. There is a single configuration option for a file containing host definitions. You’ll want to set up key-based authentication and include the path to the authorized private key in your host config.

Right-clicking a host will allow you to open a file or folder within the current VSCode window or launch a new window.

One caveat – you are running git commands from the context of the remote machine … this means you’ll need a user name set up there or your commits show up with the local logged on username and username@hostname address.