Reading about Docker’s account data compromise and I wonder how many organizations include token security as part of their general security practices. Maybe not routine changes (although I’d go that direction to everyone knows how to do it!), but are tokens revoked and re-issued when a member leaves the group?
Category: Containerized Development and Deployment
Cloudy ROI
I often have trouble seeing the value behind cloud offerings — but most cloud migrations I’ve seen have done 1:1 replacement of locally hosted servers with cloud hosted servers. The first two years, the cloud hosted servers are cheaper (although that’s some dodgy accounting as we’re assuming no workforce changes as a result of outsourcing servers and depreciation of the owned asset is not considered). The third year, though, is a break-even point. General Depreciation System considers computers a five-year property, but there are accounting practices to handle fully depreciated assets. It remains on the balance sheet as a cost, it’s accumulated depreciation is listed as a accumulated depreciation contra asset item. When you *do* stop using the asset, the accumulated depreciation account is debited for the full depreciated amount, the fixed asset account is credited with its full cost. Point being I can continue using a computer asset after five years. Cloud hosted servers make financial sense for a company that tends towards “bleeding edge” implementations (buying the new whatever next year), but for a company that buys a server or application and then uses it for a decade … you’re simply turning capital expense into a greater ongoing operating expense. Which … good this year, but bad in the long term.
Now for a smaller company that doesn’t have a dedicated IT department, and that doesn’t actually need the capacity provided by a single modern server … externally hosting resources is financially beneficial. A web site, e-mail, chat-based customer service? All make sense to host externally. You don’t have to own half a dozen servers, make sure they’re backed up, etc. But I don’t see the cost benefit at enterprise levels unless (1) you want to build data centers close to customers without the expense of actually building a data center. For instance, opening your services to customers in the EU … getting a data center set up in, say, Germany isn’t a quick proposition. As your business grows, it may become “worth it” to invest money into a European data center. But cloud-hosted computers from some major provider who already has a presence there provides quick time-to-market and minimizes up-front cost. Some countries may have a laborious process for prospective businesses too — a process the cloud hosting provider has already navigated. Or you (2) plan a substantial workforce reduction. If someone else is backing up, patching, and monitoring systems … you don’t need people performing those duties. Since a cloud-hosting provider is able to leverage those employees across far more servers than you’d need — there’s a place where scale produces a cost benefit. But, strangely, I don’t see companies reducing IT operations staff after moving to the cloud. This may be a long-term goal to ensure the enthusiasm of staff for the move — it’s not particularly enticing to put six months of work into a project that ensures my job goes away. Or this may just be a thing — move to the cloud and still have twenty ops employees.
Building A Jenkins Sandbox
You can use a pre-built docker container (the “long term support” iteration is published as jenkins/jenkins:lts) or perform a local installation from https://jenkins.io/download/, add a package repo to your package manager config (http://pkg.jenkins-ci.org/redhat-stable/jenkins.repo for RedHat-based systems), or build it from the source repo. In this sandbox example, I will be using a Docker container.
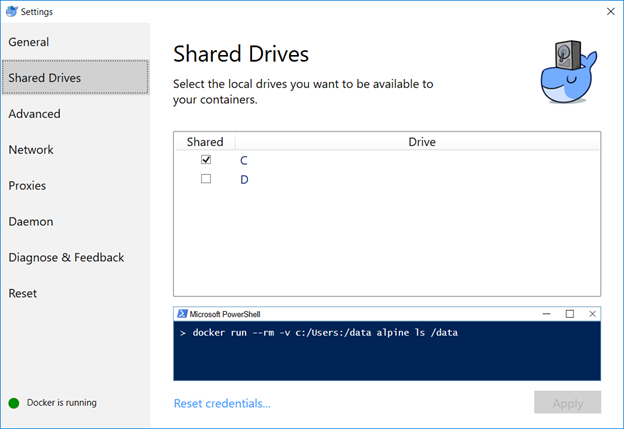
Map the /var/Jenkins_home value to something. This allows you to store user-specific data on your local drive, not within the Docker image. In my case, c: is shared in Docker and I’m using c:\docker\jenkins\jenkins_home to store the data.
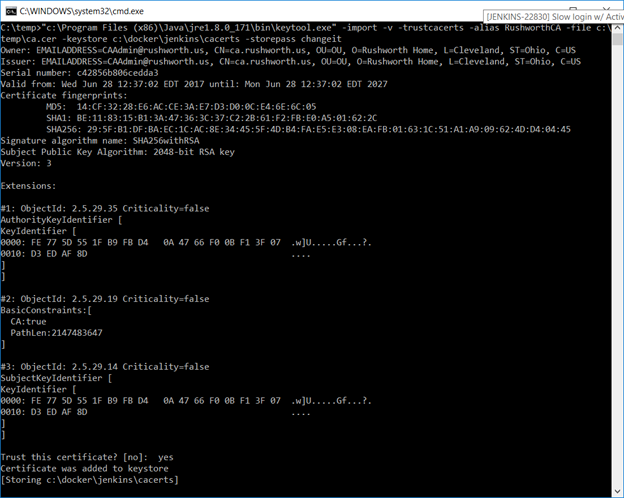
I have a java cacerts file mounted to the container as well – my CA chain has been imported into this file, and the default password, changeit, is used. This will allow Java to trust internally signed certificates. The keystore password appears as part of the process (i.e. anyone who can run commands like “ps aux” or “ps -efww” will see this value, so while security best practices dictate the default password should be changed … don’t change it to something like your root password!).
We can now start the Docker container:
docker run -p 8080:8080 -p 50000:50000 -v /c/docker/jenkins/jenkins_home:/var/jenkins_home -v /c/docker/jenkins/cacerts:/usr/lib/jvm/java-8-openjdk-amd64/jre/lib/security/cacerts jenkins/jenkins:lts
Once the container is running, you can visit the management web site (http://localhost:8080) and install the modules you want – or just take the defaults (you’ll end up with ‘stuff’ you don’t need … I don’t use subversion, for instance, and don’t really need a plugin for it). For a sandbox, I accept the defaults and then use Jenkins => Manage Jenkins => Manage Plug-ins to remove obviously unnecessary ones. And add any that may be needed (e.g. if you are using Visual Studio solution files, add in the MSBuild plugin).
Configuring Authentication (LDAP)
First install the appropriate plug-in – referrals cause authentication problems when using AD as the LDAP authentication source, if you are using AD for authentication … use the Active Directory plugin).
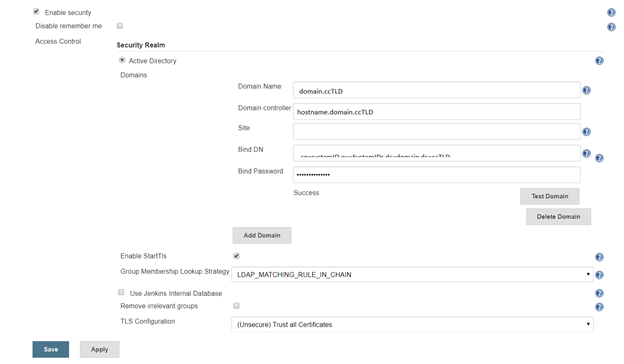
Manage Jenkins => Configure Global Security. Under access control, select the radio button for “LDAP” or “Active Directory”. Configuration is implementation specific.
AD:
Click the button to expand the advanced configuration. You should not need to specify a domain controller if service records for the domain are present in DNS. The “Site” should be “UserAuth”. For the Bind DN, you can use your userid (user@domain.ccTLD or domain\uid format) with your password. Or you can create a dedicated service account – for a “real world” implementation, you would want a dedicated service account (using *your* account means you’ll need to update your Jenkins config whenever you change your password … and when you forget this update, auth fails).
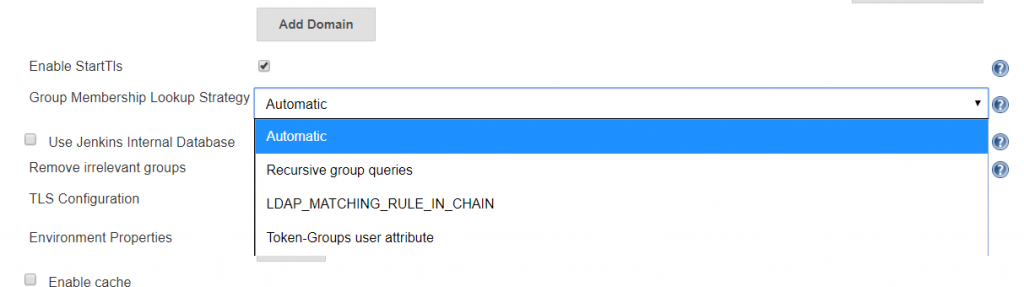
A note about the group membership lookup strategy:
For some reason, Jenkins assumes recursive group memberships will be used (e.g. there is a “App XYZ DevOps Team” that is placed into the “Jenkins Users” group, and “Jenkins Users” is assigned authorizations within the system). Bit of a shame that “none” isn’t an option for cases where there isn’t hierarchical group membership being built out.
There are three lookup strategies available: recursive group queries, LDAP_MATCHING_RULE_IN_CHAIN, and Toke-Groups user attribute. There have been bugs in the “Automatic” strategy that caused timeout failures. Additionally, the group list returned by the three strategies is not identical … so it is possible to have inconsistent authorization results as different strategies are used. To ensure consistent behaviour, I select a specific strategy.
Token-Groups: If you are not using Distribution groups within Jenkins to assign authorization (and you probably shouldn’t since it’s a distribution group, not a security group), you can select the Token-groups user attribute to handle recursive group membership. Token-groups won’t work if you are using distribution groups within Jenkins, though, as only security groups show up in the token-groups attribute.
LDAP_MATCHING_RULE_IN_CHAIN: OID 1.2.840.113556.1.4.1941, LDAP_MATCHING_GROUP_IN_CHAIN is an extended matching operator (something Microsoft added back in Windows 2003 R2) that can be used in LDAP filters:
(member:1.2.840.113556.1.4.1941:=cn=Bob,ou=ResourceUsers,dc=domain,dc=ccTLD)
This operator has known issues with high fan-outs and can cause hangs while data is retrieved. It is, however, a more efficient way of handling recursive group memberships. If your Jenkins groups contain only users, you will not encounter the known issue. If you are using nested groups, my personal recommendation would be to test each option and time logon activities … but if you do not wish to perform a test, this is a good starting option.
Recursive Group Queries: Jenkins issues a new LDAP query for each group – a lot of queries, but straight-forward queries. This is my last choice – i.e. if everything else hangs and causes poor user experience, try this selection.
For Active Directory domains that experience slow authentication through the AD plug-in regardless of the selected recursion scheme, I’ve set up the LDAP plug-in (it does not handle recursive group memberships) but it’s not a straight-forward configuration.
LDAP:
Click the button to expand the advanced server configuration. Enter the LDAP directory connection details. I usually start with clear text LDAP. Once the clear text connection tests successfully, the certificate trust can be established.
You can add a group search filter, but this is not required. If you request your group names start with a specific string, e.g. my ITSS CSG organization’s Jenkins server might use groups that start with ITSS-CSG-Jenkins, you can add a cn filter here to restrict the number of groups your implementation looks through to determine authorization. My filter, for example, is cn=ITSS-CSG-Jenkins*
Once everything is working with clear text, load the Root and Web CA public keys into your Java instance’s cacerts file (if you have more than once instance of Java and don’t know which one is being used … either figure out which one is actually being used or repeat the keytool commands for each cacerts file on your machine).
In the Docker container, the file is /usr/lib/jvm/java-8-openjdk-amd64/jre/lib/security/cacerts and I’ve mapped in from a locally maintained cacerts file that already contains our public keys for our CA chain.
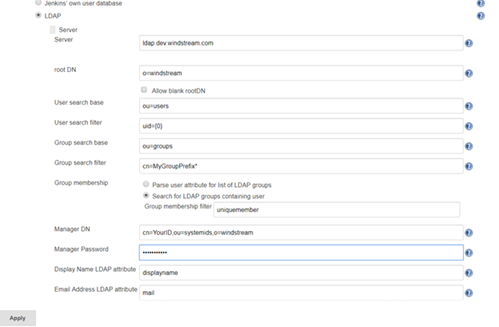
Before saving your changes, make sure you TEST the connection.
Under Authorization, you can add any of your AD/LDAP groups and assign them rights (make sure your local back door account has full rights too!).
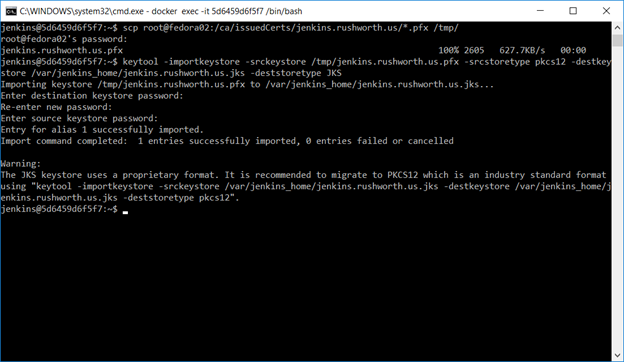
Finally, we want to set up an SSL web site. Request a certificate for your server’s hostname (make sure to include a SAN if you don’t want Chrome to call your cert invalid). Shell into the Docker instance, cd into $JENKINS_HOME, and scp the certificate pfx file.
Use the keytool command to create a JKS file from this PFX file – make sure the certificate (PFX) and keystore (JKS) passwords are the same.
Now remove the container we created earlier. Don’t delete the local files, just “docker rm <containerid>” and create It again
docker run –name jenkins -p 8443:8443 -p 50000:50000 -v /c/docker/jenkins/jenkins_home:/var/jenkins_home -v /c/docker/jenkins/cacerts:/usr/lib/jvm/java-8-openjdk-amd64/jre/lib/security/cacerts jenkins/jenkins:lts –httpPort=-1 –httpsPort=8443 –httpsKeyStore=/var/jenkins_home/jenkins.cert.file.jks –httpsKeyStorePassword=keystorepassword
Voila, you can access your server using an HTTPS URL. If you review the Jenkins documentation, they prefer leaving the Jenkins web server on http and using something like a reverse proxy to perform SSL offloading. This is reasonable in a production environment, but for a sandbox … there’s no need to bring up a sandbox Apache server just to configure a reverse proxy. Since we’re connecting our instance to the real user passwords, sending passwords around in clear text isn’t a good idea either. If only you will be accessing your sandbox (i.e. http://localhost) then there’s no need to perform this additional step. The server traffic to the LDAP / AD directory for authentication is encrypted. This encryption is just for the client communication with the web server.
Using Jenkins – System Admin Stuff
There are several of “hidden” URLs that can be used to control the Jenkins service (LMGTFY, basically). When testing and playing with config parameters, restarting the service was a frequent operation, so I’ve included two service restart URLs here:
https://jenkins.domain.ccTLD:8443/safeRestart ==> enter quiet mode, wait for running builds to complete, then restart
https://jenkins.domain.ccTLD:8443/restart ==> Restart not so cleanly
Multiple discussions about creating a more fault tolerant authentication scheme within Jenkins exist on their ‘Issues’ site. Currently, you cannot use local accounts if the directory service is unavailable. Not a big deal if you’re on the company network and using one of our highly available directory solutions. Bit of a shocker, though, if your sandbox environment is on your laptop and you try to play with the instance when not on the company network. In production implementations, this would be a DR consideration (dependency on the directory being recovered). In a cloud-hosted implementation, this creates a dependency on network connectivity into the company.
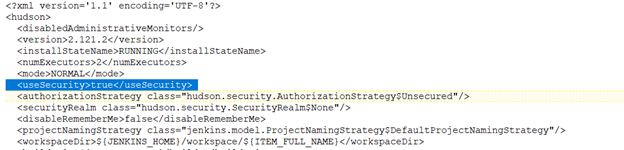
As an emergency solution, you can disable security on your Jenkins installation. I’d also get some sort of firewall rule (OS-based or hardware firewall) to restrict console access to a trusted terminal server or workstation. To disable security, stop Jenkins. Edit the config.xml file in $JENKINS_HOME, and ifnd the <useSecurity> section. Change ‘true’ to ‘false’ and start Jenkins. You’ll be able to access the console without credentials.
Updating Jenkins Image
General practice for updating an application is not to update a container. Instead, download an updated image and recreate the container with the new image. I store the container initialization command along with the folder to which image directories are mapped. My file system has /path/to/docker/storage/AppName that contains a text file with the initialization command and folder(s) that are mapped into the container. This avoids having to find the proper initialization parameters when I upgrade the container.
To update the container, pull a new image, stop the container, remove the container, and create it again. That is:
docker stop jenkins
docker pull jenkins/jenkins:lts
docker rm jenkins
<whatever you used to create the container>
Kubernetes – Using Manifest Files To Deploy
While I’ve manually configured Kubernetes to create proof-of-concept sandbox systems, that is an inefficient approach for production systems. The kubectl create command can use a yaml file (or json, if you prefer that format). I maintain my manifests in a Git repository so changes can be tracked (and so I know where to find them!). Once you have a manifest, it’s a matter of using “kubectl create -f manifest1.yaml” or “kubectl create -f manifest1.yaml -f manifest2.yaml … -f manifestN.yaml” to bring the ‘stuff’ online.
But what goes into a manifest file? The following file would deploy four replicas of the sendmail container that is retained in my private registry.
If the namespaces have not been created,
apiVersion: v1
kind: Namespace
metadata:
  name: sendmailtest
The command “kubectl get ns” will list namespaces on the cluster. Note that ‘deployment’ items were not available in the v1 API, so the v1beta1 version needs to be specified to configure a deployment.
---
apiVersion: v1
kind: Pod
metadata:
  name: sendmail
  namespace: sendmailtest
  labels:
    app: sendmail
spec:
  containers:
    - name: sendmail
      image: sendmail
      ports:
        - containerPort: 25
---
apiVersion: v1beta1
kind: Deployment
metadata:
  name: sendmail
spec:
  replicas: 4
  template:
    metadata:
      labels:
        app: sendmail
    spec:
      containers:
        - name: sendmail
          image: 'rushworthdockerregistry/sendmail/sendmail/sendmail:latest'
          ports:
            - containerPort: 25

---
apiVersion: v1
kind: Service
metadata:
  name: sendmail-service
  labels:
    name: sendmail-service
spec:
  ports:
    - port: 25
      targetPort: 25
      protocol: TCP
      name: smtp
  selector:
    app: sendmail
  type: ClusterIP
Containerized Development v/s Microservices
While both monolithic and microservice applications can be deployed in containers, there is a significant difference. Understanding that difference can save time/money/effort decomposing an application into microservices when the benefits you desire can be gained through simple containerized deployments.
One of the touted benefits of microservices — the ability for different teams to use different internal practices, different coding standards, hell even different languages and still have a functioning application because the interface is static and well documented … well, that sounds like a nightmare to me.
A company with which I worked a decade ago had teams of developers devoted to different components of the application — essentially your team owned a class or set of functions. The class/functions were had well documented and static interfaces — you wouldn’t change void functionX(int iVariable, string strOtherVariable) to return boolean values. Or to randomly add inputs (although functions were overloaded). Developers were tasked with ensuring backwards compatibility of their classes and functions. The company had a “shared libraries” development team who worked on, well, shared libraries. Database I/O stuff, authentication frameworks, GUI interfaces. A new project would immediately pull in the relevant shared functions, then start developing their code.
Developers were able to focus on a small component of the application, were able to implement code changes without having to coordinate with other teams, and consumers of their resource were able to rely on the consistent input and output of the functions as well as consistent representation of class objects.
When a specific project encountered resource shortfalls (be that family emergencies reducing workers or sales teams making overly optimistic commitments), the dozens of C# programmers could be shifted around to expand a team. In a team with an outstanding team lead, employees could easily move to other groups to progress their career.
What happens in a microservices environment? You’ve got a C# team, a Java team, a Python team. You get some guy in from Uni and he’s starting up a LISP team because Lisplets will get his code delivered through Tomcat. The next guy who comes in starts the F90 team because why not? Now I’m not saying someone with a decade of experience in Java couldn’t learn LISP … but you go back to “Google up how to do X in LISP” programming speed. There are language nuances of which you are not aware and you introduce inefficiency and possibly bugs to the code.
What’s my point? Well, (1) business practices (we program in this language, here’s our style guide, etc) are going to negate some of the perceived benefits of microservices. The small gain to be had by individual teams picking their own way are going to be outweighed by siloing (some guy from the Java team isn’t going to move into a lead role over on the C# team) and resource limitations (I cannot reallocate resources temporarily). But (2) you can architect your project to provide, basically, the same benefits.
Microservices make sense where an application has different components with different utilization rates. A product that runs a Super Bowl commercial may see a huge spike in web traffic — but scaling up thousands of complete web servers to handle the load is an inefficient use of resources. There’s a lot of product browsing, but shipping quotes, new account creations, and check-outs are not all scaling linearly to web hits. Adding tens of thousands of browsing components and only expanding the new-account-creation or checkout services as visitors decide to make purchases can be done more quickly to respond in real-time to traffic increases.
Applications where each component gets about the same amount of use … I use Kubernetes to manage a cluster of sendmail servers. As mail traffic increases, additional PODs are brought online. It’s a configuration I’d like to mirror at work — we currently have nine sendmail servers — to provide physical and site redundancy for both employee mail traffic and automated system traffic. With Kubernetes, three servers in each of the two sites (six total) would provide ample resources to accommodate mail flow. Automated systems send a lot of mail at night, and the number of pods servicing that VIP would increase. User mail flow increases during the day, so while automated mailflow pods would be spun down … user mail flow ones would be spun up. With a 33% reduction in servers, I’ve created a solution with more capacity for highly used functions (this function could be the primary usage of all six servers) that is geo-redundant (one of the current systems is *not* geo-redundant as the additional two servers in the alternate site couldn’t be justified). But I didn’t need to decompose sendmail into microservices to achieve this. Simply needed to build a containerized sendmail.
Creating a Docker Image
There are a lot of pre-built images available on Docker Hub — most recent OS builds, Apache, MariaDB, there’s even an Oracle Enterprise database server. If you’ve got a fairly recent OS, you can start from that base image and use Dockerfile (or in a CI/CD pipeline, the before_script) to install additional components. But if your OS is out-of-date … you still need a test platform that matches production! You can create your own Docker image without using a base.
First, you need a server. This can be your current dev box (or your current prod box, but I avoid touching the prod boxes!). It can be a new install. Either way, you need a server. Log in and su to root. Then tar off the installation:
tar -czf /image/centos51.tgz ./ --exclude /image
Once you’ve got a tar of the server, scp the tar to whatever computer is running your docker client. Import the image to Docker. (You can tag the image and upload it to a registry, if you’ve got one.)
docker load centos51.tgz sampleproject/cent51
Finally, start a container based on the image:
docker run -p 80:80 -p 443:443 -v /data/docker/certs:/etc/httpd/certs -v /data/docker/conf.d/SampleProjectSite.conf:/etc/httpd/conf.d/SampleProjectSite.conf -v /data/git/SampleProjectCode:/var/www/vhtml/SampleProject/html -dit --name SampleProject sampleproject/cent51 /bin/bash
Baked French Toast Casserole with Maple Syrup
Ingredients
- 1 loaf French bread (~16 ounces)
- 8 large eggs
- 1.5 cups heavy whipping cream
- 1.5 cups milk
- 2 tablespoons maple syrup
- 1 teaspoon vanilla extract
- 1/4 teaspoon ground cinnamon
- 1/4 teaspoon ground nutmeg
- Dash salt
Directions
Slice bread into 20 slices, 1-inch each. Arrange slices in a generously buttered 9 by 13-inch baking dish in 2 rows, overlapping the slices. In a large bowl, combine the eggs, half-and-half, milk, sugar, vanilla, cinnamon, nutmeg and salt and beat with a rotary beater or whisk until blended but not too bubbly. Pour mixture over the bread slices, making sure all are covered evenly with the milk-egg mixture. Spoon some of the mixture in between the slices. Cover with foil and refrigerate overnight.
The next day, preheat oven to 350 degrees F.
Bake for 40 minutes, until puffed and lightly golden. Serve with maple syrup, fresh fruit, and fresh whipped cream.