Category: Office 365

Did you know … you can send a “receipt” for Microsoft Forms submissions?

I had a maths professor who mused that, back when he was an undergrad, calculators were a newfangled thing that kids only halfway trusted. You’d complete your test; and, time permitting, you would power on that calculator and see if it agreed. Decades later, kids didn’t even do a mental check that the calculator’s results were halfway reasonable. As a technology becomes more familiar, innate trust is built. In the interim … trust but verify. Beyond trust, it’s nice to have a copy of what you’ve submitted when discussing your submissions with someone else. Or, for a periodic survey, to remind you what you said last time. Or because you are particularly proud of a particular turn of phrase and would like to use that one again. For whatever reason you want to create a “receipt” for Forms submissions, you can do it.

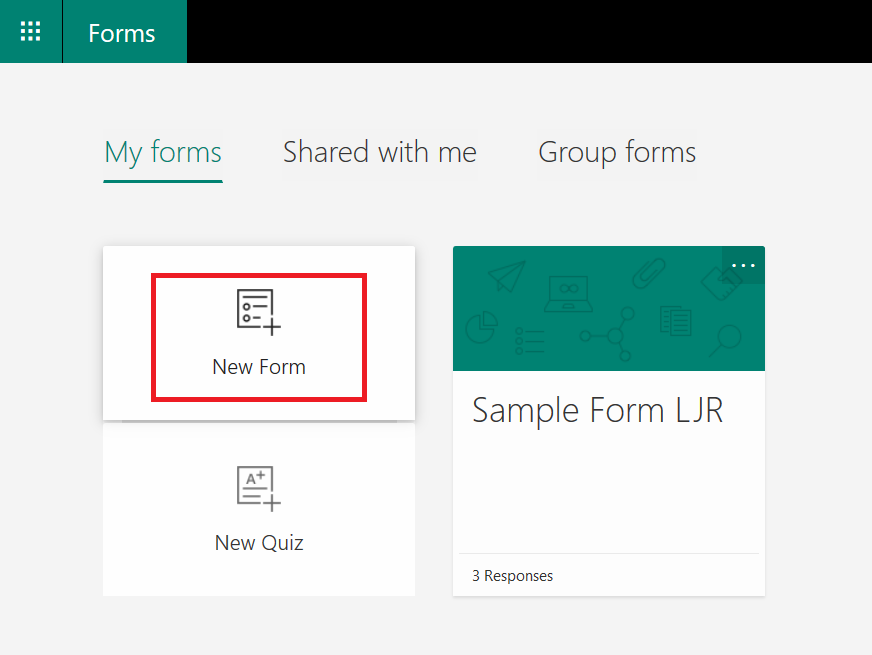
The first thing you need is a Form created under your user ID. Go to https://forms.office.com/ and click “New Form”
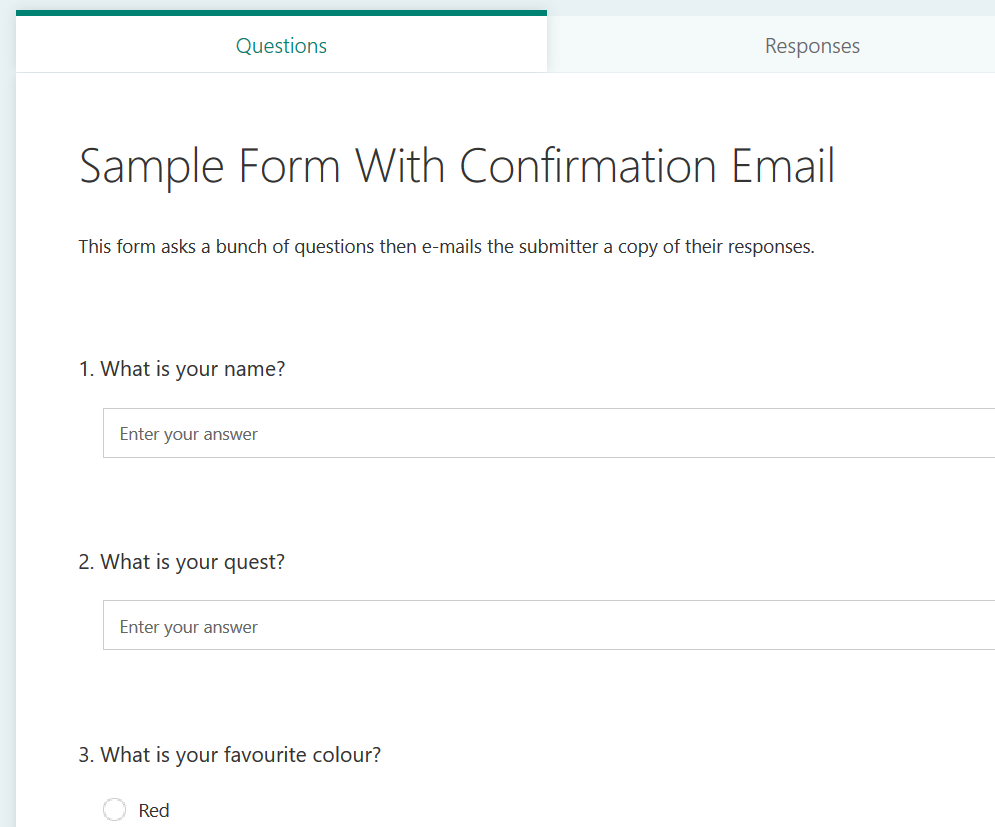
Give your form a name and add some questions
From the hamburger menu in the upper right-hand corner, select “Settings”

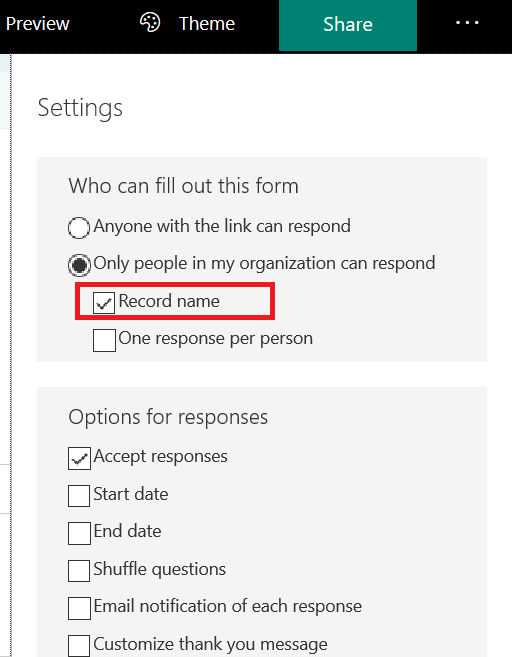
Verify that the form is restricted to “people in my organization” and “Record name” is selected.

** If the form needs to be available to individuals outside of the organization, you would need a form field to request their e-mail address … otherwise we don’t know where to send the receipt.
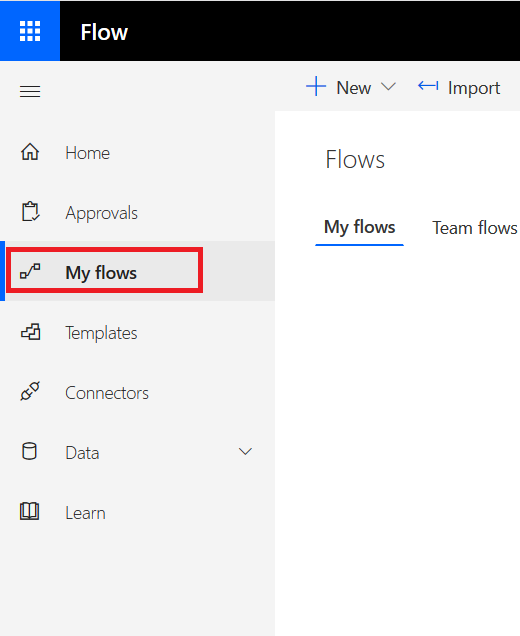
OK, we’ve got a form. Now we need to add a workflow to send the submitter a copy of their responses. Go to https://flow.microsoft.com and select the “My Flows” tile
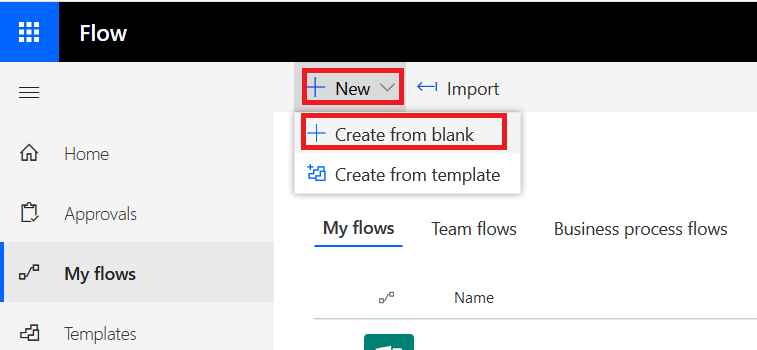
Click on “New” and “Create from blank” to begin creating the workflow.
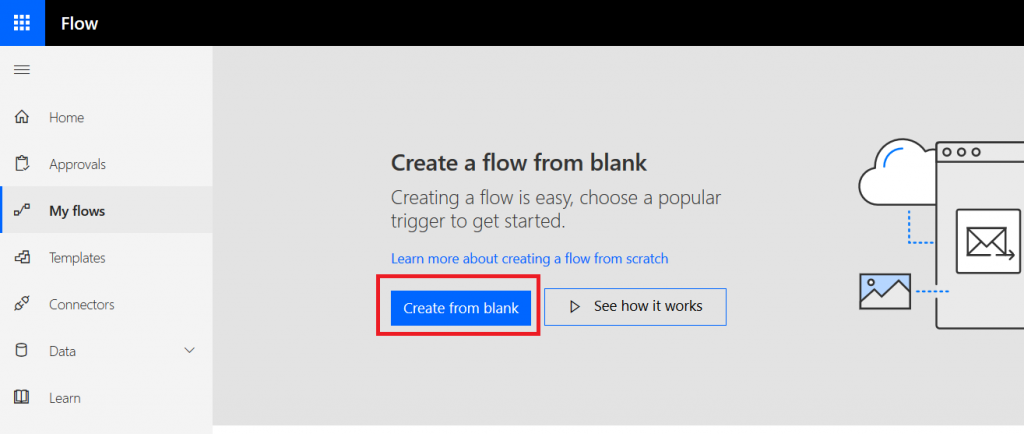
Click “Create from blank” again to confirm you really don’t want one of their templates
In the search field, type “Microsoft forms” and select the trigger “When a new response is submitted”
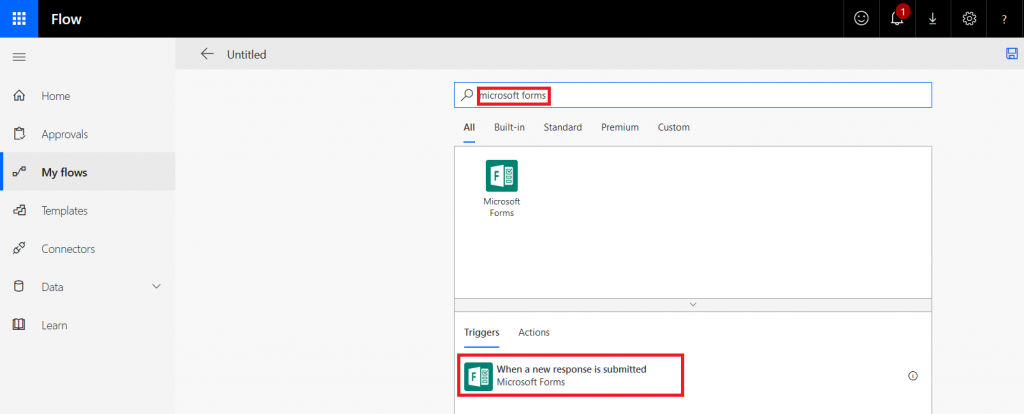
Select the form for which you want to generate a receipt – in my case, the form I just created.

Select “New Step”

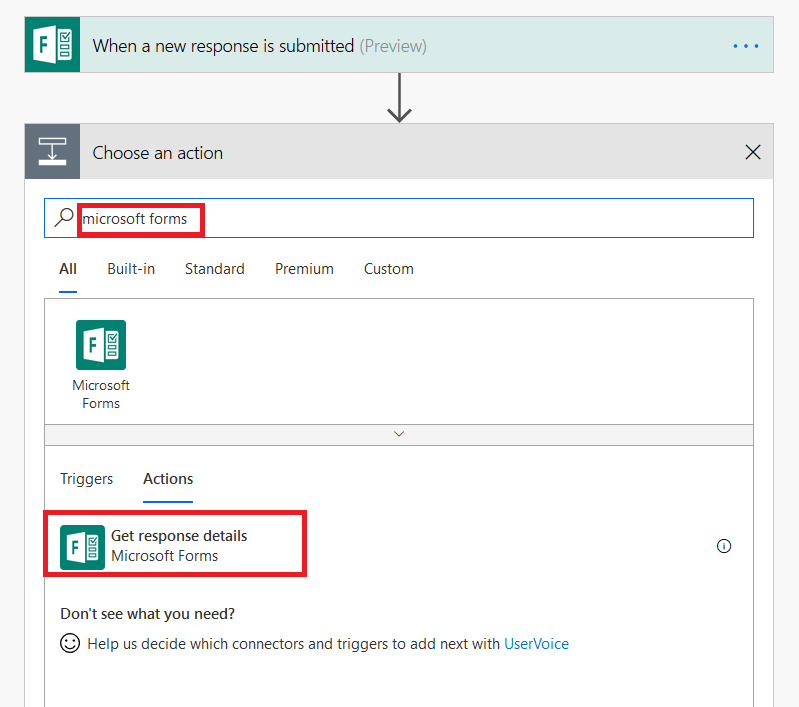
Type “Microsoft forms” in the search dialogue again, and select “Get response details”.
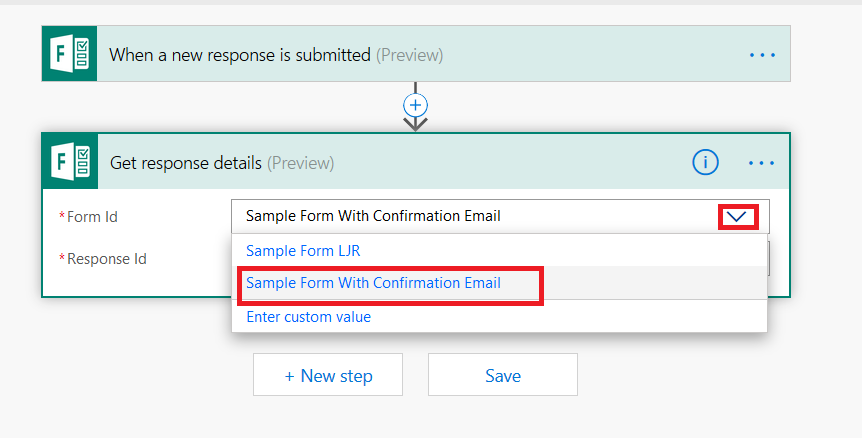
Click the inverted caret for “Form Id” and select your form again.
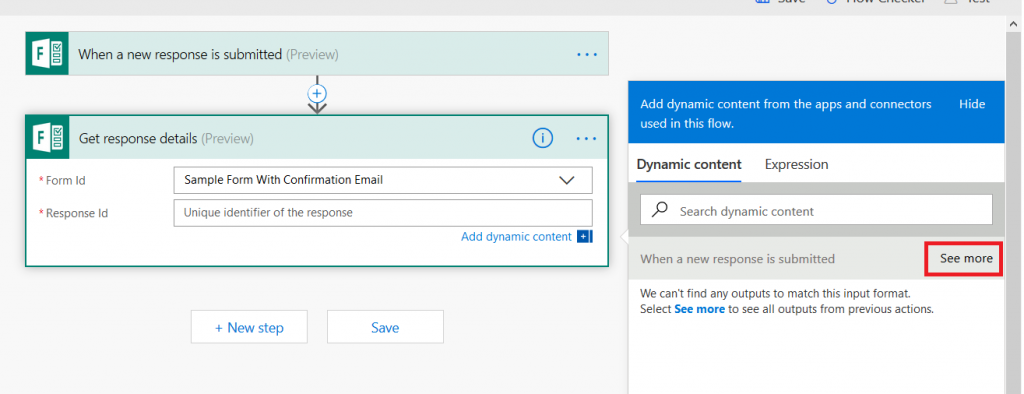
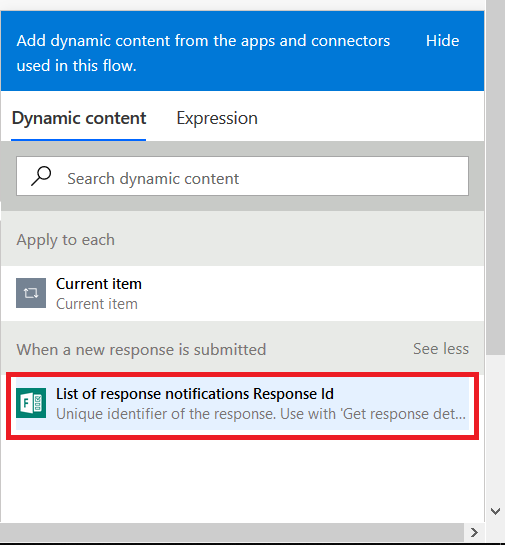
Click in the “Response Id” field – a new pane will appear to the right of your workflow. Click the “See more” button across from “When a new response is submitted”
Select “List of response notification Response Id”
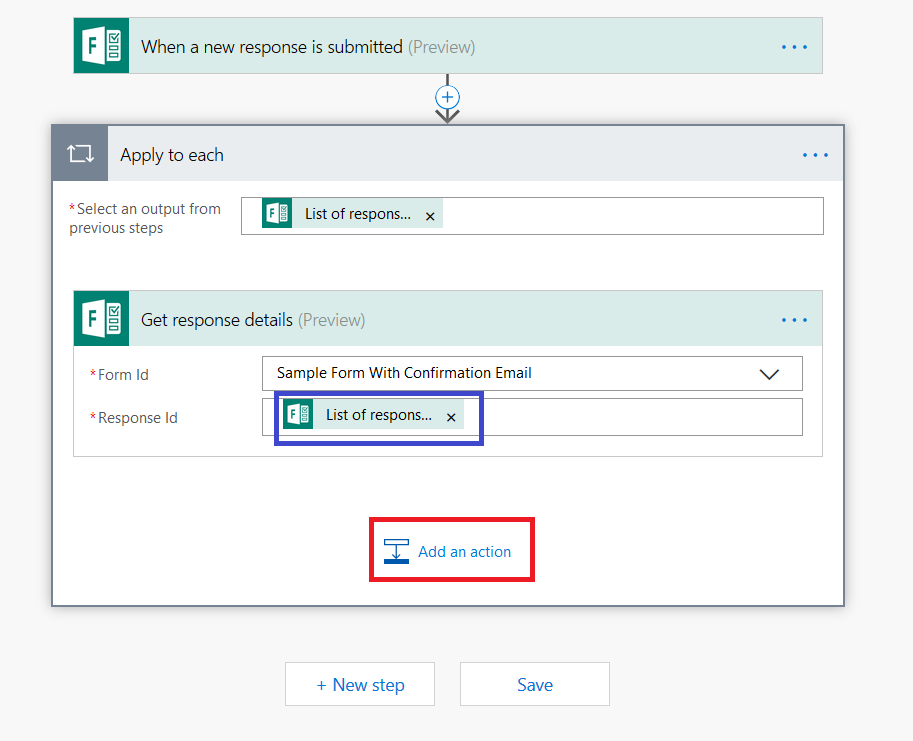
You’ll see the selection populated in the “Response Id” section. Click “Add an action”
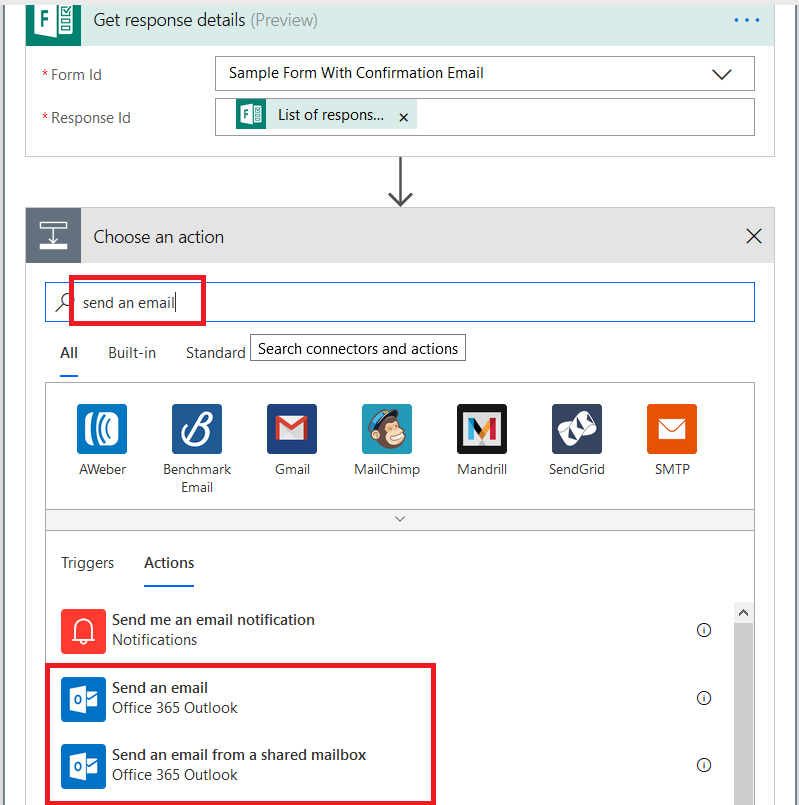
In the search dialog, type “send an email”. To send the receipt from your mailbox, select “Send an email” – to send the receipt from a generic mailbox to which you have send-as access select “Send an email from a shared mailbox”.
Click in the “To” field – the dynamic content pane will appear on the right again. Click “See more” across from “Get response details”. If this form is locked down to submitters within the organization and the submitter’s name is recorded, you can select “Responders’ email”, otherwise select the form question where you’re quested the submitter’s e-mail address (warning – since there’s nothing verifying the individual actually owns the e-mail address, forms that take freeform e-mail address submissions can be used to “spam” others).
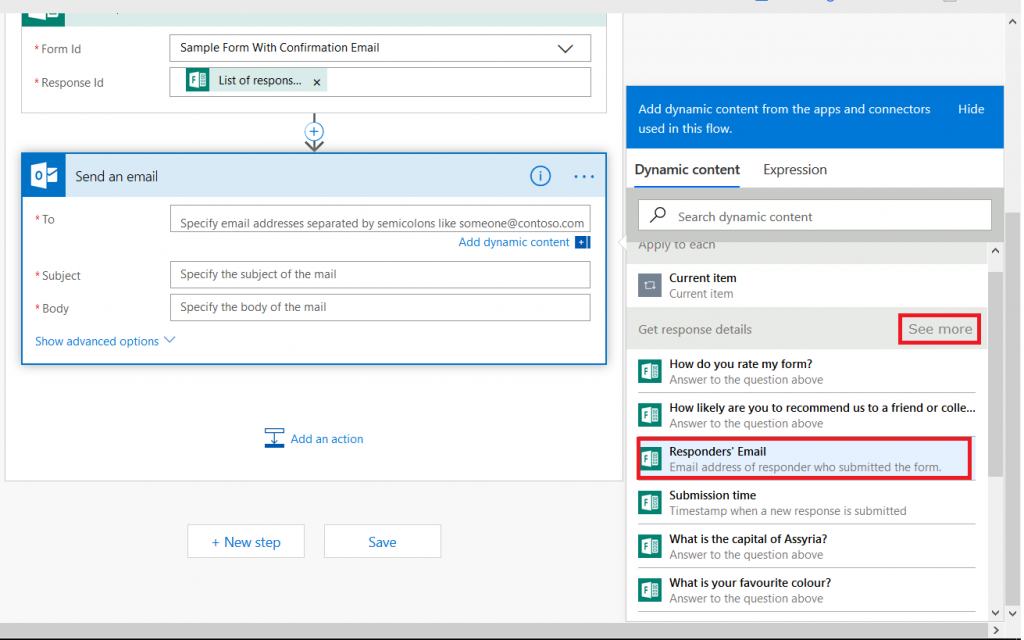
You’ll see “Responders’ E…” populated into the “To” field. Type in a reasonably descriptive subject for your message.
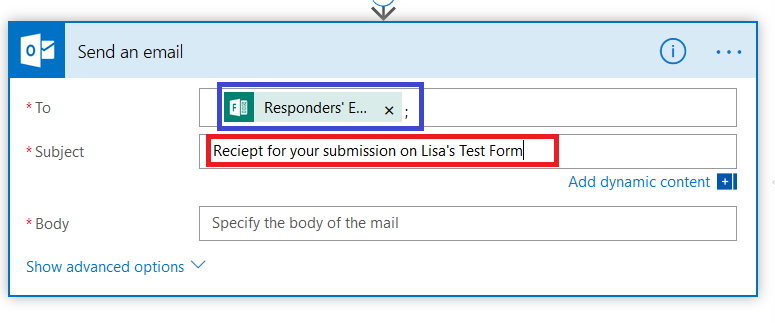
I start by creating my message template – pretty messages will require HTML, so click to “Show advanced options” and set “Is HTML” to yes.
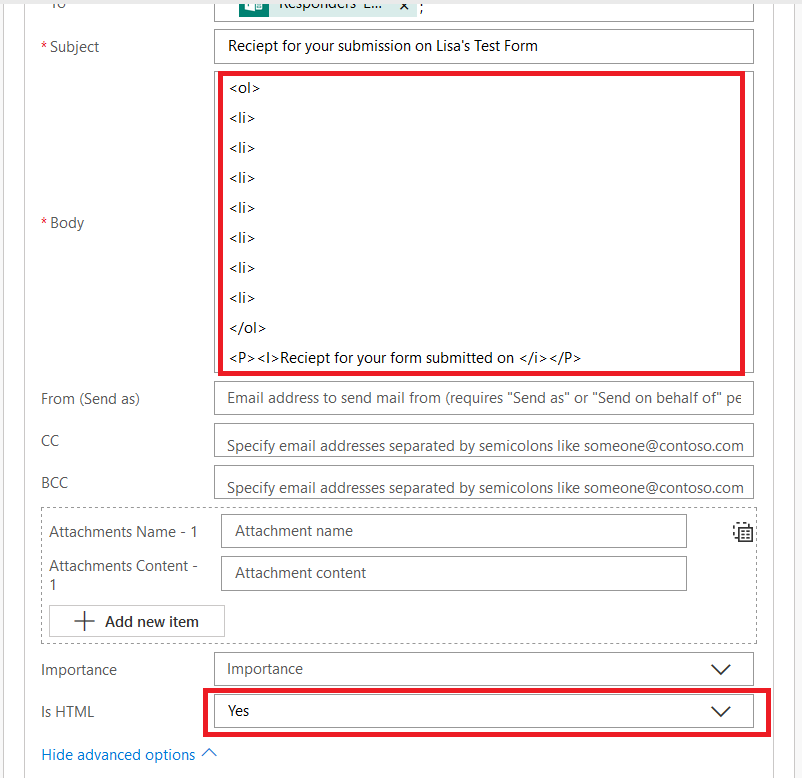
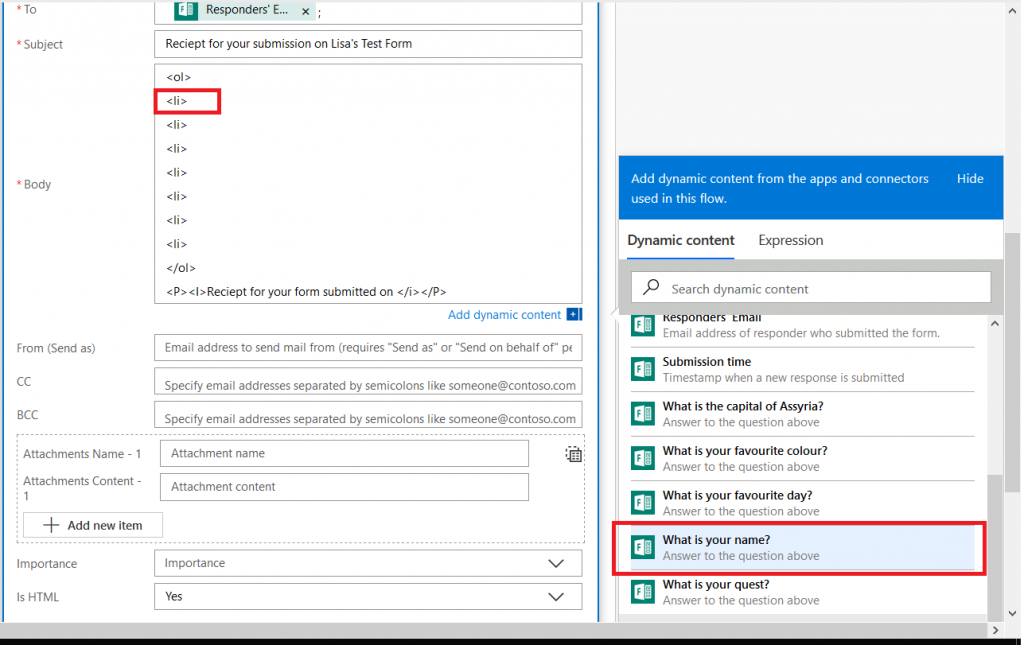
Now’s the part where we include the individual’s response data – click back into the “Body” field and you’ll see the dynamic content pane again. Within the message body, click where you want the response to appear (here, it’s after my first “<LI>” tag. Then select the question whose response you want to insert into that position.
It’s generally helpful to type something before the answer to remind the person what the question was – it’s freeform text, and pretty much anything you can do in HTML is acceptable here.
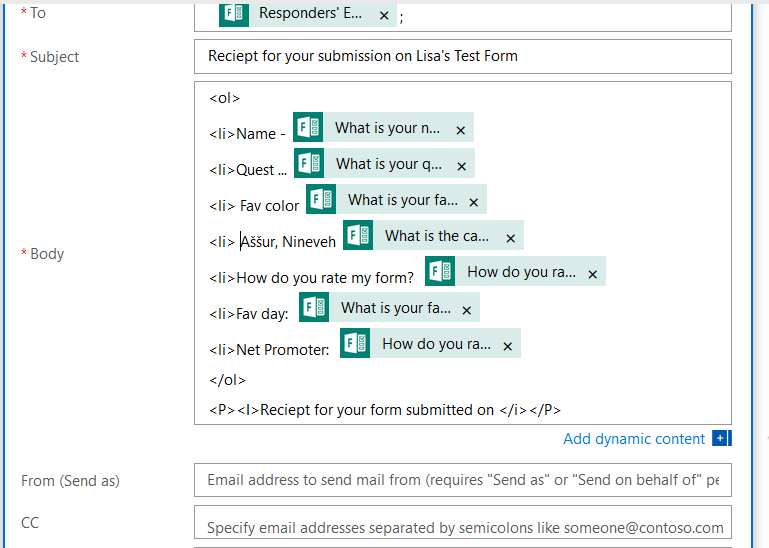
Once you have finished creating your message template, scroll down to the bottom and click “Save”
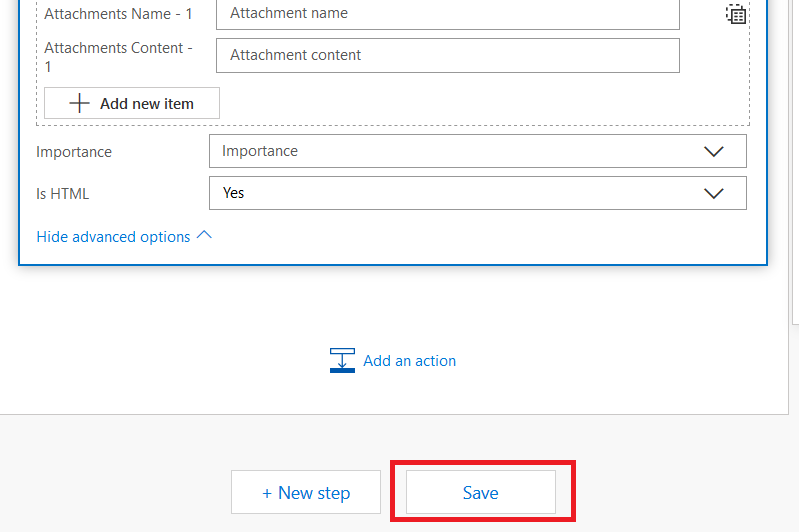
You may get a warning that a “for each” container has been added for you … that’s good, we want to generate a receipt for each submission!
Now that your workflow has been saved, click “Test”

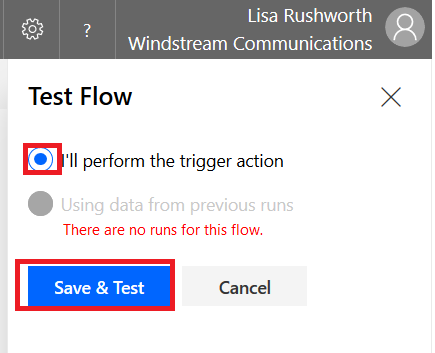
Select “I’ll perform the trigger action” and then click “Save & Test”
Return to your form and click “Preview”. Complete your form and click submit.

Return to Flow. If you are quick enough, you’ll see a message that your flow is running. Wait. Eventually you’ll see the results. You can click on the “Send an email” section to see detailed results.
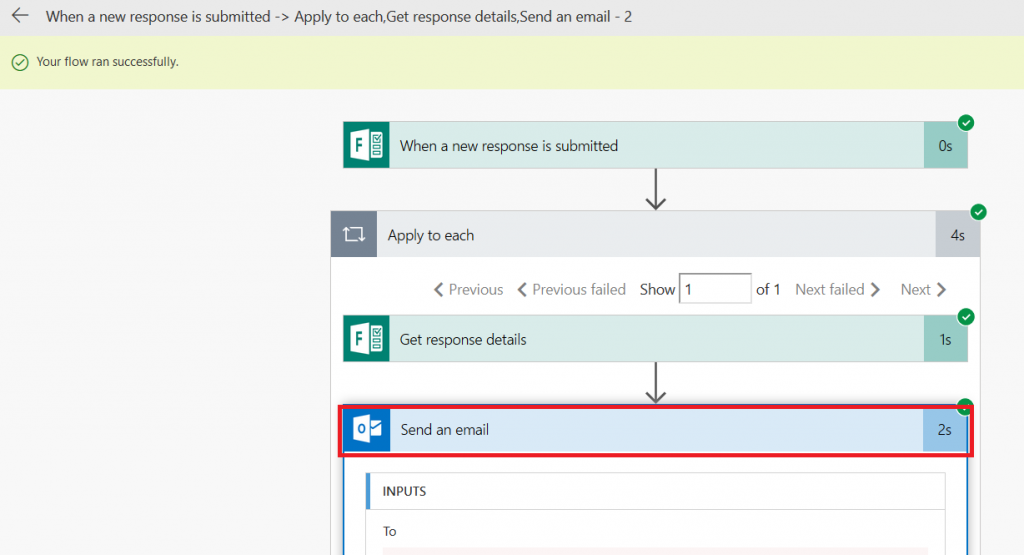
Including the e-mail address to which the receipt was sent and the status code (200 is good).
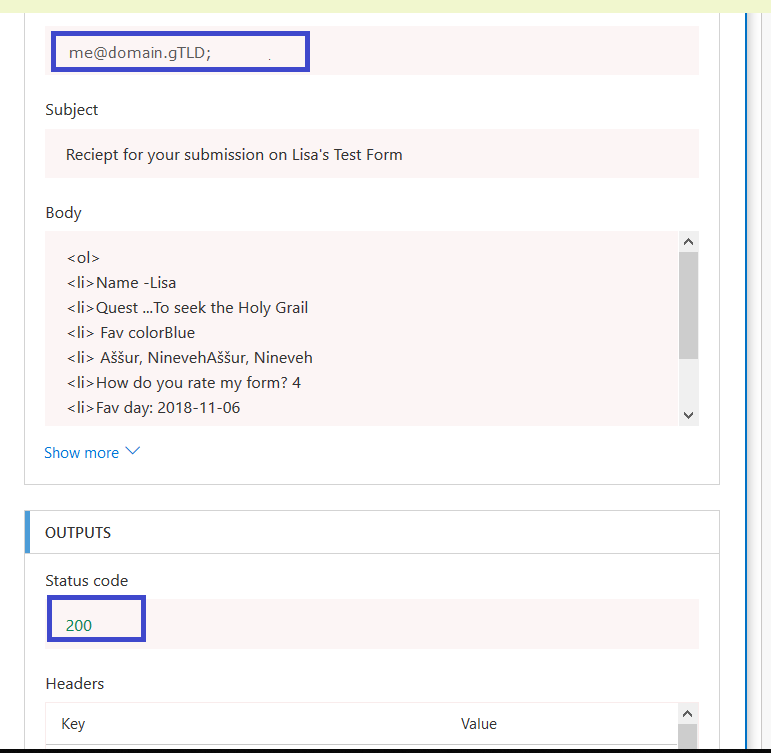
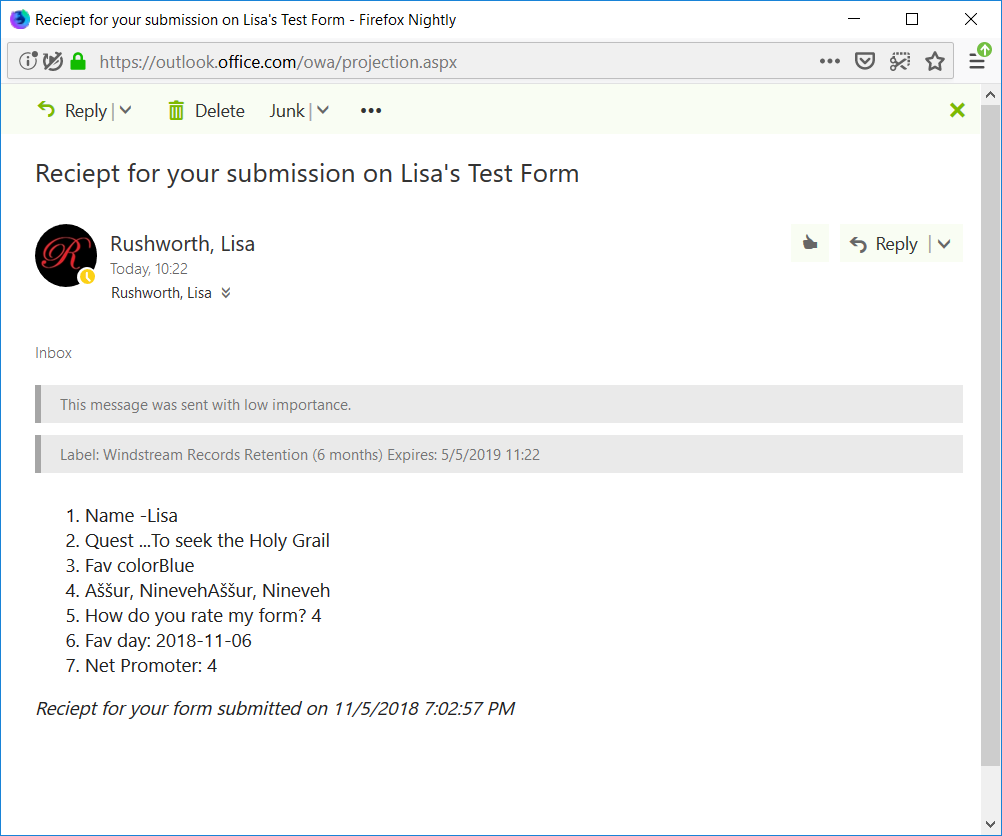
Check your mailbox too – you should have a message:
 

Did you know … Excel can convert between units of measure?

Spend enough time reading temperature probe data, and you get to where you just know 23 is room temperature, and 82 is going to cook the CPU. And sure you can type “23 C in F” into Google and get the Fahrenheit equivalent, but that’s hardly efficient with a long list of values. You could look up the formula and have Excel perform the computation, too. But did you know Excel can convert between many units of measure without you finding the conversion formula?

Excel’s CONVERT() function allows you to display values in whatever unit is most familiar to you. Usage is convert(CellToConvert,OriginalUnits,DesiredUnits)

Voila – the values in your chosen unit.

If you use the units of measure in column headers, you can use the header cells as the current and desired unit of measure values — remember to use the $ anchors, otherwise copying your formula will not yield the right answer!

Did you know … Connectors can be used to display external information in Microsoft Teams Channels?

Microsoft Teams is a single workspace that provides access to a vast array of resources. You’ve got links to important web sites, posts from other Team members, discussion surrounding shared documents … but did you know posts can automatically be created from external systems?

Why? Well … doing so allows Teams to simplify finding and distributing information. Instead of having ten people subscribed to a vendor newsletter or five people trying to remember to check a web site for information, the information comes to every Team member directly in their Teams application.

You can turn vendor-provided patch and outage notifications via RSS or Twitter into Teams posts. Google Analytics data for your site can appear in Teams posts. Jenkins has an Office365 connector that reports pipeline information in Teams posts. Browse the available connectors to see what is useful in your group.

“Best practice” recommendation: some of these connectors rely solely on Microsoft’s Internet connection to an Internet-accessible resource – as in the example I present below. These connectors are essentially self-documenting because you can view the Connector configuration to determine the URL with which the connector communicates. Many connectors, however, use web hooks registered within your application or user credentials to access the remote system. In the “Files” or “Wiki” section of the channel in which the Connector is used, create a document detailing any configuration that was done – instructions for creating a web hook in your system, which account was used to access the remote system (don’t write the password in the document!).

For connectors that require user credentials, do not use a personal account. Create a new account for your Teams feed. Twitter, for example, requires a user account to follow other accounts or hashtags. Were I to use my Twitter account in the configuration … if I transfer ownership of the Team space to someone else, they’re inheriting a configuration with my account; but I’m not going just hand my password over to them. Even if ownership of the Team space never changes, we could cease seeing updates next time I change my Twitter password. Or decide to close my account. Or … point being, if you have a non-user account, the Team owners can maintain control of the account and any changes to it.

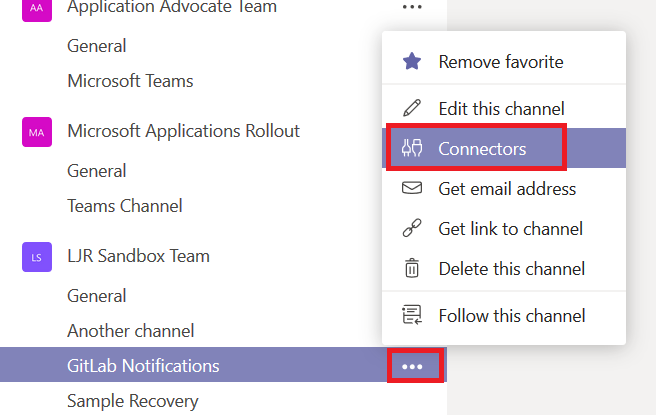
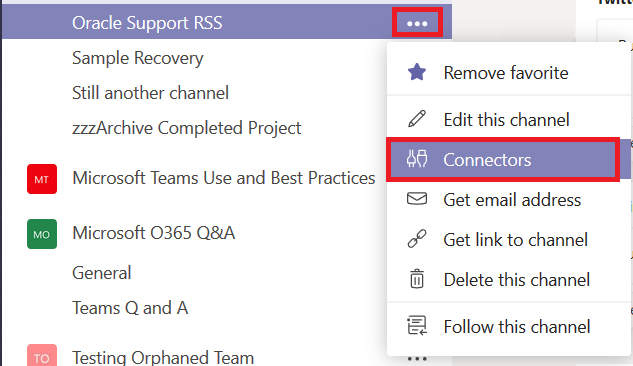
Using Connectors: Decide where you want the data posted – this can be a dedicated channel created just for this connector or it can be an existing one. Click the hamburger menu next to the channel into which you want messages posted. Select “Connectors”.

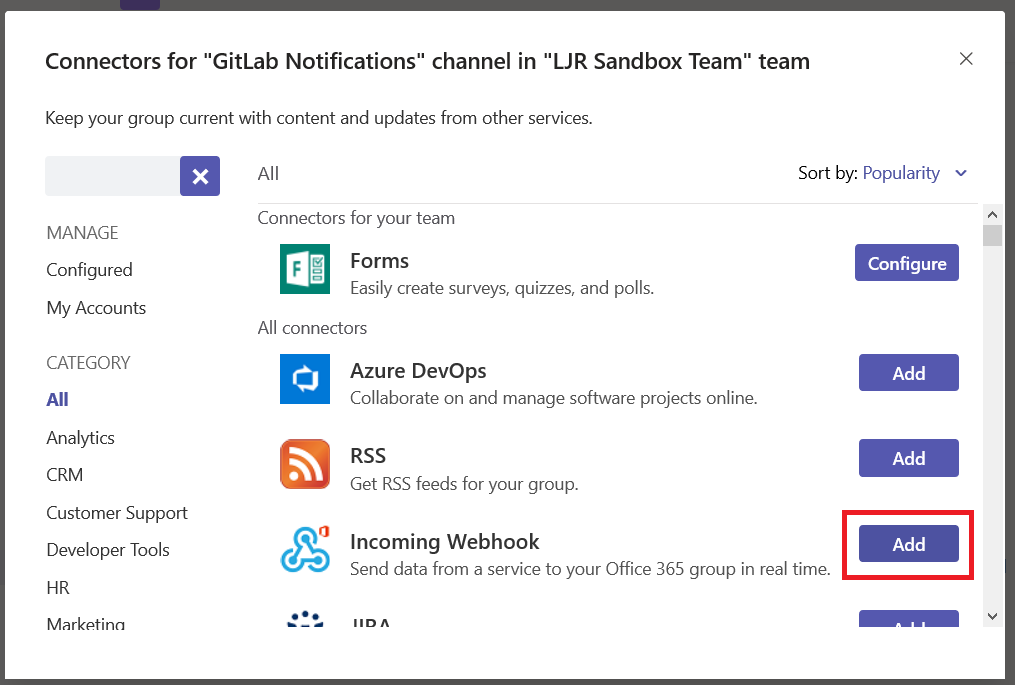
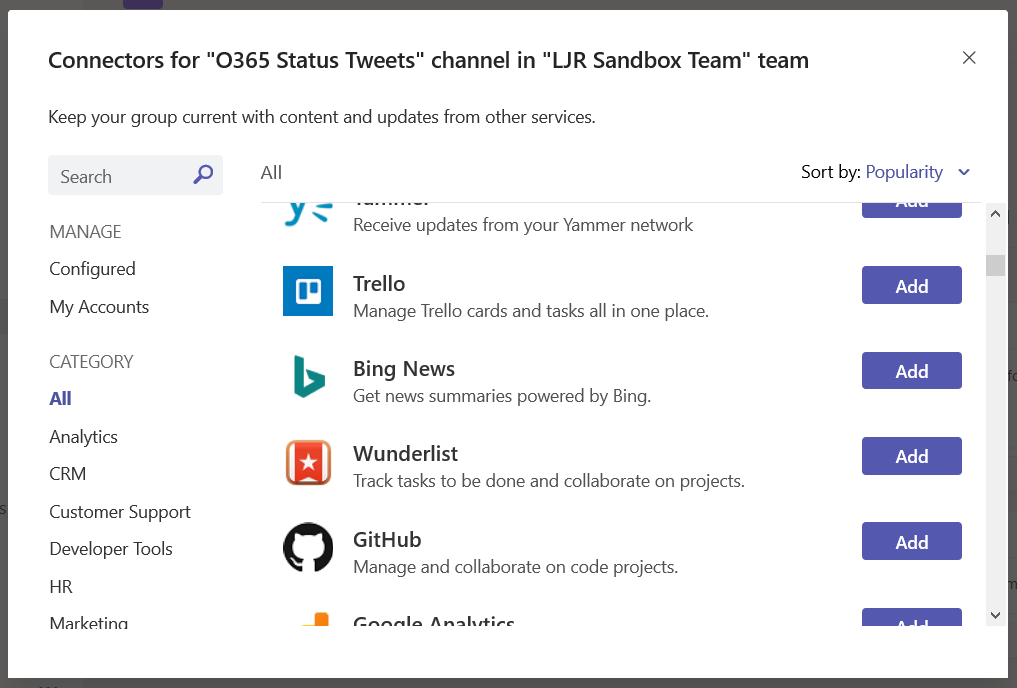
Browse through the list. Or type in the “Search” box to locate a specific connector. Click “Add” next to the connector you want to use.

Setup will vary depending on the connector selected – the Jenkins connector provides a URL to paste into your server config, Twitter asks for credentials and individuals or hashtags you want to follow in the channel. In this example, I am adding an RSS data feed.

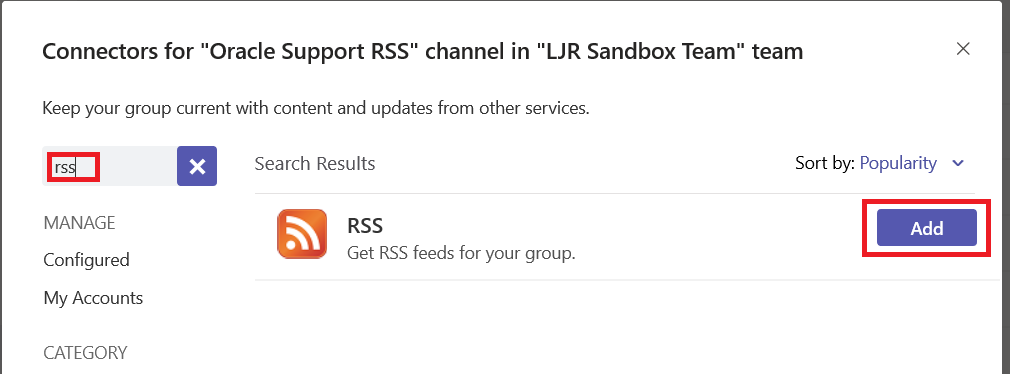
Type ‘rss’ in the search dialog. If this is the first time you’ve used the connector within this Team space, click “Add”.

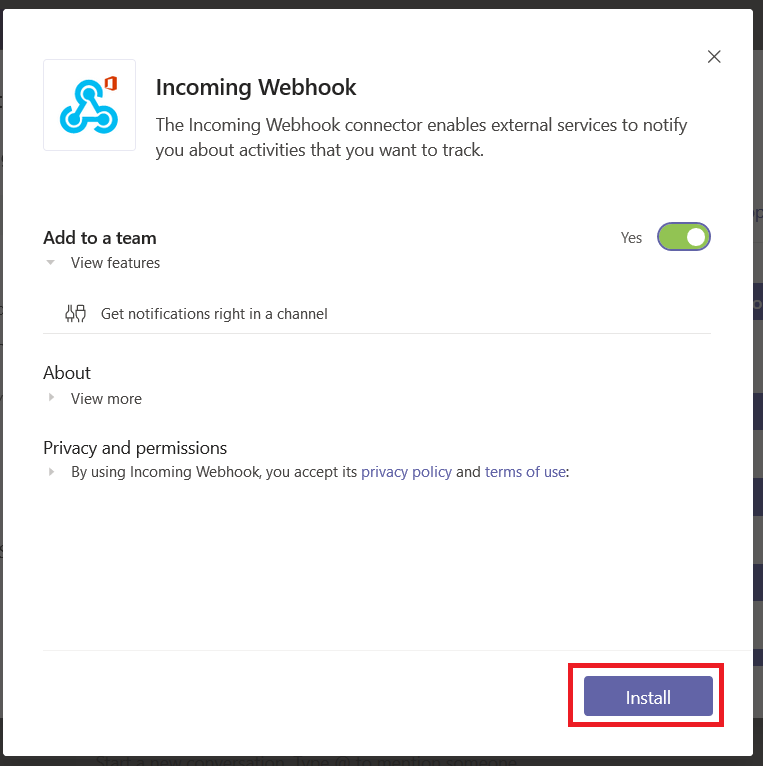
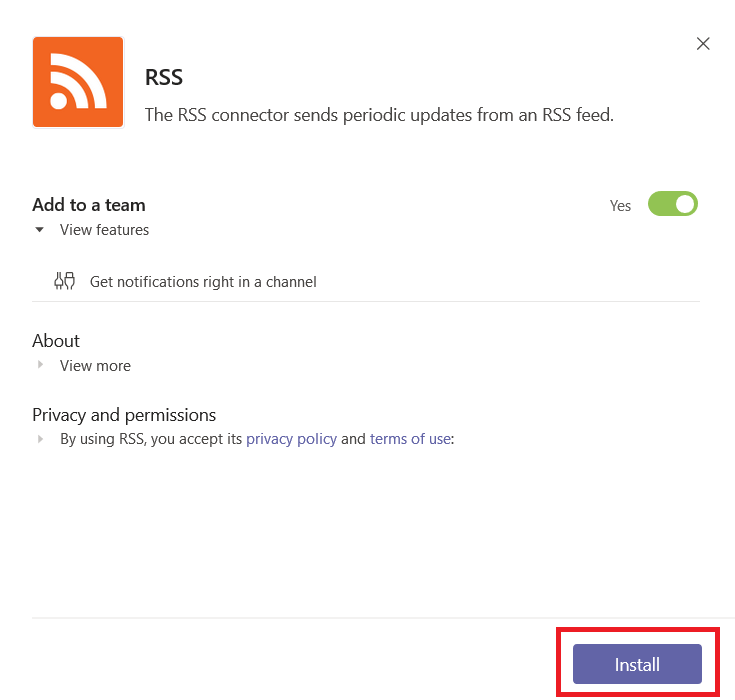
In this case, there’s not much on the next screen – read the privacy and terms of use statements.  Assuming the connector permits your intended use and you agree to all of their terms, click “Install”.

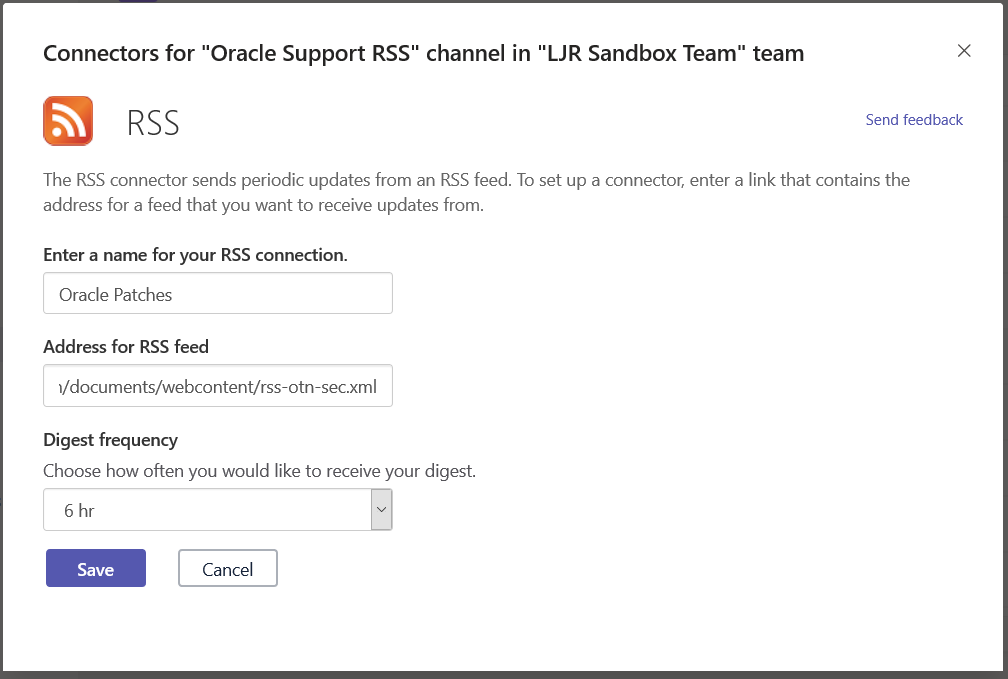
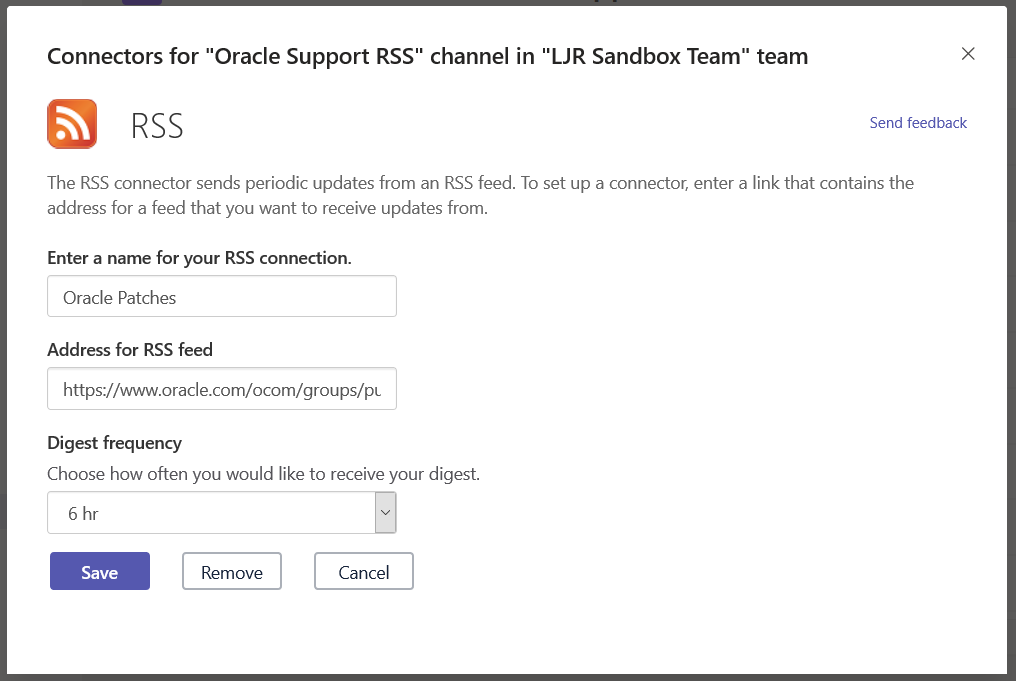
Enter a name for the connector, paste in the RSS feed URL, and select how often you want Teams to check for new data in the feed. Click “Save”

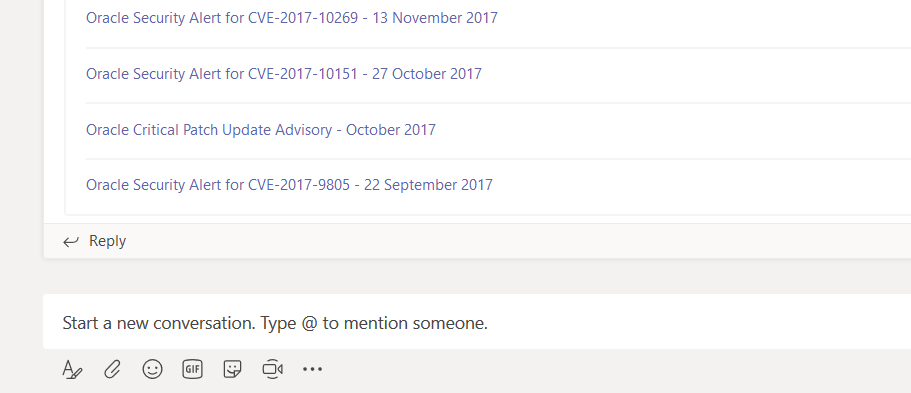
A post will be created in your channel with data from the RSS feed. Some feeds will provide information, some just provide a link. And when new data is posted to the RSS feed, a new post will be created in your Teams space.

If you need to make a change to an existing connector, click the hamburger menu next to the channel on which the connector is configured. Select “Connectors”.

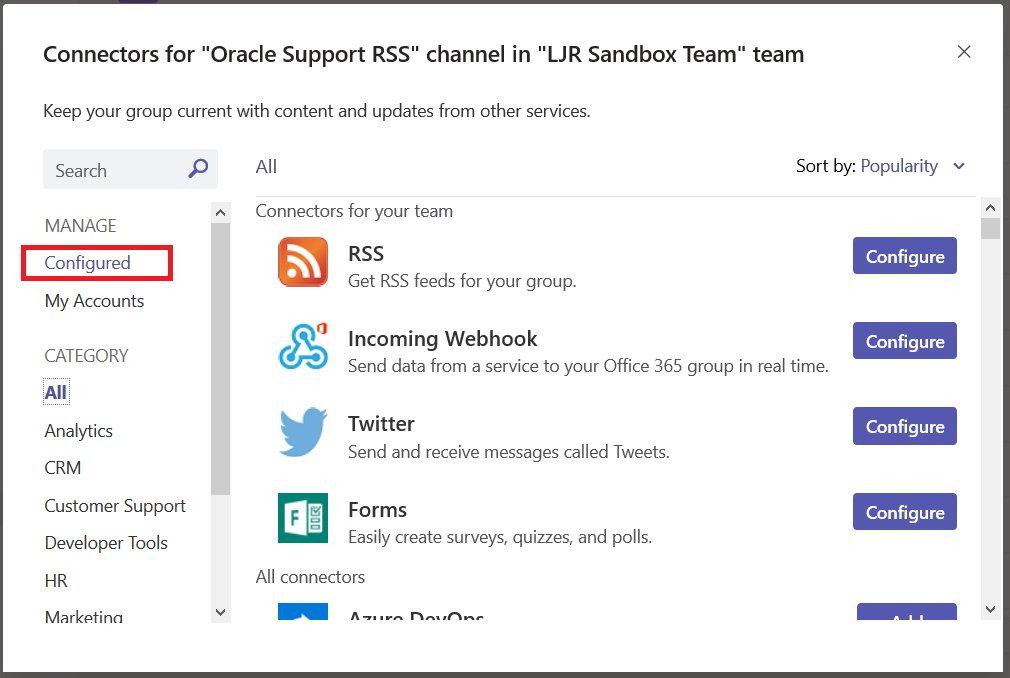
In the left-hand column, select “Configured”

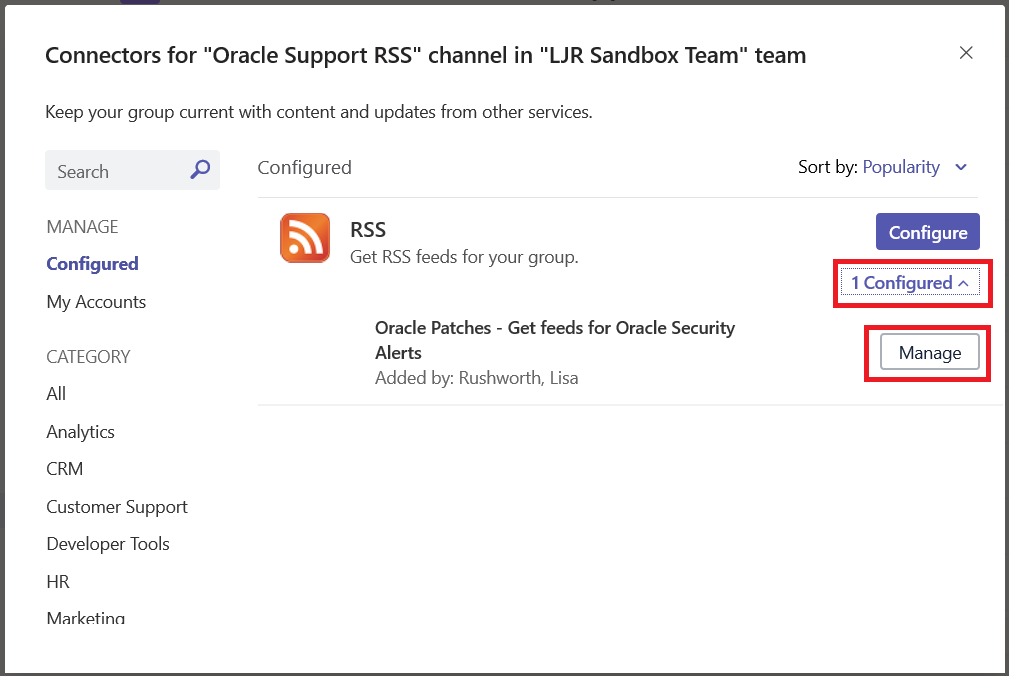
The “Configure” button will set up another connector on the channel. Instead, click the “# Configured” link below the “Configure” button. Then click “Manage” for the connector you want to manage.

Make whatever changes you need to make and click save. Or click “Remove” to remove the connector from the channel.

Did you know … you can automatically dismiss past Outlook calendar reminders?

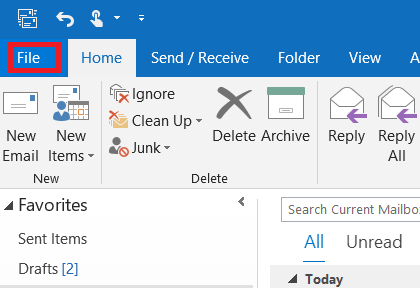
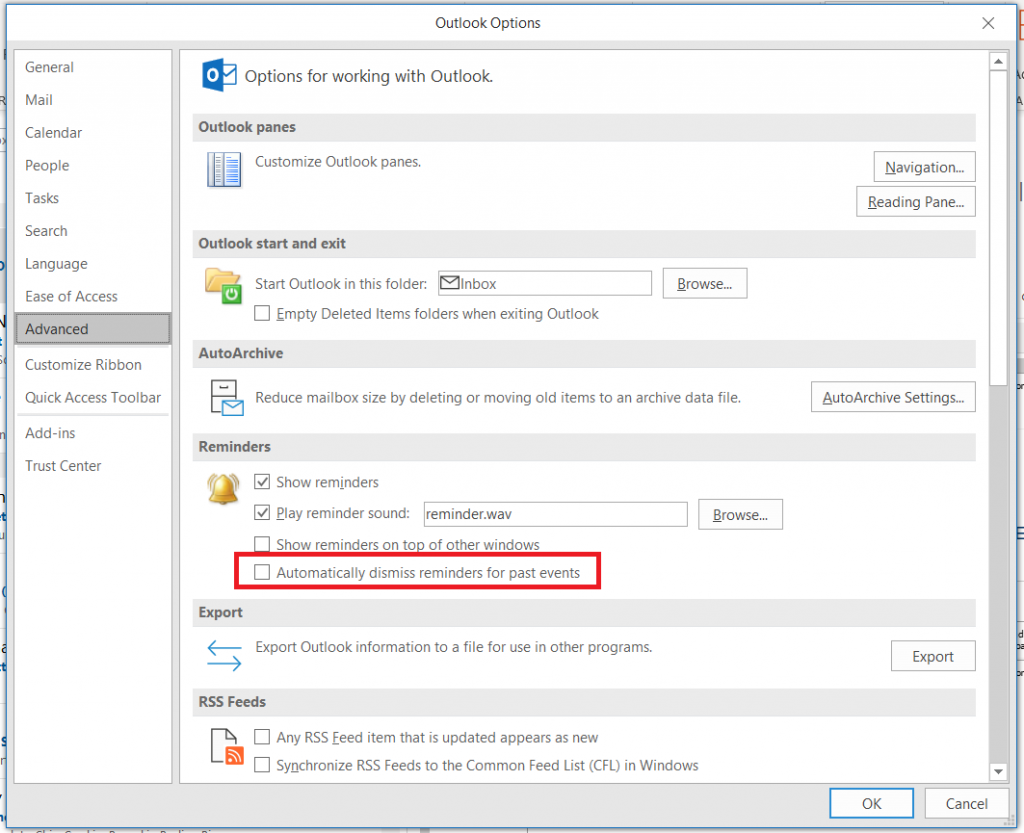
Sometimes opening Outlook and getting reminders for, say, the meetings you missed when you were out sick yesterday is quite helpful. But frequently, reminders for old events are just an annoyance. Like when you create past-dated meetings to remind yourself of what you were doing and forgot to select ‘None’ as the reminder time. That’s not just me, right? Did you know you can automatically dismiss reminders for past calendar events? From your Outlook client, click the file tab of the Outlook ribbon bar

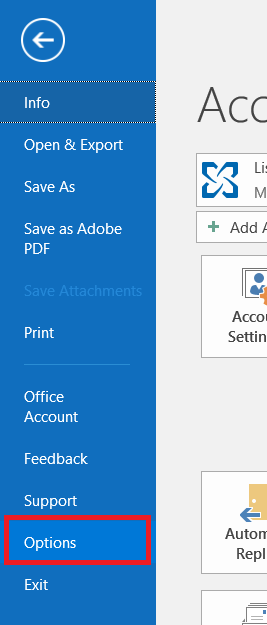
Select “Options”

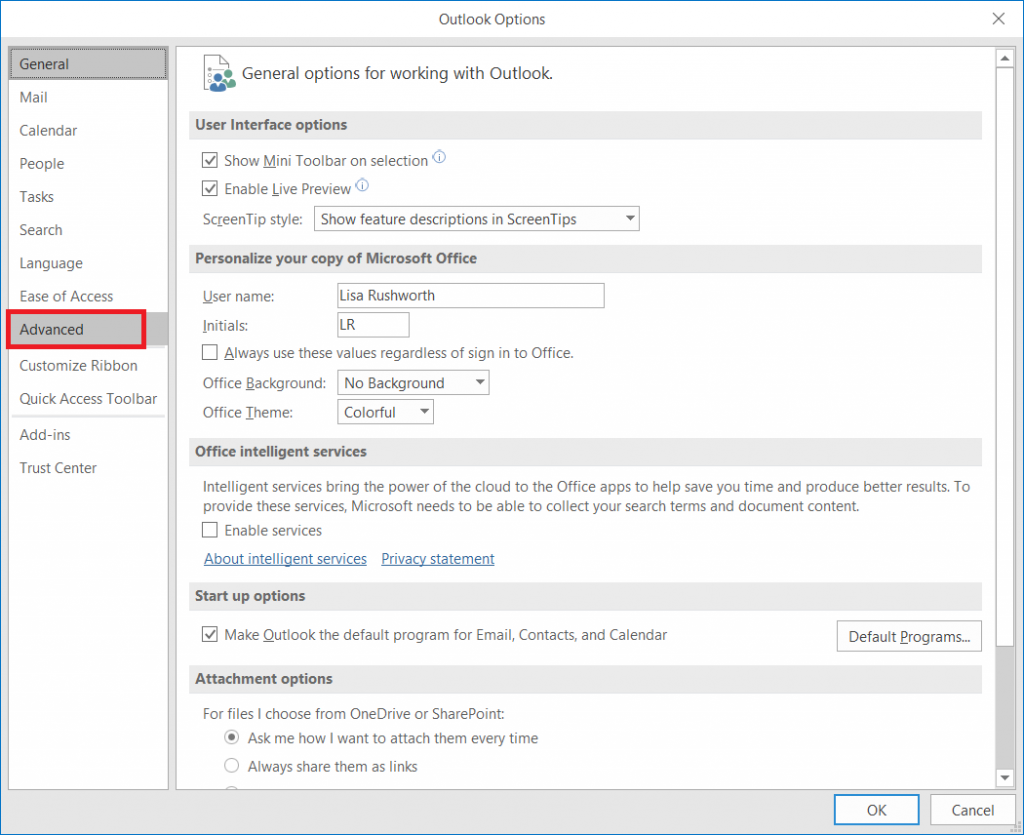
On the new window that appear, select “Advanced”

In the “Reminders” section, you’ll see a check-box to “Automatically dismiss reminders for past calendar events” – by default, this is unchecked. If you would like to avoid reminders for old meetings, click to check it then click OK.


Did you know … you can set image transparency in Word, PowerPoint, Excel, and Outlook?

When you wanted to use an image as the background for a document, you often needed an image editor to lighten the picture – the image was too dark for dark text to be legible but too light for white text. Or you’d compose your PowerPoint slide with the image in one frame and the text in another.

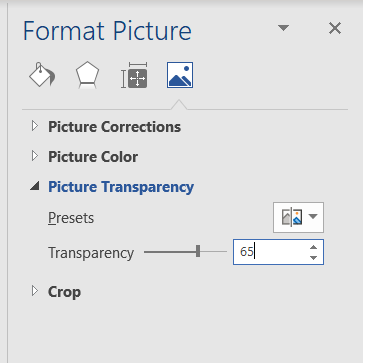
Did you know, in the latest Office 365 Update, Microsoft added a feature that allows you to create faded background images within Word, PowerPoint, Excel, and Outlook? Within one of these programs, insert a picture into your work. Select the image. From the Picture Tools Format ribbon, click on Transparency

You can select one of the pre-set transparency levels or click on “Picture Transparency Options …” for finer control of the transparency level.

Move the slider (or type a number) to adjust the transparency level – 100% is invisible, 0% is the original image.

Voila – you’ve got a background image and legible text.

There are a lot of other image effects available – the vignette is the “soft edge oval” from the “Picture Styles” section of the ribbon bar. Many of the effects I’ve traditionally used Photoshop or Gimp to apply are also available in the “Adjust” section, so click around and check it out!

Did you know … you can draw attention to Teams posts?

Before I tell you how – don’t be the person who flags every single message as urgent. Not because it’s annoying (although it is), but because it’s hard to single something out for attention if YOU ALREADY MARK EVERYTHING URGENT AND USE HUGE, BOLD, RED LETTERS AND END WITH !!!!!!!!!! If everything is urgent, you don’t have a classification for super urgent things.

OK, now that I’ve done my quasi-civic duty and at least tried to avoid having big red icons next to 97% of the messages I see …

You can use @ mentions to draw individuals’ or groups’ attention to a specific post. In the message, type @ and then begin typing either an individual’s name or the Team’s name. The @ mention can be included anywhere in the message – it doesn’t have to come first.

Team members using the desktop or mobile client will get a banner message alerting them that they have been mentioned in a post.

All clients will have a little logo along the right-hand side of the message indicating either a group

Or individual mention.

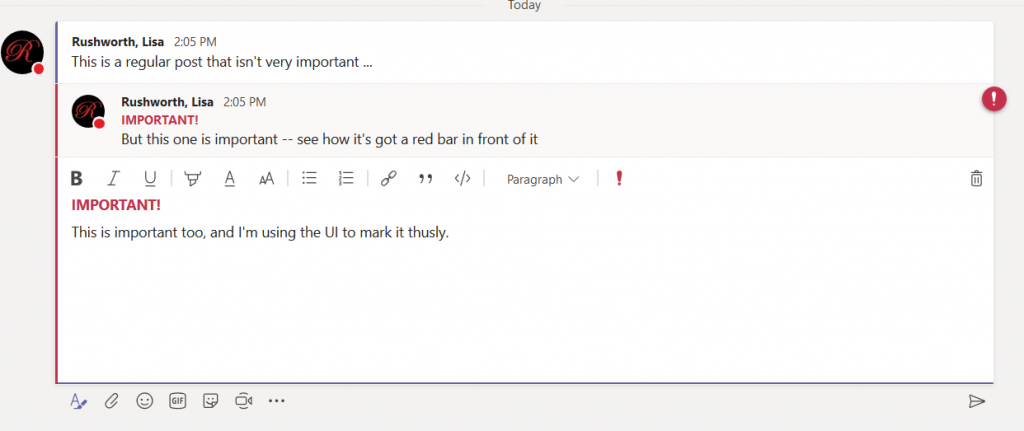
If you want to draw attention to an item without banner messages, you can also mark a post as important. When you are typing your message, click on the “Format” button when typing the message.

Then click the exclamation point. (For anyone who prefers keyboard shortcuts – use ctrl-shift-i)

And you’ll see both the red bar along the left and the IMPORTANT! designation atop the message.

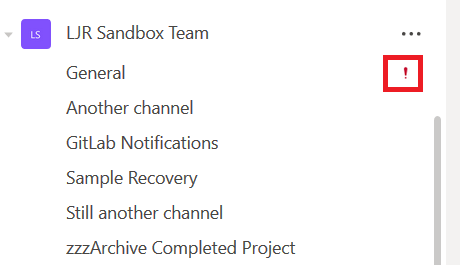
Team members will see an exclamation point marking channels with important messages too.

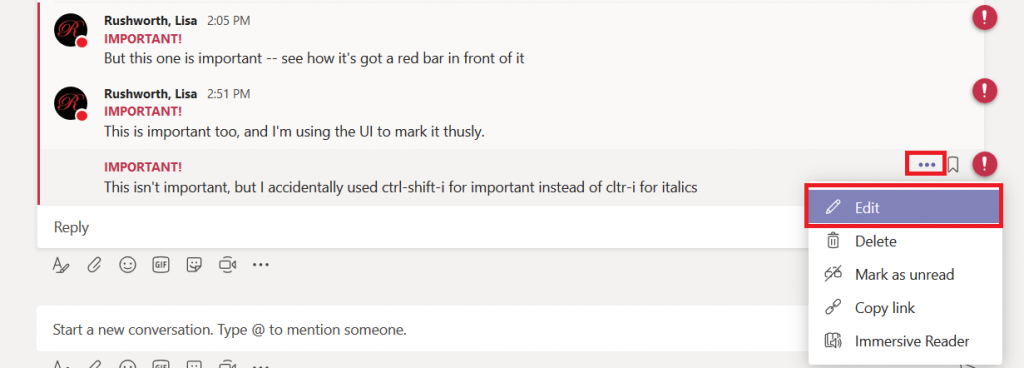
If you accidently mark a message as important (keyboard users who type ctrl-i for italics can get both ctrl and shift occasionally), click the hamburger menu next to your post and select Edit.

Click the exclamation point again to remove the important designation.

Voila, the message no longer has an over-inflated sense of self-worth. Or my typo.

Did you know … Microsoft Teams provides both public and semi-private Team spaces?

You’ve used Microsoft Teams to collaborate with individuals assigned to a project, and even created Team spaces for ad hoc groups to work on a problem. But what if you want to discuss the office’s community outreach program or plan the next employee engagement activity? Microsoft Teams is a perfect place to host that collaboration too.

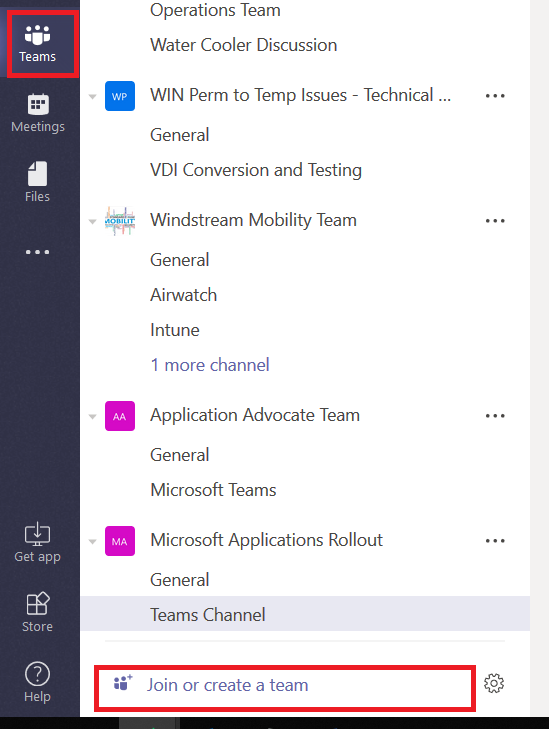
You can create a public Team space – a public Team allows anyone to join without requiring approval. This is great if you do not need to verify qualifications before allowing someone to join a Team. From the “Teams” tile, click on “Join or create a team” at the bottom of your Team list.

Click “Create team”

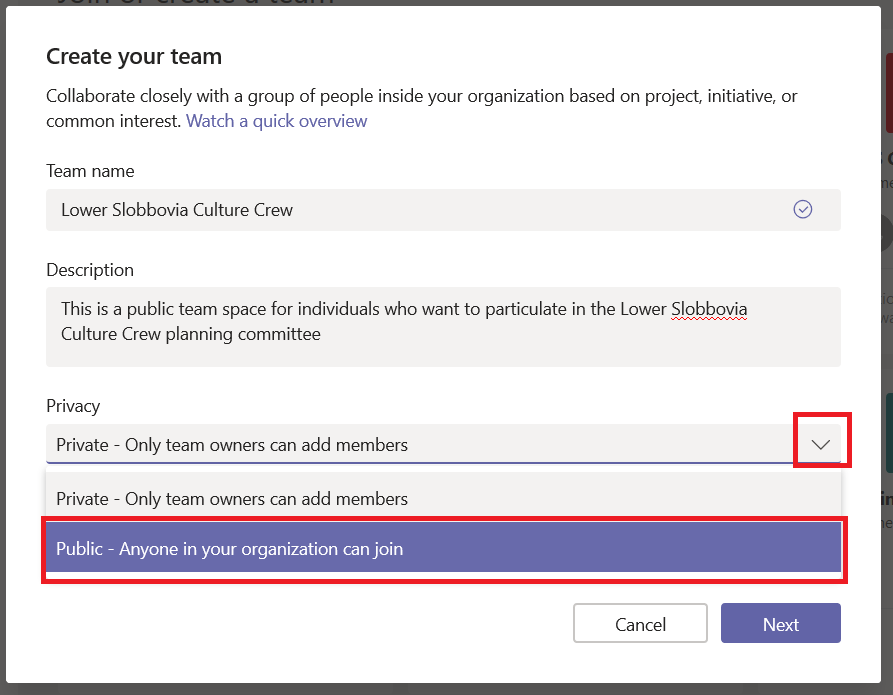
Provide a team name and description so potential members know it’s something that interests them. Now under “Privacy”, click the down arrow and select “Public – Anyone in your organization can join”.

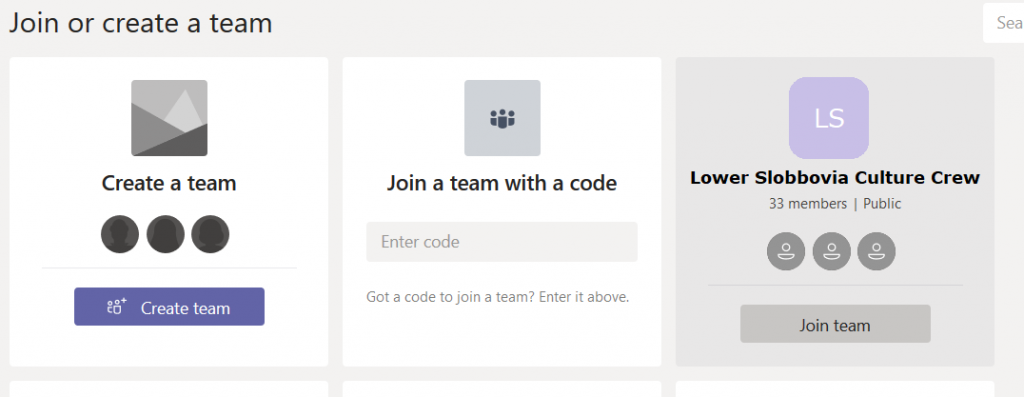
Click Next. You can start your team by adding some members, or you can click “Skip” and let members add themselves. Voila, you’ve got a public team. (Well, give it a few minutes … there’s some background magic that needs to complete). When people click “Join or create a team”, your team will show up in the Team gallery (they may need to search for it – and as of 25 October 2018 it’s a “begins with” search … so Slobbovia will not find my team, but “Lower” or “Lower Slobbovia” will). As soon as they click “Join team”, they will be added as a member of your team.


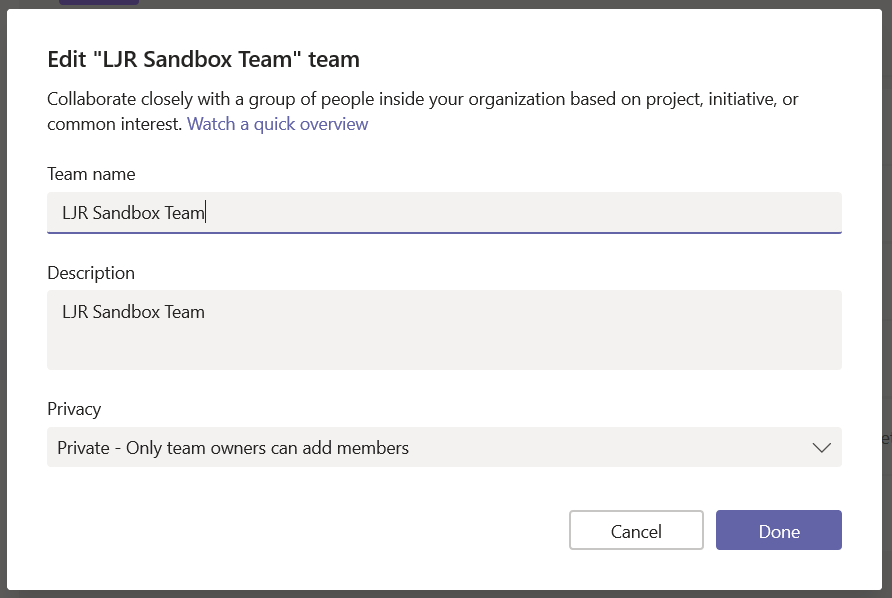
What if you don’t want your team to be that public? Say we only want people who actually work in East Slobbovia to join up. Then leave the Privacy setting at “Private – Only team owners can add members”. This means your new Team won’t appear on the “Create or join a team” Team list …

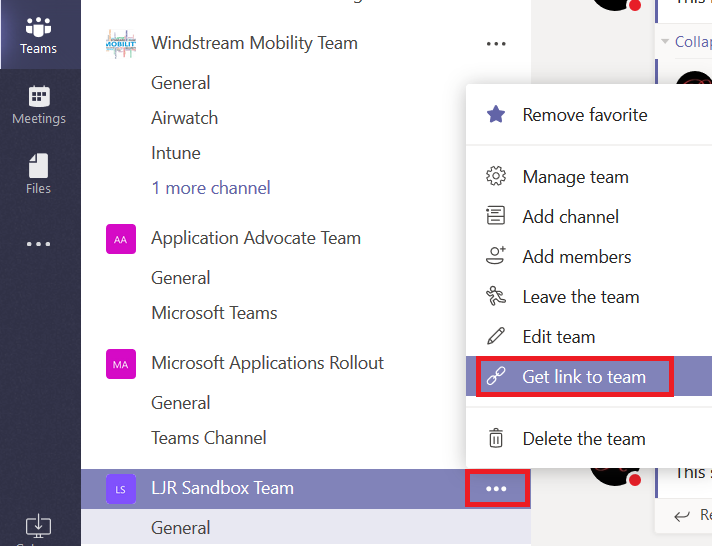
From the hamburger menu next to the team name, select “Get link to team”

The URL will be displayed in a new pane – click “Copy” and you’ll have the URL in your clipboard.

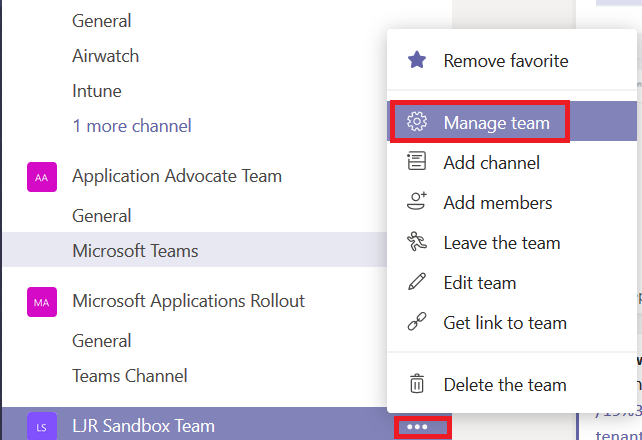
Publicize your URL — you could post it to Stream, have the link included in a local newsletter message, e-mail it to potential Team members … however you let people know about the URL. When someone follows the URL, a membership request will appear on the Team. From the hamburger menu next to the team name, select “Manage team”

Click on the “Pending Requests” tab

You’ll see, well, the pending requests. Click accept to add the person to your team, or click deny if you prefer.

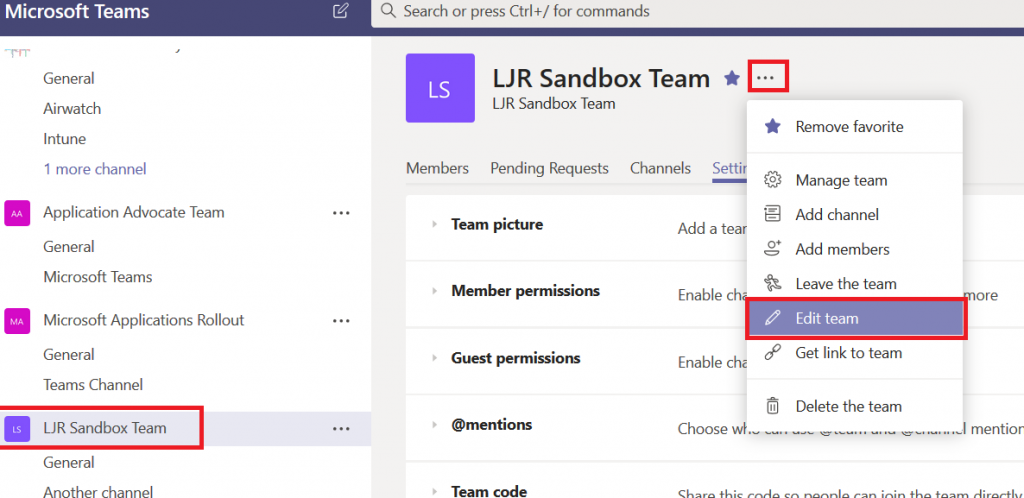
Changing the settings – If you change your mind, that’s OK too. In your Teams list, click on the Team itself (not the hamburger menu next to it, and not one of the channels under it. Then click on the hamburger menu next to the team name in the right-hand pane. Select “Edit team”.

You can change the privacy settings and click “Done”

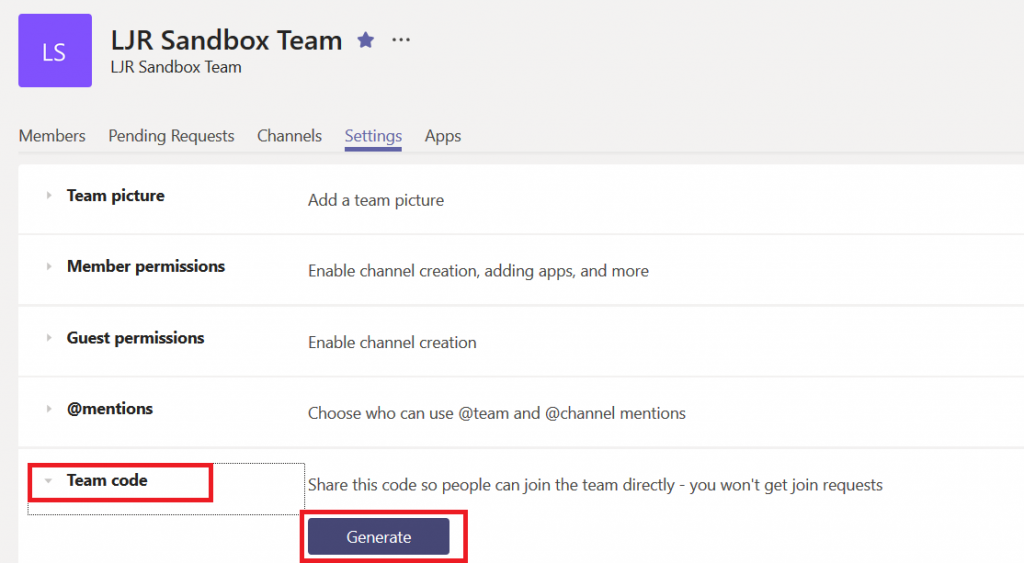
Bonus option … for those of you who have stuck with me this far! You can create a code for your team that allows invited individuals to join the team without waiting for your approval. Click the hamburger menu next to the team name and select “Manage Team”. On the “Settings” tab, expand the “Team code” section. Click “Generate”

Now there’s a code associated with your team.

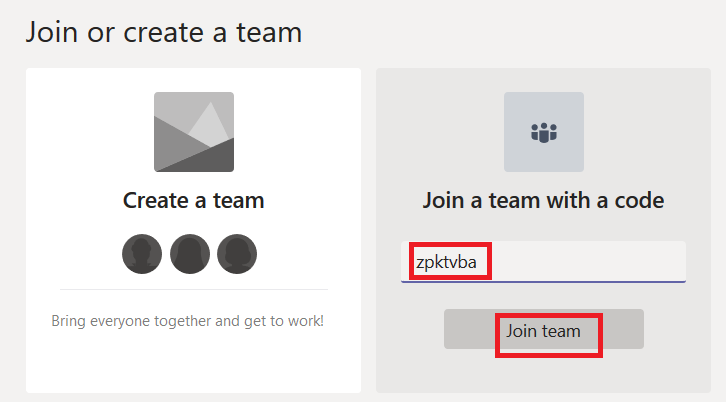
Individuals who have the code can go to the Teams gallery and enter the code in the tile that says “Join a team with a code”

Did you know … you can send e-mail to a Microsoft Teams channel?

Why would you send an e-mail to a Microsoft Teams channel? That’s a good question! At first, e-mailing a Team channel sounds like a solution in search of a problem. I think of it as moving an e-mail discussion into Teams. And there are a lot of times when an e-mail thread can be more efficiently handled in Teams.

Attachments that are being updated and resent – you know, the documents where there are five different working copies with various people’s changes and now someone must condense those changes into a single document. Including the document in the Team space allows team members to collaboratively edit it online. One copy! Having the discussion history available in Teams avoids switching between e-mail and Teams as the document is developed.

“I forwarded this to five people, and here’s what they think” – When a message gets forwarded and you’ve got three different sets of recipients discussing the same issue – or if someone keeps going back to an older message and dropping a few recipients who were added late in the discussion – moving the discussion into Teams ensures all of the people who should be involved in the discussion are included and working together – not a person from one of the threads trying to update everyone on a separate thread.

“Hey, Sean, can you forward me that hour-by-hour for this weekend?” – Ever have to ask a coworker to forward some message that you’ve misplaced (probably deleted, but cannot seem to find there either). The Teams threads are persistent (I cannot accidentally delete your message) and searchable.

The new guy – an involved discussion may take months. When a new person joins your group, someone has to remember to include them on the next reply-all (even adding an existing employee to a thread, they get lost when someone else replies to an older message). By moving involved discussions into Teams, you can quickly add a new person to the discussion.

There are also cases where Teams could replace a shared group mailbox – you cannot receive messages from outside of the company, but if your group mailbox only gets messages from other Windstream mailboxes … Teams may be a good replacement for that group mailbox. Team members can post into the thread taking ownership of the request – everyone will see who claimed the request, and if someone is unexpectedly out of office, you can see the issues on which they were working.

Ok, ok … you convinced me! Sending an e-mail into a Teams channel isn’t a completely pointless feature. So how do I do it?

First, you need to know the e-mail address associated with the channel. Click on the hamburger menu next to the channel name and select “Get email address”

There you have it – you can click “Copy” and all of that text will be in your clipboard.

Paste the address into the “to” field of an e-mail message, then send the message.

Wait for it … this may take a minute … and the message will appear as a thread in the channel.

If the message includes an attachment, that attachment will be displayed in the thread. You can even edit the document online – in Teams or in Word Online.

The default setting for Channels is to accept e-mail messages from the windstream.com domain – this may be exactly what you want. You can send the address to individuals outside of your team and allow them to create threads without having to grant them access to your Team space. But you may not want that – go back to that pane where you got the channel e-mail address. Click to “See advanced settings for more options” – you can set the channel to accept messages only from Team members:

Think it’s kind of crazy that every Team member can adjust these settings? Vote for my idea on the Teams UserVoice site 🙂

Did you know … you can quickly start a web meeting from within a Microsoft Teams channel discussion?

Sometimes text conversations become cumbersome – a topic really takes off, and there’s a lot of typing. A LOT of typing! Sometimes it’s easier to just take a few minutes and talk about the subject instead of typing back and forth. In Microsoft Teams, just click the “Meet now” icon at the bottom of the channel.

This will bring up a page that lets you start an unscheduled meeting (or schedule a meeting, if people aren’t available right now to discuss the subject). You can add a subject so attendees know which thread you want to discuss. Click “Meet now” and …

Voila – you’ve started a meeting with audio (and video, if participants choose).

Did you know … that you can recover a deleted Teams channel?

Oh no, I didn’t mean to delete THAT!!! Sure, it asked me five times if I was sure that I was sure … and maybe that’s part of the problem – I see so many “are you sure” messages that I click OK a little too easily. Well, they say to err is human. And I must be exceptionally human ? Sometimes recovering my data requires a sheepish call to the Help Desk. But did you know you can recover deleted Teams channels?

I used the hamburger menu next to a channel to delete it. Oops!

I even read the first few words of the “are you sure” dialogue before clicking the “Delete” button. Except … oops! I didn’t want to delete that channel!

You can recover the channel immediately, all by yourself. Even if you’re not a team owner. From the hamburger menu next to the team, select “Manage team”.

On the Team management page, select “Channels”. You can expand “Deleted” and see the channel you just removed. Click “Restore”

Yet another prompt … click “Restore” again.

Voila, the channel is back. Along with all its content. Whew!

Just because channel recovery is self-service doesn’t mean no one will know that you’ve mis-clicked. The channel deletion event which appears in the “General” channel … well, it’s still there. You can up-vote a request for enhancement on Microsoft’s site … but it’s not like no one will every know about your mistake.