Category: Office 365

Did you know … you can redirect custom URLs to Microsoft Forms?

Microsoft Forms provides a simple framework for creating surveys and polls which can be distributed either to internal users or made publicly available. Including your Form URL in an a href tag is one way to avoid trying to communicate the super-long Form URL … but if you’re looking for a ‘pretty’ URL, something that can be included in print media or provided to someone verbally, you can redirect custom URLs to your Form URL.

Generally, hosting a forwarding URL requires a web server; but URL-shortening services should work. To use a web server, you’ll need to configure a site (or path from a site) to serve an HTTP redirect. I am using 302 (temporary) redirection instead of 301 (permanent redirection) in case I want to forward my custom URL to a different Form.

Apache config

Use the “Redirect” directive in your virtual host config:

<VirtualHost 10.1.2.3:80>
     ServerName customsite.example.com
     ServerAlias customsite.example.com customsite
     Redirect / https://forms.office.com/Pages/DesignPage.aspx#FormID=wbRnJe2w9UCu41....
</VirtualHost>

IIS Config

In the IIS management utility, navigate to your website and select “HTTP Redirect”.

Check the box to redirect requests and paste in your Forms URL. Check the box to redirect all requests to the exact destination.

When your site is accessed, the browser receives the HTTP redirect and displays your Form.


Did you know … you can add manager approvals in Microsoft Flow?

In my previous post, I demonstrated how the Office 365 User search could be used to record a Form responder’s email address instead of their logon ID. But other information about the user is available too – including their manager. This means you can use Flow to build workflows that require manager approval where “manager” is dynamically determined. How?

Select the “Get manager (V2)” action from the “Office 365 User” connector.

In this example, I am extending the sample workflow that creates a SPO list item from a Forms submission. I have inserted a step after getting the responder’s profile information. Click in the “User (UPN)” and select the input that contains the responder’s account (which, again, Forms calls an e-mail address)

Insert a new action

Search for and select “Approvals” and then select the “Start and wait for an approval (V2)” action.

Click the drop-down for “Approval type” – since I am only adding a single approver, the first two options are essentially the same. I can, however, use “Everyone must approve” to have more than one level of manager required for approval, or a manager plus static application owner.

To assign the approval, find the dynamic content from the manager lookup and select “Mail” from that section. Add details that will appear in the approval notification – something to clearly explain what the person is approving.

Save your workflow. Now when a Form response is submitted, the responder’s manager will receive an e-mail which allows them to approve or reject the request.

If they use the Flow site, they will see the approval in their Approvals section.


Did you know … you can store Microsoft Forms responses in a SharePoint Online list with Flow?

Microsoft Forms is a great way to compose simple forms and gather responses but analyzing the data in Excel … well I generally prefer processes to be automated. To use Forms data in automated processes, I store the form response in a SharePoint Online (SPO) list. How do you get the form response into a SPO list? Microsoft Flow.

Note – Microsoft Flow cycles are not free. We receive a number of free cycles each month for each Office 365 license purchased. The company-wide number of free flow cycles is quite large, but not infinite. Be cognizant of what constitutes a cycle. In this case, a cycle is each new form submission … if I expect 20,000 people to submit the form this month, I am using 20,000 flow cycles. Not all trigger cycles are as straightforward as this. As an example, Flow could send me an alert when I receive an e-mail from my manager. A cycle is not triggered on “e-mail from my manager received in my mailbox” but rather “new e-mail message received in my mailbox”. For a mailbox dedicated to a specific purpose, the number of messages received per month may be exactly what you want to process. In my mailbox, system alerts, ITSM notifications, script results and such would quickly use up a significant portion of Windstream’s free cycle allotment.

First you need a Form. When editing your form, grab the URL and find the “FormID” section. Save that string – we’ll need that in the workflow.

Before you start – if you plan to convert your personal form into a group form, do that before creating the Flow workflow. The form ID changes when a form is moved between group and personal forms, and you will need to adjust the workflow accordingly.

To store information in a SharePoint Online list, you’ll also need a SPO list. You can create one in a dedicated SPO site or the SPO site behind a Teams space.

Record the SPO site address and list name – we’ll need that in the workflow.

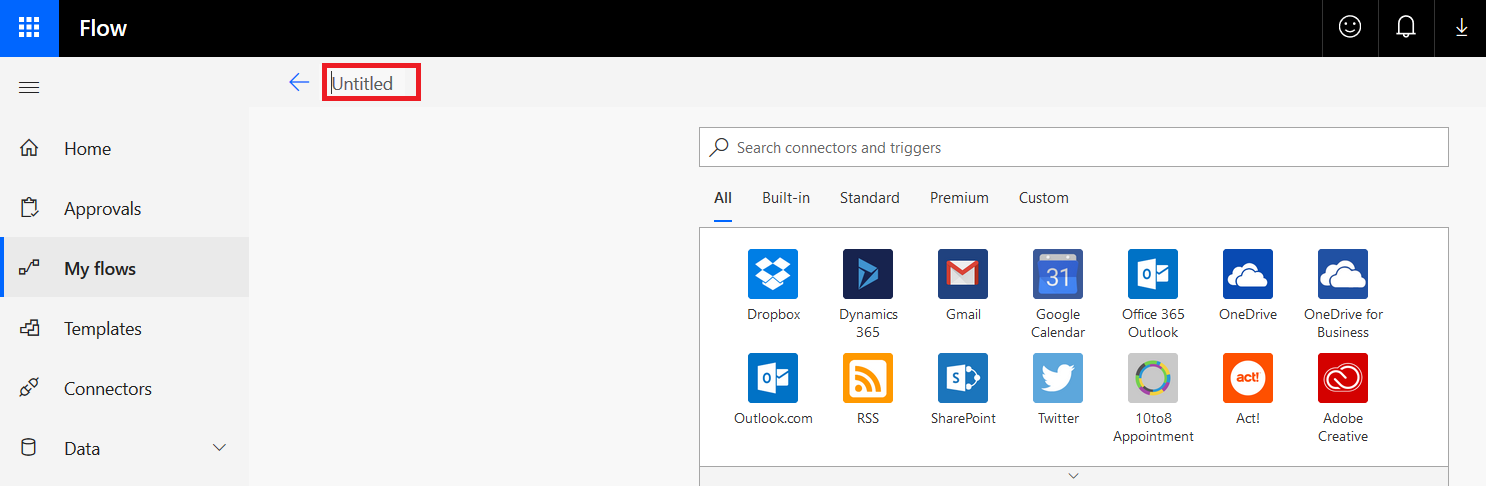
Now that we’ve got all of the components ready, we can build a workflow to connect them. Log into https://flow.microsoft.com

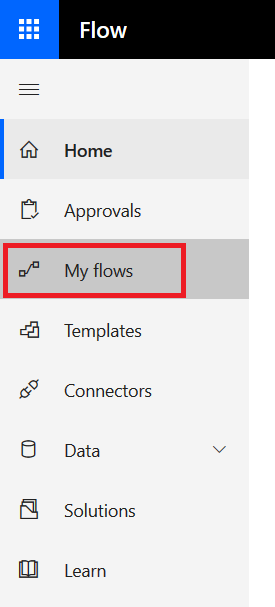
On the left-hand navigation bar, click “My Flows”.

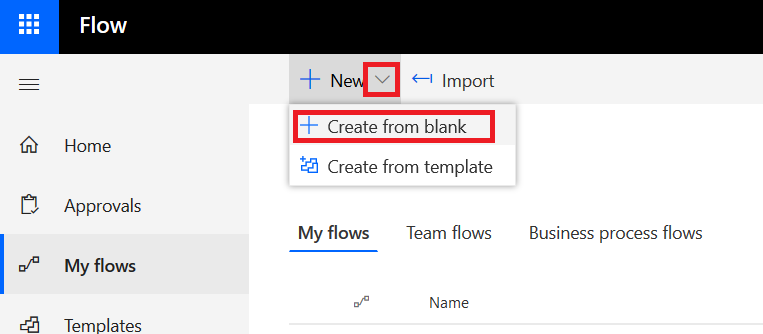
Click the drop-down next to “New” and select “Create from blank”

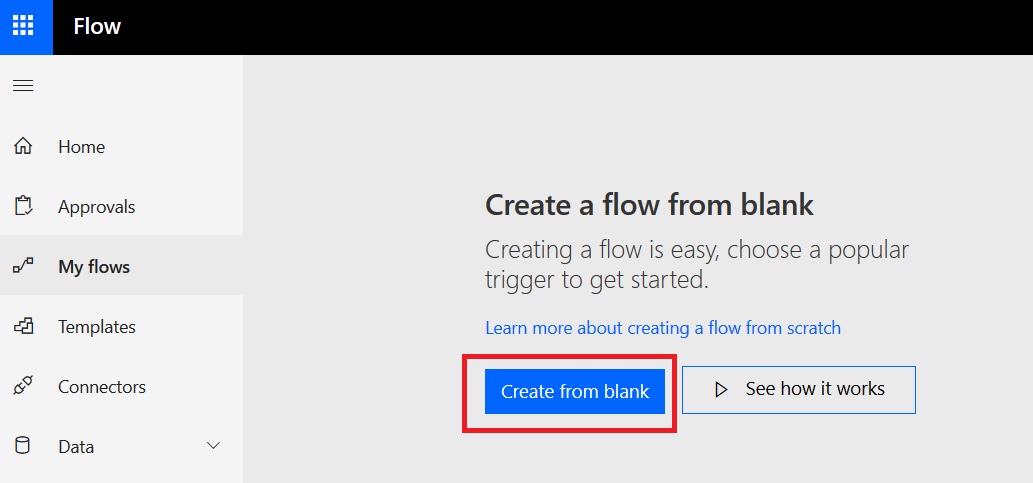
Click “Create from blank” to confirm your choice.

Before you do anything else, give your Flow a descriptive name. Click on “Untitled”, type something else, and hit enter. If you don’t name your flow, it will get a default name based on the actions taken within the workflow … which makes it really hard to differentiate between five different workflows that take Forms responses and store them in SPO lists.

The trigger for the workflow will be that a new Forms response is submitted.

Select the “When a new response is submitted” trigger.

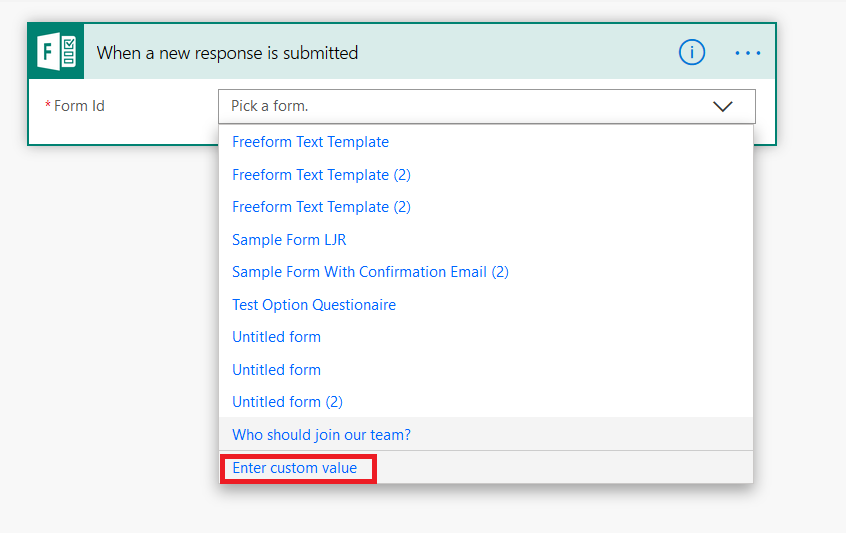
Select “Enter custom value” and paste in the form ID we recorded earlier.

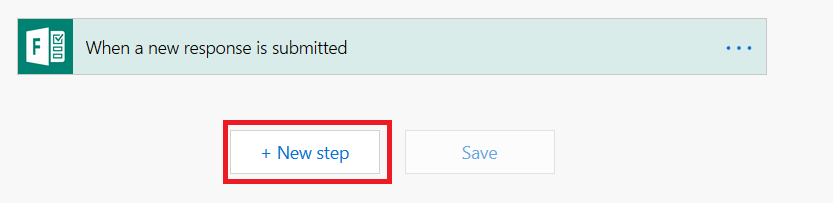
Click “+ New step” to add a new step.

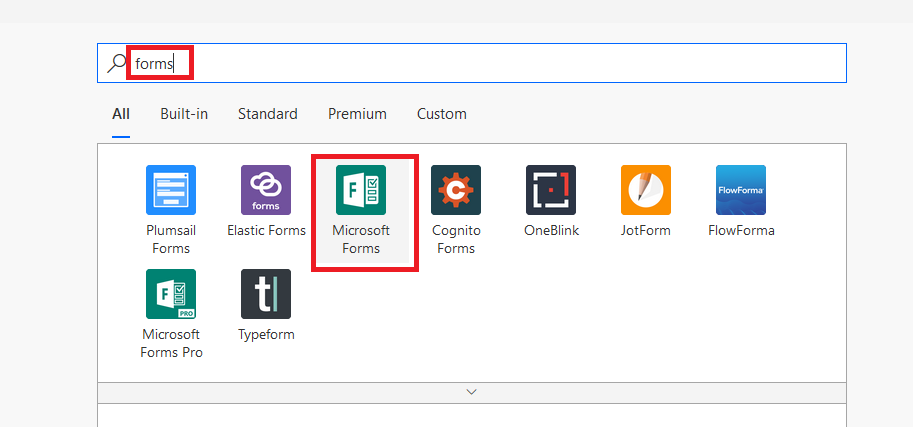
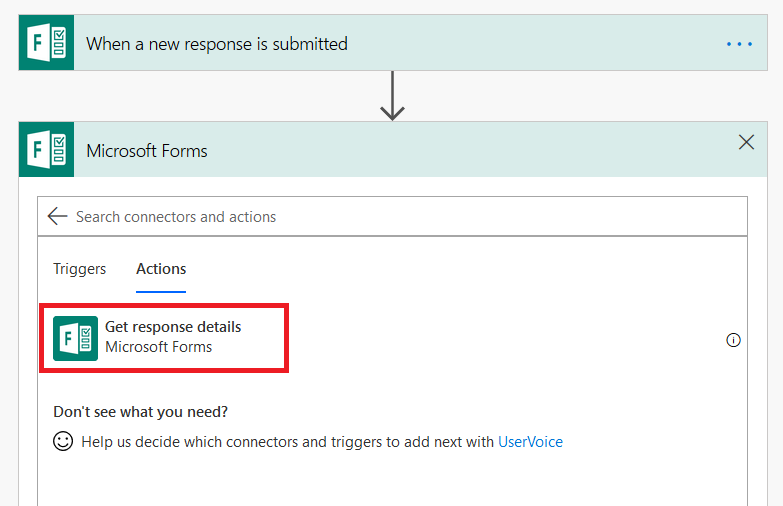
To use the data from the Form submission, we need to get the response data. Enter “Forms” again and select “Microsoft Forms”

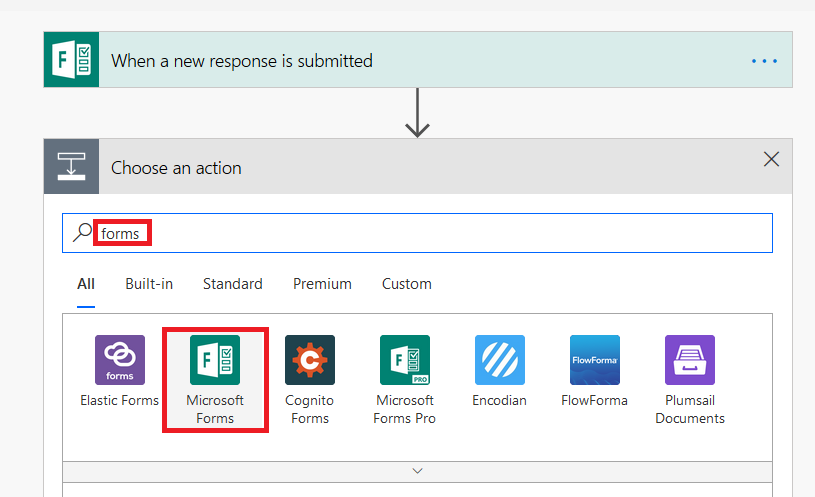
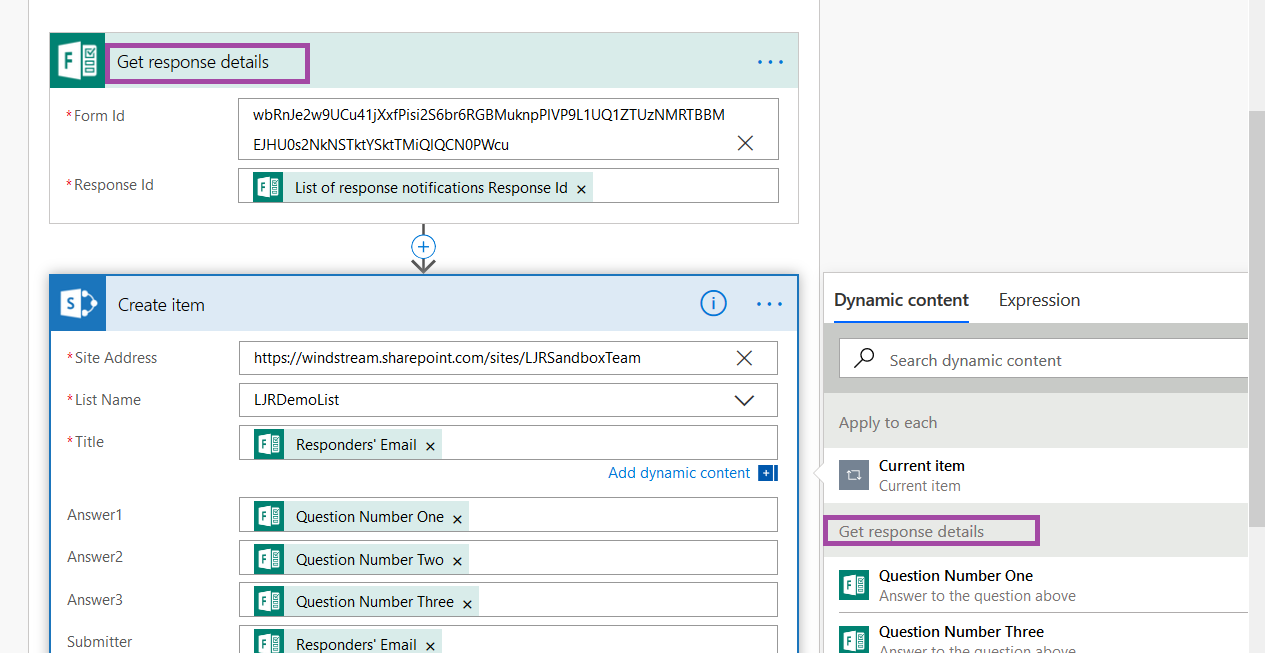
Select the “Get response details” action.

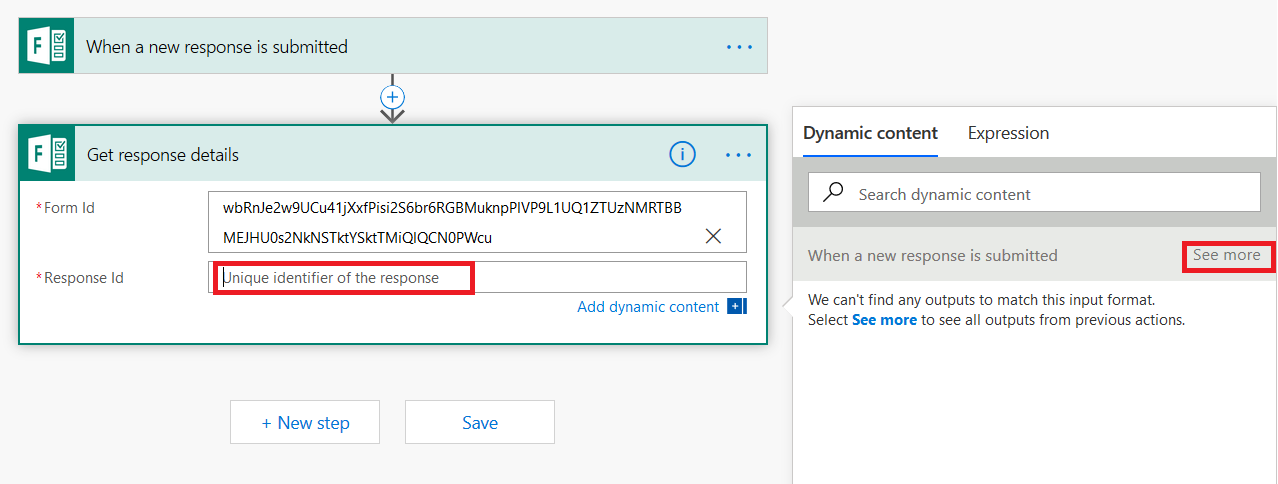
In “Form Id”, enter a custom value and paste in the Form ID. Click in the “Response Id” field. In the right-hand navigation menu, click “See more”.

Select “List of response notifications Response Id”

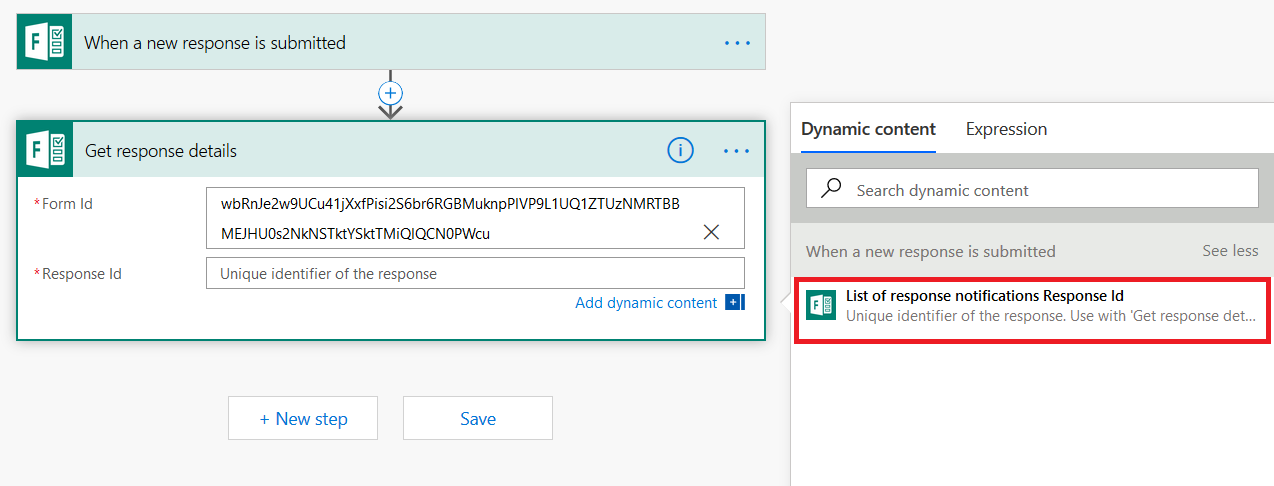
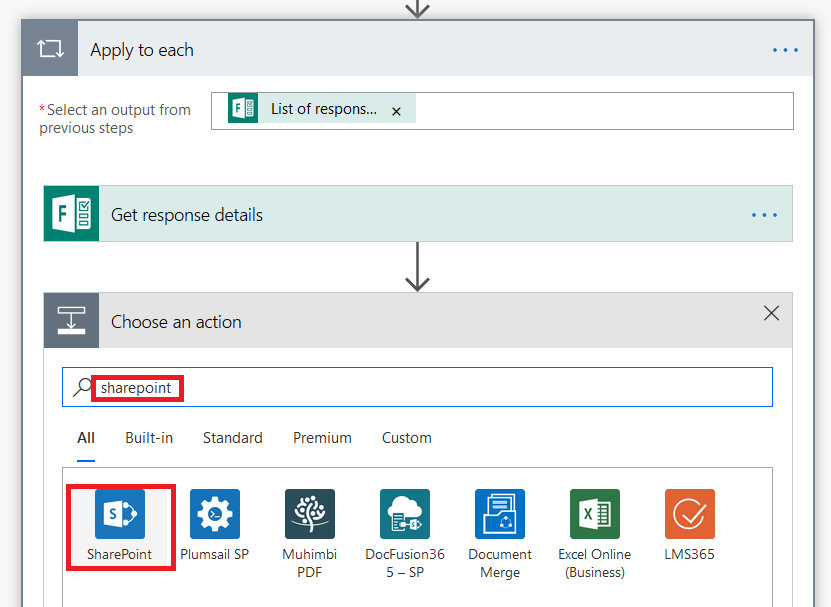
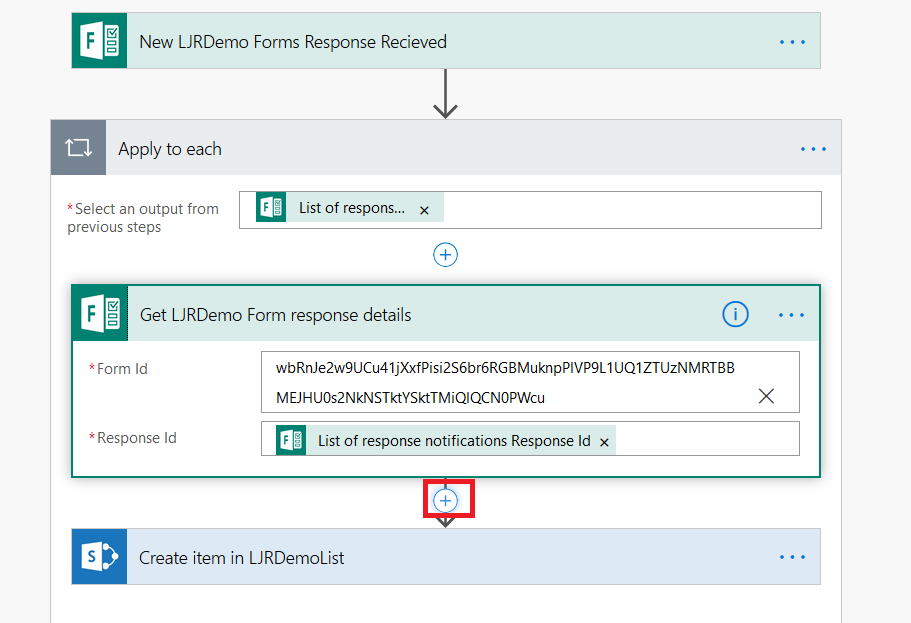
You’ll see that the response ID is added to “Select an output from the previous step”. Click “Add an action”

Type “SharePoint” and select “SharePoint”

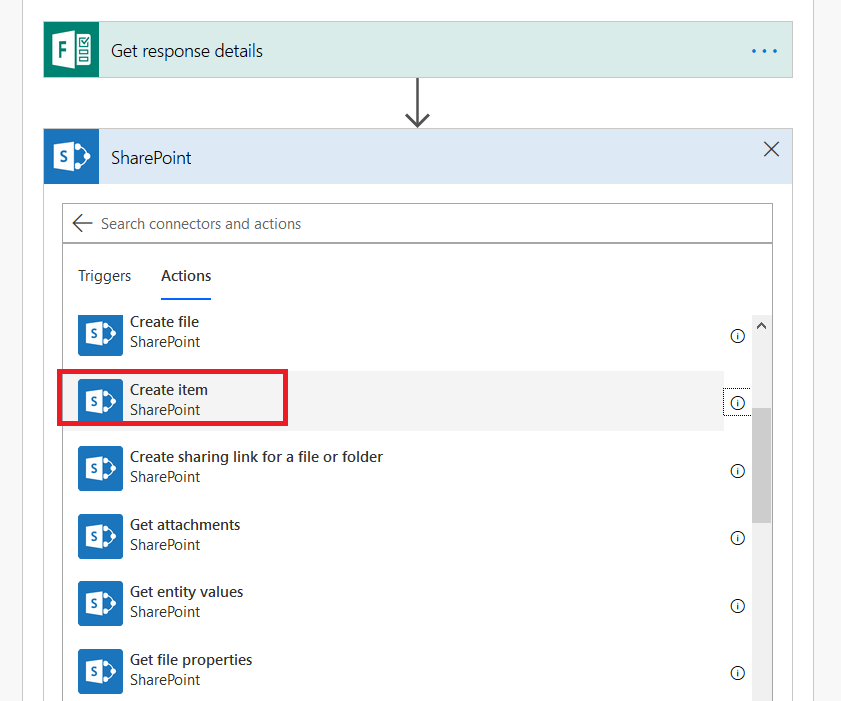
Select “Create item” from the “Actions” tab

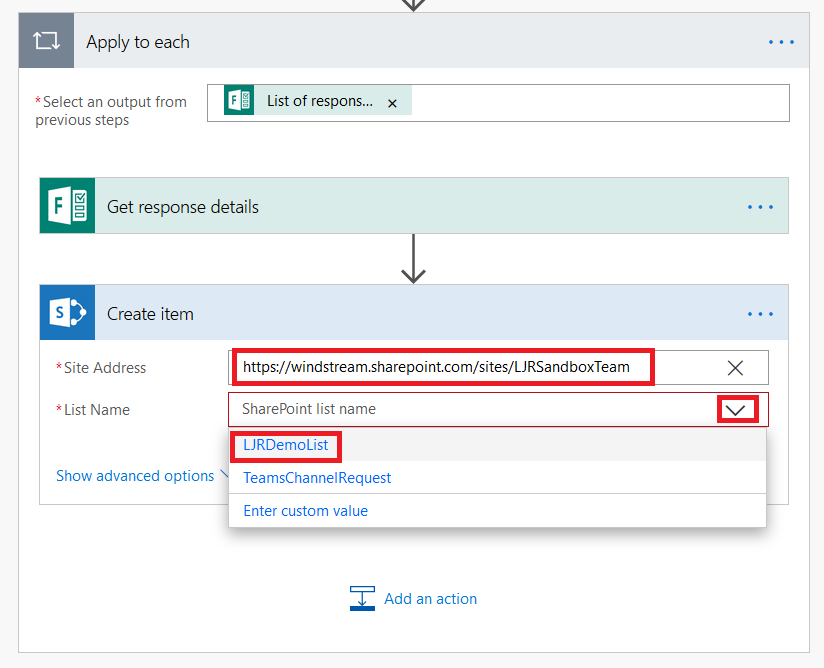
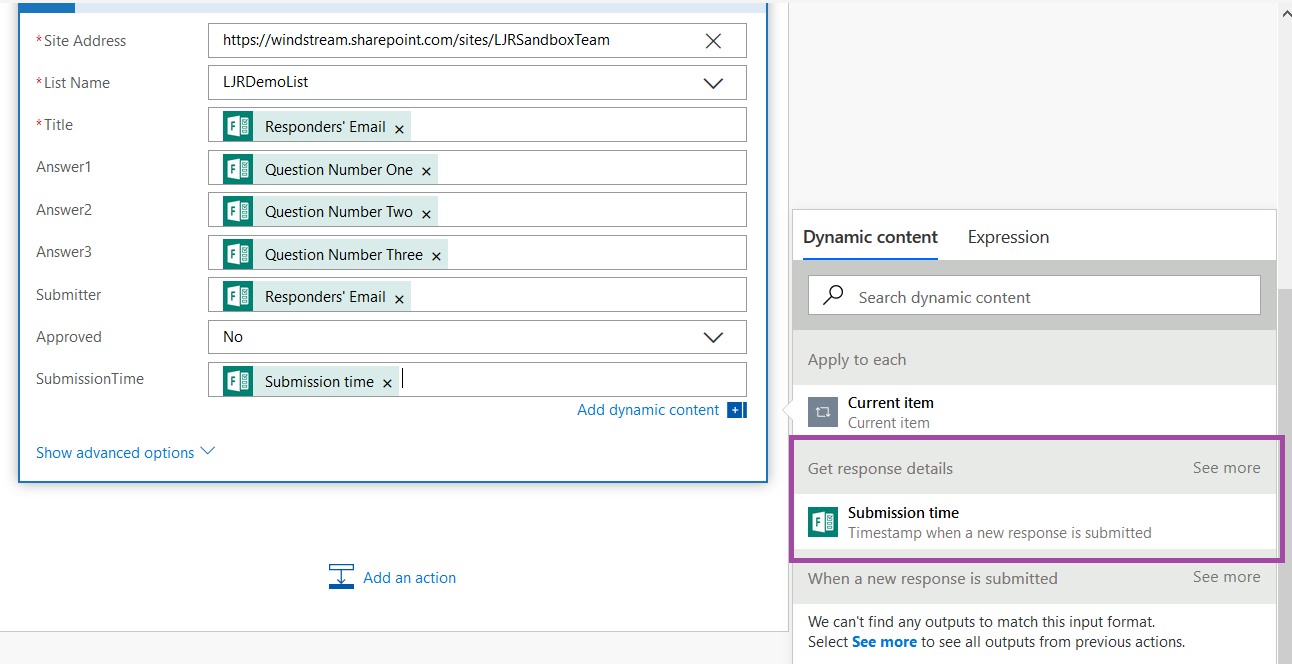
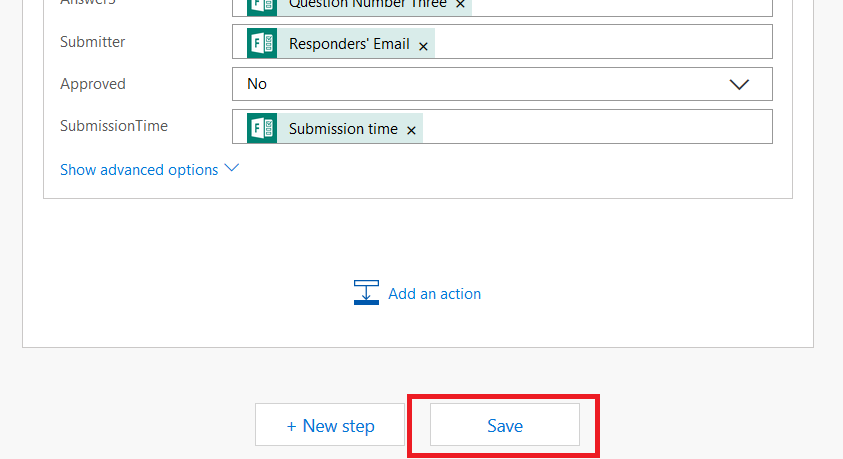
Select “Enter custom value” for the Site Address and enter the site address we recorded earlier. Then click the drop-down for “List Name” – select the list into which you want to insert Forms responses.

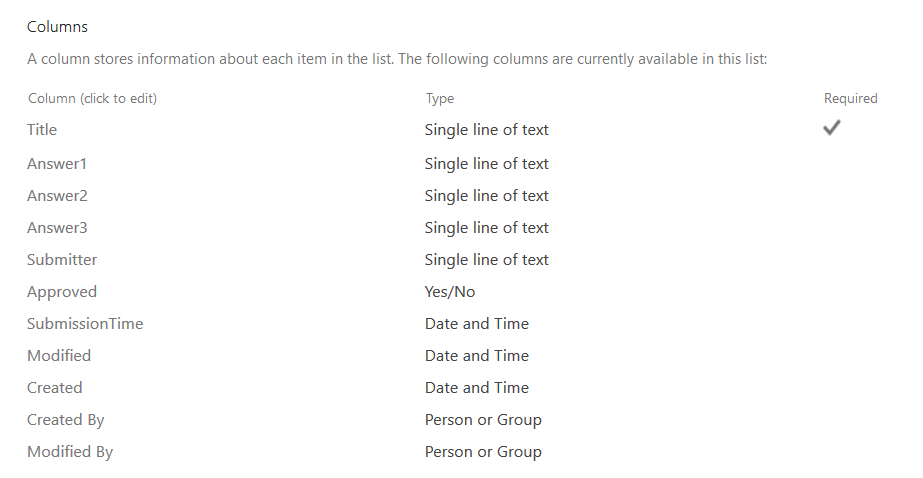
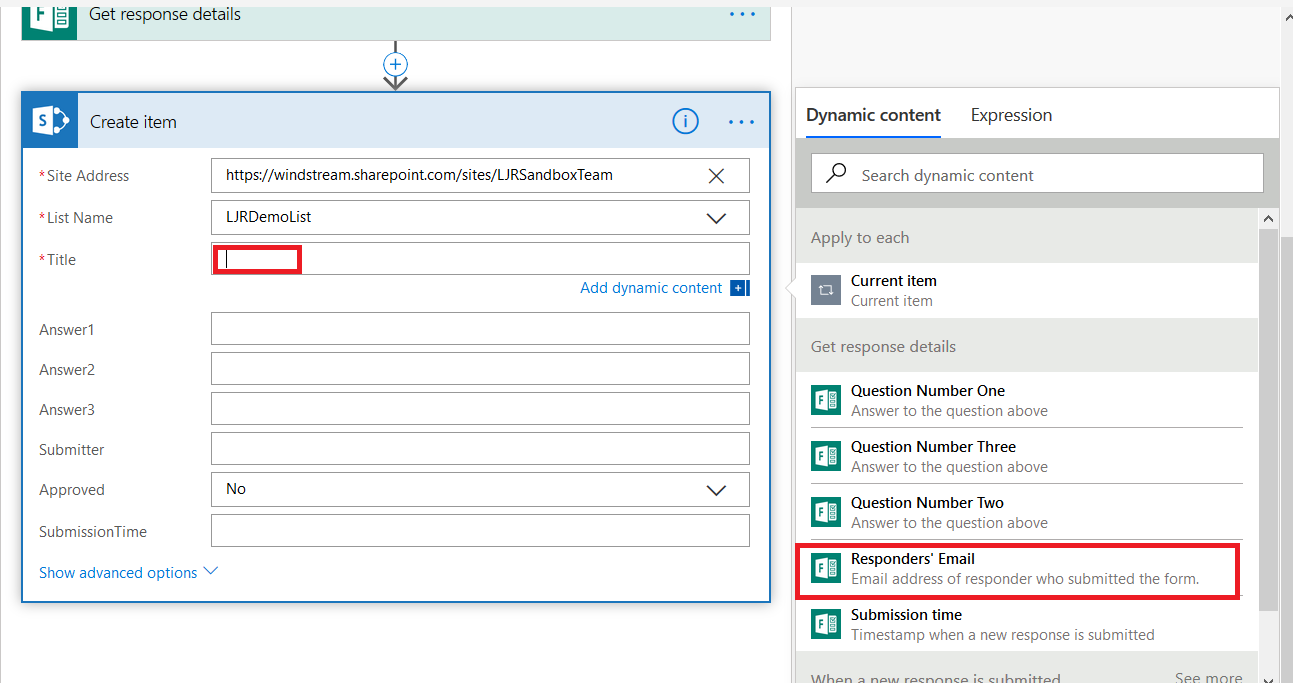
Below “List Name”, additional fields will appear – one for each column of your list. Click into a column. In the right-hand bar, you will see the Form attributes that can be placed into the List column. For each List column, select the Form component you want stored in that field.

Flow is aware of column types – if you click into a date column, it will try to present Forms information that holds dates. If you find an option missing, click “See more” to see an unfiltered list of Forms attributes.

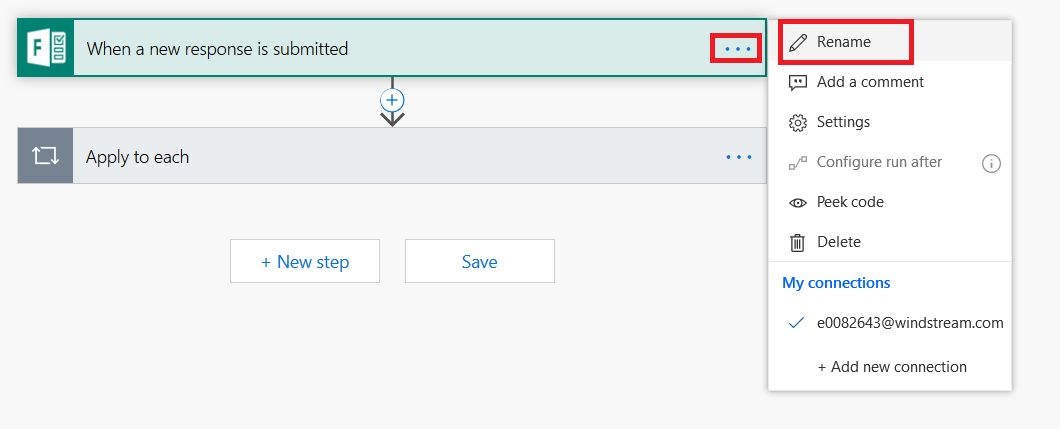
When you are selecting values to use in an action, the possible selections are grouped by the action. For a simple form/list combination like this, using the default step names is not too confusing, but if you build more complex workflows with more data elements … figuring out which “Get response details” is which becomes difficult.

It can be clearer if you provide a unique name for each trigger and action – the values from the LJRDemo form are clearly part of the “Get LJRDemo Form response details” section.

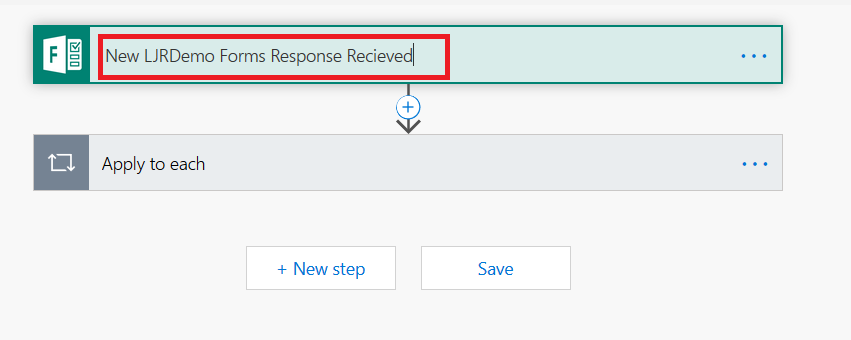
To rename a workflow element, click the ellipses and select “Rename”

Type a new name and hit enter

Click “Save” to save and activate your workflow.

Submit answers using your form, then check your SPO list.

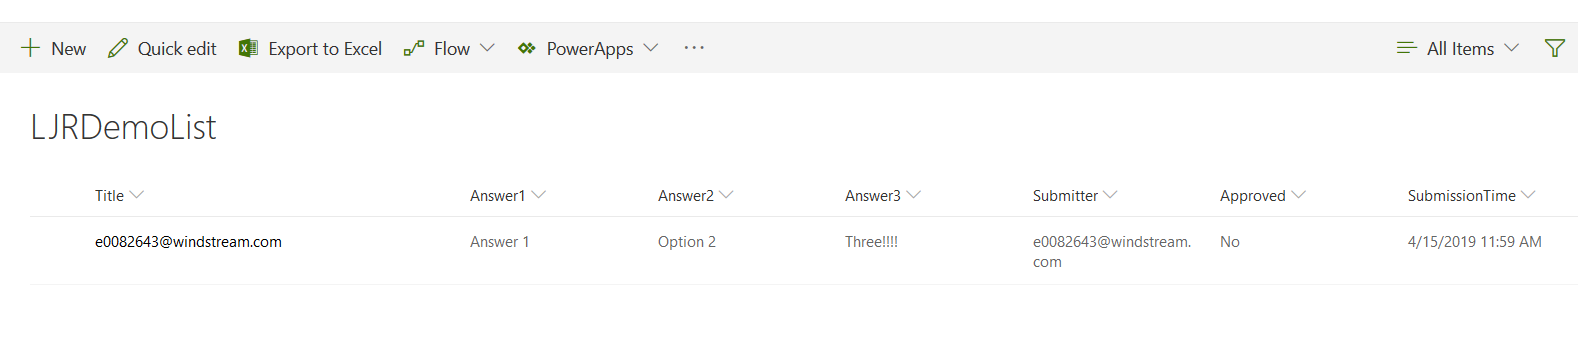
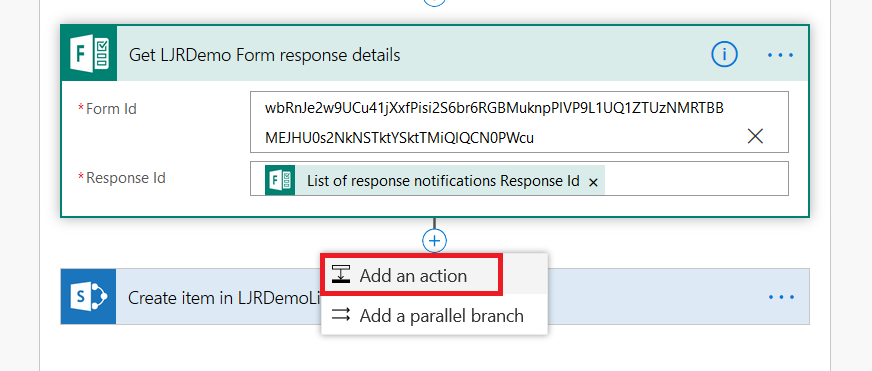
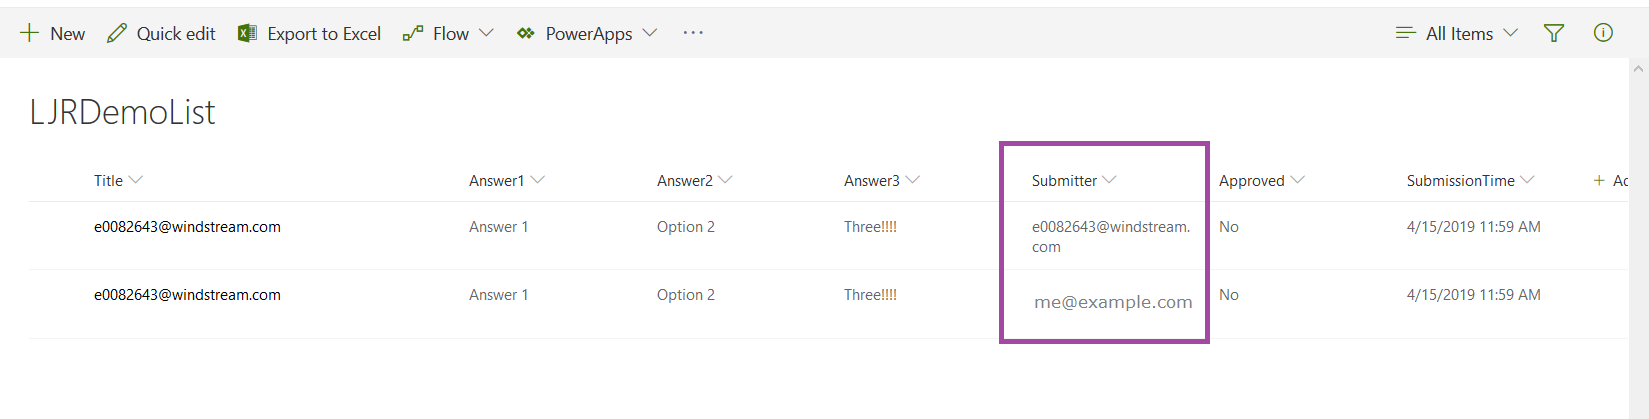
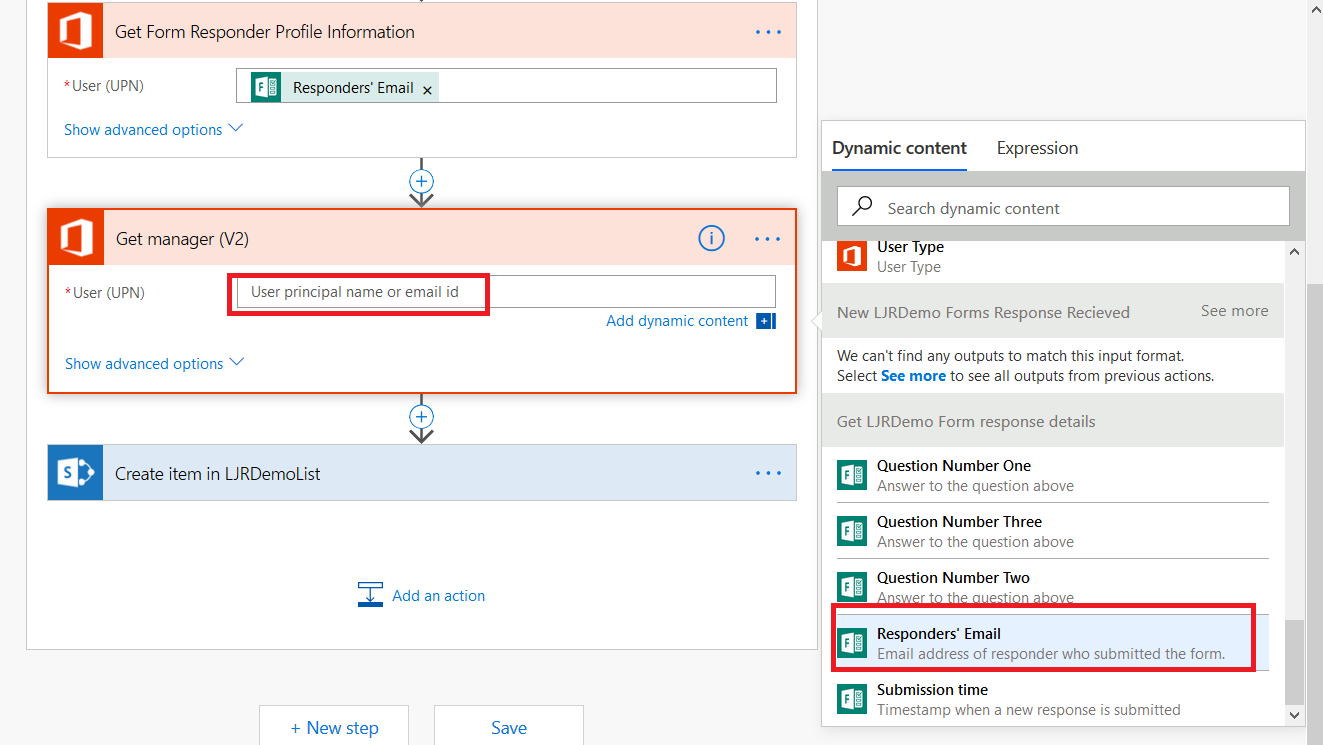
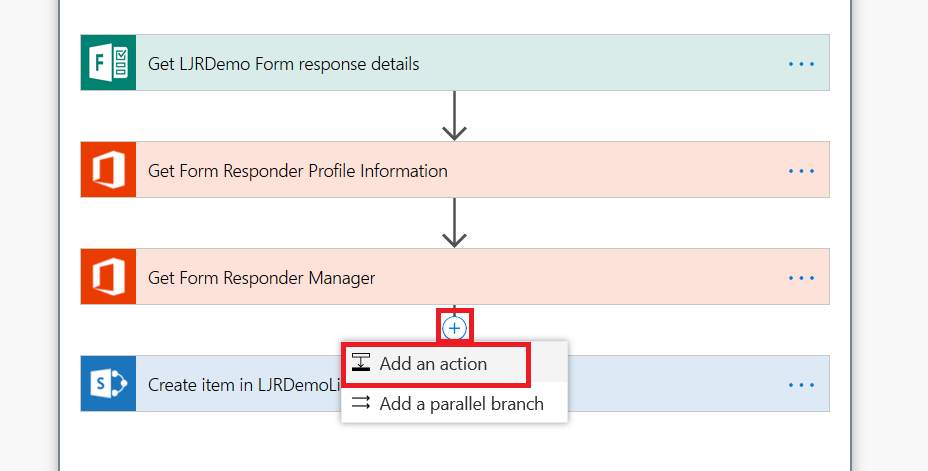
Notice that what Forms calls my e-mail address is actually my logon ID. This is very useful for IT folks who can easily correlate logon IDs to actual individuals. Maybe not so useful for you. Flow provides directory lookup capabilities if you want to turn the logon ID field into something … more readable. Edit your Flow. After the get response details step, click the little plus to insert a new step.

Select “Add an action”

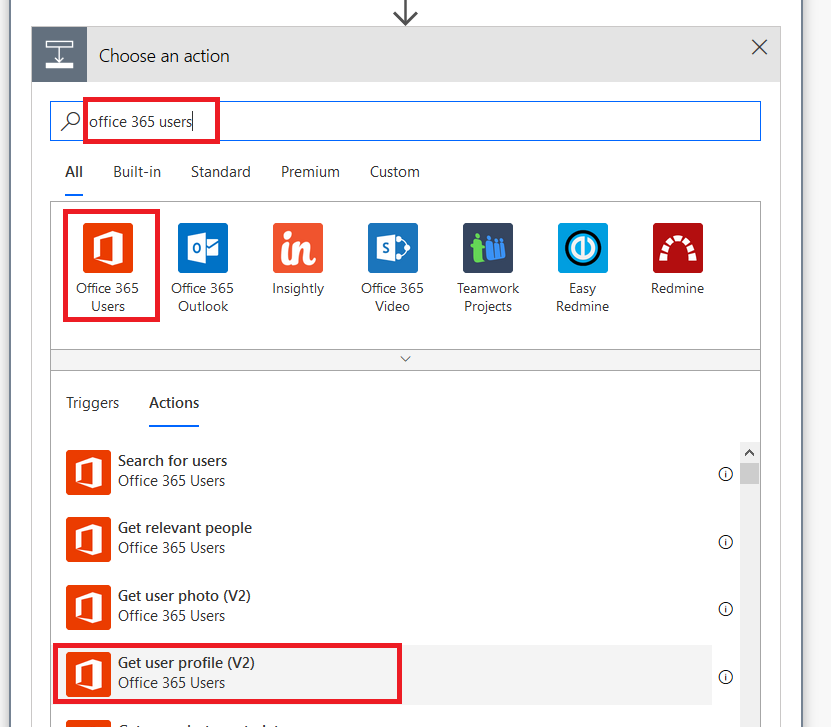
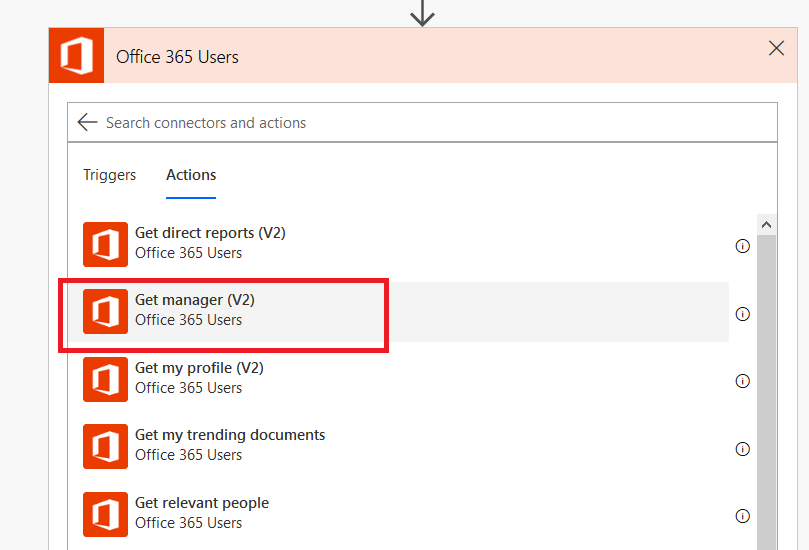
Search for “Office 365 Users”, select it, and select “Get user profile (V2)”.

Click in the “User (UPN)” box and select the Form respondent’s “e-mail”

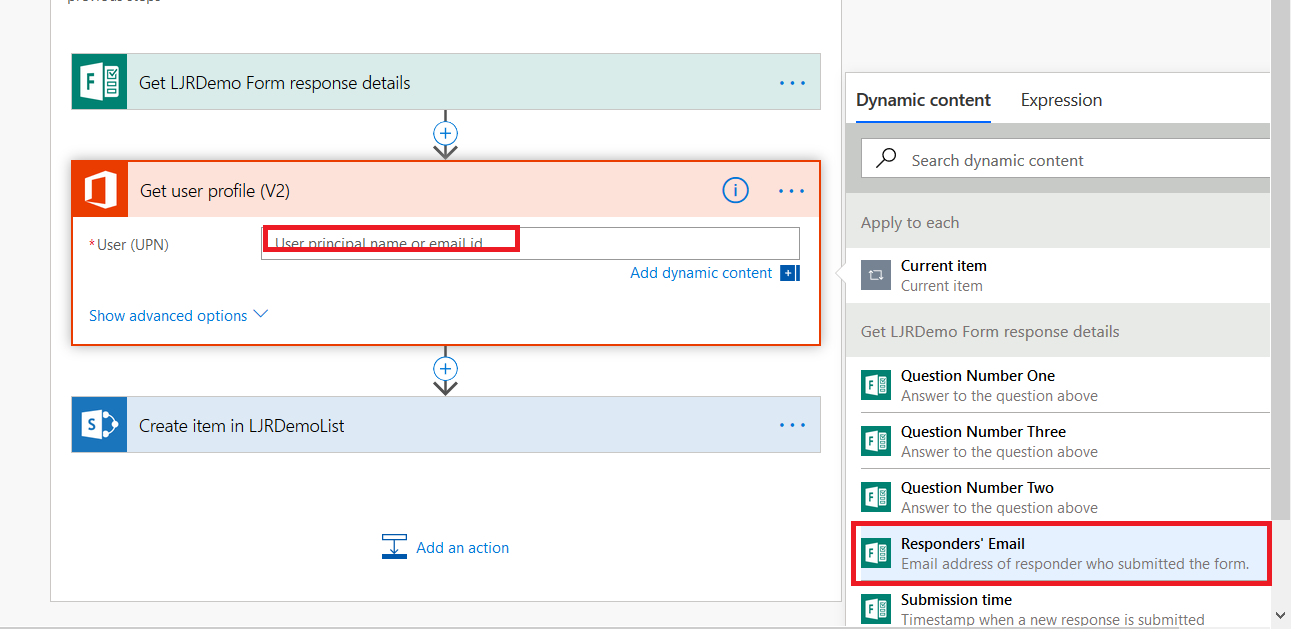
Edit the action which creates the SPO list item. You will now have dynamic content both from the Form response and the Office 365 user lookup. In this case, I will use “Mail” in the Submitter column.

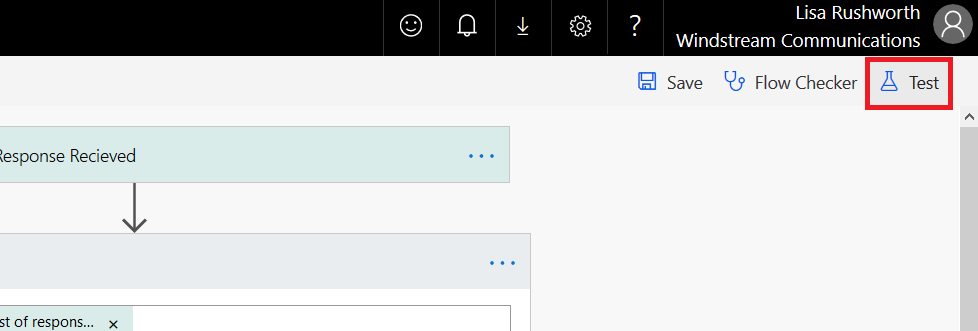
Save you changes. Since we’ve already submitted a Form response, we can test the Flow without submitting a new response. Click “Test” in the upper right-hand corner of your screen.

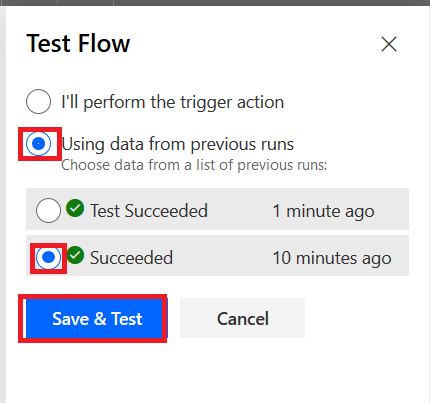
Select one of the previous runs (there may only be one!) and click “Save & Test” to re-run the Form response through your workflow.

Now the submitter is recorded as an e-mail address.

SPO Guest Access Stops Working

I ran across an interesting issue today — Windstream’s got a really awesome SPO site for SD Project Management – tracking orders, equipment orders, 3rd party cabling installations, etc. The cool part about the site being hosted in SharePoint Online is that a customer can get set up as a federated partner and be granted access to see equipment readiness and installation scheduling within our system.

Guest access is an interesting concept – while I have an account in our tenant that is linked to my Active Directory account in our domain, you can also create links to accounts in other company’s directories. The guest account can then be set up to access our Azure resources – added to Azure groups, added to SharePoint Online groups, invited to join Teams.

A guest user had her computer replaced and could no longer access the site – SPO insisted that she was not a valid user. Looking in Azure AD, the account existed; the audit log even showed successful authentication events. I’m not sure if the computer replacement was a coincidence, the new computer had a different configuration, or if your browser stashes some information that allowed her to avoid authentication failures, but her guest account in our tenant was no longer working.

For companies that don’t have Azure AD, when an individual accepts guest account access … the guest account link in our tenant lists “Microsoft Account” as the source.

But when the company sets up Azure, the auth framework seems to get confused by the Azure AD account. Easy enough solution – we’ve got to delete the guest account that’s linked to their MS Account from Azure AD. Bonus step specific to SPO, a site administrator needs to use <site>/_layouts/15/people.aspx?MembershipGroupId=0 to delete the guest account from the SPO site.


Once the “Microsoft Account” guest account has been removed, the guest can be re-invited. They’ll step through the registration process again but the guest account will be linked up to their Azure AD account.

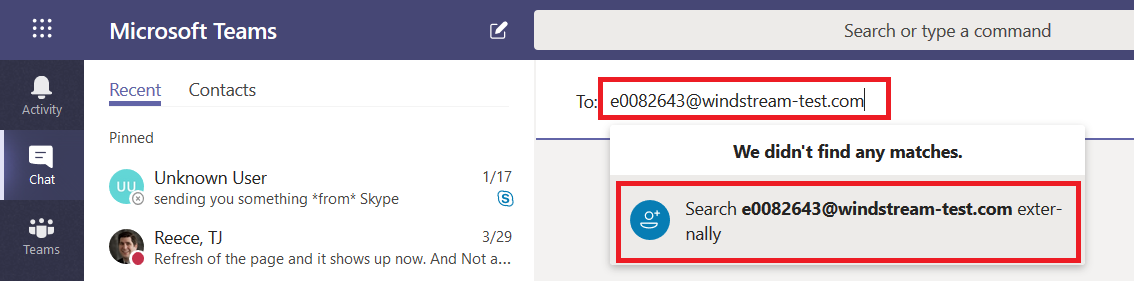
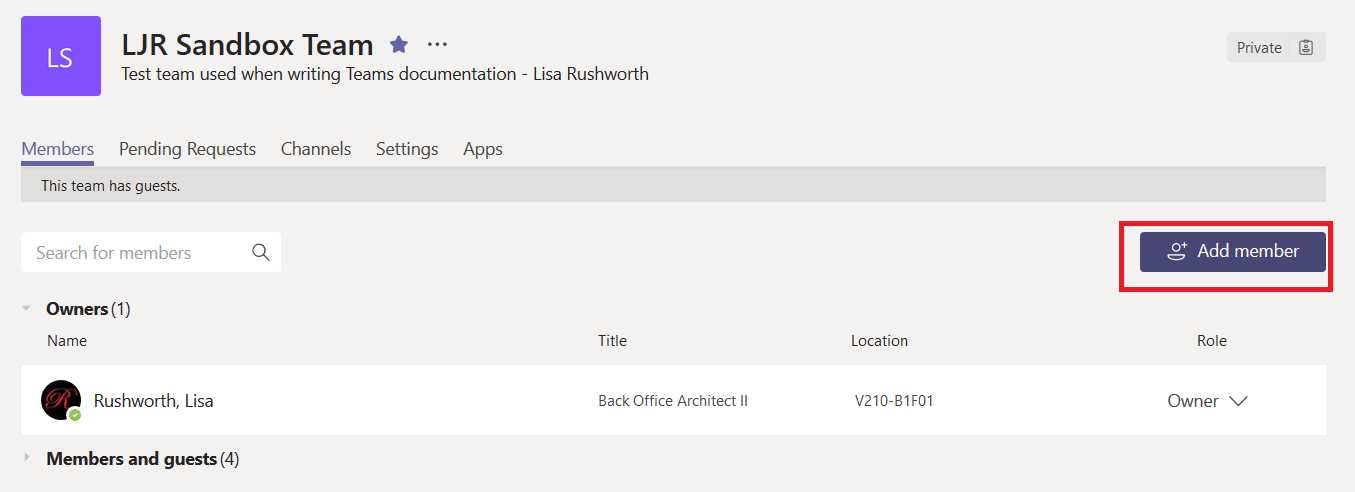
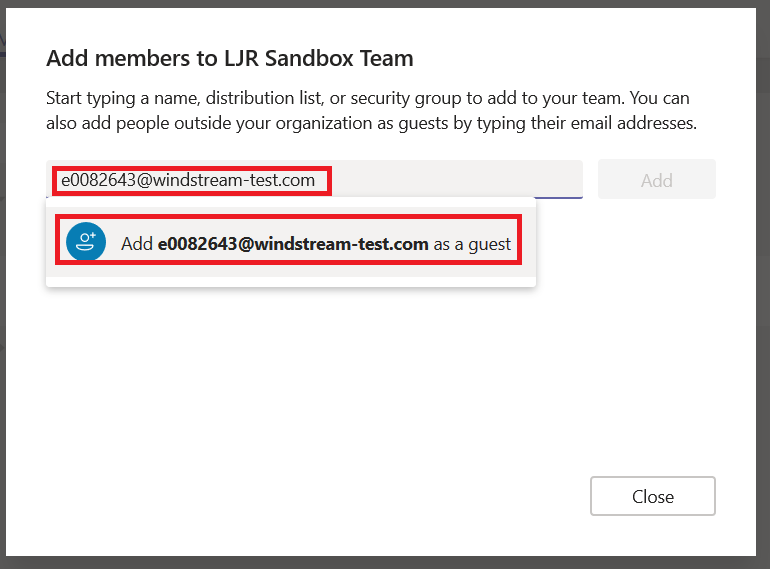
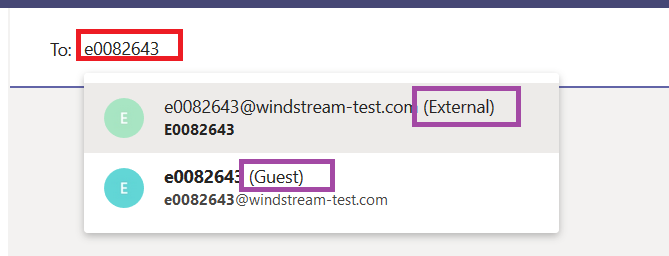
 Re-add the new guest account to whatever they were using & their access will be restored.


Did you know … you can use Teams to collaborate with vendors?

There were a few organizations set up to “federate” with Skype for Business – from your Skype client, you could send messages to their Skype for Business account. This will continue to work when you move to Teams. Microsoft calls each company’s Office 365 environment a “tenant” – you are able to send messages from Teams in our tenant to a federated partner’s Skype or Teams in their tenant.

** If your account is upgraded to Teams Only, messages sent from federated partners will be delivered to you in Teams. Otherwise messages sent from federated partners will be delivered to you in Skype.

To chat with a federated partner, simply address a new chat message to them. The “We didn’t find any matches” message lets you know there wasn’t anyone found in our organization. Click to search for the account externally.

If you get an error indicating that the conversation cannot be set up, you may be mistyping the address. It is also possible that the organization is not on our list of allowed federation partners.

If their organization is on the allowed partner list, you’ll be able to start a new conversation. Along the top banner, there are a few indicators to ensure you realize you are sending information outside of our organization. Messages sent to external recipients transit Microsoft’s Skype/Teams interop gateway. Anything that is not supported through the interop gateway – screen sharing, file sharing, multi-party chat, rich text messages – will not be available when you are chatting with an external recipient.

The other person will see your message in their Skype or Teams application – if they’ve been upgraded to Teams Only, the message will be delivered to them in Teams, otherwise it will be delivered in Skype.

Teams expands on Skype’s federated messaging functionality – accounts from allowed organizations can be “guests” in our Teams. This means vendors can participate in collaborative discussions and access shared documents without having an “n99” account with an Office license. Federated partners can add you as a guest in their Teams spaces too.

Team owners add guests the same way they add internal Team members.

When you type the guest’s address, it will not match any records in our tenant and the option to add them as a guest will be displayed.

Once someone has been added as a guest to a Teams space, there are two ways you can send them chat messages – the external account and the guest account.

What’s the difference? Where the “external” listing delivered your chat message to Skype or Teams (depending on the individual’s account configuration) in the other person’s tenant, “Guest” will deliver the chat message to Teams within *our* tenant.

Good news – that means you can use features that aren’t supported through the interop gateway. Bad news – the person may not check our Teams tenant regularly to see if there are new messages.

A person added as a guest to our organization will see a drop-down tenant selector next to their avatar in Teams. They’ll be able to click the drop-down and switch contexts to our tenant.

They will be able to see our Teams … well, the ones of which they are a member anyway!

They’ll also see chat messages sent to their guest account.

You may notice that the person appears twice in your chat history – the guest account in our tenant and the external account in their tenant are separate entities.

How will the person know they’ve got messages waiting for them in our tenant? A message count indicator will appear on the tenant selector. If they’re a guest in multiple tenants, clicking the drop-down will show them how many new messages are in each tenant.

Usage Tip: This notification isn’t immediate (and sometimes the notification is significantly delayed), so time-sensitive communication should be sent to the ‘External’ listing instead of the ‘Guest’ one.

Warning: Conversations and documents in our tenant are under our purview. This means we can restore access if data becomes orphaned, our retention policies apply to the data, documents and conversations will be included in legal discovery activity, etc. Activity in partner tenants are under their purview. Be cognizant of communication and file content before storing information outside of our tenant.

Did you know … you can perform an “unmatched query” in Excel?

I mentioned yesterday that we’re creating groups based on the upper level manager through whom individuals report. Since my groups are based on the upper level managers, I need to be able to identify when a new individual pops into the list of upper level managers. Real upper level management doesn’t change frequently, but unfilled positions create gaps in the reporting structure. I call the manager before the gap the highest-ranking person in that vertical and that individual’s reporting subtree becomes a group.

Determining if values from one list appear in another list is easy in Microsoft Access – it’s an unmatched query. I’d rather not have to switch between the two programs, and I was certain an Excel formula could do the same thing. It can!

The formula is:

=IF(ISNA(VLOOKUP(H2,SOA6MgrSummary!A:A,1,FALSE)),”Not in Manager Summary”,””)

And it does flag any manager from column H that does not appear in my list of upper level managers.

I am also able to filter my spreadsheet to display only records where the upper level manager does not appear in my summary table.

What is my formula doing? It is a combination of three functions

=IF(ISNA(VLOOKUP(H2,SOA6MgrSummary!A:A,1,FALSE)),”Not in Manager Summary”,””)

It starts with the IF function – a logical comparison – which is used as if(Test,ResultIfTestIsTrue, ResultIfTestIsFalse).

If the test is true, “Not in Manager Summary” will be put into the cell. If the test is false, nothing (“”) will be put into the cell.

The test itself is two functions. I’ve documented the VLOOKUP function previously, but briefly it searches a range of data for a specific value. If the value is found, it returns something. If the value isn’t found, it returns N/A.

In conjunction with the VLOOKUP, I am using the ISNA function. This function is a logic test – it returns TRUE when the value is N/A and FALSE otherwise.

So my formula says “Look for the value of cell H2 in column A of the SOA6MgrSummary tab. If the result is N/A, put ‘Not in Manager Summary’ in this cell, otherwise leave this cell empty”.


Did you know … Excel can create a sum of values where a condition is true?

For a project, we need to divide the entire company into groups. I chose organizational structure because it’s easy – I can determine the reporting structure for any employee or contractor, and I can roll people into groups under which ever level of manager I want.

The point of making groups, though, is to have close to the same number of people in each group. While I can use COUNTIFS to count the number of people who report up through each manager, I need to add those totals for each group of managers to determine how many individuals fall in each group. How many employees are included in Group 0?

This is actually quite easy – just like count has a conditional counterpart, countifs, sum has a conditional counterpart sumifs

The usage is =SUMIFS( Range Of Data To Sum, Range Of Data Where Criterion Needs To Match, Criterion That Needs To Match)

You can use multiple criteria ranges and corresponding criteria in your conditional sum — =SUMIFS(SumRange,CriterionRange1,CriterionMatch1,CriterionRange2,CriterionMatch2,…,CriterionRangeN,CriterionMatchN).

I only have one condition, so with a quick listing of the groups, I can add a column that tells me how many individuals are included in each group.

Bonus did you know – instead of specifying a start and end cell for a range, you can use the entire column. Instead of saying my “Range of data to sum” is B2:B101, I just used B:B to select the entire “B” column.

Viewing the values, I can see that my group size is not consistent.

As I adjust the group to which the manager is assigned, these sums are updated in real-time.


Did you know … you decide what appears in your Teams activity feed?

Have you noticed that some new Teams messages show up in your activity feed and others do not? The Teams activity feed is meant to highlight Team messages that are important to you. How does Teams know what is important to you? It doesn’t … Teams needs you to tell it what is important to you.

Normally, Teams conversation activity doesn’t appear in your activity feed. When my test account posts a message into the “General” channel …

I see the channel is bolded, indicating new activity; but I do not have any indicators on my Teams or Activity tiles.

What is included in the Activity feed?

Messages to which you’ve replied:  When you reply in a thread, your reply tells Teams that the thread is important to you (just liking a post doesn’t count … you’ve got to actually reply. There are enhancement requests to include some provision for following a thread without replying and muting notifications on a thread to which you’ve replied).

The test account added a new reply after I’d posted my reply. In addition to seeing the channel name in bold, my Activity tile indicates there is one unread message.

Followed Channels: If you want to receive notifications for all threads posted to a channel, follow the channel. Click the ellipsis next to the channel name and select “Follow this channel”.

Now when the test account posts a new thread …

I have an indicator on my Activity tile.

Team At-Mentions: You’ll also see an activity item when the Team is at-mentioned in a post (that’s why at-mentioning the Team is a really effective way to bring attention to your post).

In addition to the activity indicator, I also see an “@” symbol on the Teams tile indicating that a Team has been at-mentioned. And a little number next to the channel that tells you how many unread Team or Channel mentions are in the channel.

Some Channel At-Mentions: What is the difference between at-mentioning a Team and at-mentioning a Channel? When you at-mention a Channel, only people who have favorited the channel will see activity alerts.

Usage Tip: If you break your Team up into channels that aren’t deeply interconnected, individuals can favorite and follow the channels where they are actively involved and check other channels when they’ve got some time. You can at-mention the channel for important messages without overwhelming the whole team with alerts.

While the channel is marked as bold to indicate unread messages, I don’t get any notification about the at-mention. How do you mark a channel as a favorite? Just click that star to the right of the channel name (favorite channels also appear in the initial channel list so you don’t have to expand “X more channels” to see them).

Now a message which at-mentions the channel …

alerts me. A lot 😊


Did you know … you can edit and delete Teams messages?

Typos happen – especially in quick, “instant messaging” type communication tools like Microsoft Teams. There is a spell checker to identify mistakes that aren’t words.

But spell check doesn’t catch everything.

Beyond mistyped characters, my thread would be nicer if I had included a subject! And even if my message was perfect when posted, processes change and information becomes incorrect. Because Teams conversations are persistent, out-of-date instructions are going to turn up in search results. Instead of creating a new thread with the updated instructions, I return to the old post and edit it. Changed posts do move to the bottom of the channel (and create an activity alert for individuals who follow the channel). In private chats, edited messages do not appear as new activity, so I’ll copy my updated message and post it into the chat again.

How do you edit a message? In either the chat or channel conversation, click on the ellipses in the upper right-hand corner of your message (these controls only appear when your mouse is over the message block).

Select “Edit”

Your message is open in the basic editor. To add a subject, click the “Format” button to open the expanded editor.

Edit your message – add a subject, correct typos or update content. When you are done, click the check-mark to save your changes. Or if you no longer wish to edit the message, click the “X” to cancel.

And, yes, people will be able to see that you edited the message. They won’t see what you edited … but the phrase “Edited” will appear right next to the message timestamp. What about messages that no longer apply? Put in the wrong place? You can a message them to explain why it is no longer valid. Or you can delete it. To delete a message, click the ellipsis in the upper right-hand corner of your message and select “Delete”.

While there is no “are you sure?” prompt, you can undo the deletion. Note that the “This message has been deleted” banner remains in the thread. So until there’s better delineation between ‘reply’ and ‘start a new thread’, everyone is going to know you replied in the wrong spot 😊

What about someone else’s message? You can only edit messages you have posted. In private chats, only the person who sent the message can delete it. In channel discussion, Team owners can delete any message (including messages posted by a bot or connector).


Teams Debugging

The Teams desktop client is an Electron application – which means you can debug the Teams client just like any other Electron application. To set up debugging through Chrome, open Chrome to chrome://inspect Configure network targets. Click “Configure”

Add an unused port to be used for Teams debugging.

Run Teams with the remote debugging flag port set to the same port you added above. E.g.

%userprofile%\AppData\Local\Microsoft\Teams\current\Teams.exe –remote-debugging-port=51555

Now you’ve got access to the Electron app in Chrome. Click on “Inspect” for the thread you want to watch

You can add break-points in the code to pause program execution.

You’ll see a “Paused in debugger” indicator when a breakpoint is reached. You can resume or step over using this indicator, or you can use the DevTools debugger – the DevTools debugger also allows you to proceed one step at a time through program execution (F9).

Through the debugger, I was able to identify the source of the weak little notification ding

https://statics.teams.microsoft.com/hashedassets/audio/Teams_Notification_Secondary-a8621153.mp3

Which means I can redirect this URL … really anything that matches the URL up through Teams_Notification because I expect the alpha-numeric at the end to change and I’m sure there’s a primary notification 😊 … and make the notification noticeable.

Looking through the package, I see eighteen different ‘ringtone’ type MP3 files, and only three lines of code that use them. Hopefully this is an indicator that MS has begun development of some user-selectable notification sounds in the desktop client.

nonMeetupRingAudio = new Audio(data.assetsPath + ‘audio/ring.mp3’);

meetupRingAudio = new Audio(data.assetsPath + ‘audio/meetup_ring.mp3’);

screenshareRingAudio = new Audio(data.assetsPath + ‘audio/screenshare_ring.mp3’);