Category: Development Methodology

Azure DevOps Pipeline Error – Veracode Scan Fails

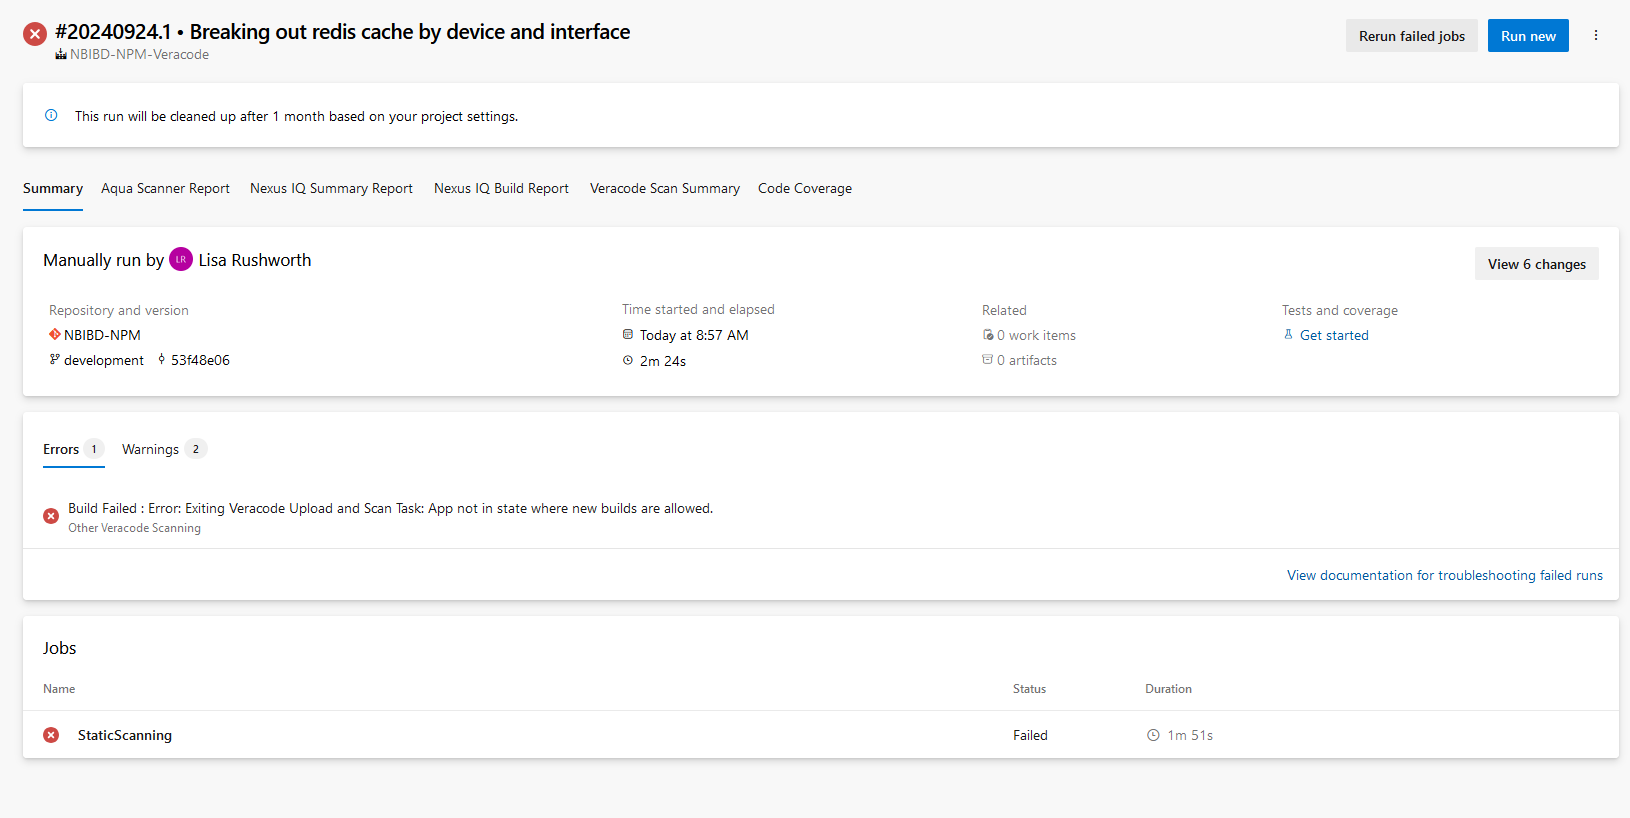
Pipeline Error:

Build Failed: Error: Exiting Veracode Upload and Scan Task: App not in state where new builds are allowed.

Resolution: There’s a scan in Veracode that never completed. Log into the web UI and delete it!

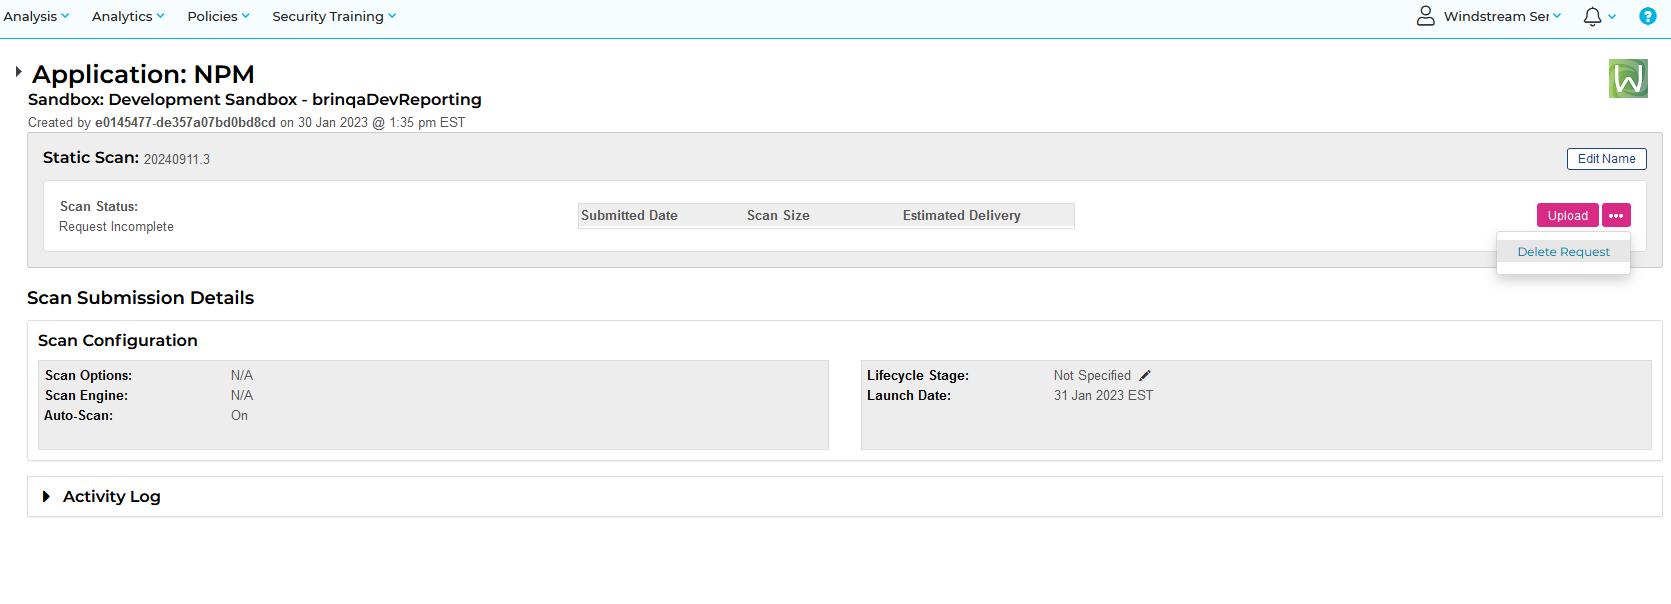
View the scans in the sandbox. Select the one that says “Request Incomplete”

Use the ellipsis button to select “Delete Request”

Confirm deletion.

Voila – now you can re-run the pipeline and the scan will proceed.

Using Templates in Azure Build Pipelines

I inherited a Java application that is actually five applications — and the build pipeline had a lot of repetition. Tell maven to use this POM file, now use that one, and now the other one. It wasn’t great, but it got even more cumbersome when I needed to split the production and development builds to use a different pool (network rule: prod and dev servers may not communicate … so the dev agent talks to the dev image repo which is used by the dev deployment. The prod agent talks to the prod image repo which is used by the prod deployment). Instead of having five “hey, maven, do this build” blocks, I now have ten.

So I created a template for the build step — jdk-path and maven-path are pipeline variables. The rest is the Maven build task with parameters to supply the step display name, pom file to use, and environment flag.

Maven Build Template:

# maven-build-step.yml
parameters:
  - name: pomFile
    type: string
  - name: dockerEnv
    type: string
  - name: displayName
    type: string

steps:
  - task: Maven@3
    displayName: '${{ parameters.displayName }}'
    inputs:
      mavenPomFile: '${{ parameters.pomFile }}'
      mavenOptions: '-Xmx3072m'
      javaHomeOption: 'Path'
      jdkDirectory: $(jdk-path)
      mavenVersionOption: 'Path'
      mavenDirectory: $(maven-path)
      mavenSetM2Home: true
      jdkArchitectureOption: 'x64'
      publishJUnitResults: true
      testResultsFiles: '**/surefire-reports/TEST-*.xml'
      goals: 'package -Denv=${{ parameters.dockerEnv }} jib:build'

Then my build pipeline uses the template and supplies a few parameters

Pipeline:

# azure-pipelines.yml
trigger: none

variables:
  appName: 'NPM'

stages:
  - stage: Build
    jobs:
      - job: NonProdBuild
        condition: ne(variables['Build.SourceBranchName'], 'production')
        displayName: 'Build non-production branch'
        variables:
          DockerFlag: 'docker_dev'
        pool:
          name: 'Engineering NPM'
        steps:
          - template: maven-build-template.yml
            parameters:
              pomFile: 'JAVA/KafkaStreamsApp/npm/pom.xml'
              dockerEnv: $(DockerFlag)
              displayName: 'Building Kafka Streams App'

          - template: maven-build-template.yml
            parameters:
              pomFile: 'JAVA/DataSync/npmInfo/pom.xml'
              dockerEnv: $(DockerFlag)
              displayName: 'Building Data Sync App'

          - template: maven-build-template.yml
            parameters:
              pomFile: 'JAVA/GroupingRules/pom.xml'
              dockerEnv: $(DockerFlag)
              displayName: 'Building Grouping Rules App'

          - template: maven-build-template.yml
            parameters:
              pomFile: 'JAVA/Errorhandler/pom.xml'
              dockerEnv: $(DockerFlag)
              displayName: 'Building Error Handler App'

          - template: maven-build-template.yml
            parameters:
              pomFile: 'JAVA/Events/pom.xml'
              dockerEnv: $(DockerFlag)
              displayName: 'Building Events App'

      - job: ProdBuild
        condition: eq(variables['Build.SourceBranchName'], 'production')
        displayName: 'Build production branch'
        variables:
          DockerFlag: 'docker_prod'
        pool:
          name: 'Engineering NPM Prod'
        steps:
          - template: maven-build-template.yml
            parameters:
              pomFile: 'JAVA/KafkaStreamsApp/npm/pom.xml'
              dockerEnv: $(DockerFlag)
              displayName: 'Building Kafka Streams App'

          - template: maven-build-template.yml
            parameters:
              pomFile: 'JAVA/DataSync/npmInfo/pom.xml'
              dockerEnv: $(DockerFlag)
              displayName: 'Building Data Sync App'

          - template: maven-build-template.yml
            parameters:
              pomFile: 'JAVA/GroupingRules/pom.xml'
              dockerEnv: $(DockerFlag)
              displayName: 'Building Grouping Rules App'

          - template: maven-build-template.yml
            parameters:
              pomFile: 'JAVA/Errorhandler/pom.xml'
              dockerEnv: $(DockerFlag)
              displayName: 'Building Error Handler App'

          - template: maven-build-template.yml
            parameters:
              pomFile: 'JAVA/Events/pom.xml'
              dockerEnv: $(DockerFlag)
              displayName: 'Building Events App'

I think this could be made more concise … but it will do for now!

Azure DevOps Maven Feed — Deleted Package

Someone deleted one of the packages from the Azure DevOps Maven feed … figured it would be easy enough to just re-publish the package. And they got an error:

409 Conflict – The version 1.2.3 of package.example.com has been deleted. It cannot be restored or pushed. (DevOps Activity ID: E7E4DEB1551D) -> [Help 1]

There’s some not-outlandish logic behind it because they don’t want half of the people to have this version 1.2.3 and the other half to get that version 1.2.3 … if it’s your code, just make it version 1.2.4. Unfortunately, this logic doesn’t hold up well when you’re publishing someone else’s package. Not like I can say “oops, we’ll use 23.13 now”. But you can restore deleted packages — from the feed, go into the recycle bin

Check off the packages that were deleted in error & restore them


Creating an Azure DevOps Work Item From a Teams Message

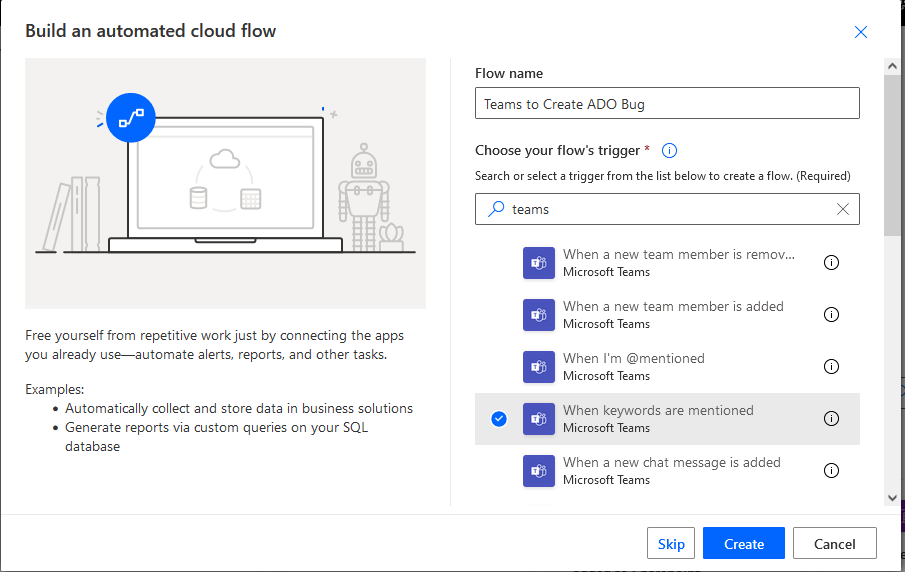
You can use Power Automate to create an ADO work item (bug, user story, etc) when a user posts into specific Teams channel.

Log into Power Automate and create a new workflow. Find a Teams trigger that suits your need – in my case, I wanted to use a key word (you could even use different key words to create work items in different projects or with different content). Note that automation cycles accrue based on execution — so if you elect to link up to a busy Teams channel and filter for keywords to indicate you want an ADO item created, you may be “wasting” workflow cycles. In our case, I have a “user group” Teams space and set up a special channel where users can submit bug and feature requests. This means workflow cycles are accrued when someone specifically wishes to create an ADO item not when messages are posted into the user group’s general chat channels.

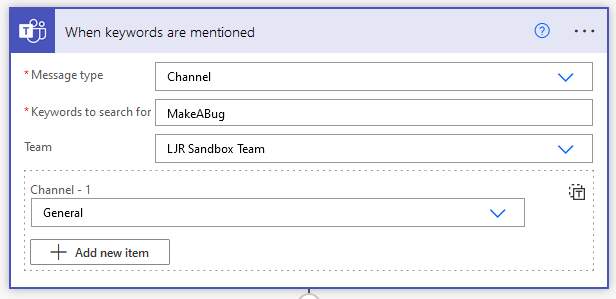
You can source messages from channels or group chats in the “Message type” selection. You cannot use hash-tags as key words! The workflow execution reports a gateway error. Select the Team and channel(s) that you want the workflow to monitor.

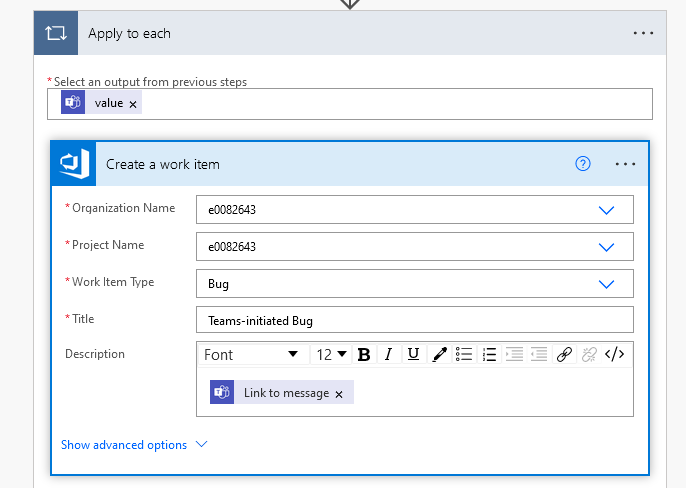
Add a new step to “create a work item” from Azure DevOps

Configure the project into which you want to create the work item – the organization and project name, the type of work item, and content of the work item.

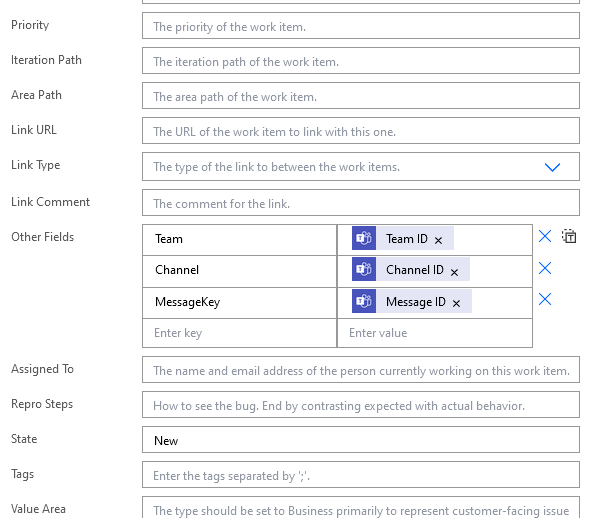
If you want to set priority, add an assignment, etc – click on “Show advanced options”. I added a few fields to provide a clue as to where the bug report came from.

Save the workflow and post a message in your channel with the key word. Go into the ADO project work items; your Teams-initiated bug should be there.


Using Git Submodules

Contents

Using Git Submodules

What Are Submodules?

Before You Start

Recursion

Adding Submodules

Performing Operations on All Submodules

Cloning a Repository That Contains Submodules

Making Changes to a Submodule

Pulling Changes Made to Submodules

Including Submodules in ADO Pipelines

Git Submodule Quick Reference Guide

What Are Submodules?

A submodule is a link – it is a pointer at a specific path in the parent repository’s directory structure that references a specific commit in another git repository. The actual git repository is no different than any other repository – what makes it a ‘submodule’ is someone using it inside a parent repository. If I create a really cool PHP function – an Excel parsing utility – I can publish it to a git repository to share it. This repository is not a submodule for me. Someone who wants to use my utility may add my repository as a submodule in their code repo. In their repo, my repository that houses the Excel parsing utility is a submodule. You cannot tell, by looking at a repository, if it is included elsewhere as a submodule.

The example provided above – one individual looking to include someone else’s code in their project – is the typical use case for submodules. But there are other scenarios where isolating different parts of code make sense. In our organization, we cannot deploy code until it passes a security scan. This means problems in one section of the code can hold up development on everything else. Additionally, our code scanning is charged per repository. While we may have a dozen independent tools that happen to reside in a parent folder, it is not cost effective to have dozens of repositories being scanned. Using submodules will allow us to roll up independent tools into a single scanned repository.

The parent repository does not actually track the changes in a submodule. Instead, the parent contains a pointer to a commit identifier in the submodule repository. All changes in the submodule are tracked in its repository.

Before You Start

Before working with submodules, ensure you have an up to date version of git. If, as you interact with remote repositories, you see an error indicating you are using an older version of git:

You are apt to see fatal errors like this:

Recursion

You can have submodules inside of submodules inside of submodules – because of this, most command that interact with submodules have a –recursive flag that will recursively apply the command to any submodules contained within submodules within the parent repository.

Adding Submodules

Begin with a git repository that will serve as the parent – in this example, I am starting with a blank repo that only contains a .gitignore and a readme.md file, but you can start with a repository that’s been under development for years.

We link in submodules using “git submodule add” followed by the repo URL. If you want the folder to have a different name, use “git submodule add URLHERE folderNameForSubmodule”

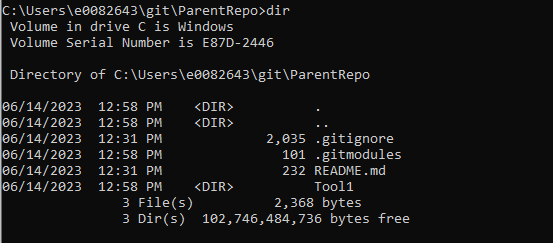
Once the Tool1 submodule has been added, files from Tool1 are on disk.
Check out a branch in the submodule, or use “git submodule foreach” to check each submodule out to the desired branch (main in this case)

If you use git diff with the –submodule switch, you can see that “Tool1” is being tracked as a submodule.

Add and commit the change – since this is both an entry in the .gitmodules file and the submodule reference to a commit hash, I am using “git add *”

Then push the changes to ADO

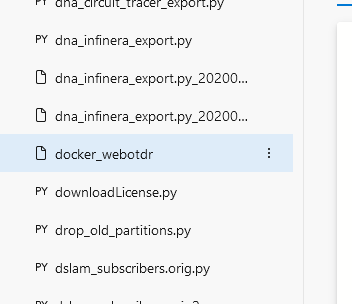
Looking in ADO, you will see each submodule folder is represented as a file. The file contents is the hash of the commit to which the submodule points.

Because the “folder” is reflected as a file in the repository, it will not sort with the other folders. You’ll need to look in the file listing to find the submodule file.
Performing Operations on All Submodules

The “git submodule foreach” command allows you to run commands on each submodule in a repository.

You can run any git command in this fromeach loop – as an example, I will checkout a specific branch in all submodules using

git submodule foreach –recursive git checkout main

Cloning a Repository That Contains Submodules

Cloning with –recurse-submodules flag

When cloning a repository with submodules, add –recurse-submodules to your git clone command to pull all of the submodules. To clone my ParentRepo, I use:

git clone –recurse-submodules https://Windstream@dev.azure.com/e0082643/e0082643/_git/ParentRepo

You will see that git checks out the parent project and all included submodules.
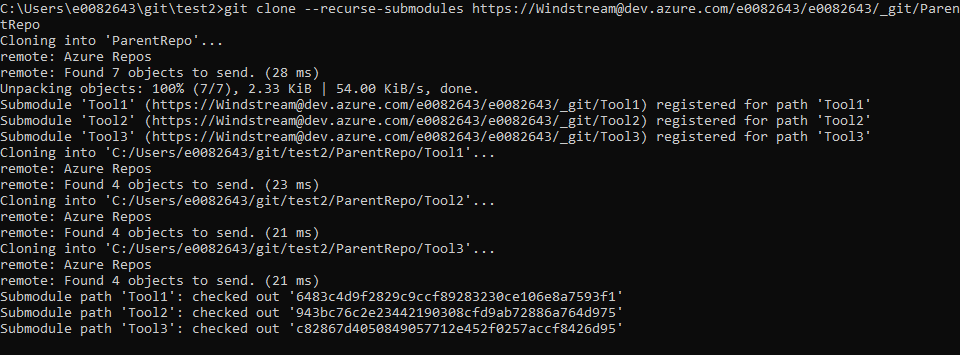
Use “git submodule foreach –recursive git checkout main” to check each submodule out to the desired branch (in this case, main).

Cloning without –recurse-submodules

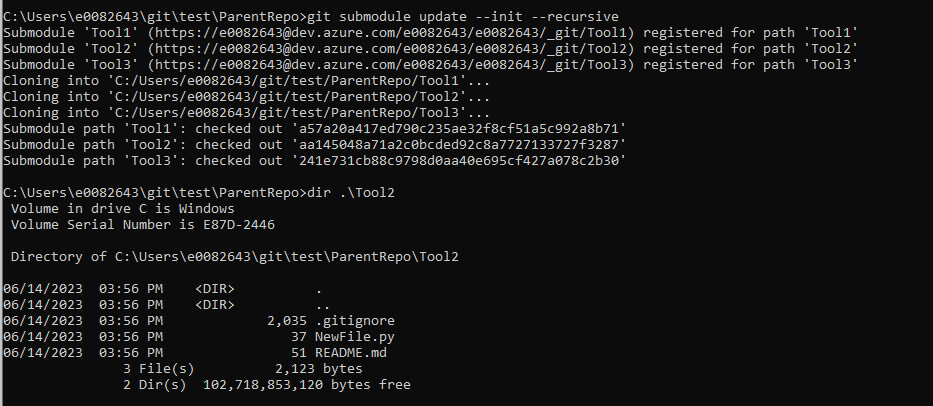
If you forget to include –recurse-submodules in your clone command, or if the submodules have been added to a repository that you have already cloned, you will have empty folders instead of each submodule’s files. A parent repository only has pointers to commits for submodules – until the submodules are initialized, those pointers go nowhere.
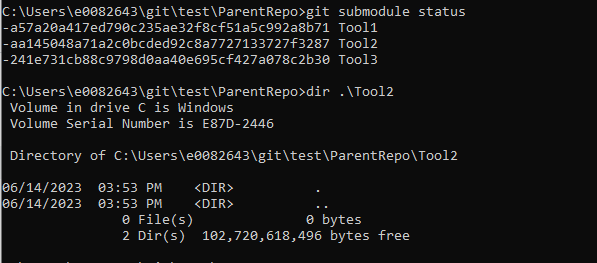
Use git submodule update –init –recursive to pull files from the registered submodules.
Making Changes to a Submodule

Working within a submodule’s folder will perform operations in the submodule’s git repository. Working in other folders will perform operations in the parent’s git repository.

To make a change to Tool3, I first need to change into the Tool3 directory.
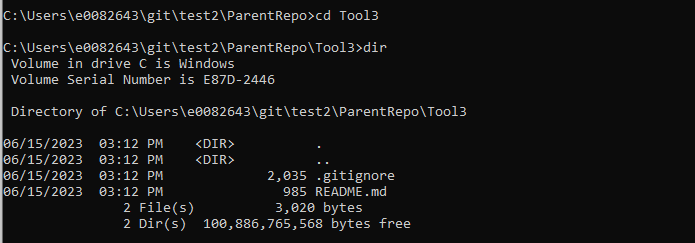
Make whatever changes are needed. Then add the changes, create a commit, and push the commit to the submodule’s repository. You can create branches, merge branches, and such all within the submodule’s folder to interact with the submodule’s git repository.
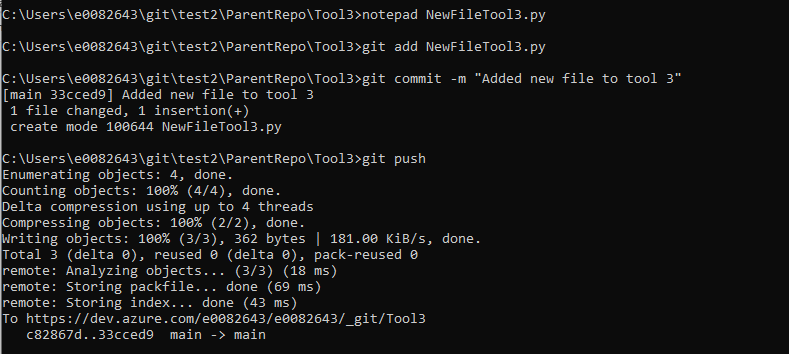
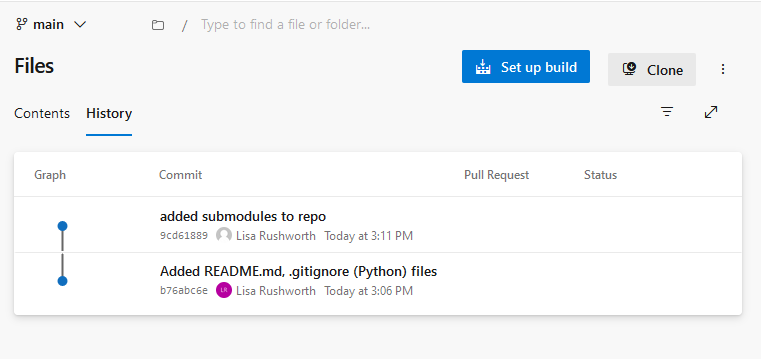
If you look at the parent repository, you will see that no changes have been made to it – committing changes to a submodule repository will not kick off the pipeline code scan.
To update the parent repository to point the submodule to your most recent commit, you will need to commit the submodule folder in the parent folder. Change directory into the parent repo – add, commit, and push the changes.
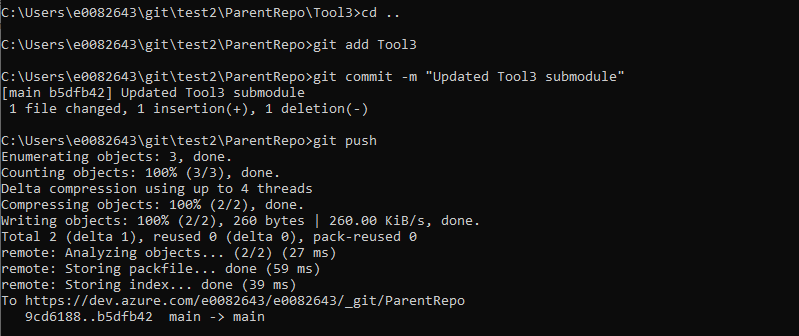
And push the references to the remote using “git submodule update –recursive –remote”

This commit updates the contents of the file representing the repo’s folder – the folder’s file used to reference a commit ending in 6d95 and now it references a commit ending in 6292
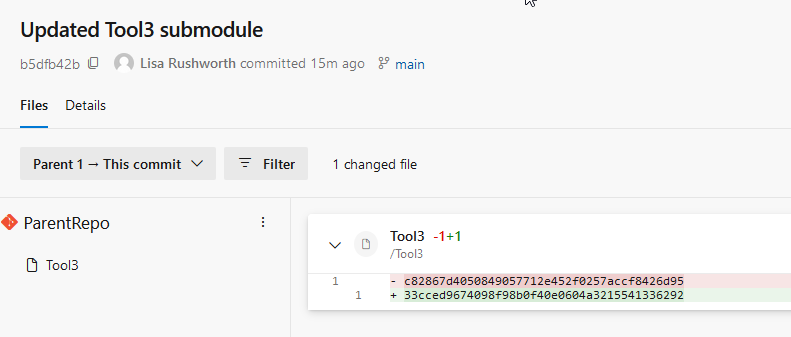
Which you can see in the git log of the submodule repository:

Because we have made changes to the parent repository, the pipeline that initiates our code scanning should execute.

Pulling Changes Made to Submodules

To sync changes made by others (or that you’ve made in other locations), you will need to pull the submodules, you need to pull the submodule as well as the parent repo.

To pull (fetch and merge) changes from all upstream submodules, use:

git submodule update –recursive –remote –merge
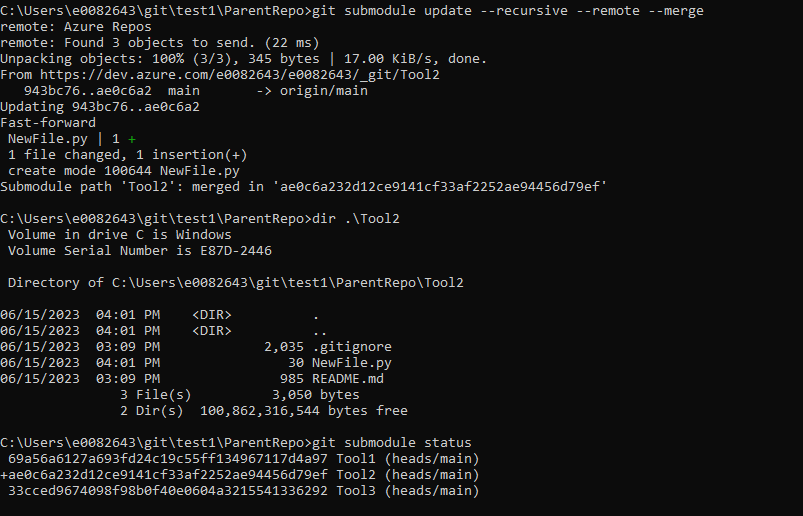
Using “git submodule status” to view the submodules, you can see the submodule now points to the commit hash from the change we made

Including Submodules in ADO Pipelines

Veracode scanning is initiated through a pipeline. Since our goal is to include files from all of the submodules when scanning the parent repository, we need to ensure those files get bundled into the zip file that is submitted for scanning.

To do so, we need to add a checkout step to the pipeline and set “submodules” to ‘true’
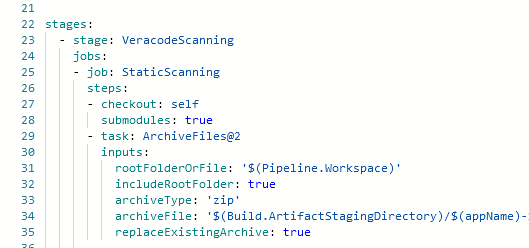
When the submodules are all part of the same ADO project, you do not need to supply additional credentials in the pipeline. Where a different set of credentials are required, you can check out the submodule by passing an extra header with an authorization token.

Git Submodule Quick Reference Guide

Clone repo and all submodules:

git clone –recurse-submodules REPO_URL

cd RepoFolder

git submodule update –init –recursive

git submodule foreach –recursive git checkout main

Add a submodule to a repo:

git submodule add REPO_URL /path/to/folderForSubmodule

git submodule update –init –recursive

git submodule foreach –recursive git checkout main

git add .

git commit -m “Adding submodules”

git push

git submodule update –recursive –remote

Check Out a Branch in All Submodules

git submodule foreach –recursive git checkout main

Committing Change to a Submodule

cd .\submodule_folder

# Make some changes!

git add .

git commit –author=”Lisa Rushworth <Lisa.Rushworth@windstream.com>” -m “Commit Message”

git push

cd ..

git add submodule_folder

git commit -m “Updated submodule”

git push

Pull Updates into All Submodules:

git submodule update –recursive –remote –merge


Azure DevOps – Changing Work Item Type

I had to reorganize a lot of my work items in a way that required items not to be what they were. Fortunately, there’s a mechanism to change work item type. Within the work item, click on the ellipsis to access a menu of options. Select “Change type …”

Select the item type you want – I record the reason I needed the new type for posterity – then click “OK”. Save the work item and re-open it.

The one thing I’ve noticed is that fields that don’t exist on an item type (e.g. “effort” on “feature” items) are still present on the new item type even when that field does not normally display (e.g. “effort” on “user story” items).


Azure DevOps – Features, User Stories, and Story Points

I had wanted to classify my ADO work items as “features” (i.e. something someone asked to be added to an application), “bugs” (i.e. some intended functionality that was not working as designed). Bugs have a story point field, but features do not appear to have their own story point field. They, instead, are a roll-up of the story points of their subordinate user stories. Which makes sense except that I’ve now got to have two work items for every feature. Rolling up larger requests into sprint-sized work units is how we use epics. So I’ve instead found myself with user stories tagged with “features” that fall into epics (or don’t in the case of a small feature request).


Open Source Methodologies – Design Document Driven

We use design documents at work to ensure a clear understanding between the requestors, product owners, and developers. There’s a request document that outlines what they’re looking to accomplish, we produce a design document that outlines what we’re doing and how that will be accomplished. External dependencies use the design document to implement their required services — if I have a design document that says I’ll pass x (required), y (required), and z (optional) to a WSDL and end up with an object in the application database where a=x, b=y, and, optionally, c=z … they’ll whip up an endpoint that takes the parameters, performs the required actions, and builds the object I need. Once everyone is in agreement that it’s what they want, it’s reasonable (security, ROI), and possible … developers get to work. Tests are built against the documented functionality, and we know we’re done when the tests pass. If the users want something changed, the design document is amended, a quick feasibility/reason-ability review is performed, and development work commences.

I thought of this process after observing some people push PRs for major overhaults into a few open source projects only to have the PRs rejected as, essentially, not the direction “we” want to go. On the other extreme … I’ve made some changes to open source apps — in some cases, those were bug fixes, and I’ve pushed the changes back to the main project. But, when I’ve changed functionality. I’ve made those changes to address a specific need I have, and I leave the changes in my own fork. Which has the detriment of, potentially, not providing useful functionality to the main project. While it’s perfectly reasonable to put a lot of time into a major change that you need anyway (and, potentially, offer those changes back to the community) … it is terrible to put a lot of your time into something for someone else and have it rejected. And while not engaging with the project maintainers to see if they’re interested in my derivative work saves effort for me, it reduces innovation (how many people actually run through all of the forks of a project to see if anything ‘interesting’ happened elsewhere?).

Obviously, the answer isn’t for projects to accept effort just because it’s a significant investment on the contributor’s part — there should be some mechanism for ensuring what you’re about to delve into is something the project maintainers actually want. Which is what made me think of the design documents we use at work.

If a project had a design document that detailed what it waned to do, how it was doing it, and potentially a section for desired future features and functionality … it would provide a guideline to anyone looking to contribute. A change that doesn’t impact functionality (e.g. a bugfix) can be worked on and submitted for inclusion in the project as occurs normally. If you want to change something about how the application works, you first submit a PR against the design document. Outline what you want to do, how you want to do it … maybe even a quick mock-up (I use Pencil Project for mock-ups where I’m uncertain the final project will be approved, HTML web code when I know the project is a go and want a head-start on my development … but I also accept the risk that I ‘wasted’ a few hours building the design document wireframe if the project gets dropped). Want to work on one of the ‘desired future’ items? Modify the design document to include that functionality and how it’ll be implemented. Discussion about the approach refines what you’ll actually be doing, and you’ll understand if the project maintainers are interested in your contribution before dedicating hundreds of hours to development.

Some projects are interested in “bugfixes only” — which can be stated in the contributing guidelines. In this example, I developed a quick script to produce in-scope user lists. I don’t want to include other details about the identified users, I don’t want to find the first n levels of reports, etc. It’s exactly what I needed, and I’m putting it on GitHub as an example — using Python to search an LDAP directory and using recursion with back-linked attributes.

Projects that are open for collaborative contributions, though, can include the design document location in their contributing guidelines. Initial contributions are made against the design document, discussed, and approved or rejected. Once approved, code can be developed to the new design.

Open Source Methodologies – The Need

Scott and I were discussing methodologies in open source development. In some ways, I find open source development to be “developer’s id”. Unlike a development job, where you need to do all of the tangentially related (or completely unrelated) tasks mandated by your company, you volunteer your time toward whatever you want to work on. If developers don’t find value in project management, then project management won’t be done in the open source project because no one devotes time to project management. If developers don’t find value in testing, testing won’t be done in the open source project because no one dedicates time to testing. Ideally, people who are interested in all aspects of development would get involved in a project, but what I’ve seen in the open source community is developers.

The problem this creates is that a larger project doesn’t really have any direction. The functionality is almost an emergent property of individual development efforts. I had a friend who worked at MicroProse back in the early 90’s. I remember him talking about a debate between military consultants and UX designers about the direction of control in a military aircraft game (IIRC as they built the first mouse-controlled game). They made a decision, and there was a reason for the decision (memory is the “true to real controls” side won and the “logical” side lost). In a company with low turnover, it was easy enough to retain that knowledge. Some new UX tester says “hey, this is counter-intuitive and makes gameplay more difficult”, they get “the spiel” about verisimilitude.

Most companies have evolved from relying on this sort of tribal knowledge. Memory is faulty (I don’t remember why we decided to do xyz ten years ago … you?), low turnover isn’t as common (my most recent hiring adventure clued me into the fact that a long series of 6-18 month contracts is fairly common in IT ops), there’s a significant level of effort involved in maintaining what amounts to an oral tradition (when I worked somewhere with the ‘oral tradition’ approach to IT architecture, I wrote up my day-long spiel so I could hand it to the next new guy and avoid straining my vocal cords), and “we all just know” certainly doesn’t fly if the company is attempting some sort of regulatory or ISO process validation. Software development companies have adopted application lifecycle methodologies, manufacturing companies have adopted production methodologies, etc that include documentation. What we intend to do, why we’re doing it, and how we’re doing it.

In theory, a new software developer coming into a firm that uses ITIL could use their first week to read through the service catalog and gain a fairly decent understanding of their job. As with most theoretical designs, I’ve not encountered a real implementation that was 100% adherent to a standard practice. That may mean that the practice was adapted to fit the individual organization/product/project, or it may mean that the company took the “start somewhere” approach and has implemented the methodology for new projects. But the result, by any road, is that there’s some tribal knowledge.

What does this have to do with open source development methodologies? I’ve started to think of open source projects as companies with really high turnover. Back in the 90’s, 104% annual turnover was a cause for celebration at the call center I supported. As in statistically every single person who worked for the company on 01 January had quit, and by 31 Dec some of their replacements had quit too. Of course, there were long-term employees and a lot of people who only stayed on for a few weeks who averaged out to 104% turnover. But watching development in a few larger open source projects brought the call center to mind. There are a handful of contributors who are consistently involved across multiple years. But there are a lot of people who pop in to create a PR for a single issue or feature that particularly touched them. This creates a scenario where maintaining an oral tradition and allowing PRs to guide the project roadmap is ineffective.

Open Source Methodologies – Project Types

Scott and I were discussing a methodology for use in open source development, and I mentioned that there are some projects that someone posted online as an open source contribution where they’re not looking for input. I have some of these — if someone finds a bug in the code I wrote to gather MS Teams usage stats, I appreciate their help. If they want to change the report format, or what’s being reported, or … well, it’s a script I wrote and use for a specific purpose, and that’s what it does. Feel free to make a fork and adjust the report to suit your needs. But I’m not going to merge a PR in that keeps five years worth of data because I don’t want five years worth of data. And that’s a perfectly valid decision for code I built that I shared in case it helps someone else who needs to achieve a similar goal. I call this a dictatorial project — there’s an individual that makes the decisions. If you want to change something about how the program works, you should run it by the dictator prior to putting a lot of effort into it. Or plan on making changes in your own fork.

There are oligarchic projects — those may be corporate sponsored projects or projects owned by a group of private individuals. As with dictatorial projects, there are a small number of people “in charge” who decide if PRs are merged or not.

And there are democratic projects — at least in theory. I don’t know if this ends up being true in practice anywhere. But, in theory, a large community of developers or users would drive the direction of the project.

I suppose, if I’m discussing theoretical repository management types … I could add in mass chaos. Open for anyone to merge changes. This is an approach that’s worked surprisingly well for Wikipedia, so I suppose it could work for a smaller code base. Someone merges in some malicious or flawed code, someone else puts in a fix.