Tag: docker

Memcached with TLS in Docker

To bring up a Docker container running memcached with SSL enabled, create a local folder to hold the SSL key. Mount a volume to your local config folder, then point the ssl-chain_cert and ssl_key to the in-container paths to the PEM and KEY file:


docker run -v /d/docker/memcached/config:/opt/memcached.config -p 11211:11211 –name memcached-svr -d memcached memcached -m 64 –enable-ssl -o ssl_chain_cert=/opt/memcached.config/localcerts/memcache.pem,ssl_key=/opt/memcached.config/localcerts/memcache.key -v

Docker and Windows — Unable to Allocate Port

On the most recent iteration of Windows (20H2 build 19042.1052) and Docker Desktop (20.10.7 built Wed Jun 2 11:54:58 2021), I found myself unable to launch my Oracle container. The error indicated that the binding was forbidden.


C:\WINDOWS\system32>docker start oracleDB
Error response from daemon: Ports are not available: listen tcp 0.0.0.0:1521: bind: An attempt was made to access a socket in a way forbidden by its access permissions.
Error: failed to start containers: oracleDB

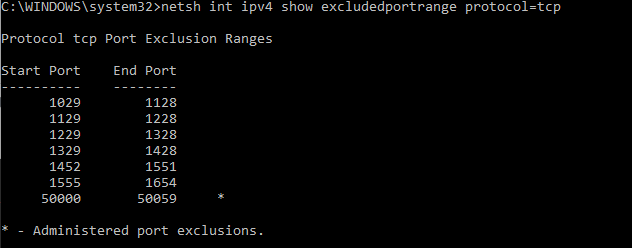
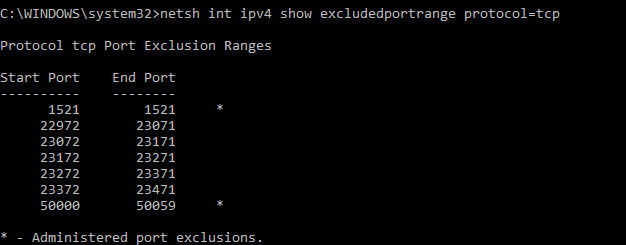
Forbidden by whom?! Windows, it seems. Checking excluded ports using netsh:

netsh int ipv4 show excludedportrange protocol=tcp

Shows that there are all sorts of ports being forbidden — Hyper-V is grabbing a lot of ports when it starts. To avoid that, you’ve got to add a manual excluded port for the one you want to use.

To reserve the port for your own use, disable Hyper-V (reboot), add a port exclusion, and enable Hyper-V (reboot)

REM Disable Hyper-V
dism.exe /Online /Disable-Feature:Microsoft-Hyper-V 
REM REBOOT ... then add an exclusion for the Oracle DB Port
netsh int ipv4 add excludedportrange protocol=tcp startport=1521 numberofports=1 
dism.exe /Online /Enable-Feature:Microsoft-Hyper-V /All
REM REBOOT again

Now 1521 is reserved for Oracle

Docker – List Container Startup Policies

A quick one-line Bash command to output all containers and the startup policy:

docker container ls -aq | xargs docker container inspect --format '{{ .Name }}: {{.HostConfig.RestartPolicy.Name}}'

For Docker on Windows, the following PowerShell command produces similar results:

$jsonData = docker container ls -aq |%{docker container inspect --format "{{json .}}"$_}
[System.Collections.ArrayList]$arrayContainerConfig = @()
foreach($jsonContainerConfig in $jsonData ){
	$psobjContainerConfig = ConvertFrom-JSON $jsonContainerConfig
	$arrayContainerConfig.add(@{Name=$psobjContainerConfig.Name;Hostname=$psobjContainerConfig.Config.Hostname;CurrentlyRunning=$psobjContainerConfig.State.Running;RestartPolicy=$psobjContainerConfig.HostConfig.RestartPolicy.Name})
}

$arrayContainerConfig | ForEach {[PSCustomObject]$_} | Format-Table -AutoSize

Discourse acme.sh Script Failure

I had a hellacious time updating the certificate on my Dockerized Discourse server — the acme.sh script doesn’t have a slash delimiter between the hostname and the ./well-known folder within the URI. Which means the request fails. Repeatedly.


[Sat Oct 10 00:01:09 UTC 2020] _post_url='https://acme-v02.api.letsencrypt.org/acme/chall-v3/7784162898/nr42-g'
[Sat Oct 10 00:01:09 UTC 2020] _CURL='curl -L --silent --dump-header /shared/letsencrypt/http.header -g '
[Sat Oct 10 00:01:10 UTC 2020] _ret='0'
[Sat Oct 10 00:01:10 UTC 2020] code='200'
[Sat Oct 10 00:01:10 UTC 2020] trigger validation code: 200
[Sat Oct 10 00:01:10 UTC 2020] sleep 2 secs to verify
[Sat Oct 10 00:01:12 UTC 2020] checking
[Sat Oct 10 00:01:12 UTC 2020] url='https://acme-v02.api.letsencrypt.org/acme/chall-v3/7784162898/nr42-g'
[Sat Oct 10 00:01:12 UTC 2020] payload
[Sat Oct 10 00:01:12 UTC 2020] POST
[Sat Oct 10 00:01:12 UTC 2020] _post_url='https://acme-v02.api.letsencrypt.org/acme/chall-v3/7784162898/nr42-g'
[Sat Oct 10 00:01:12 UTC 2020] _CURL='curl -L --silent --dump-header /shared/letsencrypt/http.header -g '
[Sat Oct 10 00:01:13 UTC 2020] _ret='0'
[Sat Oct 10 00:01:13 UTC 2020] code='200'
[Sat Oct 10 00:01:13 UTC 2020] discourse.example.com:Verify error:Fetching https://discourse.example.com.well-known/acme-challenge/XY02T_40TL92IADByQ45JMj4JzC2qJCatVd2odJMAlU: Invalid host in redirect target
[Sat Oct 10 00:01:13 UTC 2020] pid
[Sat Oct 10 00:01:13 UTC 2020] No need to restore nginx, skip.


Turns out that’s my bad config — I’ve got a reverse proxy in front of Discourse, and we don’t use the clear text http site. The reverse proxy just bounces you over to the https site. Two problems — one, I failed to put the trailing slash after my redirect, s http://discourse.example.com/.well-known/blah is being redirected to https://discourse.example.com.well-known/blah

<VirtualHost 10.1.2.3:80>
ServerName discourse.example.com
ServerAlias discourse

Redirect 301 / https://discourse.example.com

</VirtualHost>


That’s easy enough to fix — add the trailing slash I should have had anyway. But the subsequent problem is that the bootstrap nginx config that is used to serve up the validation page only listens on port 80. So I cannot redirect the clear-text traffic over to the SSL site. I have to reverse proxy the clear text site as well (at least whenever the certificate needs to be renewed).

ProxyPass / https://discourse.example.com/
ProxyPassReverse / https://discourse.example.com/

Voila, a web server with an updated certificate.

Discourse in Docker on Fedora 32

I had to make a few tweaks in order to run the Discourse base Docker image. First, I got the following very clear error:

discourse docker this version of runc doesn't work on cgroups v2: unknown

I had to switch from cgroupv2 to cgroup

grubby --update-kernel=ALL --args="systemd.unified_cgroup_hierarchy=0"

At which point I was at least able to run through the configuration. This yielded an access denied error attempting to create /shared/postgres:

Configuration file at updated successfully!

Updates successful. Rebuilding in 5 seconds.
Building app
Ensuring launcher is up to date
Fetching origin
Launcher is up-to-date
cd /pups && git pull && /pups/bin/pups --stdin
Already up to date.
I, [2020-08-11T18:15:03.664400 #1] INFO -- : Loading --stdin
I, [2020-08-11T18:15:03.672609 #1] INFO -- : > locale-gen $LANG && update-locale
I, [2020-08-11T18:15:03.746912 #1] INFO -- : Generating locales (this might take a while)...
Generation complete.

I, [2020-08-11T18:15:03.747838 #1] INFO -- : > mkdir -p /shared/postgres_run
mkdir: cannot create directory ‘/shared/postgres_run’: Permission denied
I, [2020-08-11T18:15:03.754890 #1] INFO -- :

FAILED
--------------------
Pups::ExecError: mkdir -p /shared/postgres_run failed with return #<Process::Status: pid 21 exit 1>
Location of failure: /pups/lib/pups/exec_command.rb:112:in `spawn'
exec failed with the params "mkdir -p /shared/postgres_run"
d98ee8471413ad77ab27ed3506f12c5c94a2b6902622faf4d88d5dbb51a10f63
** FAILED TO BOOTSTRAP ** please scroll up and look for earlier error messages, there may be more than one.
./discourse-doctor may help diagnose the problem.

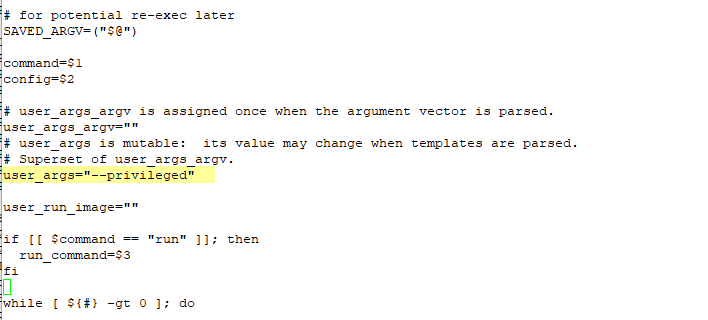
Gut was that I encountered an SELinux problem. Turns out I was right. There’s a lot of reading you can do about SELinux and Docker — this, for one — but the quick and simple solution is to run the docker container in privileged mode (note: this may not be a good idea in your specific scenario. understand what privileged mode is and the risks it entails). To do so, edit the launcher script (/var/discourse/launcher in my case) and add  “–privileged” to user_args:

And finally (and this may well be a RTFM thing) — you’ve got to have your public DNS set up & whatever firewall rules to get traffic to the http:// website you are trying to build in order to use the LetsEncrypt SSL cert and configure HTTPS. It uses the file-based verification (i.e. create a file named xyz in /path/to/xyz.whatever on your web server, lets encrypt grabs the file and verifies it exists) which fails quite spectacularly when the Internet at large cannot access your about-to-be-a-discourse-server.

Docker for Windows: Using Built-in k8s

I just started using k8s built into Docker for Windows, but I couldn’t connect because the target machine actively refused the connection.

C:\Users\lisa>kubectl version
Client Version: version.Info{Major:"1", Minor:"14", GitVersion:"v1.14.6", GitCommit:"96fac5cd13a5dc064f7d9f4f23030a6aeface6cc", GitTreeState:"clean", BuildDate:"2019-08-19T11:13:49Z", GoVersion:"go1.12.9", Compiler:"gc", Platform:"windows/amd64"}
Unable to connect to the server: dial tcp [::1]:8080: connectex: No connection could be made because the target machine actively refused it.

No idea — it’s all internal traffic, but I resorted to turning off my firewall anyway just to see what would happen. Nothing. Turns out I need a KUBECONFIG environment variable pointing to the config file

C:\Users\lisa>set | grep KUB
KUBECONFIG=C:\Users\lisa.RUSHWORTH.000\.kube\config

Applied the yaml file and started the proxy

C:\Users\lisa>kubectl apply -f https://raw.githubusercontent.com/kubernetes/dashboard/v1.10.1/src/deploy/recommended/kubernetes-dashboard.yaml
secret/kubernetes-dashboard-certs created
serviceaccount/kubernetes-dashboard created
role.rbac.authorization.k8s.io/kubernetes-dashboard-minimal created
rolebinding.rbac.authorization.k8s.io/kubernetes-dashboard-minimal created
deployment.apps/kubernetes-dashboard created
service/kubernetes-dashboard created

C:\Users\lisa>kubectl proxy
Starting to serve on 127.0.0.1:8001

Working! Get the token from

kubectl -n kube-system describe secret default

And access the dashboard.


A reminder for myself — the totally not obvious package name for the kubeadm binary on the CHANGELOG link list is Node. Go figure!

Docker Hub

Docker Official Images: Official images won’t have a publisher listed, and they will be tagged with “Official Image”.

Docker Official Images are a set of images curated by Docker. They’re generally recommended for new users as Docker has a team that reviews and publishes these images. Beyond Docker’s verification, you can see how an individual image was built. Navigate to the GitHub image library. Find the file corresponding with the image, and you’ll see a GitRepo line. Navigate to that URL to find the Dockerfiles that were used to build the image.

Docker Certified: Other images will be certified by Docker – these are published by someone other than Docker but have been tested & scanned for vulnerabilities, they come from a reputable source, and comply with best practice guidelines.

If you click on the hyperlinked organization name, they are listed as a verified publisher – this means someone put a little effort into ensuring “Oracle” is actually the corporation everyone thinks of when they hear “Oracle”

Other Images: You’ll also find containers that are not certified that have been published by un-verified parties. Don’t use these without some investigation.

We happen to interact with OpenHAB developers and “know” the guy who builds these images. I trust him and do run this image on my home network. I also know where to go to view his Dockerfiles, and I know how his images are built. https://github.com/openhab/openhab-docker

But there are images posted by random Internet denizens – I run Docker on my personal Windows laptop and needed to access the underlying MobyVM. The image justincormack/nsenter1 will do it … but I have no idea who this person is. A quick search of the Internet yielded a Dockerfile for this image, but there’s nothing that ensures the image on Docker Hub is actually built with this file. It’s safer to use the Dockerfile to build your own version of the image.

GitLab – Using the Docker Executor for Testing

Setting up gitlab-runner to use a Docker executor: You need Docker running on the gitlab-runner host. In my sandbox, I have GitLab running as a Docker container. Instead of installing Docker in Docker, I have mounted the host Docker socket to the GitLab container. You’ll need to add the –privileged flag, and since I’m using Windows … my mount path is funky. But it works.

docker run –detach –hostname gitlab.rushworth.us –publish 443:443 –publish 80:80 –publish 22:22 –name gitlab -v //var/run/docker.sock:/var/run/docker.sock –privileged gitlab/gitlab-ee:latest

Register the runner using “docker-runner register”. I always specify the image in my CI YAML file, so the default image is immaterial … but I’ve encountered groups with an image that mirrors the production servers who set that image as the default.

Edit /etc/gitlab-runner/config.toml and change “privileged = false” to true.

Start the runner (docker-runner start). In the GitLab Admin Area, navigate to Overview => Runners and select the one we just created. When a project is updated, tags can be used to select an appropriate runner. Because most of my testing is done with the shell executor, the runner which uses the shell executor has no tags and the runner which uses the Docker executor is tagged with “runner-docker”. You can require all jobs include a tag to select the appropriate runner (which avoids someone accidentally forgetting a tag and having their project processed through the wrong runner).

An image – you’ll need an image. You can use base images from the Docker Hub registry or create your own image. You can add components in the before_script or use a Dockerfile to build an image from the parent image.

Now we’re ready to use the Docker executor! Create your CI YAML file.

If you are not using the default image, start with “image: <the image you want>”.

We don’t want phpunit in the running image, but I use it for testing. Thus, I need a before_script component to install the phpunit package.

If you’ve used a tag to restrict what is run in your Docker-executor based runner, add the appropriate tag. Include the tester command line.

.gitlab.yml:

image: gitlab.rushworth.us:4567/lisa/ljtestproject-dockerexecutor
stages:
- test

before_script:
# Install dependencies
- bash ci/docker_InstallReqs.sh

test_job:
stage: test
tags:
- runner-docker
script:
- phpunit --configuration phpunit_myapp.xml

Docker_InstallReqs.sh

#!/bin/bash
yum install php-phpunit-PHPUnit

Now when you commit changes to the repository, the Docker-executor based runner will be used for the CI/CD pipeline. A transient Docker container will be created with the image, your before_script will be executed, and then the test script will be run within the container.


Building a Docker Image From a Parent Image

Docker maintains a registry of pre-built images that may be all you need. Put some thought into it, though – don’t just trust any image you find on the registry. When a pre-built image doesn’t meet your needs, you can make your own image based on any base image.

I create a new folder to hold the build instructions, additional configuration files, and notes about the build process. In that folder, create a file named “Dockerfile” which controls the image build.

You’ll need to specify the base image for your build using the FROM directive. I have examples here for installing sqlite3 on both a CentOS and Ubuntu base image. Add LABELs indicating the purpose of the image and who maintains it. Use the “RUN” directives to provide instructions to modify the base image to your needs – install what you want, create folders or files, clean up anything you don’t want.

The ENTRYPOINT is what runs when the container starts – it can be an executable, as in this case, or a script file.

If you need to expose ports for inter-container communication, add a list of ports to expose. SQLite is self-contained, but a microservice environment may have “EXPOSE 21443” to allow other containers to communicate with it on port 21443. Note this is different than binding the container port to a host – my Apache web server container has 443 bound; but that’s done in the “docker run” line where the container is built, not in the Dockerfile for the image.

Example – SQLite3 on CentOS

FROM centos:latest

LABEL "version": "latest"
LABEL "description": "CentOS server running SQLite3"
LABEL "maintainer": "DockerImages@lisa.rushworth.us"

RUN yum -y install glibc.i686
RUN yum -y install zlib.i686
RUN yum -y install wget
RUN yum -y install unzip

RUN cd /root && wget https://sqlite.org/2019/sqlite-tools-linux-x86-3290000.zip && unzip -j -d /usr/bin -o /root/sqlite-tools-linux-x86-3290000.zip && rm -f /root/sqlite-tools-linux-x86-3290000.zip

RUN rm -rf /var/lib/apt/lists/* /tmp/* /var/tmp/*

RUN mkdir -p /db

WORKDIR /db

ENTRYPOINT [ "sqlite3" ]

Example – SQLite3 on Ubuntu

FROM ubuntu:latest

LABEL "version": "latest"
LABEL "description": "Ubuntu server running SQLite3"
LABEL "maintainer": "DockerImages@lisa.rushworth.us"

RUN DEBIAN_FRONTEND=noninteractive apt-get -yq update

RUN DEBIAN_FRONTEND=noninteractive apt-get -yq install sqlite3

RUN rm -rf /var/lib/apt/lists/* /tmp/* /var/tmp/*

RUN mkdir -p /db

WORKDIR /db

ENTRYPOINT [ "sqlite3" ]

Save your Dockerfile and build your container using “docker build -t image/name .”

Use “docker images” to confirm the image has been successfully created.
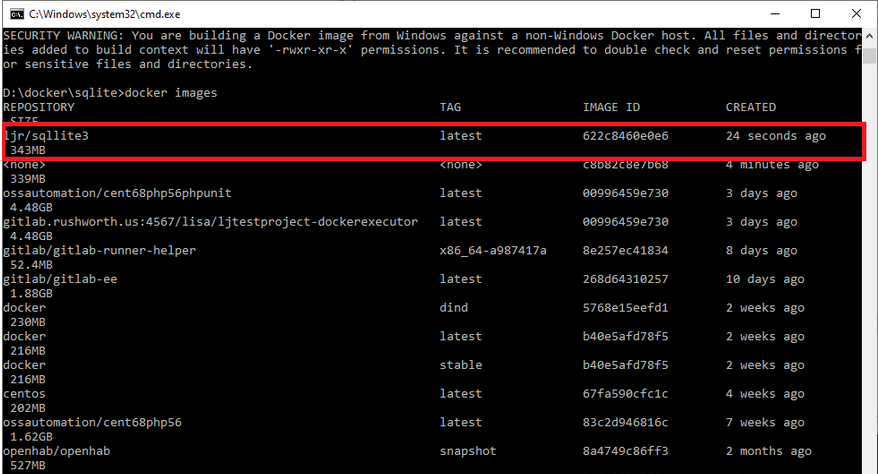
And start a container using your image:

docker run -it --name ljrimagetest ljr/sqllite3

If you are having problems starting your container, change the entrypoint to something like “/bin/bash” – this will drop you to the host’s command line instead of the application. From there, you can troubleshoot your launch problems and sort the problem. The CentOS sqlite install, as an example, required glib and zlib components to run. Rather than trying something, rebuilding the image, launching a container, and looping until sqlite3 launched … I used bash as my entrypoint, installed packages until the application ran, and then modified the Dockerfile and rebuilt the image.

At this point, you can tag the image and upload it to a registry. I use my GitLab server to store Docker images. There is a DockerImages repository

To tag the image, use

docker tag ljr/sqllite3 gitlab.rushworth.us:4567/lisa/dockerimages/sqllite3:latest

And upload the image to your registry (you may need to authenticate first)

docker push gitlab.rushworth.us:4567/lisa/dockerimages/sqllite3:latest

If you are using GitLab as your registry, navigate to the repository. Select Packages => Container Registry

Here’s my Sqlite3 image