We’ve got tassels all over now — silks on corn, cobs forming. This is the Damaun SH2 sweet corn we’ve planted for the first time this year.
Pumpkin Progress
Creating an Azure DevOps Work Item From a Teams Message
You can use Power Automate to create an ADO work item (bug, user story, etc) when a user posts into specific Teams channel.
Log into Power Automate and create a new workflow. Find a Teams trigger that suits your need – in my case, I wanted to use a key word (you could even use different key words to create work items in different projects or with different content). Note that automation cycles accrue based on execution — so if you elect to link up to a busy Teams channel and filter for keywords to indicate you want an ADO item created, you may be “wasting” workflow cycles. In our case, I have a “user group” Teams space and set up a special channel where users can submit bug and feature requests. This means workflow cycles are accrued when someone specifically wishes to create an ADO item not when messages are posted into the user group’s general chat channels.
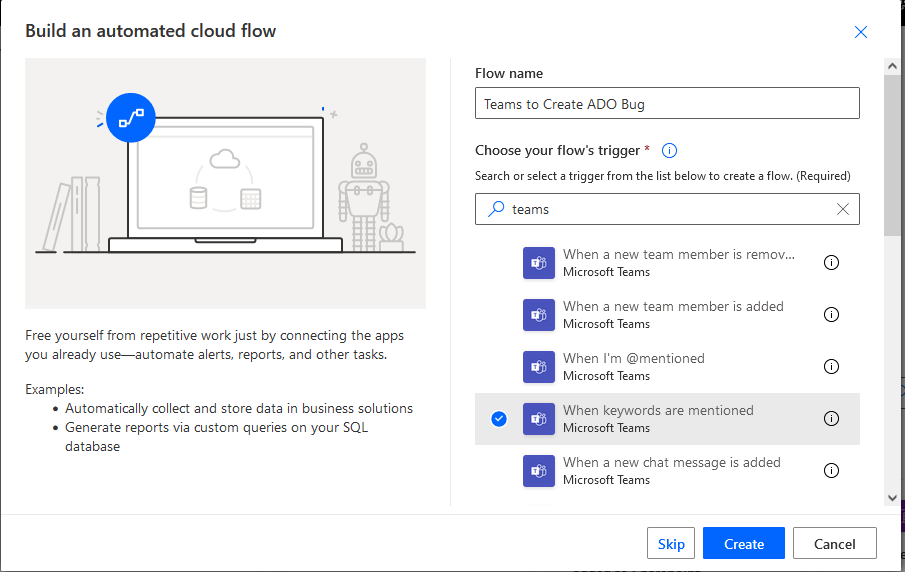
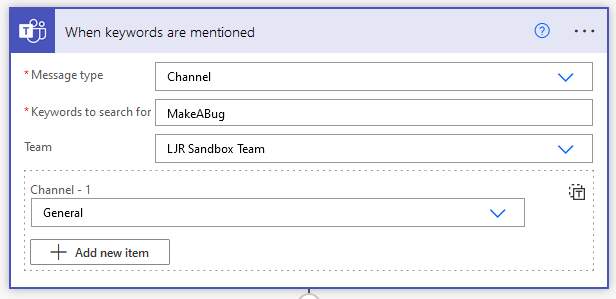
You can source messages from channels or group chats in the “Message type” selection. You cannot use hash-tags as key words! The workflow execution reports a gateway error. Select the Team and channel(s) that you want the workflow to monitor.
Add a new step to “create a work item” from Azure DevOps

Configure the project into which you want to create the work item – the organization and project name, the type of work item, and content of the work item.
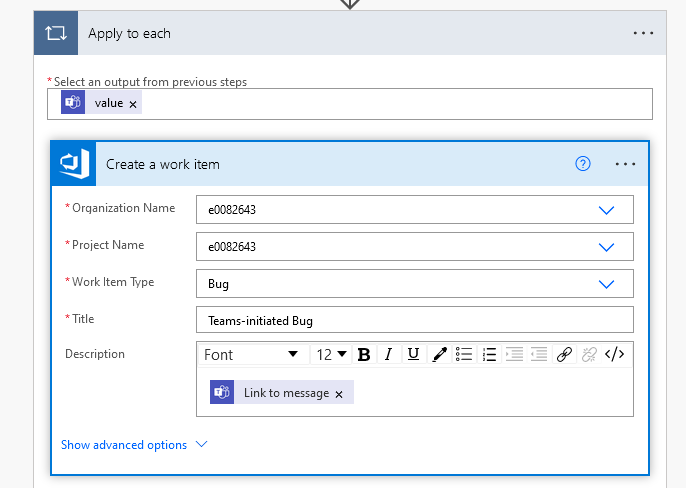
If you want to set priority, add an assignment, etc – click on “Show advanced options”. I added a few fields to provide a clue as to where the bug report came from.
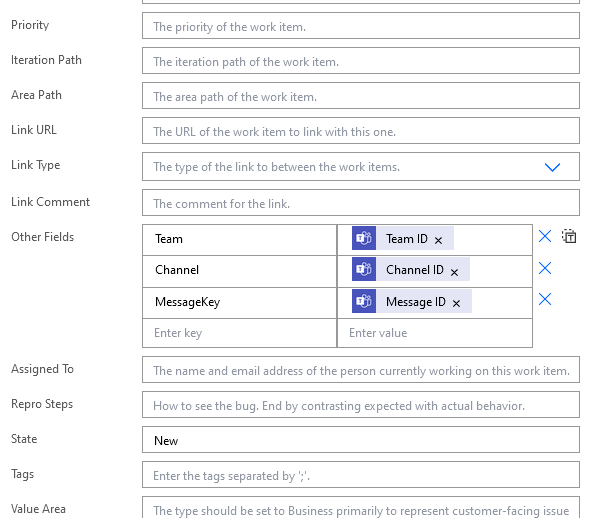
Save the workflow and post a message in your channel with the key word. Go into the ADO project work items; your Teams-initiated bug should be there.

Verifying Connectivity From Locked Down Windows Desktop or Server
We frequently encounter individuals who cannot use something from their server or desktop — but their IT group has Windows locked down so they cannot just telnet to the destination on the port and check if it’s connecting. Windows doesn’t have a whole lot of useful tools of its own. Fortunately, I’ve found that nmap.org publishes a local install zip file for Windows.
Download latest Win32 zip file from https://nmap.org/dist/ — on 8/8/2023, that is https://nmap.org/dist/nmap-7.92-win32.zip
Extract the zip file contents somewhere (I use tmp, right in downloads works, whatever)
Open command prompt and change directory (cd) into the folder where nmap was extracted — e.g. cd /d c:\tmp\nmap-7.92
— A quick trick for opening a command prompt to a directory location: If you have a file explorer window open to the location, click into the header where the file path is shown and remove the text that appears there
Type cmd and hit enter
And voila — a command prompt opened to the same location you were viewing
In the command prompt, run an map command to test a specific port (-p) and host. Since some hosts do not return ICMP requests, I also include -P0 instructing nmap not to attempt pinging the host first. This example verifies we have connectivity to google.com on port 443 (https)
Corn Tassels
Linux: Disabling Wild Local DNS Server Thing (i.e. systemd-resolved)
I am certain there is some way to configure systemd-resolved to actually use internal DNS servers so you can resolve your local hostnames. But nothing I’ve tried have worked, and I don’t actually need this wild local DNS thing.
Here’s the problem — systemd-resolved creates an /etc/resolv.conf file that uses a localhost address as the nameserver — and that may very well forward requests out to Internet DNS servers. Which don’t have any clue about your internal DNS zones — thus you can no longer resolve local hostnames. Whenever I see 127.0.0.53 in /etc/resolv.conf, I know systemd-resolved is at work.
[lisa@linux ~]# cat /etc/resolv.conf
# This is /run/systemd/resolve/stub-resolv.conf managed by man:systemd-resolved(8).
# Do not edit.
#
# This file might be symlinked as /etc/resolv.conf. If you're looking at
# /etc/resolv.conf and seeing this text, you have followed the symlink.
#
# This is a dynamic resolv.conf file for connecting local clients to the
# internal DNS stub resolver of systemd-resolved. This file lists all
# configured search domains.
#
# Run "resolvectl status" to see details about the uplink DNS servers
# currently in use.
#
# Third party programs should typically not access this file directly, but only
# through the symlink at /etc/resolv.conf. To manage man:resolv.conf(5) in a
# different way, replace this symlink by a static file or a different symlink.
#
# See man:systemd-resolved.service(8) for details about the supported modes of
# operation for /etc/resolv.conf.

nameserver 127.0.0.53
options edns0 trust-ad
search example.com
To disable this local name resolution, stop and disable systemd-resolved, unlink the /etc/resolv.conf file it created, and restart NetworkManager
[lisa@linux ~]# systemctl stop systemd-resolved.service
[lisa@linux ~]# systemctl disable systemd-resolved.service
[lisa@linux ~]# unlink /etc/resolv.conf
[lisa@linux ~]# systemctl restart NetworkManager
Removed /etc/systemd/system/multi-user.target.wants/systemd-resolved.service.
Removed /etc/systemd/system/dbus-org.freedesktop.resolve1.service.
Voila, /etc/resolv.conf is now populated with reasonable internal DNS servers, and you can resolve local hostnames.
[lisa@linux ~]# cat /etc/resolv.conf
# Generated by NetworkManager
search example.com
nameserver 10.1.2.33
nameserver 10.1.2.66
Pumpkins Are Forming
Peanut Butter Fence
We got the peanut butter fence up on the farm — Scott and Anya attached the metal strips, and I smeared the with peanut butter. Since they are connected to an electric fence line, the idea is that a deer will lick at the peanut butter (evidently something they really like) and get an unpleasant jolt. It’s a solar energizer, so not too unpleasant. But enough for them to think “I’m gonna go eat this other green leafy stuff!”.
Cisco Aironet — Unable to Access Wireless Device That Moved to Different Access Point
I think this is a fairly esoteric issue — something that happens frequently enough but doesn’t actually impact functionality so anyone notices. We got a new WiFi doorbell that we set up inside (and could access it), took outside (and could access it) … but, when we went back inside? We could not access the doorbell. No HTTPS, no RTSP, no ICMP. Nothing.
Cisco access points maintain a list of associated wireless clients. These may also be kept in an arp table, although arp caching appears to be disabled by default. So device was on AP1, moved to AP2. Clients on AP2 (or AP3, or AP4) were able to access it since the switch has it registered on the port for AP2. Anything on AP1, however, cannot access the device. The MAC address still appeared in the associations table for AP1. You can set a lower activity timeout — the default was one day — to clear devices out more promptly. But … if the device communicates outside of its new WAP, how frequently is it going to be talking to a device on its old WAP? Generally, we’re talking to our servers (wired) or the Internet (also wired). So technically … Scott’s cell phone couldn’t reach my cell phone when I go from the bedroom to the office. But we never notice because we have minimal peer to peer communication. It’s not like doorbells are going to go walking about normally … but it was good to know a quick AP reboot would allow our cell phones to pull up the doorbell’s video feed.
Zoneminder – Don’t forget to set the server
We got some new IP cameras — devices that support direct RTSP access to the video stream — but I could not get them to work with Zoneminder. No matter what I tried, it reported that shm is not connected. My /dev/shm directory wasn’t full, the permissions were fine. In short, there was no reason that the memory map file couldn’t have been created. I could not figure it out — and, in trying to delete a 2 GB log file so it would be more readable … the server crashed and would only boot in recovery mode.
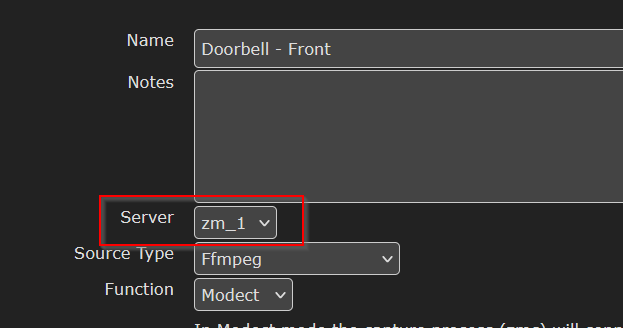
Sigh! Fortunately, I was able to repair the file system and get the server back online. I was working, so Scott looked at the cameras and had them working almost immediately. Turns out the default, when you add a new device, is that the server is set to ‘None’ … which evidently leads to the “unable to connect to monitor”, “Monitor shm is not connected”, and “Can’t open memory map file” errors I was seeing. He just selected the zoneminder server from the dropdown, saved it, and voila — a camera stream.


