Tag: Microsoft Office

Did you know … you can share your screen from the Teams web client in Chrome?

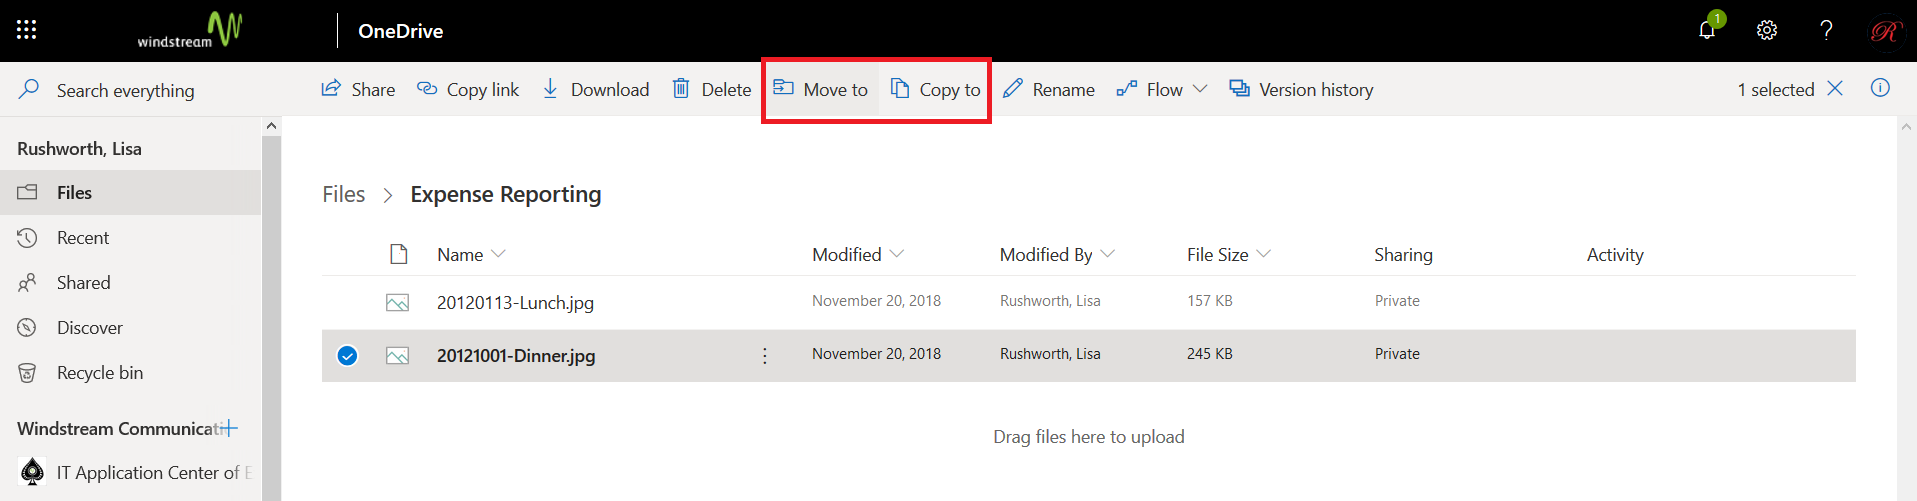
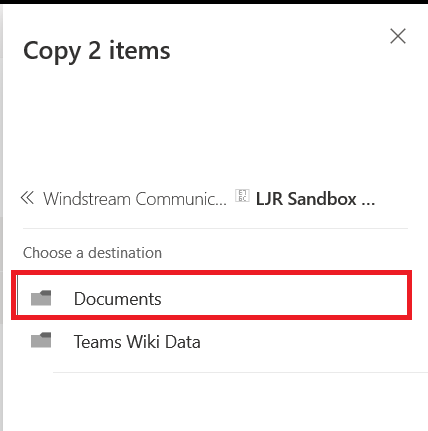
I use the Teams web client as my primary Teams application – I like it, but it’s also important to be able to identify where the web client falls short of full Teams functionality. There is one big “missing” feature to me – screen sharing. I can view shared screen, but I cannot remote control shared screens and cannot share my own screen.

But now you can share your screen in a Teams web client. You have to schedule a meeting, and you still cannot perform remote control operations in the web browser. But it’s awesome to be able to show someone what I’m working on or let a tech support engineer follow along as I reproduce an error.

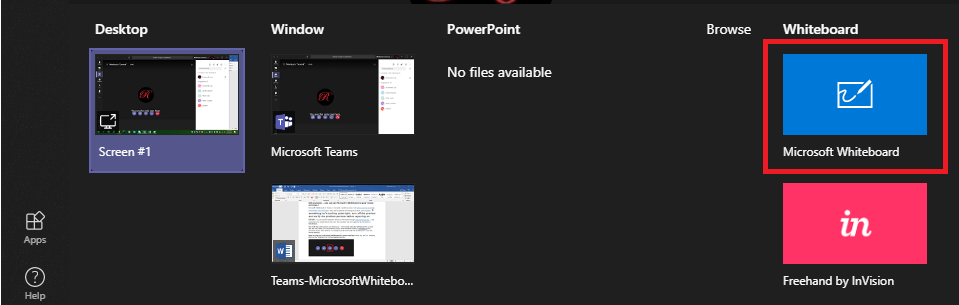
To share your screen from a Chrome browser, first open https://teams.microsoft.com in Chrome. Schedule a meeting and join it. Open the sharing control panel.

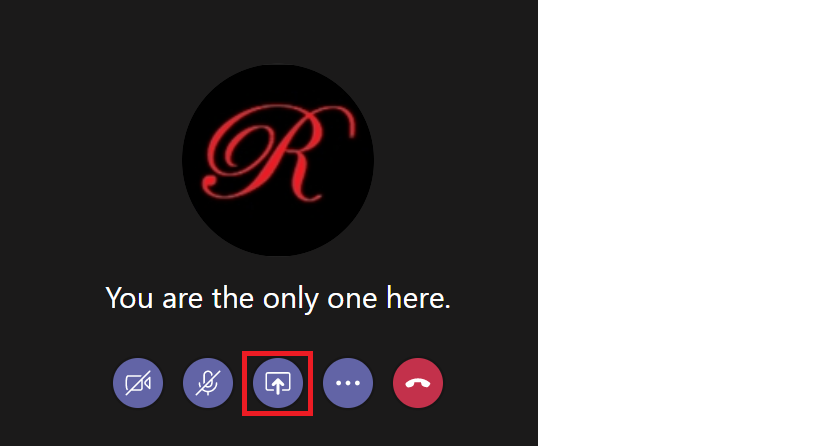
Select “Screenshare”

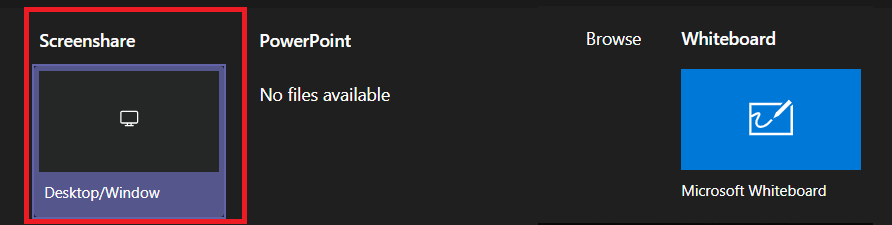
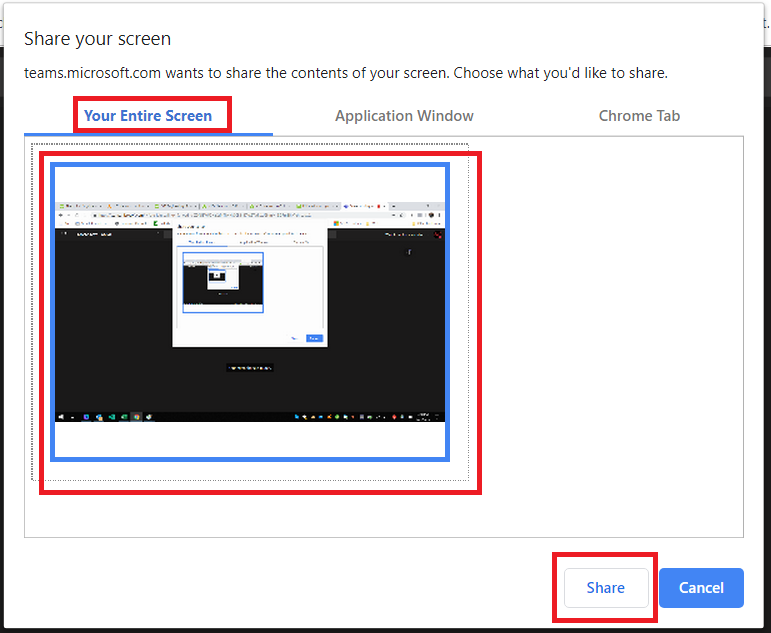
Select the appropriate tab to share your entire screen, a single application, or a single Chrome tab. Select the screen/application/tab that you want to share and click “Share”.

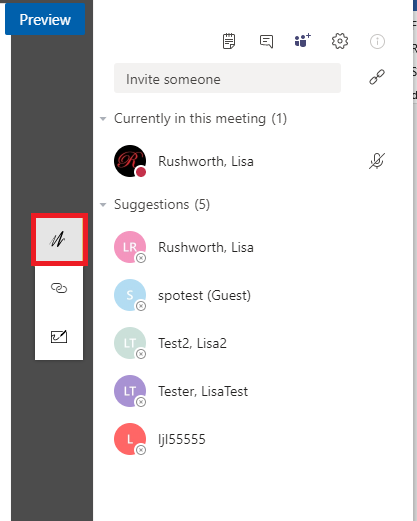
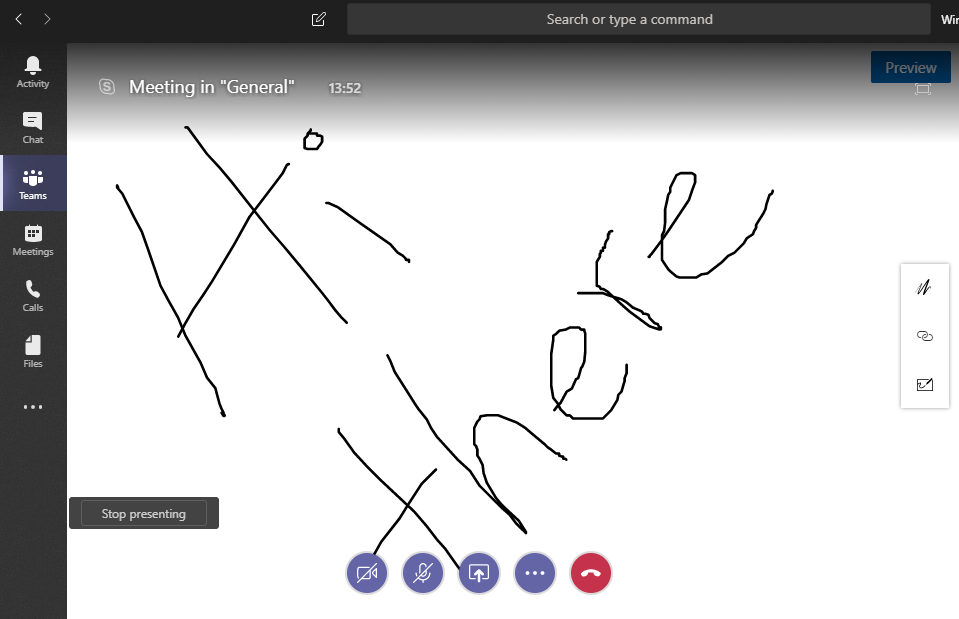
Voila! You are sharing your screen. Click “Stop sharing” when you are done (or just disconnect from the meeting).


Did you know … you can “clean up” your Teams chat history?

My inbox has 7,582 messages in it. This fact doesn’t bother me at all because “Unread: 2” indicates what still needs to be addressed. I mark a message as unread to keep them in my “needs to be worked on” queue, so seeing thousands of messages in my inbox doesn’t feel like an overwhelming pile of outstanding requests.

Some people move messages from their inbox – either deleting the message or sorting it into an appropriate folder – and, for them, the item count is their “needs to be worked on” list. My mom is one of those people – she gets a little stressed out just seeing the pages (and pages, and pages!) of messages in my inbox.

I mention this because it never bothered me that the Teams chat list is cluttered with the last 30 days of private chats, chats from within meetings, Planner notifications. Nothing is in bold, there’s no activity indicator on the Chat tile … to me, that says “you’re all done here”.

But that’s not true for everyone. Some people see the pages of conversation history and subconsciously see a bunch of messages they still need to address. Or they see clutter — “when you’re done with it, put it away” and this isn’t away! If you don’t like to have dozens of finished conversations hanging out for a month, you can hide them. Hiding conversations does NOT delete the messages – if you receive a new message from the individual or address a new message to them, your previous chat history will still be there. Hidden chat messages are still displayed when you search for information. But hiding chats reduces the number of “recent” conversations displayed in Teams.

To hide a conversation, move your mouse over a listing and click the ellipsis which appears.

Select “Hide” from the menu.

The hidden chat record will no longer be listed in your recent conversation history. Repeat as needed with the rest of your chat history.

If the person sends you a new message, you will see an activity indicator on the “Chat” tile and the conversation will pop back into your recent conversation listing. If you address a new chat message to the person, the conversation will pop back into your recent conversation listing. You can hide the conversation again when you’ve finished the discussion.


Did you know … Conditional Formatting can highlight data based on date?

As we are upgrading groups to Microsoft Teams, we need to be able to identify which activities need to be performed each week. While highlighting today’s date is a start, it is better to identify which tasks need to be performed in the upcoming week so we can plan ahead.

To accomplish this, I use a conditional formatting rule. It highlights all of the date values that fall between today and seven days in the future. How? In conditional formatting, you can use a formula to determine which cells to format. My selection rage is E2 through J20, so the conditional formatting formula is based off of the E2 cell.

The formula AND’s to IF functions. If the difference between the cell date and today is less than 8 (less than 8 days in the future) AND if the difference between the cell date and today is greater than or equal to zero (today or a future date), the rule evaluates to TRUE and the highlighting is applied.

=AND(IF((E2 – TODAY()) <8,1,0),IF((E2 – TODAY()) >= 0,1,0))

The result – every activity we need to plan for in the upcoming week is highlighted.


Did you know … the Teams mobile client lets you configure you time?

Mobile access to the company’s communication platforms is convenient – and you can use Teams on your Android or iOS device. A training class or a trip out to a customer’s site no longer means you are disconnected from the day’s routine discussions. But sometimes I want to disconnect – watching my daughter’s gymnastics performance, my husband’s birthday dinner, listening to a band at the local club, painting en plein air at the local park. Oh, and certainly dark-o-clock when I’m sleeping. Configure “quiet hours”!

Tap the hamburger menu in the upper left-hand corner of the screen.

Tap “Notifications”

Tap “Quiet hours”

Move the “Quiet hours” slider to ‘on’

Select the times when you want Teams notifications to stop and resume. If you want to disable Teams notifications for entire days (regularly scheduled days off or temporarily for vacation days), tap “Quiet days”

Move the “Quiet days” slider to “On” and tap the days during which you wish to suppress notifications.

Return to the menu and you will see that quiet hours are scheduled.

During quiet hours (or days), the notifications logo will indicate that notifications are disabled and tell you when notifications will resume.

The hamburger menu on the Teams app will also indicate that notifications are temporarily suspended.


Did you know … you can use Microsoft’s Whiteboard in your Teams meetings?

Microsoft Whiteboard, in Teams, is currently a public preview. Like other previews available in the Office 365 ecosystem, there will be glitches and things that don’t work properly. If something isn’t working quite right, turn off the preview and verify the problem persists before reporting an issue. You can submit feedback directly to Microsoft through their UserVoice site, but previews are not supported by Microsoft.

Now that the warning bit is out of the way – we’ve been using the Whiteboard for a week and the only oddity I’ve encountered occurs when both a Whiteboard and desktop are shared simultaneously. You must keep minimizing the Whiteboard to view the shared desktop.

How do you use a Microsoft Whiteboard in your meeting? When you are in a meeting, click on the “Sharing Tray” in the meeting tool bar.

In the “Whiteboard” column, select “Microsoft Whiteboard”

A whiteboard will be opened and shared with everyone on the call. To draw on the Whiteboard, select “Inking mode”

Click on a pen (or the eraser) along the right-hand side to select a pen color.

Draw on the screen. Click on the blue check-mark to leave inking mode. To close the whiteboard, click “Stop presenting”.

After the meeting, how do you access the Whiteboard? Visit https://whiteboard.microsoft.com – the Whiteboard will be stored for the person who initiated the Whiteboard in the meeting. To share it with others who had attended, click the ellipses on the Whiteboard preview.

Select “Invite”

Select “Create sharing link” and paste the link into the Teams meeting chat.

Team members can use the link to view the Whiteboard.

Whiteboards from Teams meetings are also available through the Whiteboard app. The app expands on the basic Whiteboard functionality available in Teams or online. In the app, you can select text ink and convert it to more readable text. Use the lasso tool to select a region of text ink.

Click on the magic wand

Voila, more legible text!

Click the hamburger menu in the upper right-hand corner of the screen for additional options — including “Export” which will create a PNG or SVG image from your Whiteboard data.

Did you know … Teams displays an alert when a new Planner task is assigned to you?

You will now be alerted in Teams when Planner tasks are assigned to you – this is another step toward making Teams the single hub for collaboration. Task assignment only creates activity when the Planner is a tab in one of your Teams spaces. If you create a Planner board that does not appear as a tab in a Teams space, new tasks assigned on that board will not create activity in Teams. To start getting Teams alerts for a board, just add it as a tab to a Teams space.

You’ll see an alert in your “Activity” feed

And in “Chat”. The card contains the task title, the name of the individual who assigned the task to you, the Teams space where the Planner is stored, and a link to view the task.

Click “Open Task” and you’ll be brought to the Planner board within the appropriate Teams space. The task will be open and ready to edit.

* If you have the mobile Planner app installed, you will receive push notifications in addition to seeing the task in your Teams activity.


Did you know … e-mails can be sent to a Teams channel?

I’ve mentioned before that we can send e-mails to a Teams channel – forward a message in my mailbox to a channel so we can discuss it. But did you know Teams channels can receive e-mail from outside of our Exchange Online environment too?

That doesn’t mean you’ll be seeing advertisements for low cost (and dodgy) prescription drugs or entreaties from the purported prince of far-far-away show up in your channel conversations. Until someone gets an e-mail address for a channel, it doesn’t have one.

To associate an e-mail address, click the ellipsis next to a channel name and select “Get email address”

Copy the SMTP address. If you want to control which domains can send e-mails to the channel, click “advanced settings”

By default, anyone can send e-mails to the address. Simply select the appropriate radio button for the restrictions you want. “Only members of this team” lets members forward messages from their personal mailbox for discussion.

Selecting “Only emails sent from these domains” allows you to enter the list of domains from which you want to receive messages. Click “Save” to save your changes.

Send an e-mail message from an approved domain. Voila – a message from my home domain delivered to the Teams channel.

You can have monitoring systems, vendor ticketing systems, all sorts of e-mail sources deliver messages right into your Teams channels.


Did you know … you can add Teams channel meetings to your calendar?

Holding a meeting in a Teams channel allows channel members to attend if they have time and are interested in the meeting – it also lets Team members access meeting artifacts easily.

But when you schedule a meeting in a channel, only direct invitees see the meeting in their calendar. This is great for people who aren’t going to attend, but I end up joining the call ten minutes late because I didn’t see the meeting when I check my calendar to see what’s coming up.

But you can add a channel meeting to your calendar – if you decide to attend the meeting, click the ellipses on the meeting item and select “View meeting details”

Click “Add to calendar”

Voilà! Now the meeting appears in your calendar.


Did you know … you can open Teams files directly from Office 365 Applications?

While you can go into a channel, select the files tab, and open a file from within Teams … that’s a lot of clicking just to open a file in another program. But you can open files stored in Teams (or any other SharePoint document repository) directly from Office 365 programs. How?

Open an Office 365 program – Word, Excel, PowerPoint, Visio. Click on the “File” ribbon bar and select “Open”. SharePoint Online document repositories, including those used by Teams, are listed under “Sites – Windstream Communic…”.

You may already have SharePoint sites listed. To add a new site, you just have to follow it.

Select the SharePoint site that matches your Team name. Click “Documents”

You’ll see a folder for each channel in your Team. Click the channel where the file is saved.

Navigate to the folder where your file is stored, then select the file. It will open directly in the application. When you save the document, the SharePoint document is updated.

Tip: Frequently used documents can be pinned for quick access. After you have opened the file, it will appear in the most recently used list. Click the little push-pin next to the file and it will be pinned to the top of the recently used file list. The Excel files and Word documents that I use frequently can now be opened without navigating through the file structure to find them.


Did you know … you can copy files from OneDrive to SharePoint Online (thus Microsoft Teams too)?

Sometimes I work on a document privately before putting it out for my group to review, but it takes time to upload a copy of the document to our Teams space! You can move and copy documents from OneDrive directly to SharePoint Online. Since “Files” in Teams spaces are just SharePoint Online document repositories, this means you can move/copy documents to a Teams space too.

Open “OneDrive” from https://portal.office.com or the side-bar of any web-based Office 365 product.

Select the document(s) that you want to move/copy and select either “Move to” or “Copy to” from the menu bar.

A new pane will fly out from the right-hand side of the browser window. You’ll see some of the SharePoint Online sites and Teams spaces to which you have access listed. If the one you want isn’t listed, click “Browse sites” to see a full list.

Click “Show more” to browse through the list of sites.

If you are unable to locate the site you want to use, open it in SharePoint online and follow it. Click on the site into which you want to move/copy your documents.

For SharePoint online sites, you’ll see the site contents and can navigate through the hierarchy to the location you want the file stored. For Teams spaces, click “Documents”.

You’ll then see folders for each Channel. Click the channel into which you want to store the documents.

Navigate through the Channel’s file structure to the location you want the document stored. Click the blue button to copy/move the document to that location.

Voila, my documents are moved within Microsoft’s cloud from OneDrive to SharePoint Online.