I saw a really pretty autumn planter box at a local restaurant and wanted to remember it for next year. Could even plant a pumpkin instead of the ivy so the gourd components would be live.
K8s, resolv.conf, and ndots
I had a very strange problem when firewalld was used with nftables as the back end – rules configured properly in firewalld didn’t exist in the nftables rulesets so … didn’t exist. The most obvious failure in the k8s cluster was DNS resolution – requests to any nodes where nftables was the back end just timed out. In diagnosing the “dns queries time out” issue, I was watching the logs from the coredns pods. And I saw a lot of NXDOMAIN errors. Not because I had a hostname mistyped or anything – each pod was appending every domain in the resolv.conf search order before trying the actual hostname.
Quick solution was to update our hostnames to include the trailing dot for the root zone. It is not redishost.example.com but rather redishost.example.com.
But that didn’t explain why – I’ve got plenty of Linux boxes where there are some search domains in resolv.conf. Never once seen redishost.example.com.example.com come across the query log. There is a configuration that I’ve rarely used that is designed to speed up getting to the search list. You can configure ndots – the default is one, but you can set whatever positive integer you would like. Surely, they wouldn’t set ndots to something crazy high … right??
Oh, look –
Defaulted container "kafka-streams-app" out of: kafka-streams-app, filebeat
bash-4.4# cat /etc/resolv.conf
search kstreams.svc.cluster.local svc.cluster.local cluster.local mgmt.example.net dsys.example.net dnoc.example.net admin.example.net example.com
nameserver 10.6.0.5
options ndots:5
Yup, it’s right there in the source — and it’s been there for seven years:

What does this mean? Well, ndots is really just the number of dots in a hostname. If there are fewer than ndots dots, the resolver will try appending the search domains first and then try what you typed as a last resort. With one dot, that basically means a string with no dots will get the search domains appended. I guess if you go out and register a gTLD for your company – my hostname is literally just example. – then you’ll have a little inefficiency as the search domains are tried. But that’s a really edge case. With the k8s default, anything with fewer than five dots gets all of those search domains appended first.
So I need redishost.example.com? I see the following resolutions fail because there is no such hostname:
[INFO] 64.24.29.155:57014 - # "A IN redishost.example.com.svc.cluster.local. udp # false 512" NXDOMAIN qr,aa,rd 158 0.00019419s
[INFO] 64.24.29.155:57028 - # "AAAA IN redishost.example.com.svc.cluster.local. udp # false 512" NXDOMAIN qr,aa,rd 158 0.00019419s
[INFO] 64.24.29.155:56096 - # "A IN redishost.example.com.cluster.local. udp # false 512" NXDOMAIN qr,aa,rd 158 0.00019419s
[INFO] 64.24.29.155:56193 - # "AAAA IN redishost.example.com.cluster.local. udp # false 512" NXDOMAIN qr,aa,rd 158 0.00019419s
[INFO] 64.24.29.155:55001 - # "A IN redishost.example.com.mgmt.example.net. udp # false 512" NXDOMAIN qr,aa,rd 158 0.00019419s
[INFO] 64.24.29.155:55194 - # "AAAA IN redishost.example.com.mgmt.example.net. udp # false 512" NXDOMAIN qr,aa,rd 158 0.00019419s
[INFO] 64.24.29.155:54078 - # "A IN redishost.example.com.dsys.example.net. udp # false 512" NXDOMAIN qr,aa,rd 158 0.00019419s
[INFO] 64.24.29.155:54127 - # "AAAA IN redishost.example.com.dsys.example.net. udp # false 512" NXDOMAIN qr,aa,rd 158 0.00019419s
[INFO] 64.24.29.155:52061 - # "A IN redishost.example.com.dnoc.example.net. udp # false 512" NXDOMAIN qr,aa,rd 158 0.00019419s
[INFO] 64.24.29.155:52182 - # "AAAA IN redishost.example.com.dnoc.example.net. udp # false 512" NXDOMAIN qr,aa,rd 158 0.00019419s
[INFO] 64.24.29.155:51018 - # "A IN redishost.example.com.admin.example.net. udp # false 512" NXDOMAIN qr,aa,rd 158 0.00019419s
[INFO] 64.24.29.155:51104 - # "AAAA IN redishost.example.com.admin.example.net. udp # false 512" NXDOMAIN qr,aa,rd 158 0.00019419s
[INFO] 64.24.29.155:50052 - # "A IN redishost.example.com.example.com. udp # false 512" NXDOMAIN qr,aa,rd 158 0.00019419s
[INFO] 64.24.29.155:50189 - # "AAAA IN redishost.example.com.example.com. udp # false 512" NXDOMAIN qr,aa,rd 158 0.00019419s
Wonderful — IPv6 is enabled and it’s trying AAAA records too. Finally it resolves redishost.example.com!
Luckily, there is a quick solution. Update the deployment YAML to include a custom ndots value – I like 1. I could see where someone might want two – something.else where I need svc.cluster.local appended, maybe I don’t want to waste time looking up something.else … I don’t want to do that. But I could see why something higher than one might be desirable in k8s. Not sure I buy it’s awesome enough to be the default, though!

Redeployed and instantly cut the DNS traffic by about 90% — and reduced application latency as each DNS call no longer has to have fourteen failures before the final success.
Watching Redis Records for Strange Changes
I write a lot of things down to save myself time the next time I need to do the same sort of thing — and publish this to the Internet in case I can save someone else time too. But this one is so specific, I’m not sure it’s an “ever going to encounter this again” sort of thing. Just in case, though — I have device data being stored in redis — because the device doesn’t know its throughput values, you need the last time and last value paired with the current device metrics to calculate throughput. OK. But, sporadically, the cached data is updated insomuch as a new record is posted with a new timestamp. But the actual values, other than timestamp, remain unchanged. With millions of interfaces, it’s challenging to identify these situations by spot-checking the visualizations. Instead, I need to monitor redis and identify when the tstamp is updated but no other values change.
import redis
import time
import re
import json
import os

# Configuration
redis_host = 'redishost.example.net'
redis_port = 6379
redis_password = 'P@5sw0rDG03sH3r3'  # Replace with your Redis password
pattern = re.compile(r'INTERFACE_RAW_STATS_hostname\d\d\d\d_\d+_\d+')
output_file = 'changed_records.json'

# Connect to Redis
client = redis.StrictRedis(host=redis_host, port=redis_port, password=redis_password, decode_responses=True)

# Dictionary to track records
records = {}
matching_keys = []

def get_matching_keys():
    """
    Retrieve keys from Redis matching the specified pattern.

    Returns:
        list: A list of keys that match the pattern.
    """
    all_keys = client.keys()
    matching_keys = [key for key in all_keys if pattern.match(key)]
    return matching_keys

def process_keys():
    """
    Process Redis keys to track changes in data.

    Retrieves keys matching the pattern, gets their data using HGETALL,
    and tracks changes. If only the 'tstamp' field has changed and all
    other fields remain the same, the record is written to a file.
    """
    global records
    i = 0

    for key in matching_keys:
        i += 1
        data = client.hgetall(key)
        if i == 1 or i % 1000 == 0:
            print(f"Processed {i} records")

        if not data:
            continue

        collector_name = data.get('collectorName')
        node_id = data.get('nodeId')
        if_index = data.get('ifIndex')
        tstamp = data.get('tstamp')

        if not collector_name or not node_id or not if_index or not tstamp:
            continue

        unique_key = f"{collector_name}_{node_id}_{if_index}"

        if unique_key in records:
            previous_data = records[unique_key]
            if previous_data['tstamp'] != tstamp:
                # Check if all other values are the same
                if all(data[k] == previous_data[k] for k in data if k != 'tstamp'):
                    print(f"***** Record changed: {json.dumps(data, indent=2)} *****")
                    write_to_file(data)
            records[unique_key] = data  # Update the record
        else:
            records[unique_key] = data

def write_to_file(data):
    """
    Write the given data to a file.

    Args:
        data (dict): The data to write to the file.
    """
    with open(output_file, 'a') as file:
        file.write(json.dumps(data) + '\n')

if __name__ == "__main__":
    # Ensure the output file is empty at the start
    if os.path.exists(output_file):
        os.remove(output_file)

    # Retrieve the list of matching keys once
    matching_keys = get_matching_keys()

    while True:
        process_keys()
        print("Sleeping ... ")
        time.sleep(300)  # Sleep for 5 minutes
Fedora 40: NFTables not logging
We upgraded Anya’s laptop to Fedora 40, and Skype has evidently moved from an installable RPM to a snap package. Which didn’t work with the firewall rules we built earlier in the year (video and audio calls would not connect); and, worse, nothing logs out. Looks like the netfilter kernel logging isn’t enabled
Enabled the logging:
echo 1 | sudo tee /proc/sys/net/netfilter/nf_log_all_netns
And, voila, we’ve got log records from nftables. And now Skype works … so I don’t know what to add. Sigh!
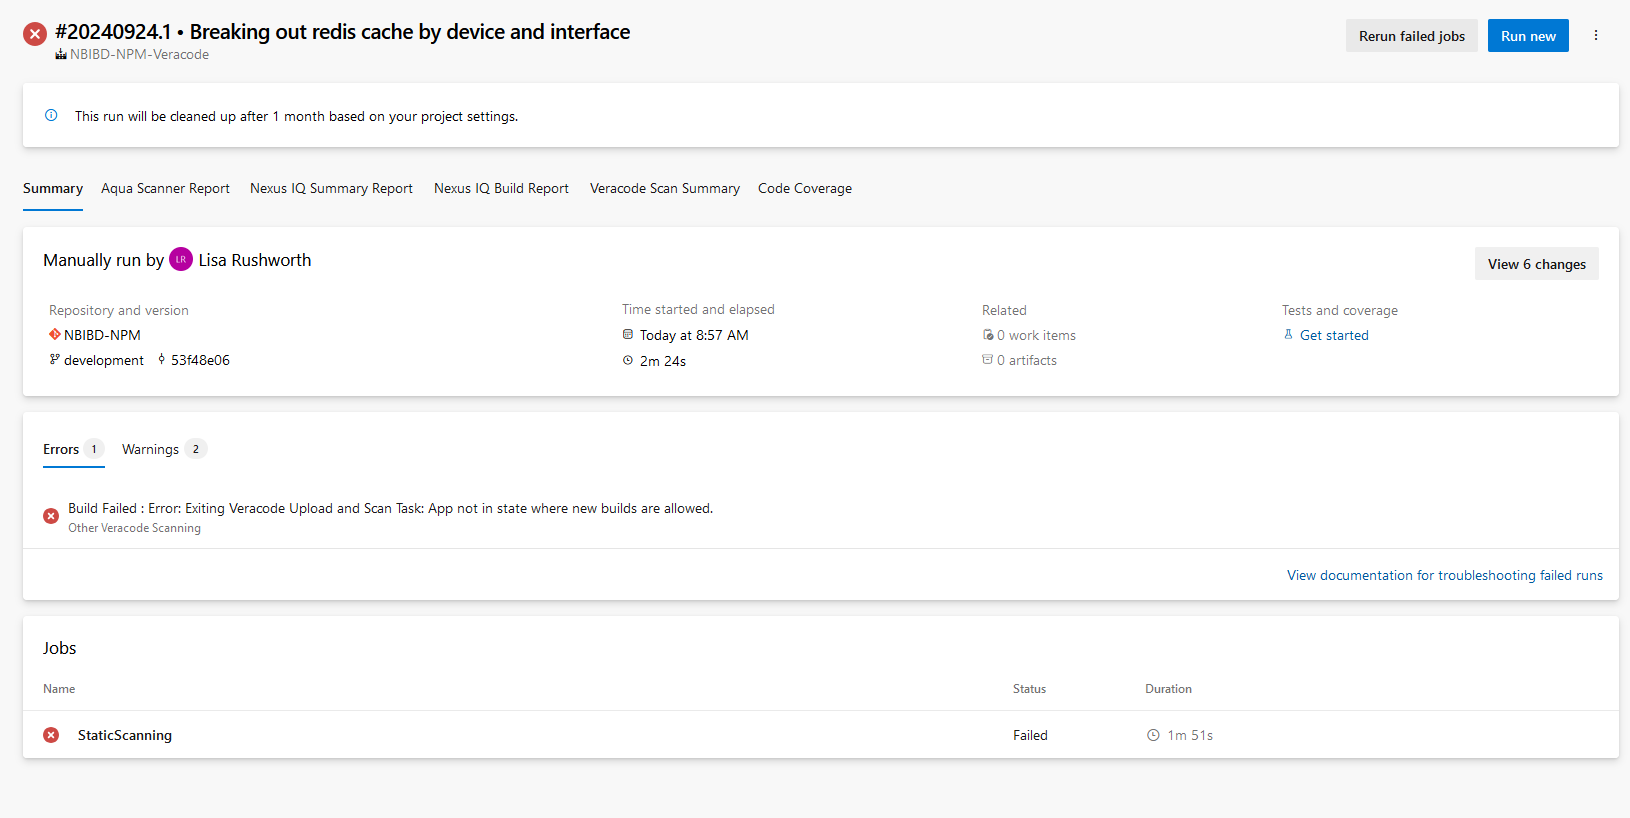
Azure DevOps Pipeline Error – Veracode Scan Fails
Pipeline Error:
Build Failed: Error: Exiting Veracode Upload and Scan Task: App not in state where new builds are allowed.

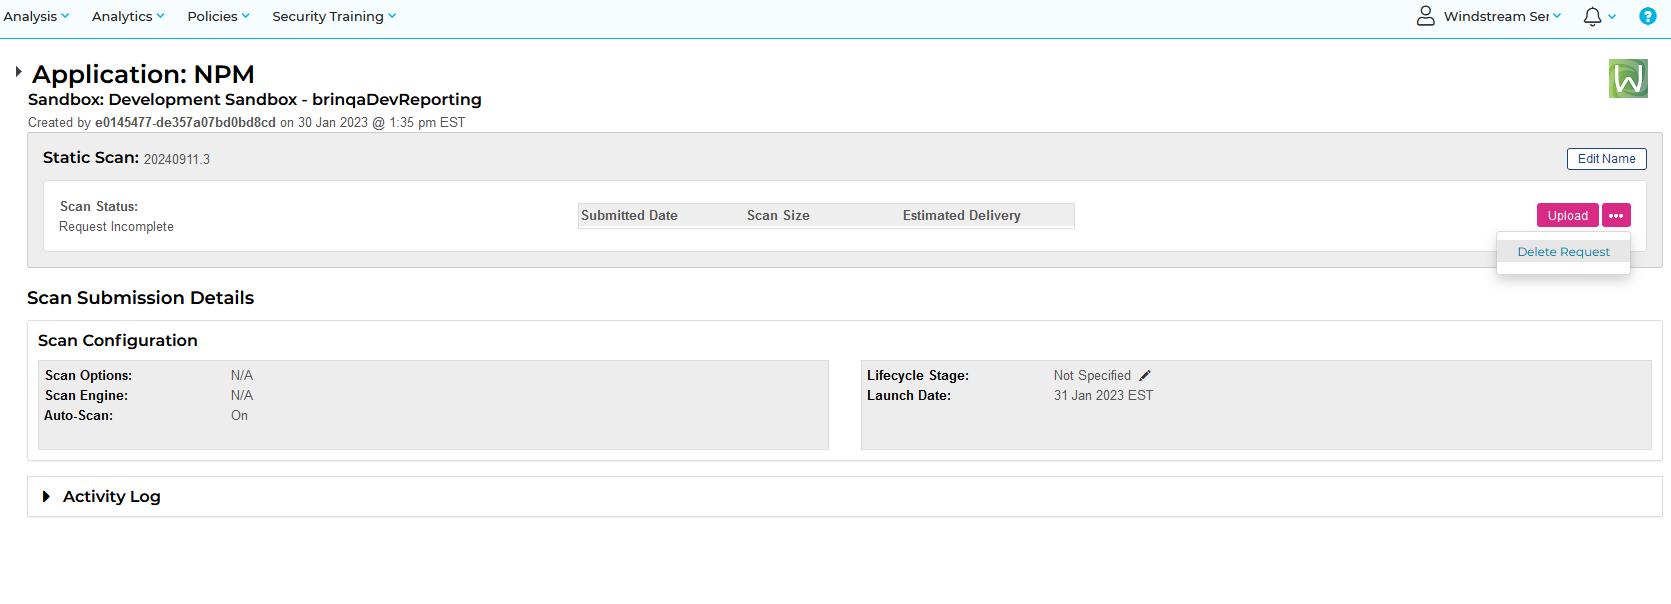
Resolution: There’s a scan in Veracode that never completed. Log into the web UI and delete it!
View the scans in the sandbox. Select the one that says “Request Incomplete”

Use the ellipsis button to select “Delete Request”

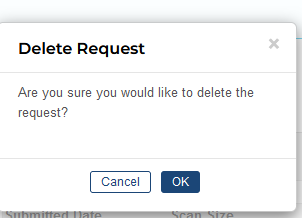
Confirm deletion.

Voila – now you can re-run the pipeline and the scan will proceed.

Kafka Streams, Consumer Groups, and Stickiness
The Java application I recently inherited had a lot of … quirks. One of the strangest was that it calculated throughput statistics based on ‘start’ values in a cache that was only refreshed every four hours. So at a minute past the data refresh, the throughput is averaged out over that minute. At three hours and fifty nine minutes past the data refresh, the throughput is averaged out over three hours and fifty nine minutes. In the process of correcting this (reading directly from the cached data rather than using an in-memory copy of the cached data), I noticed that the running application paused a lot as the Kafka group was re-balanced.
Which is especially odd because I’ve got a stable number of clients in each consumer group. But pods restart occasionally, and there was nothing done to attempt to stabilize partition assignment.
Which was odd because Kafka has had mechanisms to reduce re-balancing — StickyAssignor added in 0.11
        // Set the partition assignment strategy to StickyAssignor
        config.put(ConsumerConfig.PARTITION_ASSIGNMENT_STRATEGY_CONFIG, "org.apache.kafka.clients.consumer.StickyAssignor");
And groupInstanceId in 2.3.0
        // Set the group instance ID
        String groupInstanceId = UUID.randomUUID().toString();
        config.put(ConsumerConfig.GROUP_INSTANCE_ID_CONFIG, groupInstanceId);
Now, I’m certain that a UUID isn’t the best way to go about crafting your group instance ID name … but it produces a “name” that isn’t likely to be duplicated. Since deploying this change, I went from seeing three or four re-balance operations an hour to zero.
Kafka Streams Group Members and Topic Partitions
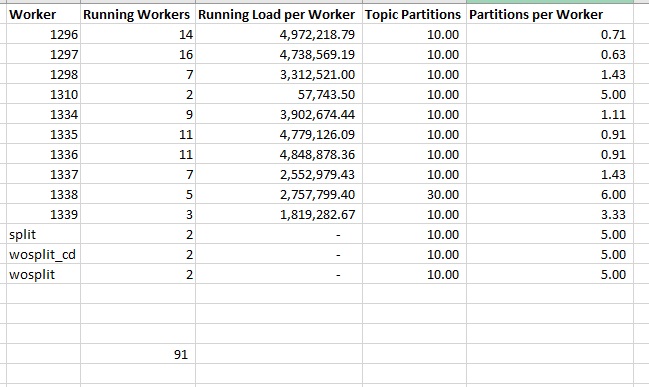
I encountered an oddity in a Java application that uses Kafka Streams to implement a scalable application that reads data from Kafka topics. Data is broken out into multiple topics, and there are Kubernetes pods (“workers”) reading from each topic. The pods have different numbers of replicas defined. But it appears that no one ever aligned the topic partitions with the number of workers being deployed.
Kafka Streams assigns “work” to group members by partition. If you have ten partitions and five workers, each worker processes the data from two partitions. However, when the numbers don’t line up … some workers get more partitions than others. Were you to have eleven partitions and five workers, four workers would get data from two partitions and the fifth worker gets data from three.
Worse – in some cases we have more workers than partitions. Those extra workers are using up some resources, but they’re not actually processing data.

It’s a quick fix — partitions can be added mostly invisibly (the consumer group will be re-balanced, write operations won’t really change. New data just starts getting placed in the new partitions), so I increased our partition counts to be 2x the number of workers. This allows us to add a few workers to a topic if it gets backlogged, but the configuration evenly distributes the work across all of the normally running pods.
Springfield
Governor DeWine had an editorial in the NY Times this morning — https://www.nytimes.com/2024/09/20/opinion/springfield-haitian-migrants-ohio.html — he starts out OK. Essentially I’ve got a history in that area, I know the area, and I know this nonsense to be untrue. But then he says he still supports Trump because of the horrible problems with immigration elsewhere.
Without mentioning that a bipartisan attempt to do something got scuttled by the very guy I am telling you will fix it.
Worse – without thinking maybe some of those reports are made up or embellished like this situation has been? If I know first-hand what is going on in Springfield, and I know that Trump’s portrayal of it is wildly inaccurate? Why wouldn’t I question how accurate his depiction of Colorado or even the Mexican border is?!?
They just let you steal!
This is another case of simplifying a complex situation to make someone look bad: Cali lets you walk right out if you are stealing $950 or less. And ignoring the real problem (if you want to have all of these crimes investigated and prosecuted, your local/state taxes need to go up so departments can staff accordingly and enough jails can be built to house all of these criminals).
Every state has a law that differentiates between misdemeanor theft and felony theft. e.g. https://law.justia.com/codes/arkansas/title-5/subtitle-4/chapter-36/subchapter-1/section-5-36-103/ for Arkansas at $1000. I think most people would agree that someone who steals ten dollars worth of merchandise and someone who steals three grand worth of merchandise should get different punishments. Punishments are generally defined along with the classification of the crime. And each state’s law reflects this. Different states have different dollar amounts — and $950 sounds like a lot of money. But compared to the other states? California’s demarcation is pretty middle of the pack.
Unfortunately the entire criminal justice system is overloaded. Police may be too busy to deal with your theft complaint. The prosecutor may not get around to filing charges. And what happens if they do get a conviction? Now we need to find somewhere to detain the thief. And, again, if there’s a person stealing cars, a person kidnapping minors, and a person stealing the latest video game … ideally, we’d have resources to punish all of them. But we don’t. And I’d be way more upset if the kidnapper skated because they had a task force down at the GameStop gathering video from all the surrounding stores to track down this thief.
Prop 47 absolutely has some flaws. There’s a Prop 36 this year that seems like an attempt to fix some of the unintended consequences — two or more theft charges under $950 would be a felony. Stealing from multiple places that add up to over $950 would be a felony. Won’t know if that passes until November, but it’s not like all the liberals are dancing around saying this was 100% perfect and everyone else should do it too.
Alabama: $500
Alaska: $750
Arizona: $1,000
Arkansas: $1,000
California: $950
Colorado: $2,000
Connecticut: $2,000
Delaware: $1,500
Florida: $750
Georgia: $1,500
Hawaii: $750
Idaho: $1,000
Illinois: $500
Indiana: $750
Iowa: $300
Kansas: $1,500
Kentucky: $1,000
Louisiana: $1,000
Maine: $1,000
Maryland: $1,500
Massachusetts: $1,200
Michigan: $1,000
Minnesota: $1,000
Mississippi: $1,000
Missouri: $750
Montana: $1,500
Nebraska: $1,500
Nevada: $1,200
New Hampshire: $1,000
New Jersey: $200
New Mexico: $500
New York: $1,000
North Carolina: $1,000
North Dakota: $1,000
Ohio: $1,000
Oklahoma: $1,000
Oregon: $1,000
Pennsylvania: $2,000
Rhode Island: $1,500
South Carolina: $2,000
South Dakota: $1,000
Tennessee: $1,000
Texas: $2,500
Utah: $1,500
Vermont: $900
Virginia: $1,000
Washington: $750
West Virginia: $1,000
Wisconsin: $2,500
Wyoming: $1,000
PostgreSQL 12 — Cascading Replication
I’ve got replicated PostgreSQL database pairs that each have some 50TB of data. The server operating systems need to be upgraded, but there is a constraint: no in-place upgrades. I don’t get to veto that constraint (i.e. the fact that we could just cross our fingers and upgrade a replica … and, if it fails, built new and pull the data again doesn’t matter). Unfortunately, trying to add a second replica delays the existing replication. Since all write operations to to the RW server and reads to to the read-only replica … having the read-only copy a day or two out of sync whilst this secondary replica comes online is a non-starter.
Fortunately, you can cascade replication — seed the new replica from the current read-only replica. Create a new replication slot — here new-pg-ro-replica-pgdata. You need to verify the new server is in the pg_hba.conf file to authenticate with the replication account.
pg_basebackup -h pg-ro-replica.example.net -D /pgdata -U replicatorID -v -P --wal-method=stream --slot=new-pg-ro-replica-pgdata
Wait … wait … wait. It’ll finish eventually. Then tweak your recovery.conf
standby_mode = 'on'
primary_conninfo = 'host=pg-rw-replica.example.net port=5432 user=replicatorID password=your_password' sslmode=require
primary_slot_name = 'new-pg-ro-replica-pgdata'
And
touch /pgdata/standby.signal
Finally, start the server
pg_ctl start -D /pgdata
Voila — a second read-only replica. Now they can decom the old server.
