Tag: automation

Python Script: Checking Certificate Expiry Dates

A long time ago, before the company I work for paid for an external SSL certificate management platform that does nice things like clue you into the fact your cert is expiring tomorrow night, we had an outage due to an expired certificate. One. I put together a perl script that parsed output from the openssl client and proactively alerted us of any pending expiration events.

That script went away quite some time ago — although I still have a copy running at home that ensures our SMTP and web server certs are current. This morning, though, our K8s environment fell over due to expired certificates. Digging into it, the certs are in the management platform (my first guess was self-signed certificates that wouldn’t have been included in the pending expiry notices) but were not delivered to those of us who actually manage the servers. Luckily it was our dev k8s environment and we now know the prod one will be expiring in a week or so. But I figured it was a good impetus to resurrect the old script. Unfortunately, none of the modules I used for date calculation were installed on our script server. Seemed like a hint that I should rewrite the script in Python. So … here is a quick Python script that gets certificates from hosts and calculates how long until the certificate expires. Add on a “if” statement and a notification function, and we shouldn’t come in to failed environments needing certificate renewals.

from cryptography import x509
from cryptography.hazmat.backends import default_backend
import socket
import ssl
from datetime import datetime, timedelta

# Dictionary of hosts:port combinations to check for expiry
dictHostsToCheck = {
"tableau.example.com": 443       # Tableau 
,"kibana.example.com": 5601      # ELK Kibana
,"elkmaster.example.com": 9200   # ELK Master
,"kafka.example.com": 9093       # Kafka server
}
for strHostName in dictHostsToCheck:
    iPort = dictHostsToCheck[strHostName]

    datetimeNow = datetime.utcnow()

    # create default context
    context = ssl.create_default_context()

    # Do not verify cert chain or hostname so we ensure we always check the certificate
    context.check_hostname = False
    context.verify_mode = ssl.CERT_NONE

    with socket.create_connection((strHostName, iPort)) as sock:
        with context.wrap_socket(sock, server_hostname=strHostName) as ssock:
            objDERCert = ssock.getpeercert(True)
            objPEMCert = ssl.DER_cert_to_PEM_cert(objDERCert)
            objCertificate = x509.load_pem_x509_certificate(str.encode(objPEMCert),backend=default_backend())

            print(f"{strHostName}\t{iPort}\t{objCertificate.not_valid_after}\t{(objCertificate.not_valid_after - datetimeNow).days} days")


Reporting Last Patch Dates on Fedora / RedHat / CentOS Systems

I needed to verify the last time a bunch of servers were patched — basically to ensure compliance with the stated quarterly patching interval. This python script pulls the list of installed packages and the date for each package, sorts the info by date DESC, and then reports the latest date on any packages — as well as the number of packages updated on that date. If there’s only one … the system still might bear some investigation. But if a couple of dozen packages were updated in the past quarter … we don’t need to be too worried about turning up on the out-of-compliance report.

import subprocess
import re
import datetime
from collections import OrderedDict

def getFirstElement(odictInput):
    '''
        This function returns the first element from an ordered collection (an arbitrary element if an unordered collection is passed in)
        Input -- odictInput -- ordered collection
        Output -- type varies -- first element of ordered collection, arbitrary element of unordered collection

    '''
    return next(iter(odictInput))

listHosts = ['host01.example.com', 'host02.example.com', 'host03.example.com','host04.example.com','host05.example.com']

for strHost in listHosts:
        dictPatchDates = {}

        objResults = subprocess.Popen(['ssh', strHost, 'rpm', '-qa', '--last'],stdout=subprocess.PIPE)
        for strLine in objResults.stdout:
                strPackageInfo  = strLine.decode('utf-8').rstrip()
                listPackageInfo = re.split(r'\s*([a-zA-Z]{3,}\s[0-9]{2,}\s[a-zA-Z]{3,}\s[0-9]{2,})',strPackageInfo)
                strUpdateDate = listPackageInfo[1]
                dateUpdateDate = datetime.datetime.strptime(strUpdateDate, "%a %d %b %Y").date()
                if dictPatchDates.get(dateUpdateDate) is not None:
                        dictPatchDates[dateUpdateDate] = dictPatchDates[dateUpdateDate] + 1
                else:
                        dictPatchDates[dateUpdateDate] = 1

        dictOrderedPatchDates = OrderedDict(sorted(dictPatchDates.items(), key=lambda t: t[0],reverse=True))
        dateLatestPatch = getFirstElement(dictOrderedPatchDates)
        print(f"{strHost}\t{dateLatestPatch}\t{dictOrderedPatchDates[dateLatestPatch]}")

Simplified Outage Reporting

We’ve lost power the past few days — I think that’s because the forestry crew is clearing a few trees that are down on the power lines, but I don’t know so we report the outage. First Energy has a really cool way of reporting outages — you use SMS to register your phone with your account. Once the phone is registered to an account, you can text “OUT” to their short code. There’s a short code to register for outage notifications, status alerts. So when the power went out today, it took about three seconds to report the outage. No walking through the IVR to report the outage online. I hope to see more companies doing this in the future.

Jenkins: Creating A Build Pipeline

Prerequisites:

You will need the “Git” plugin (https://plugins.jenkins.io/git).

You will need the “GitHub” plugin (https://plugins.jenkins.io/github)

Setting Up Access Within GitHub:

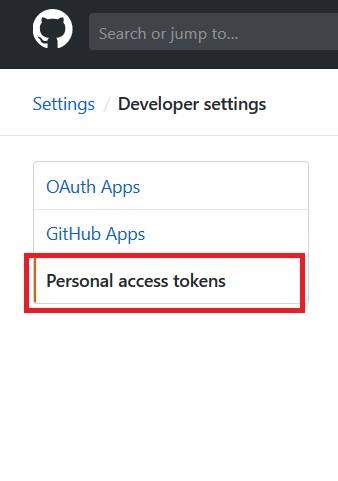
Log into GitHub and navigate to your repository. Click the “Settings” tab, then select “Developer settings” from the bottom of the left-hand menu. From the Developer Settings page, select “Personal access tokens”.

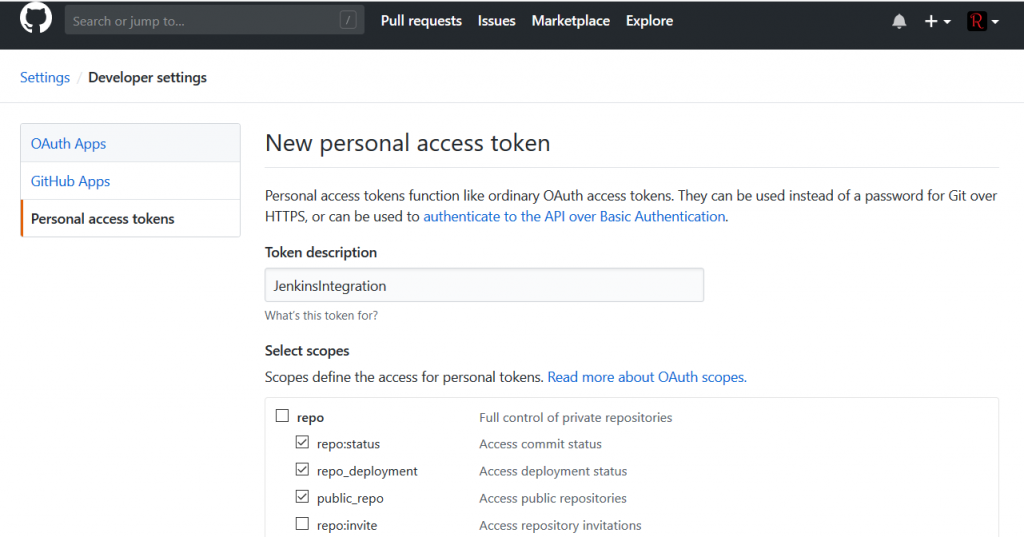
Click “Generate new token” to add a token for your Jenkins integration.

Provide a description for the token and select permissions – read access to the repo is sufficient.

Save the token and copy the secret text.

Setting Up Jenkins – Configuring GitHub Integration

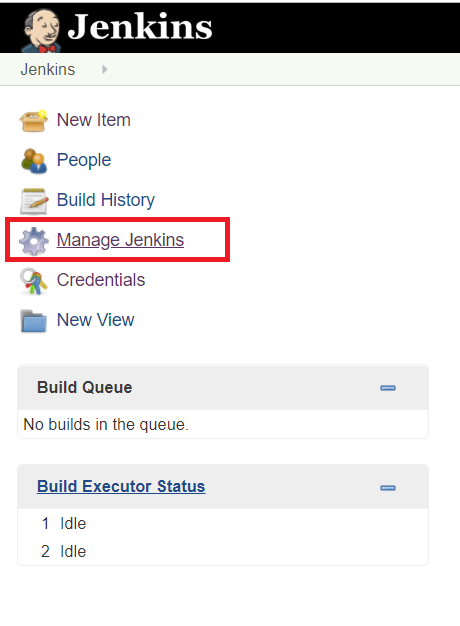
On your Jenkins server, select “Manage Jenkins”

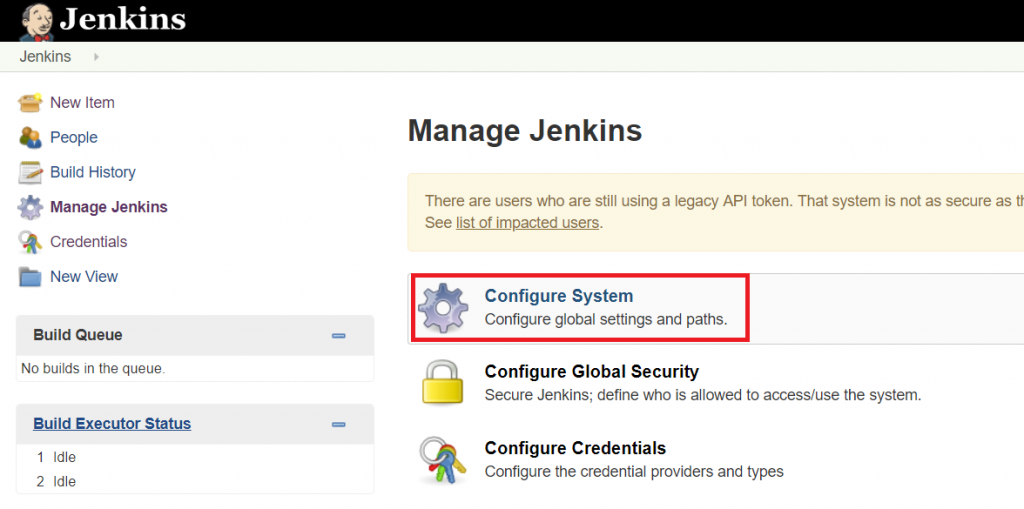
Select “Configure System”

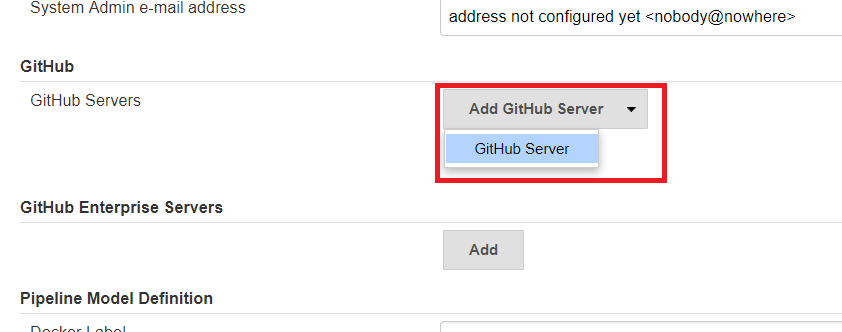
Scroll down – possibly a lot – to the GitHub section. Click on the “Add GitHub Server” drop-down and select “GitHub Server”

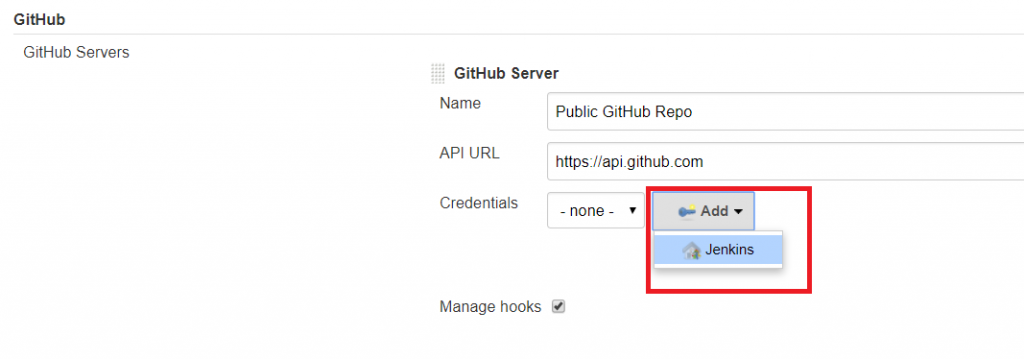
Provide a name, the API URL is pre-populated. Next to Credentials, click the drop-down for “Add” and select “Jenkins”.

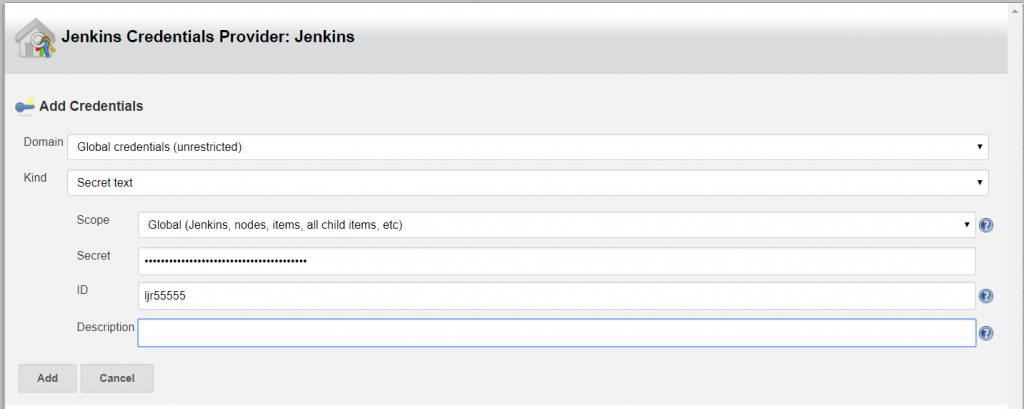
The credential kind is “Secret text”, and “ID” is your GitHub user ID. Save the credential

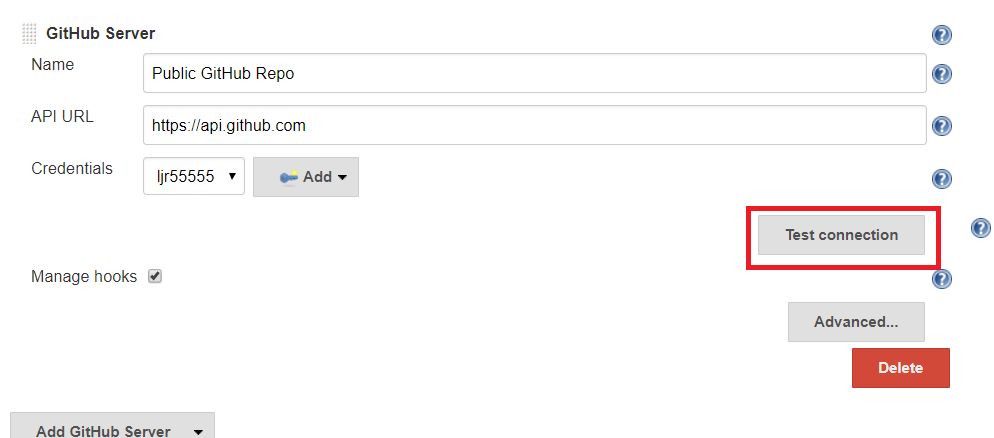
Select cred from drop-down and test

Hopefully the credentials are verified, you are done.

Using Jenkins – Creating A Basic Pipeline:

Click on “New Item”, create a new Freestyle project, and give it a descriptive name.

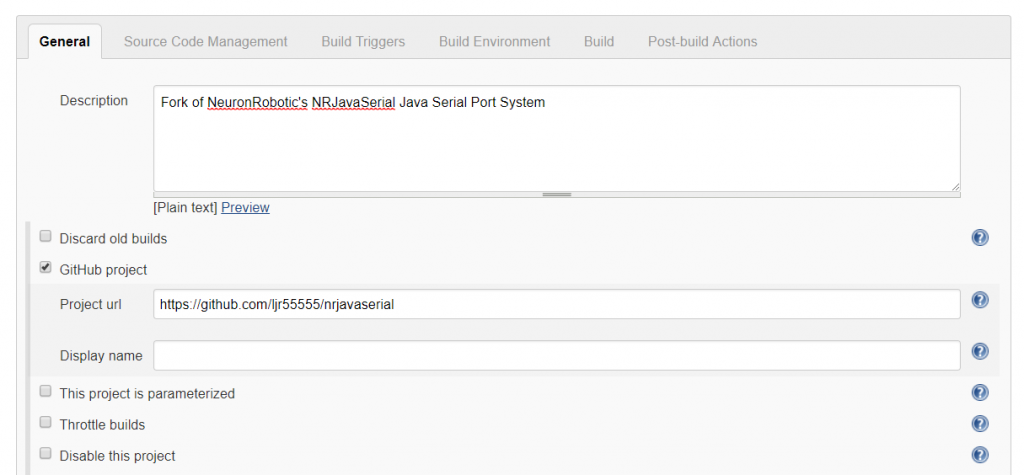
Since this is a GitHub project, I’m adding the project URL – that’s the actual project URL, not the URL for a specific branch or the path to clone the project.

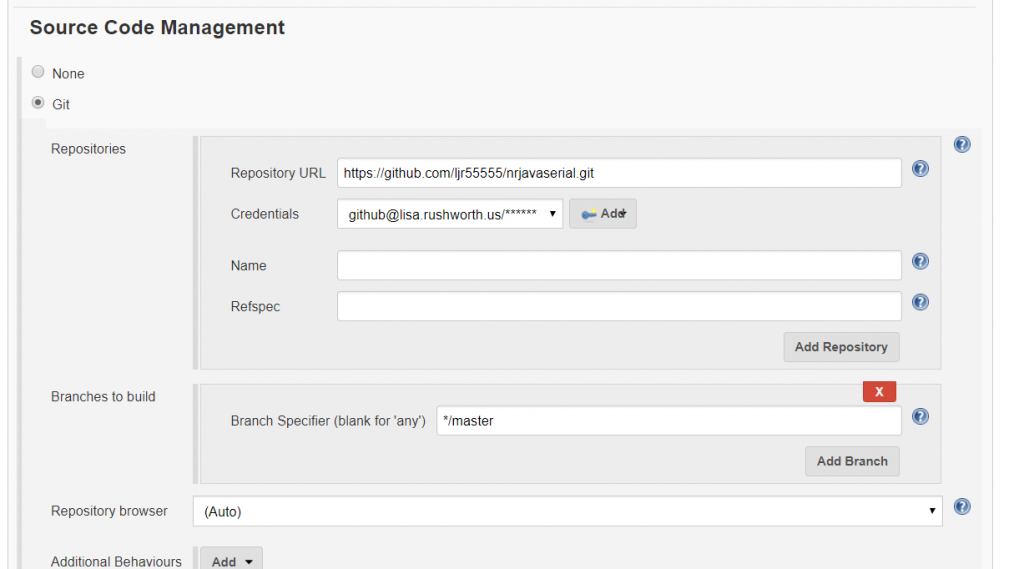
As you scroll down, the tab will change to “Source Code Management”. Select “Git” and enter the URL used to clone the repository. If you have not already added credentials, click “Add”; otherwise select the appropriate credential from the drop-down menu. If you intend to build a branch other than master, correct the branch name.

Build triggers will depend on what exactly you want to happen. You can trigger new builds based on PRs or push activity. You can schedule a nightly build.

If there are a lot of changes, you may not wish to re-build the project every single time the repo changes. Conversely if the repo rarely changes, nightly builds waste a lot of cycles), etc.

Using the hook trigger requires that your Jenkins server be Internet-accessible and as such has a non-zero risk of malicious access. You can expose your endpoint through a reverse proxy to have more control over service access. I have also experimented with using GitHub provided metadata, https://api.github.com/meta, to restrict access to certain subnets. A potential attacker could still proxy their access by attempting to register your Jenkins endpoint in their GitHub project … but that’s a narrower attack vector than “anyone who can make a web call”.

If you want to trigger builds based on changes within the GitHub project, you can configure Jenkins to automatically register webhooks or you can manually add the webhook to your project.

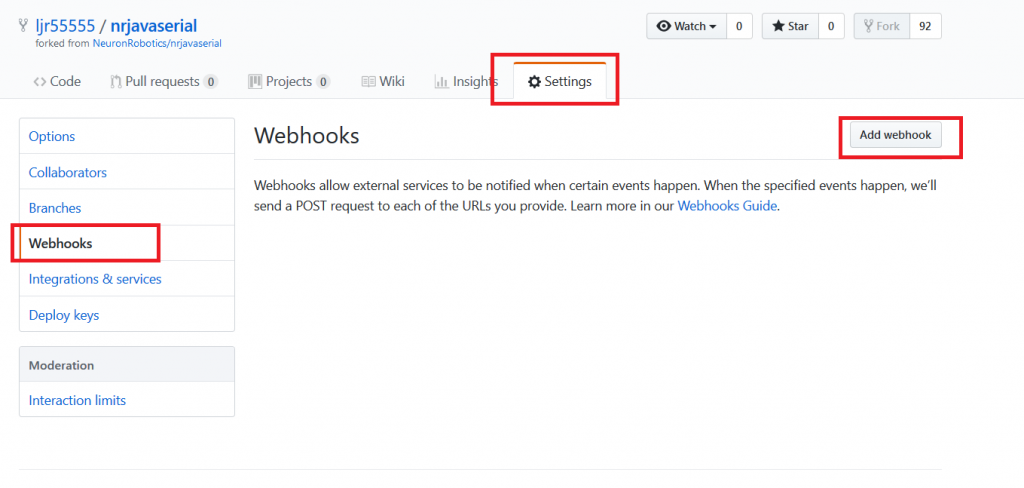
Manual Webhook creation: Within your project’s “Settings” tab, select “Webhooks” and then “Add webhook”.

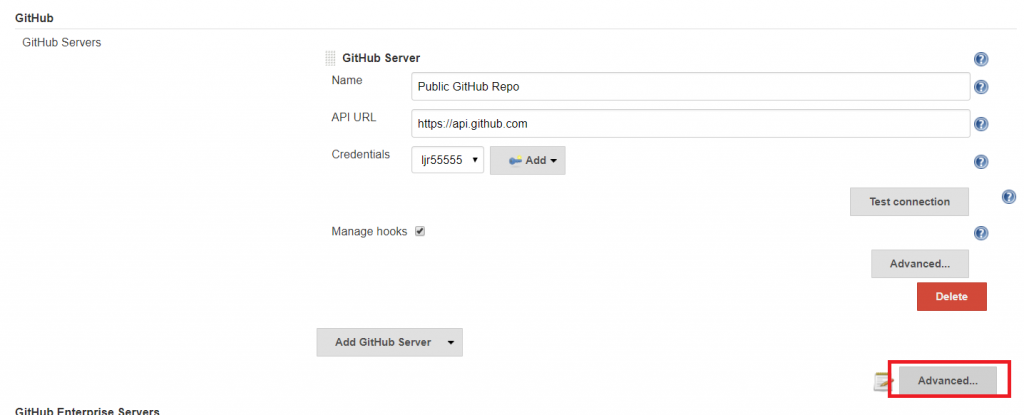
Automatic Webhook creation: Manage Jenkins => Configure System. In the GitHub section, click the second “Advanced” button (with a notepad next to it).

Click the “Additional Actions” drop-down menu and select “Convert login and password to token”

Enter your credentials and click “Create token credentials”

A message will be displayed confirming the credential.

In this case, I will schedule a nightly build of the project. After selecting “Build periodically”, enter the cron-like expression to control when you want builds to occur. To avoid having a lot of project builds initiated at quarter-hour marks, use the modifier “H” to indicate a time range. In this example, the build will be triggered some time between 02:00 and 04:59. Since the value of H is a hash of the job name, the build time will be consistent (i.e. the time displayed below the schedule field will be the time used each cycle). This means it is still possible to have a number of builds scheduled simultaneously.

Time, by default, is relative to your Jenkins’ server JVM configuration. You can override that setting by adding a TZ directive at the beginning of the schedule field.

There are a number of pre-build and post-build actions you can take, and various add-on modules expand this functionality. You can manage builds, Docker containerization, and deployment into Kubernetes clusters from Jenkins build pipelines.

Once the job has been saved, you can run it immediately by returning to the dashboard. Click the little clock to the right of the item listing.

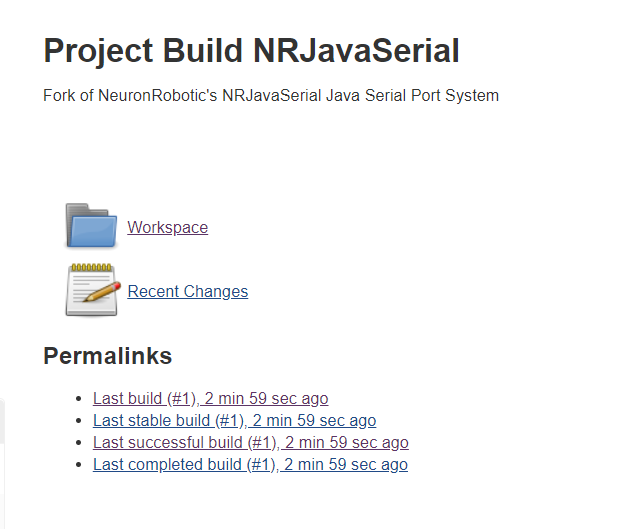
Once a build has been completed, the item’s workspace will contain the build and console output from the build job. If a job fails, console output is a good point to start troubleshooting.

What, me worry?

Steven Mnuchin, one of Trump’s best people, is not worried about mass worker displacement due to automation. Said so at an event hosted by Axios. I’d love some of whatever he’s been toking.

In the near term (and evidently that’s all business execs or government types care about these days), sure automation and AI will drastically increase profitability. But I foresee the trend following a similar path as off shoring … great for individual businesses, but at some point capitalism mandates people have some money to buy the stuff and neither offshoring or wide-scale automation is sustainable. Offshoring at least provided alternate jobs for enough people to float enough debt to sustain the market near-term. We’ve got “knowledge workers”. But what percentage of those can be turned into AI programs? A significant number. I automate 80% of IT work. Chat bots could provide at least half of legal and medical consultations — the routine stuff. Robots make products, load the truck/train/drone that drives itself. Right to your door, or even inside if you have the Amazon lock. There aren’t a lot of jobs where some portion couldn’t be automated today. And budget cuts and productivity demands essentially require it. Some lucky few own doomed companies and profit for some time, another really lucky few are AI programmers and electronics engineers (although self-building AI/robots are totally a thing too). Maybe automation will beget a whole new industry that will provide good jobs for billions of people. Maybe the capitalist system will collapse and everyone will have more than they need (the Star Trek series, I guess). But I don’t know that I wouldn’t worry about the impact automation has on employment and the economy.

Active Directory Federation Services (ADFS) Relying Party Trust Cert Expiry

At work, we received a critical ticket for an application that was unable to authenticate to ADFS. Nothing globally wrong – other applications are authenticating. A long call later, we discovered that the app’s certificate has expired. Why would the application not monitor their certificate expiry dates?? That’s an excellent question, but not one over which I have any control.

can monitor their certs on our side. So I wrote a quick powershell script to grab certificates from the relying party trusts and alerts us if any certs will be expiring in the next 30 days. It has to run on the ADFS server – I’d love to get it moved to the automation server in the future. I expect get-adfsrelyingpartytrust returns disabled agreements. I want to filter out disabled agreements.

Bulk LDAP Operations

LDIF – Directory Import and Export using LDIFDE.EXE and LDAPMODIFY


You can obtain ldifde.exe from any existing domain controller – copy \\dcname\c$\winnt\system32\ldifde.exe  to your SYSTEM32 folder. The ldapmodify command is part of the openldap-clients package on Linux. Windows builds of the openldap clients are available. The data being imported is essentially the same, just the command line to invoke the program differs.

Using LDIF files to update LDAP data is facilitated if you know the directory schema attributes, especially those associated to the user object class.  Active Directory schema is well documented on MSDN – base Active Directory schema can be found at http://msdn.microsoft.com/library/default.asp?url=/library/en-us/adschema/adschema/active_directory_schema_site.asp and the extensions made by Exchange are documented at http://msdn.microsoft.com/library/default.asp?url=/library/en-us/wss/wss/wss_ldf_AD_Schema_intro.asp

LDIFDE is a command line program which runs with currently logged on user’s credentials – this means that your ID can write changes to AD using LDIFDE.  Please do not play with this program in the production Active Directory domain but rather test writing to a test domain.


LDIF Export

Exporting directory information is fairly straight forward:


ldifde –f filename.txt –d “ou=base,DC=windstream,DC=com” –p subtree –r “(&(attribute=value)(otherattribute=othervalue))” –s domaincontroller.windstream.com –l “attribute1, attribute2, attribute3 …”


-f File to contain exported data
-d Search base
-p Search scope
-r RFC-2254 compliant filter
-s Domain controller from which to obtain data
-l Attributes to be returned (eliding this command will return values for all attributes)


This will create a file named ljlexport.txt of all e####### users with email addresses whose accounts are located under WINDSTREAM.COM\WINDSTREAM\IT.  The file will contain, for each user, their logon ID (sAMAccountName), email address (mail), account status (userAccountControl), display name, and telephone number.

ldifde –f ljlexport.txt –d “ou=IT,ou=windstream,DC=windstream,DC=com” –r “(&(sAMAccountName=e*)(mail=*))” –s neohtwnnt836.windstream.com –l “sAMAccountName, mail, userAccountControl, displayName, telephoneNumber”


-r specifies the search filter and can become a rather complex query depending on what you are looking for — & is an AND filter, | is an OR filter.  ! can be used to find unmatched values and * works as a wildcard

“(&(mail=*)(!sAMAccountName=n99*))”        find all mail enabled accounts which are not N99’s for instance.

“(&(sAMAccountName=e0*)(!(employeeID=*)))”      Find all employee accounts with no employee ID specified

“(&(mail=*)(|(sAMAccountName=n99*)(sAMAccountName=g99*)))”            mail enabled accounts which are either n99’s or g99’s

“(&(objectClass=user)(objectCategory=person))”        Real user accounts, objectClass=user alone will return a lot of things you don’t believe are users J

“(&(objectClass=user)(objectCategory=person)(telephoneNumber=813*))”     Real user accounts with phone numbers in the 813 area code

“(&(objectClass=user)(objectCategory=person)(msExchHomeServerName=*SCARLITNT841))”       Real user with mailboxes on SCARLITNT841


-d specifies the search base (subtree search by default) – you can use “DC=windstream,DC=com” to get the entire directory or something like “ou=Central,ou=windstream,DC=windstream,DC=com” to just get users within the Central OU.


LDIF Import

Importing Directory Information is not so straight forward and again do not play with this program in the production Active Directory domain.  You need to create an ldif import file to make changes to objects.  A sample file content:

dn: cn=Landers\, Lisa,ou=GPOTest,ou=IT,ou=windstream,dc=windstreamtest,dc=com
changetype: modify
add: proxyAddresses
proxyAddresses: smtp:lisa@newtestdomain.windstream.com
-
replace: telephoneNumber
telephoneNumber: 501-905-4305
-
delete: mobile
mobile: 501-607-3750
-
delete: facsimileTelephoneNumber
-
 
dn: cn=Ahrend\, Sam,ou=IT,ou=windstream,dc=windstreamtest,dc=com
changetype: modify
replace: mDBUseDefaults
mDBUseDefaults: FALSE
-
replace: mDBStorageQuota
mDBStorageQuota: 190000
-
replace: mDBOverQuotaLimit
mDBOverQuotaLimit: 200000
-

Provided you have an import file, the syntax of the command is ldifde –i –v –k –y –f filename.txt  


-i LDIFDE import operation
-v Produce verbose output
-k Ignore constraint violations (and entry exists errors on add)
-y Lazy commit
-f File name to be imported


Changetype Add

A changetype of add is used when the entire object does not currently exist – this ldap operation creates a new object with the attributes specified in the stanza.


dn: cn=TestingGroup 10001,ou=testing,ou=it,DC=windstream,DC=com
changetype: add
cn: TestingGroup 10001
distinguishedName: cn= TestingGroup 10001,ou=testing,ou=it,DC=windstream,DC=com
name: TestingGroup10001
sAMAccountName: TestingGroup10001
objectClass: group
objectCategory: CN=Group,CN=Schema,CN=Configuration,DC=windstream,DC=com
groupType: -2147483646
managedBy: cn=Landers\, Lisa,OU=GPOTest,ou=IT,OU=WINDSTREAM,DC=windstream,DC=com
member: cn=Landers\, Lisa,OU=GPOTest,ou=IT,OU=WINDSTREAM,DC=windstream,DC=com
member: cn=Ahrend\, Sam, ou=IT,OU=WINDSTREAM,DC=windstream,DC=com
legacyExchangeDN: /o=WINDSTREAMEXCH/ou=First Administrative Group/cn=Recipients/cn=TestingGroup10001
mailNickname: TestingGroup10001
reportToOriginator: TRUE


This example will create an e-mail enabled global security group named “TestingGroup 10001” under windstream.com – it – testing.  Both Sam and I will be listed as members of  the group and I will be listed as the group owner.  Add operations can be chained together with just a blank line between them should you need to add multiple objects in batch.


Any mandatory attributes for the schema classes need to be included (handled by ldifde works too) or the add operation will fail.  Attributes not valid for the object classes will cause the operation to fail as well.  If an object already exists, no change will be made even if some of the attributes specified differ from the values within AD.


Changetype Delete

Delete is used to delete the entire object – so be extra careful here.  The syntax is quite simple – the DN of the object to be removed and a line that says “changetype: delete”.  Again, multiple operations can be chained together with just a blank line.


dn: cn=TestingGroup 10002,ou=testing,ou=it,DC=windstream,DC=com
changetype: delete
 
dn: cn=TestingGroup 10003,ou=testing,ou=it,DC=windstream,DC=com
changetype: delete
 
dn: cn=TestingGroup 10004,ou=testing,ou=it,DC=windstream,DC=com
changetype: delete
 
dn: cn=TestingGroup 10005,ou=testing,ou=it,DC=windstream,DC=com
changetype: delete
 

Changetype Modify

Modify is used to change attributes on an existing object.  Modify can be used to add, replace, or delete an attribute.  The example above has two different stanza’s (separated by a blank line).  Within each stanza several operations are made:


First to add another email address to the secondary email addresses.  For a multi-value attribute (member, proxyAddresses …) changetype: modify\nadd: attribute adds another value to the attribute.  For single-valued attributes modify/add will fail if a value is present.

dn: cn=Landers\, Lisa,ou=GPOTest,ou=IT,ou=windstream,DC=windstream,DC=com
changetype: modify
add: proxyAddresses
proxyAddresses: smtp:lisa@newtestdomain.windstream.com
-

The next operation replaces the telephone number with the value specified – this will overwrite the existing value.  Be careful not to replace multi-value attributes

replace: telephoneNumber
telephoneNumber: 501-905-4305
-

The next operation deletes the mobile phone number with the value specified – if the value does not match, a change is not made.  This can be used as a failsafe, in this case only delete my mobile telephone number if the value is what I expect it to be, or to remove entries from multi-value attributes.  Delete the member of the group which is the specific member listed without changing the other group members, for instance.

delete: mobile
mobile: 501-607-3750
-

The next operation deletes the fax number – regardless of content the value is removed.

delete: facsimileTelephoneNumber
-

A blank line separates the two stanzas and a new object is specified.  Again the modify/replace option is used which will change the attributes to the values specified.

dn: cn=Ahrend\, Sam,ou=IT,ou=windstream,DC=windstream,DC=com
changetype: modify
replace: mDBUseDefaults
mDBUseDefaults: FALSE
-
replace: mDBStorageQuota
mDBStorageQuota: 190000
-
replace: mDBOverQuotaLimit
mDBOverQuotaLimit: 200000
-
 
dn: cn=Landers\, Lisa,ou=IT,ou=windstream,DC=windstream,DC=com
changetype: modify
replace: mDBUseDefaults
mDBUseDefaults: TRUE
-

Changetype ModDN
ModDN changes the object’s distinguishedName.  This is interesting as it can be used to move users – this example would move my account into the Central OU under ACI

dn: CN=Landers\, Lisa,OU=GPOTest,OU=IT,OU=WINDSTREAM,,DC=windstream,DC=com
changetype: moddn
newrdn: CN= Landers \, Lisa,OU=Central,OU=WINDSTREAM,DC=windstream,DC=com
deleteoldrdn: 1


ModDN can also be used to rename the object’s display in administrative listings:

dn: CN=Landers\, Lisa,OU=GPOTest,OU=IT,OU=WINDSTREAM,,DC=windstream,DC=com
changetype: moddn
newrdn: CN= Landers\, Jane, OU=GPOTest,OU=IT,OU=WINDSTREAM,,DC=windstream,DC=com
deleteoldrdn: 1

You would of course want to modify/replace at least givenName and displayName on the object dn to avoid confusion – otherwise my middle name would appear in active directory users and computers but my first name in Outlook.  I would modify the attributes first – if you modify the DN first, you need to remember to use the new DN for subsequent attribute value changes.

dn: CN=Landers\, Lisa,OU=GPOTest,OU=IT,OU=WINDSTREAM,,DC=windstream,DC=com
changetype: modify
replace: givenName
givenName: Jane
-
replace: displayName
displayName: Landers, Jane
-
 
dn: CN=Landers\, Lisa,OU=GPOTest,OU=IT,OU=WINDSTREAM,,DC=windstream,DC=com
changetype: moddn
newrdn: CN= Landers\, Jane, OU=GPOTest,OU=IT,OU=WINDSTREAM,,DC=windstream,DC=com
deleteoldrdn: 1
-