Tag: kubernetes

K8s, resolv.conf, and ndots

I had a very strange problem when firewalld was used with nftables as the back end – rules configured properly in firewalld didn’t exist in the nftables rulesets so … didn’t exist. The most obvious failure in the k8s cluster was DNS resolution – requests to any nodes where nftables was the back end just timed out. In diagnosing the “dns queries time out” issue, I was watching the logs from the coredns pods. And I saw a lot of NXDOMAIN errors. Not because I had a hostname mistyped or anything – each pod was appending every domain in the resolv.conf search order before trying the actual hostname.

Quick solution was to update our hostnames to include the trailing dot for the root zone. It is not redishost.example.com but rather redishost.example.com.

But that didn’t explain why – I’ve got plenty of Linux boxes where there are some search domains in resolv.conf. Never once seen redishost.example.com.example.com come across the query log. There is a configuration that I’ve rarely used that is designed to speed up getting to the search list. You can configure ndots – the default is one, but you can set whatever positive integer you would like. Surely, they wouldn’t set ndots to something crazy high … right??

Oh, look –

Defaulted container "kafka-streams-app" out of: kafka-streams-app, filebeat
bash-4.4# cat /etc/resolv.conf
search kstreams.svc.cluster.local svc.cluster.local cluster.local mgmt.example.net dsys.example.net dnoc.example.net admin.example.net example.com
nameserver 10.6.0.5
options ndots:5

Yup, it’s right there in the source — and it’s been there for seven years:

What does this mean? Well, ndots is really just the number of dots in a hostname. If there are fewer than ndots dots, the resolver will try appending the search domains first and then try what you typed as a last resort. With one dot, that basically means a string with no dots will get the search domains appended. I guess if you go out and register a gTLD for your company – my hostname is literally just example. – then you’ll have a little inefficiency as the search domains are tried. But that’s a really edge case. With the k8s default, anything with fewer than five dots gets all of those search domains appended first.

So I need redishost.example.com? I see the following resolutions fail because there is no such hostname:

[INFO] 64.24.29.155:57014 - # "A IN redishost.example.com.svc.cluster.local. udp # false 512" NXDOMAIN qr,aa,rd 158 0.00019419s
[INFO] 64.24.29.155:57028 - # "AAAA IN redishost.example.com.svc.cluster.local. udp # false 512" NXDOMAIN qr,aa,rd 158 0.00019419s
[INFO] 64.24.29.155:56096 - # "A IN redishost.example.com.cluster.local. udp # false 512" NXDOMAIN qr,aa,rd 158 0.00019419s
[INFO] 64.24.29.155:56193 - # "AAAA IN redishost.example.com.cluster.local. udp # false 512" NXDOMAIN qr,aa,rd 158 0.00019419s
[INFO] 64.24.29.155:55001 - # "A IN redishost.example.com.mgmt.example.net. udp # false 512" NXDOMAIN qr,aa,rd 158 0.00019419s
[INFO] 64.24.29.155:55194 - # "AAAA IN redishost.example.com.mgmt.example.net. udp # false 512" NXDOMAIN qr,aa,rd 158 0.00019419s
[INFO] 64.24.29.155:54078 - # "A IN redishost.example.com.dsys.example.net. udp # false 512" NXDOMAIN qr,aa,rd 158 0.00019419s
[INFO] 64.24.29.155:54127 - # "AAAA IN redishost.example.com.dsys.example.net. udp # false 512" NXDOMAIN qr,aa,rd 158 0.00019419s
[INFO] 64.24.29.155:52061 - # "A IN redishost.example.com.dnoc.example.net. udp # false 512" NXDOMAIN qr,aa,rd 158 0.00019419s
[INFO] 64.24.29.155:52182 - # "AAAA IN redishost.example.com.dnoc.example.net. udp # false 512" NXDOMAIN qr,aa,rd 158 0.00019419s
[INFO] 64.24.29.155:51018 - # "A IN redishost.example.com.admin.example.net. udp # false 512" NXDOMAIN qr,aa,rd 158 0.00019419s
[INFO] 64.24.29.155:51104 - # "AAAA IN redishost.example.com.admin.example.net. udp # false 512" NXDOMAIN qr,aa,rd 158 0.00019419s
[INFO] 64.24.29.155:50052 - # "A IN redishost.example.com.example.com. udp # false 512" NXDOMAIN qr,aa,rd 158 0.00019419s
[INFO] 64.24.29.155:50189 - # "AAAA IN redishost.example.com.example.com. udp # false 512" NXDOMAIN qr,aa,rd 158 0.00019419s

Wonderful — IPv6 is enabled and it’s trying AAAA records too. Finally it resolves redishost.example.com!

Luckily, there is a quick solution. Update the deployment YAML to include a custom ndots value – I like 1. I could see where someone might want two – something.else where I need svc.cluster.local appended, maybe I don’t want to waste time looking up something.else … I don’t want to do that. But I could see why something higher than one might be desirable in k8s. Not sure I buy it’s awesome enough to be the default, though!

Redeployed and instantly cut the DNS traffic by about 90% — and reduced application latency as each DNS call no longer has to have fourteen failures before the final success.

Kubernetes / Containerd Image Pull Failure

We are in the process of moving our k8s environment from CentOS 7 to RHEL 8.8 hosts — which means the version of pretty much everything involved is being updated. All of the pods that use images from an internal registry fail to load. At first, we were thinking DNS resolution … but the test pods we spun up all resolved names appropriately.

2023-09-13 13:48:34 [root@k8s ~/]# kubectl describe pod data-sync-app-deployment-78d58f7cd4-4mlsb -n streams
Events:
  Type     Reason            Age                 From               Message
  ----     ------            ----                ----               -------
  Normal   Scheduled         15m                 default-scheduler  Successfully assigned kstreams/data-sync-app-deployment-78d58f7cd4-4mlsb to ltrkarkvm1593-uos
  Normal   Pulled            15m                 kubelet            Container image "docker.elastic.co/beats/filebeat:7.9.1" already present on machine
  Normal   Created           15m                 kubelet            Created container filebeat
  Normal   Started           15m                 kubelet            Started container filebeat
  Normal   BackOff           15m (x3 over 15m)   kubelet            Back-off pulling image "imageregistry.example.net:5000/myapp/app_uat"
  Warning  Failed            15m (x3 over 15m)   kubelet            Error: ImagePullBackOff
  Normal   Pulling           14m (x3 over 15m)   kubelet            Pulling image "imageregistry.example.net:5000/myapp/app_uat"
  Warning  Failed            14m (x3 over 15m)   kubelet            Failed to pull image "imageregistry.example.net:5000/myapp/app_uat": rpc error: code = Unknown desc = failed to pull and unpack image "imageregistry.example.net:5000/myapp/app_uat:latest": failed to resolve reference "imageregistry.example.net:5000/npm/app_uat:latest": get registry endpoints: parse endpoint url: parse " http://imageregistry.example.net:5000": first path segment in URL cannot contain colon
  Warning  Failed            14m (x3 over 15m)   kubelet            Error: ErrImagePull
  Warning  DNSConfigForming  31s (x73 over 15m)  kubelet            Search Line limits were exceeded, some search paths have been omitted, the applied search line is: kstreams.s            vc.cluster.local svc.cluster.local cluster.local mgmt.windstream.net dsys.windstream.net dnoc.windstream.net

I have found “first path segment in URL cannot contain colon” in reference to Go — and some previous versions at that. There were all sorts of suggestions for working around the issue — escaping the colon, starting with “//”, adding single or double quotes around the string, downgrading to a version of Go not impacted by the problem. Nothing worked.

A few hours with no progress, I thought some time investigating “how can I work around this?” was in order. Kubernetes is using containerd … so it should be feasible to pre-stage the image in containerd and then set our imagePullPolicy values to IfNotPresent or Never

To pre-seed the images in containerd so that they are available for kubernetes run:

ctr -n=k8s.io image pull -u $REGISTRYUSER:$REGISTRYPASSWORD --plain-http imageregistry.example.net:5000/myapp/app_uat:latest

This must be run on every k8s worker in the environment — if a pod tries to spin up on server2 but you’ve only seeded the image file on server1 … the pod will fail to load. We need to update this staged image every time we make changes to the application. Better than not using the new servers, so that’ll just be the process for a while.

Ultimately, the problem ended up being that a few of the workers had a leading space in the TOML file for the repo — how that got there, I have no idea. But once there was no longer extraneous white-space, we could deploy the pods without issue. Now that it’s working “as designed”, we deleted the pre-seeded image using:

ctr -n=k8s.io images rm ImageNameHere

K8s 1.24.12 Upgrade

Trying to upgrade our dev Kubernetes environment to 1.24.12 … and we encountered what seems to be a fairly common error — unknown service runtime.v1alpha2.RuntimeService

kubeserver:~ # kubeadm init
I0323 13:53:26.492921   55320 version.go:256] remote version is much newer: v1.26.3; falling back to: stable-1.24
[init] Using Kubernetes version: v1.24.12
[preflight] Running pre-flight checks
        [WARNING Firewalld]: firewalld is active, please ensure ports [6443 10250] are open or your cluster may not function correctly
error execution phase preflight: [preflight] Some fatal errors occurred:
        [ERROR FileAvailable--etc-kubernetes-manifests-kube-apiserver.yaml]: /etc/kubernetes/manifests/kube-apiserver.yaml already exists
        [ERROR FileAvailable--etc-kubernetes-manifests-kube-controller-manager.yaml]: /etc/kubernetes/manifests/kube-controller-manager.yaml already exists
        [ERROR FileAvailable--etc-kubernetes-manifests-kube-scheduler.yaml]: /etc/kubernetes/manifests/kube-scheduler.yaml already exists
        [ERROR FileAvailable--etc-kubernetes-manifests-etcd.yaml]: /etc/kubernetes/manifests/etcd.yaml already exists
        [ERROR CRI]: container runtime is not running: output: E0323 13:53:26.741684   55340 remote_runtime.go:948] "Status from runtime service failed" err="rpc error: code = Unimplemented desc = unknown service runtime.v1alpha2.RuntimeService"
time="2023-03-23T13:53:26-05:00" level=fatal msg="getting status of runtime: rpc error: code = Unimplemented desc = unknown service runtime.v1alpha2.RuntimeService"
, error: exit status 1
        [ERROR DirAvailable--var-lib-etcd]: /var/lib/etcd is not empty
[preflight] If you know what you are doing, you can make a check non-fatal with `--ignore-preflight-errors=...`
To see the stack trace of this error execute with --v=5 or higher

We found a lot of people online with the same issue who (1) removed the config.toml and tried again, (2) changed the SystemdCGroup setting in the config, or uninstalled and reinstalled some/all of the components until it worked. Unfortunately, removing or modifying the config didn’t help. And removing and reinstalling everything wasn’t particularly appealing. However, we noticed that the same error was reported directly from containerd:

kubeserver:~ # crictl ps
E0323 13:53:07.061777   55228 remote_runtime.go:557] "ListContainers with filter from runtime service failed" err="rpc error: code = Unimplemented desc = unknown service runtime.v1alpha2.RuntimeService" filter="&ContainerFilter{Id:,State:&ContainerStateValue{State:CONTAINER_RUNNING,},PodSandboxId:,LabelSelector:map[string]string{},}"
FATA[0000] listing containers: rpc error: code = Unimplemented desc = unknown service runtime.v1alpha2.RuntimeService

Looking at the plugins, there were some in an error state

kubeserver:~ # ctr plugins ls
TYPE                                  ID                       PLATFORMS      STATUS
io.containerd.content.v1              content                  -              ok
io.containerd.snapshotter.v1          aufs                     linux/amd64    skip
io.containerd.snapshotter.v1          btrfs                    linux/amd64    skip
io.containerd.snapshotter.v1          devmapper                linux/amd64    error
io.containerd.snapshotter.v1          native                   linux/amd64    ok
io.containerd.snapshotter.v1          overlayfs                linux/amd64    error
io.containerd.snapshotter.v1          zfs                      linux/amd64    skip

So … it seemed reasonable to look for errors in the messages log from containerd. And, yeah, we had all sorts of errors. Including a rather scary one about reformatting the file system!

Mar 23 13:24:51 kubeserver containerd: time="2023-03-23T13:24:51.726984260-05:00" level=warning msg="failed to load plugin io.containerd.snapshotter.v1.overlayfs" error="/var/lib/containerd/io.containerd.snapshotter.v1.overlayfs does not support d_type. If the backing filesystem is xfs, please reformat with ftype=1 to enable d_type support"

That would do it — we have a dedicated partition for the k8s stuff … and that volume is formatted the right way — xfs_info confirmed ftype=1

kubeserver:~ # xfs_info /kubernetes/
meta-data=/dev/mapper/kubernetes-kubernetes isize=512    agcount=4, agsize=131071744 blks
         =                       sectsz=512   attr=2, projid32bit=1
         =                       crc=1        finobt=0 spinodes=0
data     =                       bsize=4096   blocks=524286976, imaxpct=5
         =                       sunit=0      swidth=0 blks
naming   =version 2              bsize=4096   ascii-ci=0 ftype=1
log      =internal               bsize=4096   blocks=255999, version=2
         =                       sectsz=512   sunit=0 blks, lazy-count=1
realtime =none                   extsz=4096   blocks=0, rtextents=0

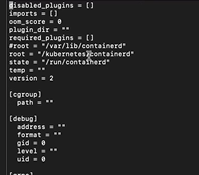
However containerd doesn’t really know anything about this volume, does it? The default location that containerd wants to use isn’t set up to support d_type. Editing /etc/containerd/config.toml, root now tells containerd to use our special partition for ‘stuff’ …

And we were able to run kubeadm init without error. Everything came up as it should have, and our k8s server was upgraded!

Tracking Down Which Pod is Exhausting IP Connections

We’ve been seeing an error that prevents clients from connecting to Postgresql servers – basically that all available connections are in use and the remaining connections are reserved for superuser and replication activity.

First, we need to determine what the connection limit is

SELECT setting, source, sourcefile, sourceline FROM pg_settings WHERE name = 'max_connections';

And if there are any per-user connection limits – a limit of -1 means unlimited connections are allowed.

SELECT rolname, rolconnlimit FROM pg_roles

The next step is to identify what connections are exhausting available connections – are there a lot of long-running queries? Are there just more active queries than anticipated? Are there a bunch of idle connections?

SELECT pid, usename, client_addr, client_port 
 ,to_char(pg_stat_activity.query_start, 'YYYY-MM-DD HH:MI:SS') as query_start
 , state, query 
FROM pg_stat_activity
-- where state = 'idle'
-- and usename = 'app_user'
order by query_start;

In our case, there were over 100 idle connections using up about 77% of the available connections. Auto-vacuum, client read operations, and replication easily filled up the remaining available connections.

Because the clients keeping these idle connections open are an app running in a Kubernetes cluster, there’s an extra layer of complexity identifying where the connection is actually sourced. When you view the list of connections from the Postgresql server’s perspective, “client_addr” is the worker hosting the pod.

On the worker server, use conntrack to identify the actual source of the connection – the IP address in “-d” is the IP address of the Postgresql server. To isolate a specific connection, select a “client_port” from the list of connections (37900 in this case) and grep for the port. You will see the src IP of the individual POD.

lhost1750:~ # conntrack -L -f ipv4 -d 10.24.29.140 -o extended | grep 37900
ipv4 2 tcp 6 86394 ESTABLISHED src=10.244.4.80 dst=10.24.29.140 sport=37900 dport=5432 src=10.24.29.140 dst=10.24.29.155 sport=5432 dport=37900 [ASSURED] mark=0 use=1
conntrack v1.4.4 (conntrack-tools): 27 flow entries have been shown.

Then use kubeadm to identify which pod is assigned that address:

lhost1745:~ # kubectl get po --all-namespaces -o wide | grep "10.244.4.80"
kstreams kafka-stream-app-deployment-1336-d8f7d7456-2n24x 2/2 Running 0 10d 10.244.4.80 lhost0.example.net <none> <none>

In this case, we’ve got an application automatically scaling up that can have 25 connections help open and idle … so there isn’t really a solution other than increasing the number of available connections to a number that’s appropriate given the number of client connections we plan on leaving open. I also want to enact a connection limit on the individual account – if there are 250 connections available on the Postgresql server, then limit the application to 200 of those connections.


Reverse engineering Kubernetes YAML’s

Ideally, the definitions for Kubernetes objects are all safely stored in your code repository — you can easily revert back to the previous, working iteration, you can see who changed what, and you’ve got a copy of it all available if super electromagnet man takes a stroll through the data center. Ideally.

Here, in the real world, we took over management of a k8s implementation that’s been in service for about a year now. And, fortunately, the production YAMLs are all in the repo. The development system, on the other hand, isn’t. Logic dictates that the config would be similar, but it’s always good to check.

I wrote a quick script to dump YAML files for all of the configmaps, cron jobs, deployments, horizontal pod autoscaling, jobs, persistent volumes, persistent volume claims, secrets, service accounts, services, and stateful sets.

#!/bin/bash
nsbase="namespace/"
for ns in $(kubectl get namespaces -o=name)
do
        ns=${ns#${nsbase}}
        for n in $(kubectl get --namespace=$ns -o=name configmap,cronjob,deployment,hpa,job,pv,pvc,secret,serviceaccount,service,statefulset)
        do
            yamlfile="${ns}/${n}.yaml"
            mkdir -p $(dirname ${ns}/${n})
            kubectl get --namespace=$ns -o=yaml $n > $yamlfile
        done
done

Docker for Windows: Using Built-in k8s

I just started using k8s built into Docker for Windows, but I couldn’t connect because the target machine actively refused the connection.

C:\Users\lisa>kubectl version
Client Version: version.Info{Major:"1", Minor:"14", GitVersion:"v1.14.6", GitCommit:"96fac5cd13a5dc064f7d9f4f23030a6aeface6cc", GitTreeState:"clean", BuildDate:"2019-08-19T11:13:49Z", GoVersion:"go1.12.9", Compiler:"gc", Platform:"windows/amd64"}
Unable to connect to the server: dial tcp [::1]:8080: connectex: No connection could be made because the target machine actively refused it.

No idea — it’s all internal traffic, but I resorted to turning off my firewall anyway just to see what would happen. Nothing. Turns out I need a KUBECONFIG environment variable pointing to the config file

C:\Users\lisa>set | grep KUB
KUBECONFIG=C:\Users\lisa.RUSHWORTH.000\.kube\config

Applied the yaml file and started the proxy

C:\Users\lisa>kubectl apply -f https://raw.githubusercontent.com/kubernetes/dashboard/v1.10.1/src/deploy/recommended/kubernetes-dashboard.yaml
secret/kubernetes-dashboard-certs created
serviceaccount/kubernetes-dashboard created
role.rbac.authorization.k8s.io/kubernetes-dashboard-minimal created
rolebinding.rbac.authorization.k8s.io/kubernetes-dashboard-minimal created
deployment.apps/kubernetes-dashboard created
service/kubernetes-dashboard created

C:\Users\lisa>kubectl proxy
Starting to serve on 127.0.0.1:8001

Working! Get the token from

kubectl -n kube-system describe secret default

And access the dashboard.


A reminder for myself — the totally not obvious package name for the kubeadm binary on the CHANGELOG link list is Node. Go figure!

Kubernetes – Using Manifest Files To Deploy

While I’ve manually configured Kubernetes to create proof-of-concept sandbox systems, that is an inefficient approach for production systems. The kubectl create command can use a yaml file (or json, if you prefer that format). I maintain my manifests in a Git repository so changes can be tracked (and so I know where to find them!). Once you have a manifest, it’s a matter of using “kubectl create -f manifest1.yaml” or “kubectl create -f manifest1.yaml -f manifest2.yaml … -f manifestN.yaml” to bring the ‘stuff’ online.

But what goes into a manifest file? The following file would deploy four replicas of the sendmail container that is retained in my private registry.

If the namespaces have not been created,

apiVersion: v1
kind: Namespace
metadata:
  name: sendmailtest

The command “kubectl get ns” will list namespaces on the cluster. Note that ‘deployment’ items were not available in the v1 API, so the v1beta1 version needs to be specified to configure a deployment.

---
apiVersion: v1
kind: Pod
metadata:
  name: sendmail
  namespace: sendmailtest
  labels:
    app: sendmail
spec:
  containers:
    - name: sendmail
      image: sendmail
      ports:
        - containerPort: 25
---
apiVersion: v1beta1
kind: Deployment
metadata:
  name: sendmail
spec:
  replicas: 4
  template:
    metadata:
      labels:
        app: sendmail
    spec:
      containers:
        - name: sendmail
          image: 'rushworthdockerregistry/sendmail/sendmail/sendmail:latest'
          ports:
            - containerPort: 25

---
apiVersion: v1
kind: Service
metadata:
  name: sendmail-service
  labels:
    name: sendmail-service
spec:
  ports:
    - port: 25
      targetPort: 25
      protocol: TCP
      name: smtp
  selector:
    app: sendmail
  type: ClusterIP


Kubernetes Sandbox With Minikube

A scaled down sandbox can be used to gain experience with the applications and techniques used to deploy containerized applications and microservices. This sandbox will be built on a Windows 10 laptop, but the same components can be run on Linux variants.

Prerequisites:

Verify Virtualization is enabled:

Open Task Manager (taskman.exe) and ensure the virtualization extensions have been enabled.
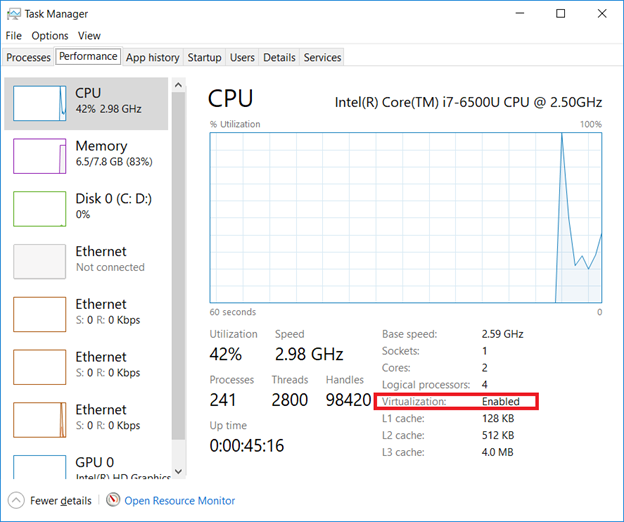
If virtualization is disabled, boot into the system config (start menu => settings => update & security => recovery, click “Restart now” under “Advanced startup”)

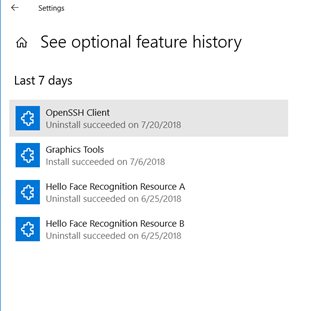
Uninstall the Windows OpenSSH client

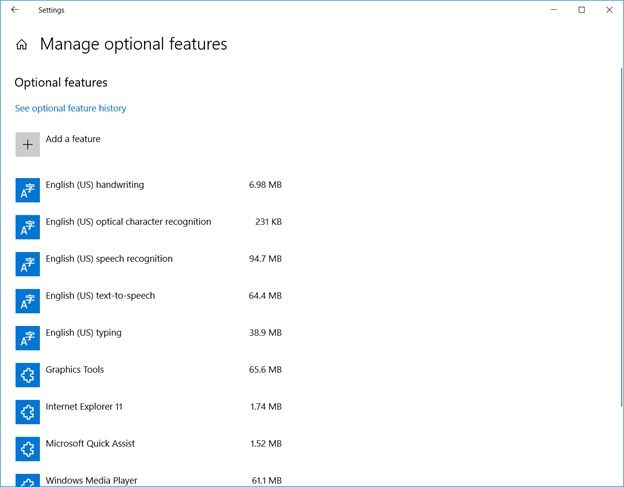
Click ‘Start’ and type “Manage optional features” – within the installed feature list, find “OpenSSH Client”. If present, remove it.
Enable Hyper-V

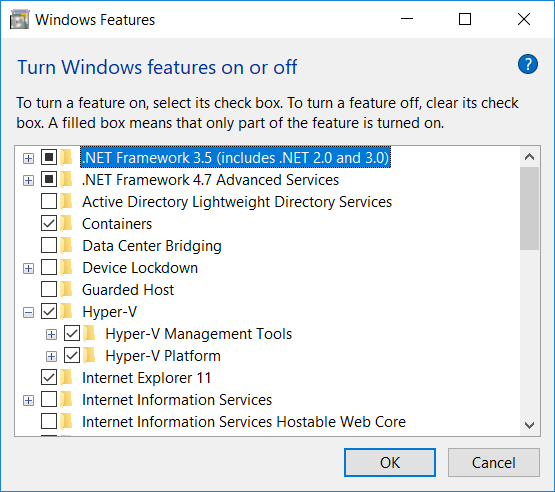
Enable the Hyper-V Windows feature (Control Panel => Programs => Programs and Features, “Turn Windows features on or off” and check both Hyper-V components).
Add Virtual Switch To Hyper-V

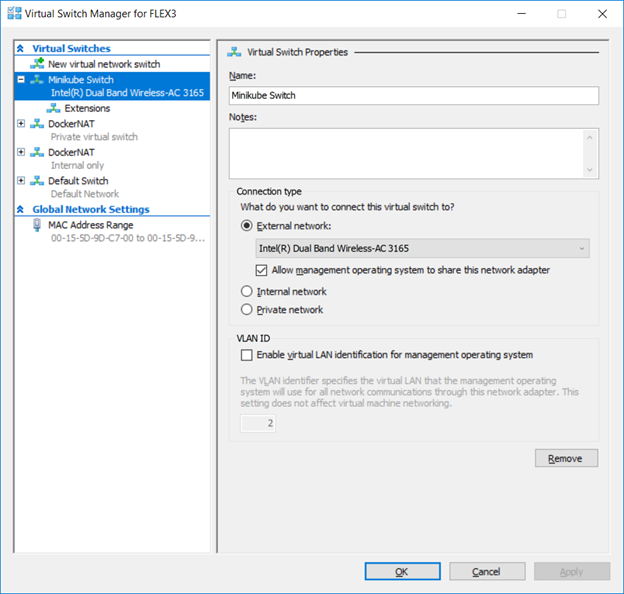
In the Hyper-V Manager, open the “Virtual Switch Manager”. Create a new External virtual switch. Record the name used for your new virtual switch.
 

Install Minikube

View https://storage.googleapis.com/kubernetes-release/release/stable.txt and record the version number. The current stable release version is v1.11.1

Modify the URL http://storage.googleapis.com/kubernetes-release/release/v#.##.#/bin/windows/amd64/kubectl.exe to use the current stable release version. Current URL is http://storage.googleapis.com/kubernetes-release/release/v1.11.1/bin/windows/amd64/kubectl.exe

Create a folder %ProgramFiles%\Minikube and add this folder to your PATH variable.

Download kubectl.exe from the current release URL to %ProgramFiles%\Minikube

Download the current Minikube release from https://github.com/kubernetes/minikube/releases (scroll down to the “Distribution” section, locate the Windows/amd64 link, and save that binary as %ProgramFiles%\Minikube\minikube.exe). ** v0.28.1 was completely non-functional for me (and errors were related to existing issues on the minikube GitHub site) so I used v0.27.0

Verify both are functional. From a command prompt (run as administrator) or Powershell (again run as administrator), run “kubectl version” and verify the output includes a client version

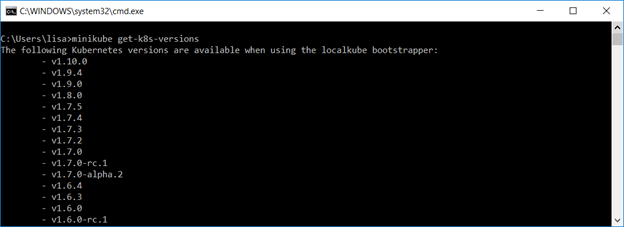
Run “minikube get-k8s-versions” and verify there is output.
Configure the Minikube VM using the Hyper-V driver and switch you created earlier.

minikube start –vm-driver hyperv –hyperv-virtual-switch “Minikube Switch” –alsologtostderr
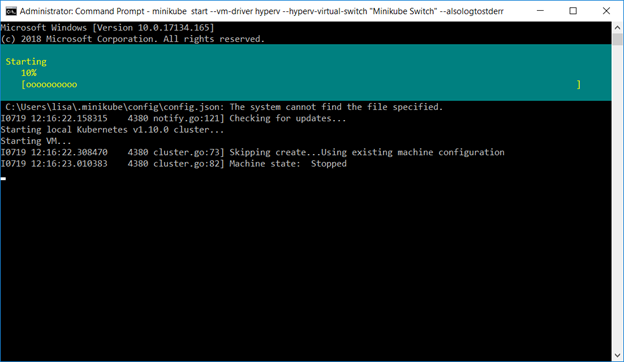
Once everything has started, “kubectl version” will report both a client and server version.

You can use “minikube ip” to ascertain the IP address of your cluster

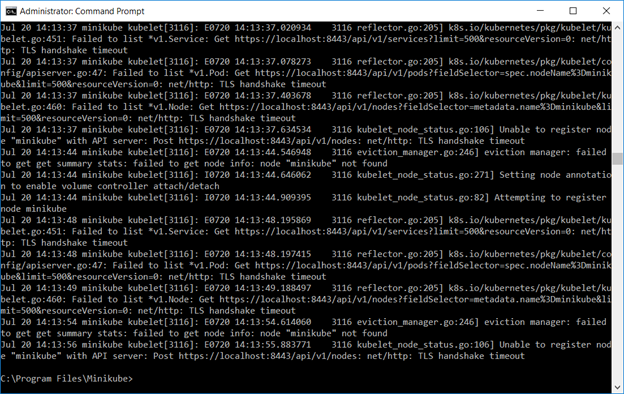
If the cluster services fail to start, there are a few log locations.

Run “minikube logs” to see the log information from the minikube virtual machine
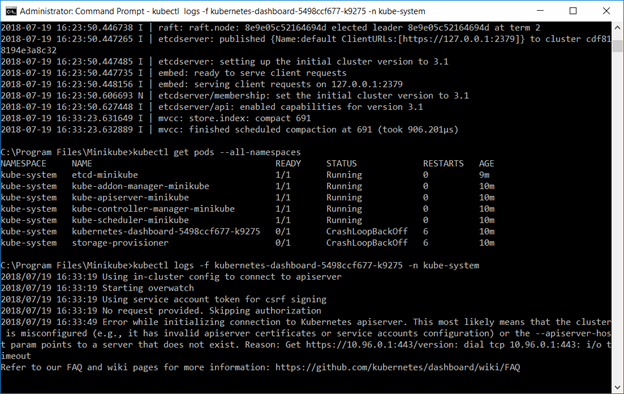
Use “kubectl get pods –all-namespaces” to determine which component(s) fail, then use “kubectl logs -f name -n kube-system” to review logs to determine why the component failed to start.
If you need to connect to the minikube Hyper-V VM, the username is docker and the password is tcuser – you can ssh into the host or connect to the console through the Hyper-V Manager.

Before the management interface comes online, you can use view the status of the containers using the docker command line utilities on the minikube VM.

$ docker ps

CONTAINER ID        IMAGE                        COMMAND                  CREATED              STATUS              PORTS               NAMES

7d8d66b5e465        af20925d51a3                 “kube-apiserver –ad…”   About a minute ago   Up About a minute                       k8s_kube-apiserver_kube-apiserver-minikube_kube-system_0f6076ada4273000c4b2f846f250f3f7_3

bb4be8d267cb        52920ad46f5b                 “etcd –advertise-cl…”   7 minutes ago        Up 7 minutes                            k8s_etcd_etcd-minikube_kube-system_0199781185b49d6ff5624b06273532ab_0

d6be5d6ae360        9c16409588eb                 “/opt/kube-addons.sh”    7 minutes ago        Up 7 minutes                            k8s_kube-addon-manager_kube-addon-manager-minikube_kube-system_3afaf06535cc3b85be93c31632b765da_1

b5ddf5d1ff11        ad86dbed1555                 “kube-controller-man…”   7 minutes ago        Up 7 minutes                            k8s_kube-controller-manager_kube-controller-manager-minikube_kube-system_d9cefa6e3dc9378ad420db8df48a9da5_0

252d382575c7        704ba848e69a                 “kube-scheduler –ku…”   7 minutes ago        Up 7 minutes                            k8s_kube-scheduler_kube-scheduler-minikube_kube-system_2acb197d598c4730e3f5b159b241a81b_0

421b2e264f9f        k8s.gcr.io/pause-amd64:3.1   “/pause”                 7 minutes ago        Up 7 minutes                            k8s_POD_kube-scheduler-minikube_kube-system_2acb197d598c4730e3f5b159b241a81b_0

85e0e2d0abab        k8s.gcr.io/pause-amd64:3.1   “/pause”                 7 minutes ago        Up 7 minutes                            k8s_POD_kube-controller-manager-minikube_kube-system_d9cefa6e3dc9378ad420db8df48a9da5_0

2028c6414573        k8s.gcr.io/pause-amd64:3.1   “/pause”                 7 minutes ago        Up 7 minutes                            k8s_POD_kube-apiserver-minikube_kube-system_0f6076ada4273000c4b2f846f250f3f7_0

663b87989216        k8s.gcr.io/pause-amd64:3.1   “/pause”                 7 minutes ago        Up 7 minutes                            k8s_POD_etcd-minikube_kube-system_0199781185b49d6ff5624b06273532ab_0

7eae09d0662b        k8s.gcr.io/pause-amd64:3.1   “/pause”                 7 minutes ago        Up 7 minutes                            k8s_POD_kube-addon-manager-minikube_kube-system_3afaf06535cc3b85be93c31632b765da_1


This allows you to view the specific logs for a container that is failing to launch

$ docker logs 0d21814d8226

Flag –admission-control has been deprecated, Use –enable-admission-plugins or –disable-admission-plugins instead. Will be removed in a future version.

Flag –insecure-port has been deprecated, This flag will be removed in a future version.

I0720 16:37:07.591352       1 server.go:135] Version: v1.10.0

I0720 16:37:07.596494       1 server.go:679] external host was not specified, using 10.5.5.240

I0720 16:37:08.555806       1 feature_gate.go:190] feature gates: map[Initializers:true]

I0720 16:37:08.565008       1 initialization.go:90] enabled Initializers feature as part of admission plugin setup

I0720 16:37:08.690234       1 plugins.go:149] Loaded 10 admission controller(s) successfully in the following order: NamespaceLifecycle,LimitRanger,ServiceAccount,NodeRestriction,DefaultTolerationSeconds,DefaultStorageClass,MutatingAdmissionWebhook,Initializers,ValidatingAdmissionWebhook,ResourceQuota.

I0720 16:37:08.717560       1 master.go:228] Using reconciler: master-count

W0720 16:37:09.383605       1 genericapiserver.go:342] Skipping API batch/v2alpha1 because it has no resources.

W0720 16:37:09.399172       1 genericapiserver.go:342] Skipping API rbac.authorization.k8s.io/v1alpha1 because it has no resources.

W0720 16:37:09.407426       1 genericapiserver.go:342] Skipping API storage.k8s.io/v1alpha1 because it has no resources.

W0720 16:37:09.445491       1 genericapiserver.go:342] Skipping API admissionregistration.k8s.io/v1alpha1 because it has no resources.

[restful] 2018/07/20 16:37:09 log.go:33: [restful/swagger] listing is available at https://10.5.5.240:8443/swaggerapi

[restful] 2018/07/20 16:37:09 log.go:33: [restful/swagger] https://10.5.5.240:8443/swaggerui/ is mapped to folder /swagger-ui/

[restful] 2018/07/20 16:37:52 log.go:33: [restful/swagger] listing is available at https://10.5.5.240:8443/swaggerapi

[restful] 2018/07/20 16:37:52 log.go:33: [restful/swagger] https://10.5.5.240:8443/swaggerui/ is mapped to folder /swagger-ui/


Worst case, we haven’t really done anything yet and you can start over with “minikube delete”, then delete the .minikube directory (likely located in %USERPROFILE%), and start over.

Once you have updated the Hyper-V configuration and started the cluster, you should be able to access the kubernetes dashboard

Actually using it

Now that you have minikube running, you can access the dashboard via a web URL – or just type “minikube dashboard” to have the site launched in your default browser.

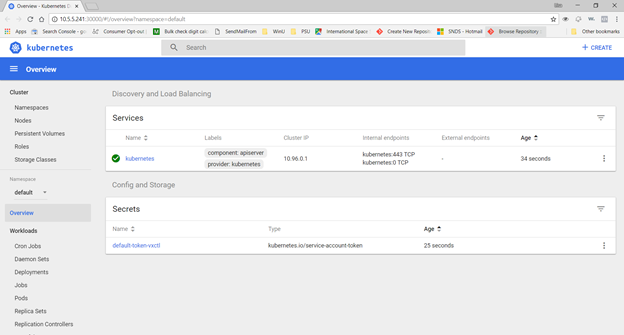
Create a deployment – we’ll use the nginx sample image here

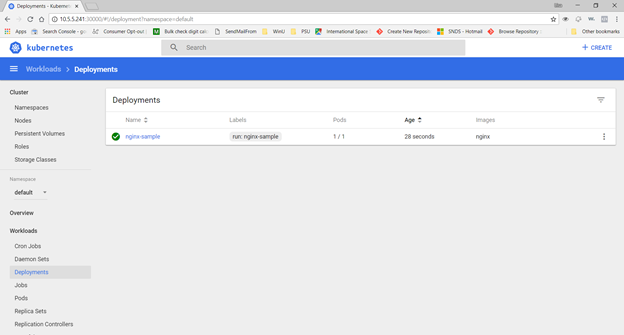
Voila, under Workloads => Deployments, you should see this test deployment (if the Pods column has 0/1, the image has not completely started … wait for it!)
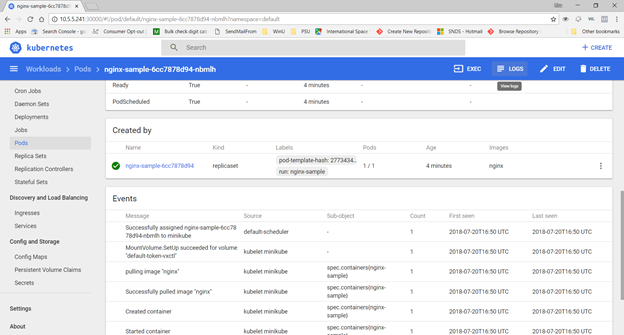
Under Workloads=>Pods, you can select the sample. In the upper right-hand corner, there are buttons to shell into the Pod as well as view logs from the Pod.
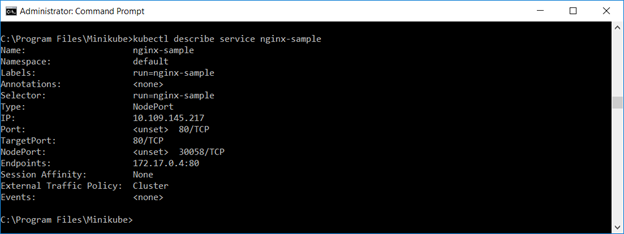
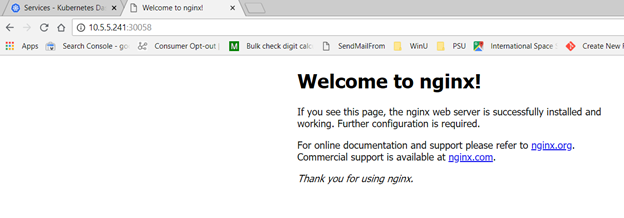
Expose the deployment as a service. You can use the web GUI to verify the service or “kubectl describe service servicename

Either method provides the TCP port to access the service. Access the URL in a browser. Voila, a web site:
Viewing the Pod logs should now show the web server access logs.

That’s all fine and good, but there are dozens of other ways to bring up a quick web server. Using Docker directly. Magic cloudy hosting services. A server with a web server on it. K8 allows you to quickly scale the deployment – specify the number of replicas you want and you’ve got them:
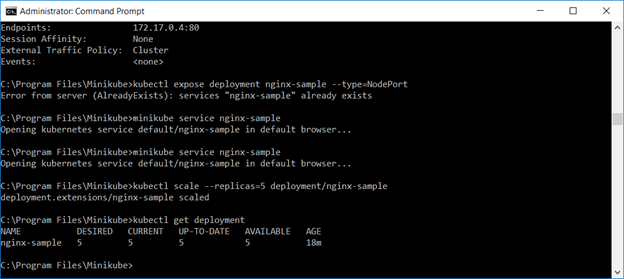
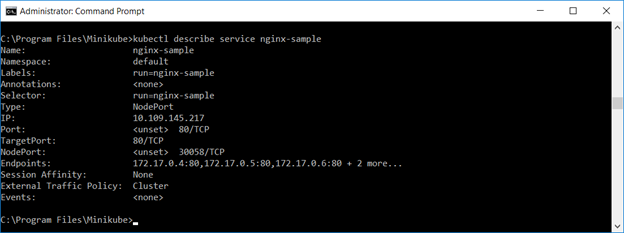
Describing the service, you will see multiple endpoints.
What do I really have?

You’ve got containers – either your own container for your application or some test container. Following these instructions, we’ve got a test container that serves up a simple web page.

You’ve got a Pod – one or more containers are run in a Pod. A pod exists on a single machine, so all containers within a Pod share resources. This is good thing if the containers interact with each other (shared resources speed up this communication), but it’s a bad thing if the containers have no correlation but run high I/O functions (shared resources create contention for this communication).

You’ve got a deployment – a managed group of Pods. Each application or microservice will have a deployment. The deployment keeps the desired number of instances running – if an instance is not healthy, it is terminated and a new instance spawned. You can resize the deployment on a schedule, or you can use load metrics to manage capacity.

You’ve got services – services map resources running within pods to internal or external access. The service has an IP address and port for client access, and requests are load balanced across healthy, running Pods. In our case, we are using NodePort, and “kubectl describe service ngnix-sample” will provide the port number.

Because client access is performed through the service, you can perform “rolling updates” by setting a new image (and even roll back if the newly deployed image is malfunctioning). To roll a new image into service, use “kubectl set image deployments/ngnix-sample ngnix-sample=something/image:v5”. Using “kubectl get pods”, you can see replicas come online with the new image and ones with the old image terminate. Or, for a quick summary of the rollout status, run “kubectl rollout status deployment nginx-sample”
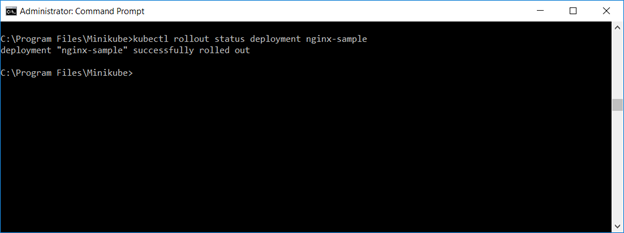
If the new container fails to load, or if adverse behavior is experienced, you can run “kubectl rollout undo deployment nginx-sample” to revert to the previous working container image.

When you are done with your sandbox, you can stop it using “minikube stop”, and “minikube start” will bring the sandbox back online.

A “real world” deployment would have multiple servers (physical, virtual, or a combination thereof) essentially serving as a resource pool. You wouldn’t manually scale deployments either.

Notice that the dashboard – and all of its administrative functions – are open to the world. A “real world” deployment would either include something like OpenUnison to authenticate through ADFS or some web hook that performs LDAP authentication and provides an access token.

And there’s no reason to use kubectl to manually deploy updates. Commit your changes into the git repository. Jenkins picks up the changes, runs the Maven build and tests, and creates a Docker build. The final step within the Jenkins workflow is to perform the image rollout. This means you can have a new image deployed within minutes (actual time depends on the build/test time) of committing code to a repo.