Tag: o365

Outlook Preferred Meeting Time

While this doesn’t address work days or conveniently highlight working and non-working hours when someone is checking free/busy … Microsoft does offer a way for individuals to publish their preferred working hours – so someone who lives in Mountain time but works 6AM-3PM to match their colleagues on the east coast can let us all know that they are keeping non-standard hours for their time zone.

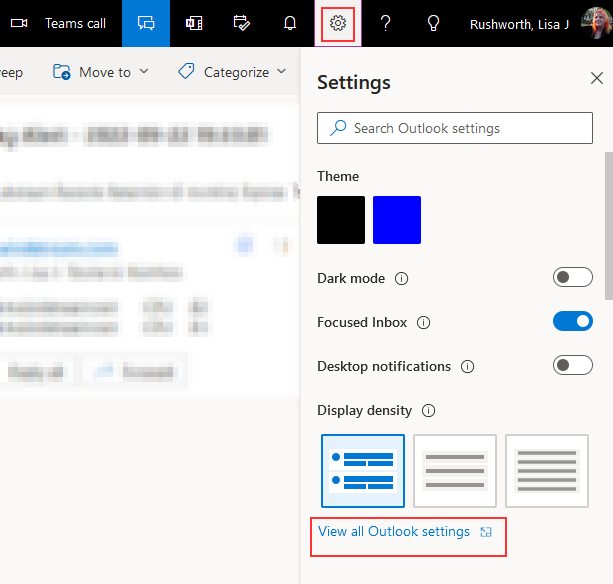
Logged in to OWA, select the “Settings” gear:

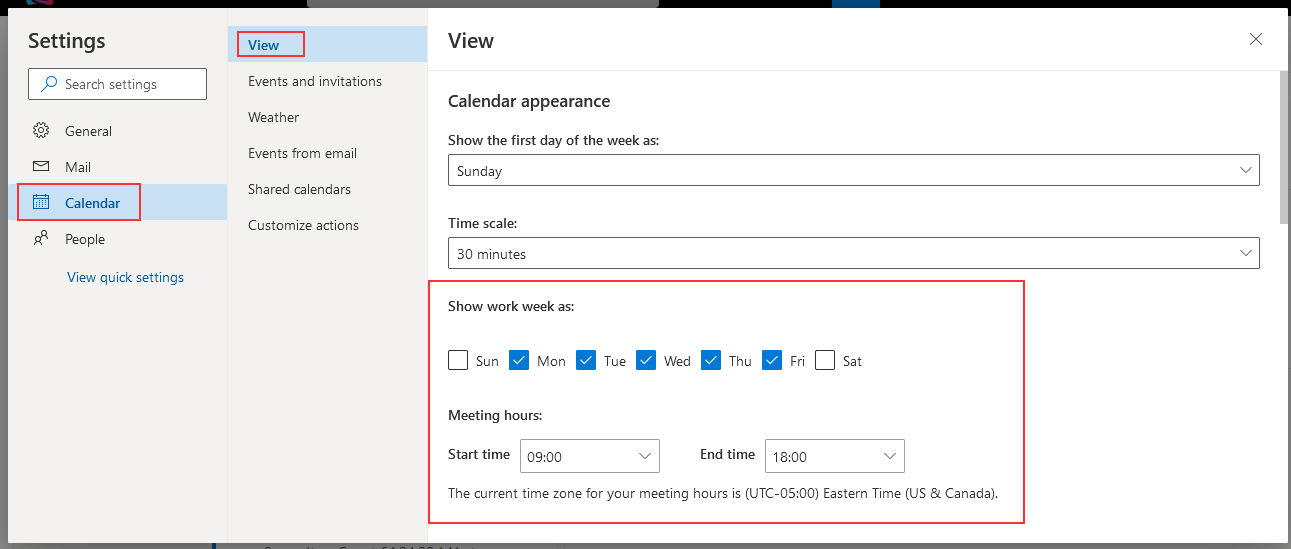
Select “Calendar” and then select “View” – there is a place to specify your “meeting hours”.

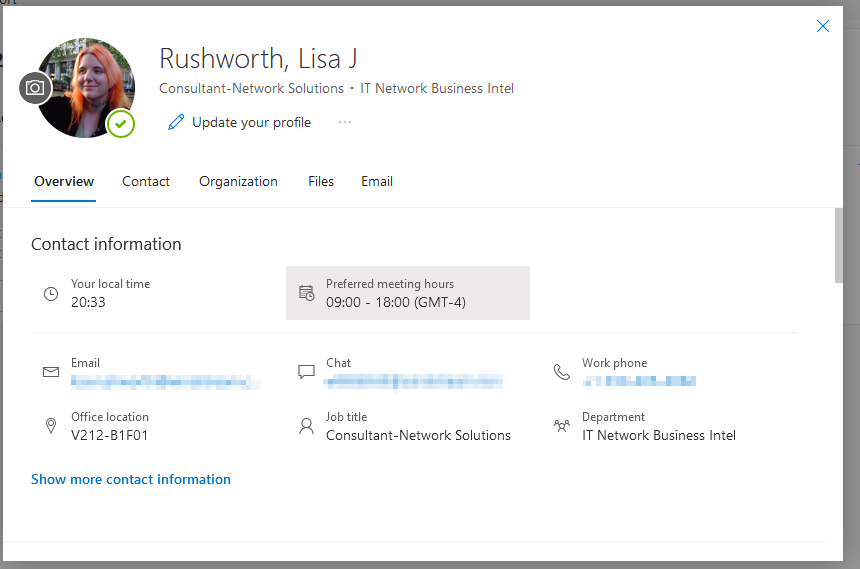
That data is used to populate “Preferred meeting hours” in your profile card:


Microsoft Whiteboard Sticky Notes and Text Box

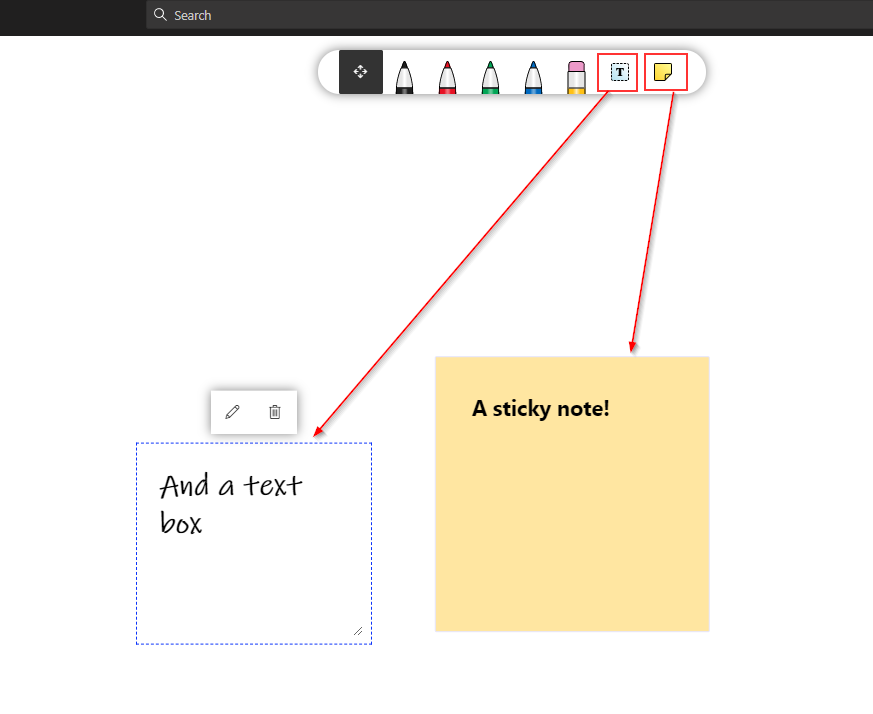
Two ways to add text to Microsoft Whiteboard sessions — ways that aren’t dragging your finger or mouse around in an attempt to draw legible text — are available. I’d like to be able to change the font in the text box — I get that their font choice is meant to evoke hand-written text, but it strikes me as non-professional.

Did you know … there’s version history for Microsoft Teams files too?

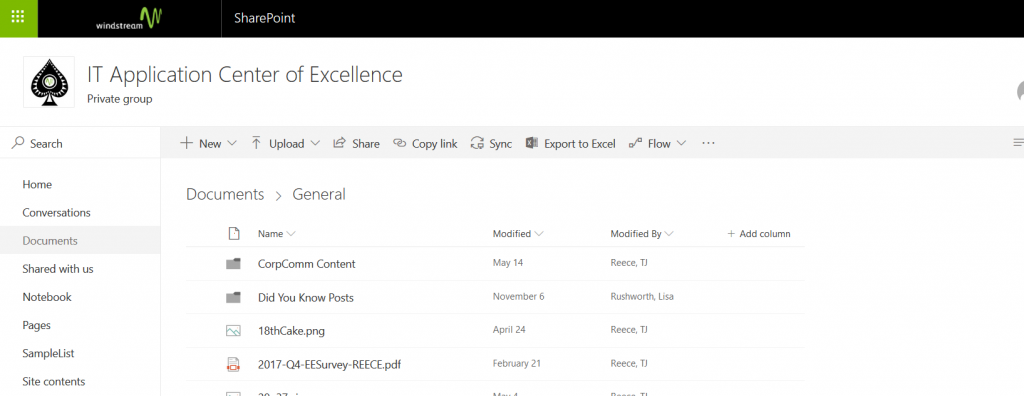
There is — which is obvious once you start thinking about how Teams data is stored. The “Files” tab is a pretty front end for a SharePoint document library, and document libraries store version history. The problem is I didn’t know a good way to walk an end user through accessing that document library. I’d generally do a screen sharing session with the user & navigate them to the right place myself. And then I saw this — on the Files tab, there is an “Open in SharePoint” button. You don’t need to drill down to find the specific file you want to revert – as long as you are on the proper channel, we’ll be able to get to the document.

Voila! A new tab opens and shows you the SharePoint document library that underpins the Teams Files tab. Now drill down until you find the file for which you are looking.

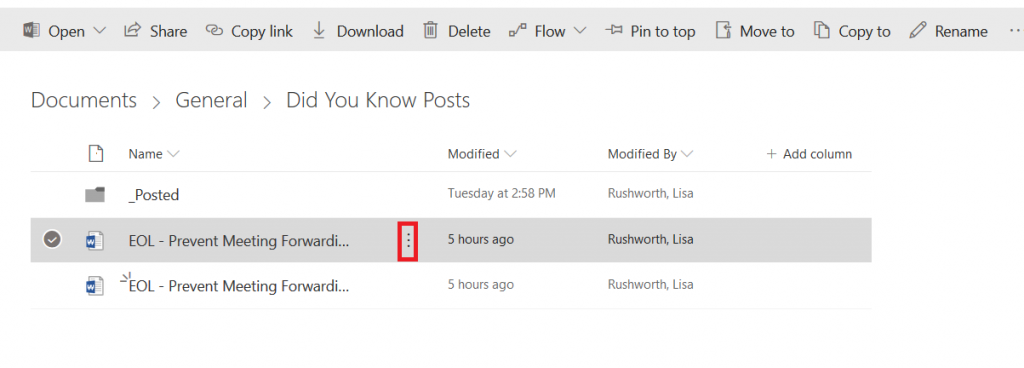
Click on the not-quite-a hamburger menu – the one between the file name and modify time.

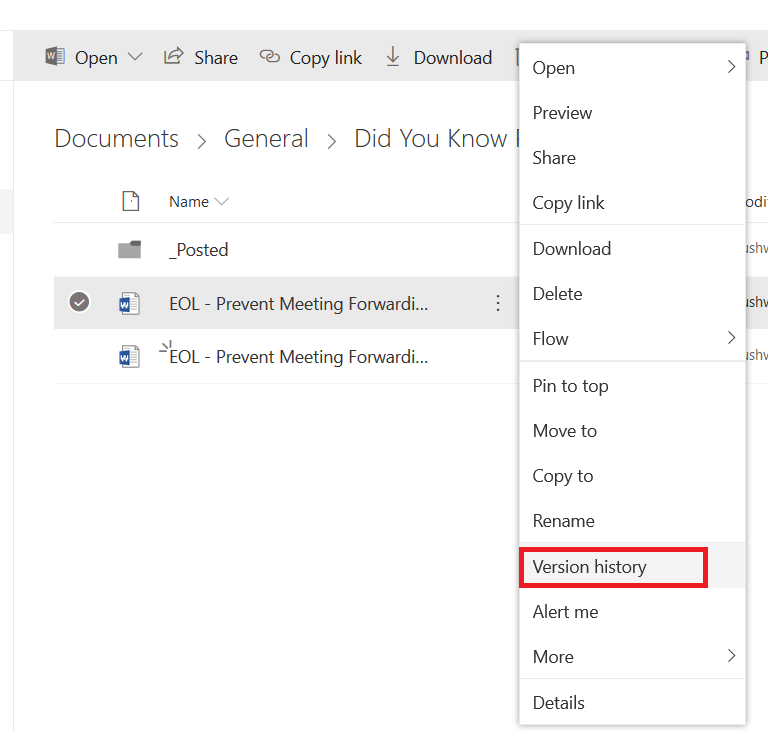
Select “Version History”

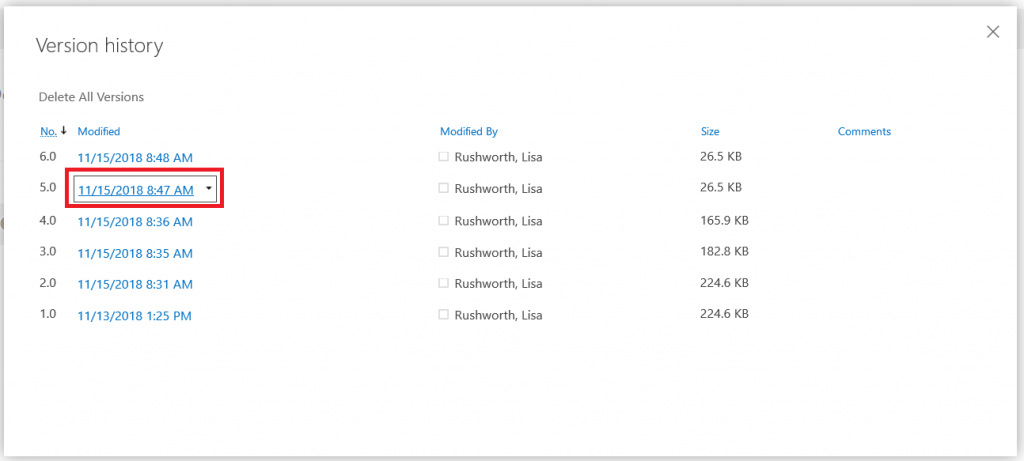
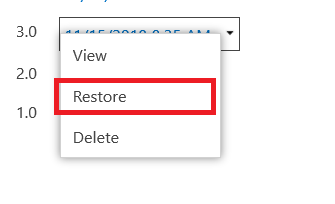
To view the previous version, click on the hyperlinked modify timestamp. To restore the previous version, hover your mouse over the modify timestamp of the iteration you want.

On this menu, “View” will show you some information about the file – not actually view the file. Select restore “Restore” to replace the current version (the one that shows up in Teams) with the selected – you’ll be asked to confirm that you want to overwrite the current version.

Once the document has been restored, you’ll have a new entry on the version history pane – so you can even revert your document reversion if needed.


Did you know … you can organize your Microsoft Teams list?

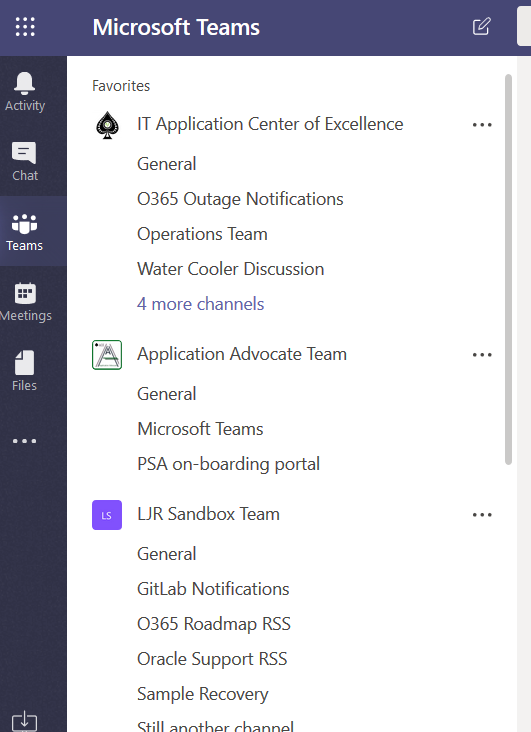
You’ve been using Teams for a while, created a few Teams, been added to even more … and you realize that all of these Teams and channels have created clutter of their own. Teams are listed in the order you joined them. Channels are listed in the order they were created. And those first couple of Teams spaces you played around with? All at the top!

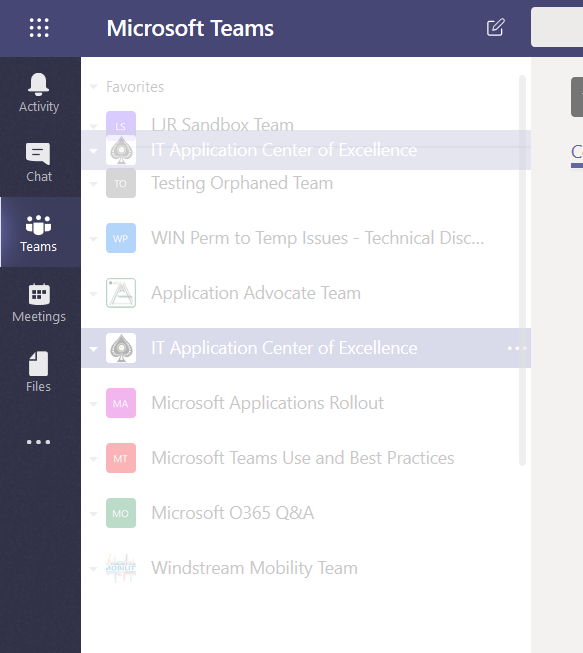
But the Teams interface – both the client and the website – allow you to drag Teams around to reorder them. Simply click and hold over the Teams listing you want to move and drag your mouse – there will be a “ghost” listing that tells you where the Teams listing will appear when you release the mouse button.

OK, that’s a little better – now the Teams spaces for my groups are at the top.

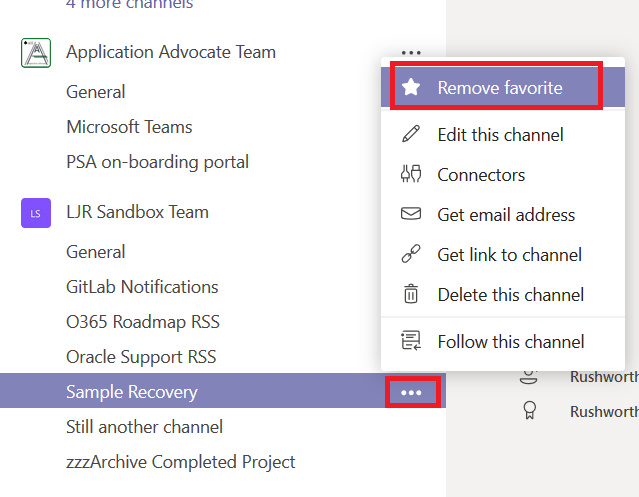
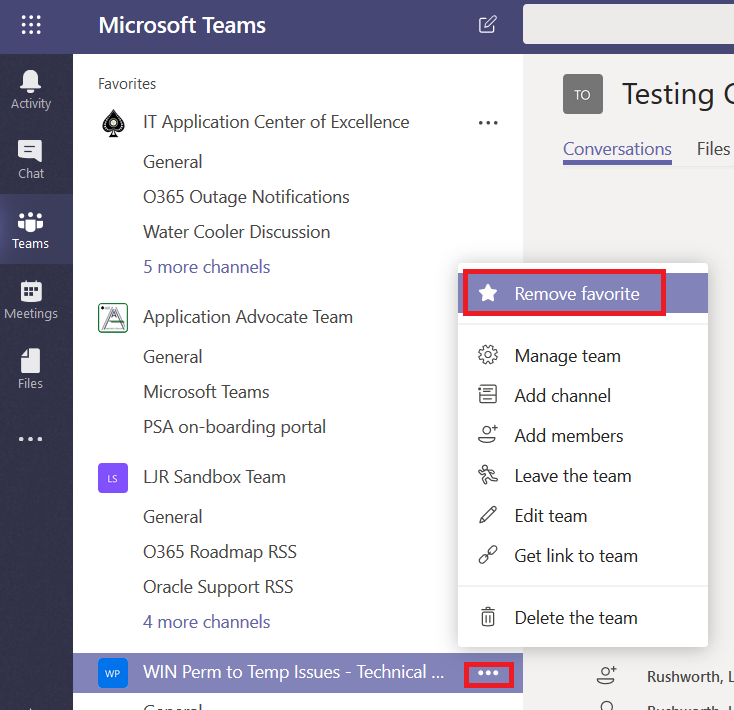
That’s still a lot of channels, though. If you remove ‘favorite’ designation from a channel, it will collapse into an expandable menu. Click the hamburger menu next to the channel, then click “Remove favorite”

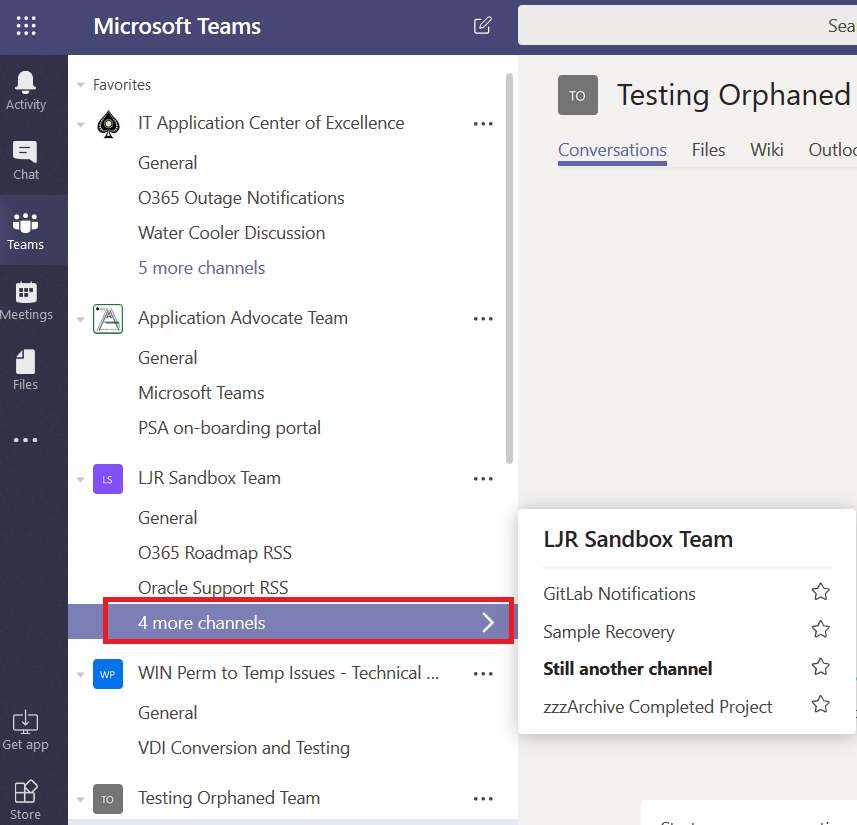
That’s a LOT better – those channels are still available, just click on “# more channels”

You can remove the favorite designation from a Teams space as well – it will no longer be so prominently displayed in your Teams list. Click on the hamburger menu next to the Teams space listing and click “Remove favorite”

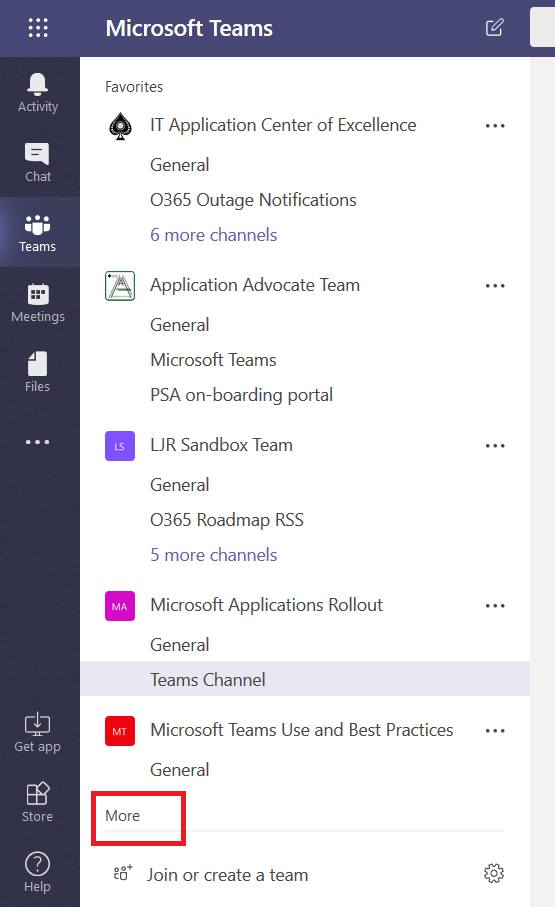
Down to one page! If you want to check one of the hidden Teams, just click “More”

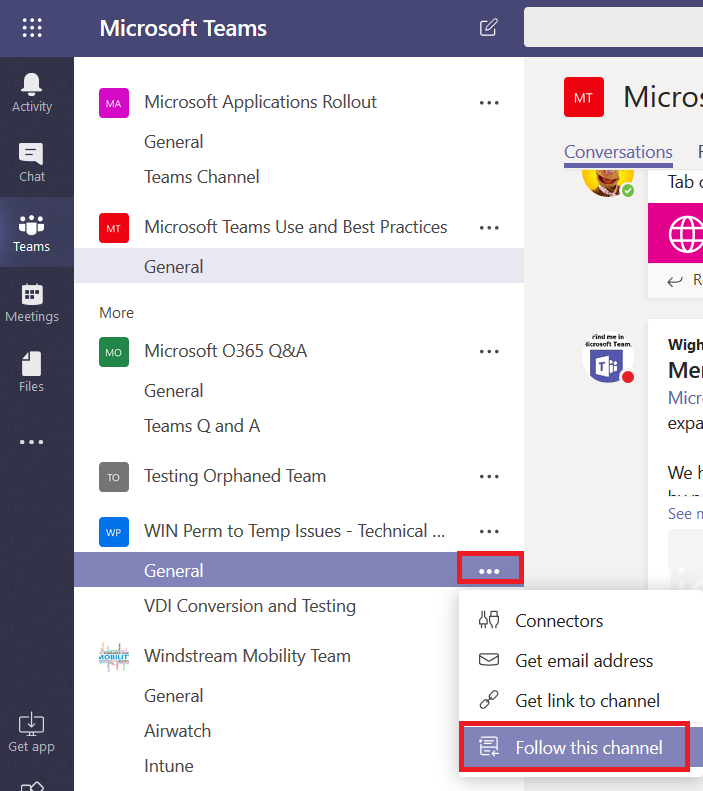
And if you want to get notifications when an important-but-infrequently-used channel has some activity, click the hamburger menu next to the channel and select “Follow this channel”. New posts will be listed in your Activity feed (and e-mailed to you if you’ve set up e-mail notification for followed channels).

Did you know … you can use markdown in Teams messages?

Teams supports markdown within messages – type something like this

And you actually see this:

You’ll know it’s working because the markdown is converted as you type it (pasting a marked down string into Teams doesn’t work — you’ll have the literal characters and not the implied formatting)

You can even type a backtick (`)

To get an inline code block

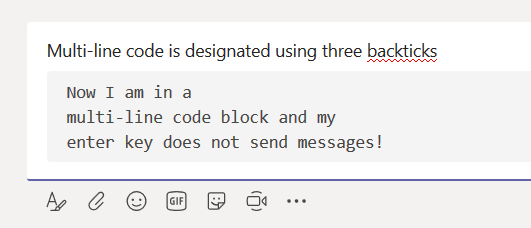
You can insert multi-line code blocks as well. It’s a little trickier to get a code block in a message since you’ve got to use shift-enter to move to a new line then type three back ticks.

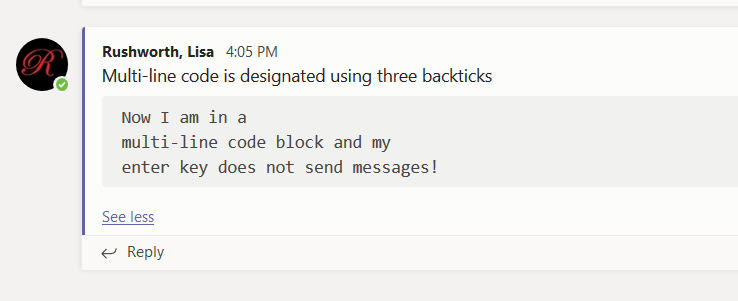
After you type the three back ticks, your cursor will be in the code block. Enter will now move to a new line instead of sending the post.

They’ve got a bug where you cannot do anything after the multi-line code block … but you can always reply to your post if you’ve got something to add.

As of this writing, you cannot paste markdown text into the message and have the formatting rendered. You can paste content into the multi-line code block composer, but you cannot paste *things* with ~markdown in them~ and see “`
pretty output

Did you know … you can edit the tag for Teams @ mentions?

Well, you can ? Not generally worthwhile if you are only mentioning one or two people, but if you need to flag half a dozen people, the list of names starts getting REALLY long.

Click in the middle of the name – your cursor will be placed within the name element.

Use backspace or delete to remove one of the name components – backspace will remove the surname and comma, delete will remove the given name.

The links are maintained, so the individual gets flagged with the post.

Does it matter if there are three Bob’s on there? In the previous case, no – I’m trying to garner the attention of a bunch of people and direct them all to the same text. But if you have a bunch of people in your Teams group with the same name … it’s probably better to leave their full name in place or delete the given name!

Did you know … you can send a “receipt” for Microsoft Forms submissions?

I had a maths professor who mused that, back when he was an undergrad, calculators were a newfangled thing that kids only halfway trusted. You’d complete your test; and, time permitting, you would power on that calculator and see if it agreed. Decades later, kids didn’t even do a mental check that the calculator’s results were halfway reasonable. As a technology becomes more familiar, innate trust is built. In the interim … trust but verify. Beyond trust, it’s nice to have a copy of what you’ve submitted when discussing your submissions with someone else. Or, for a periodic survey, to remind you what you said last time. Or because you are particularly proud of a particular turn of phrase and would like to use that one again. For whatever reason you want to create a “receipt” for Forms submissions, you can do it.

The first thing you need is a Form created under your user ID. Go to https://forms.office.com/ and click “New Form”
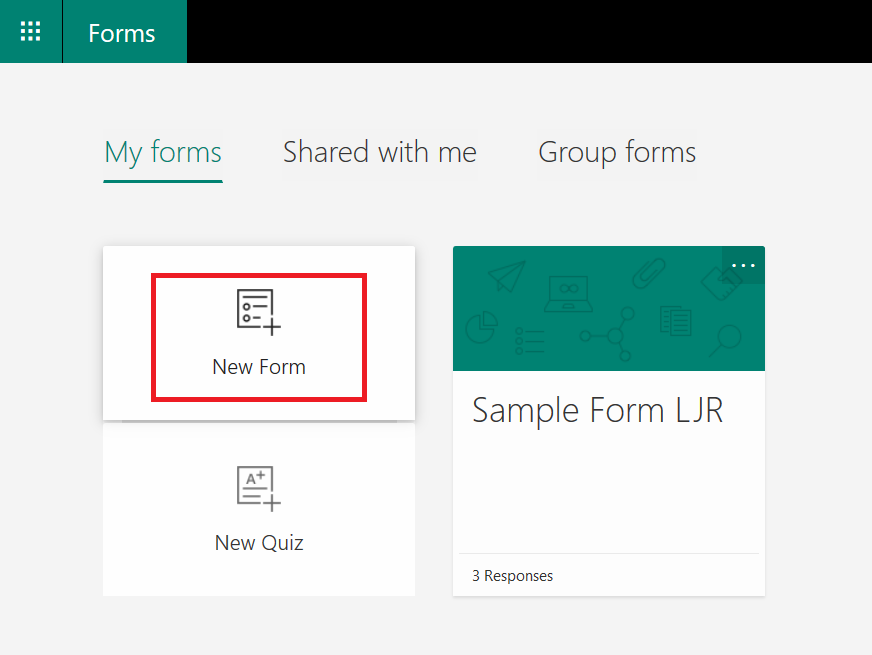
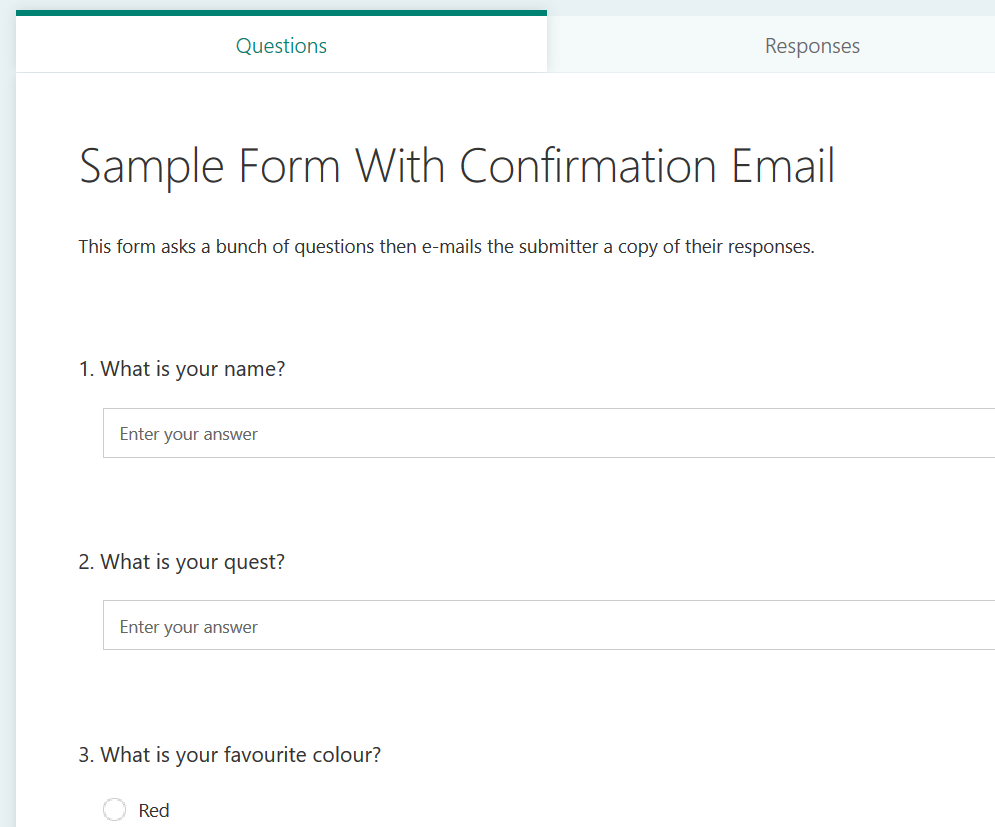
Give your form a name and add some questions
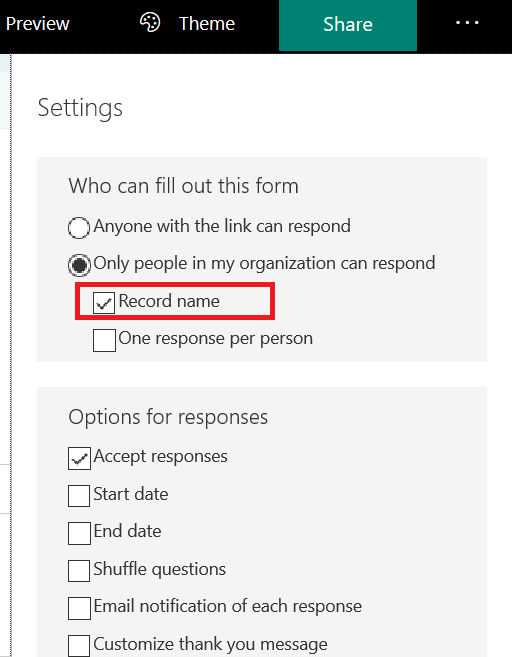
From the hamburger menu in the upper right-hand corner, select “Settings”

Verify that the form is restricted to “people in my organization” and “Record name” is selected.

** If the form needs to be available to individuals outside of the organization, you would need a form field to request their e-mail address … otherwise we don’t know where to send the receipt.
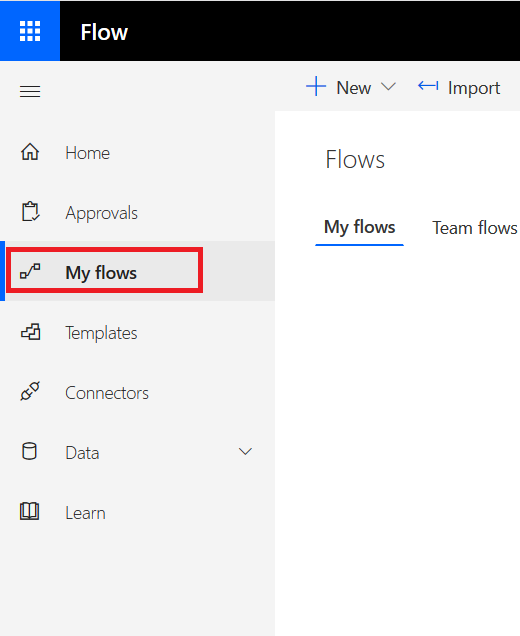
OK, we’ve got a form. Now we need to add a workflow to send the submitter a copy of their responses. Go to https://flow.microsoft.com and select the “My Flows” tile
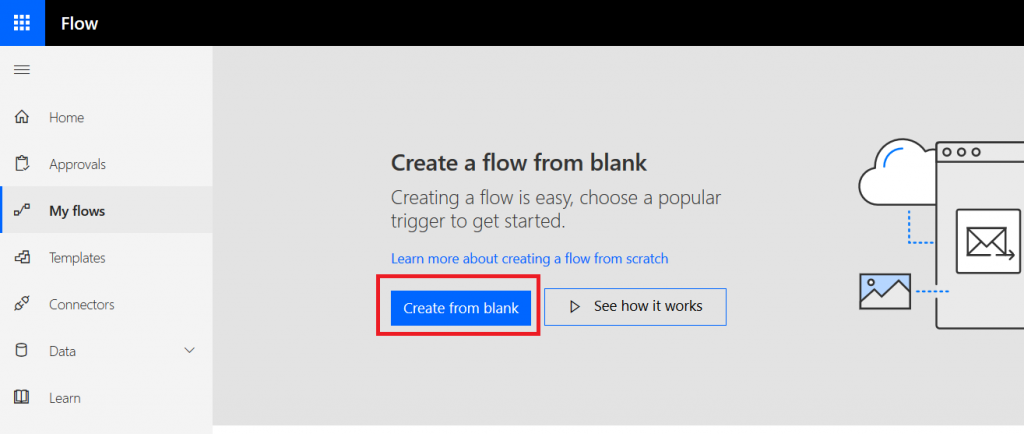
Click on “New” and “Create from blank” to begin creating the workflow.
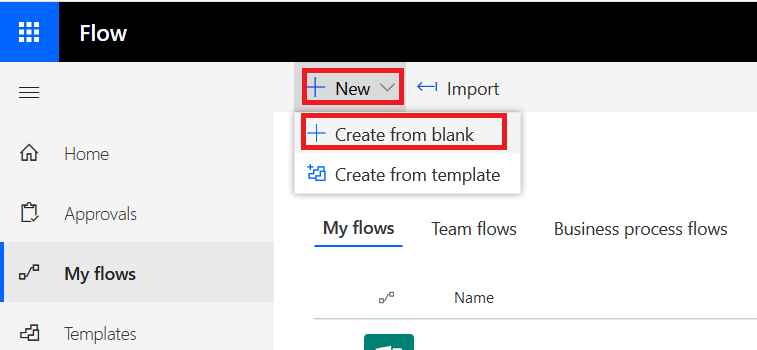
Click “Create from blank” again to confirm you really don’t want one of their templates
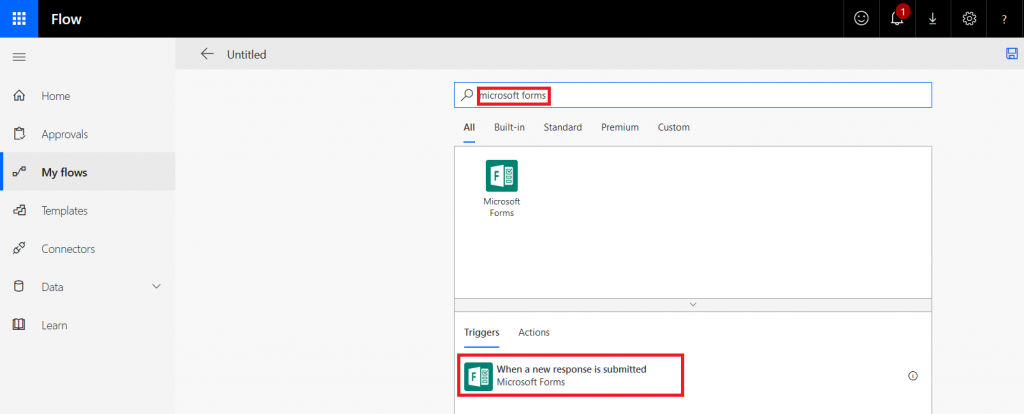
In the search field, type “Microsoft forms” and select the trigger “When a new response is submitted”
Select the form for which you want to generate a receipt – in my case, the form I just created.

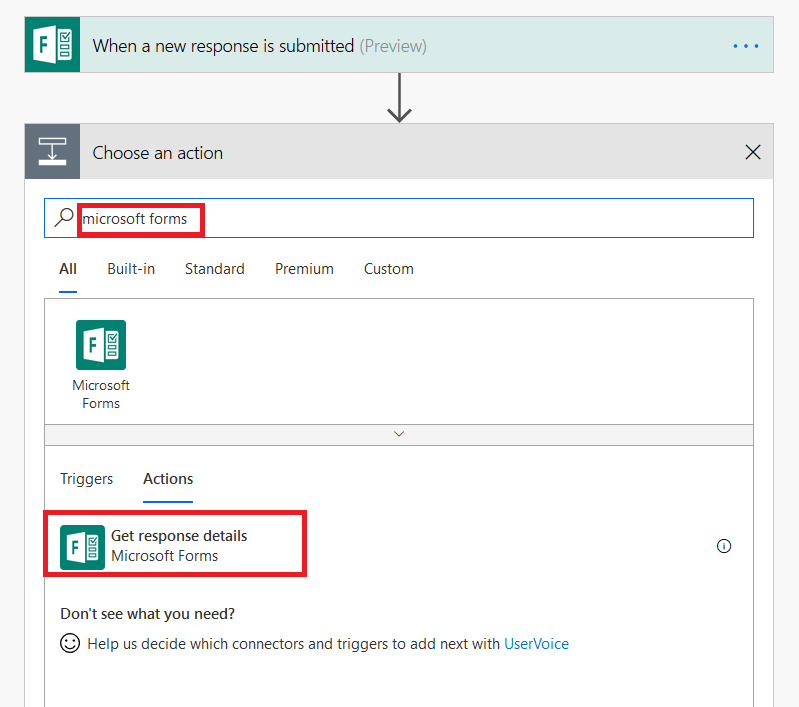
Select “New Step”

Type “Microsoft forms” in the search dialogue again, and select “Get response details”.
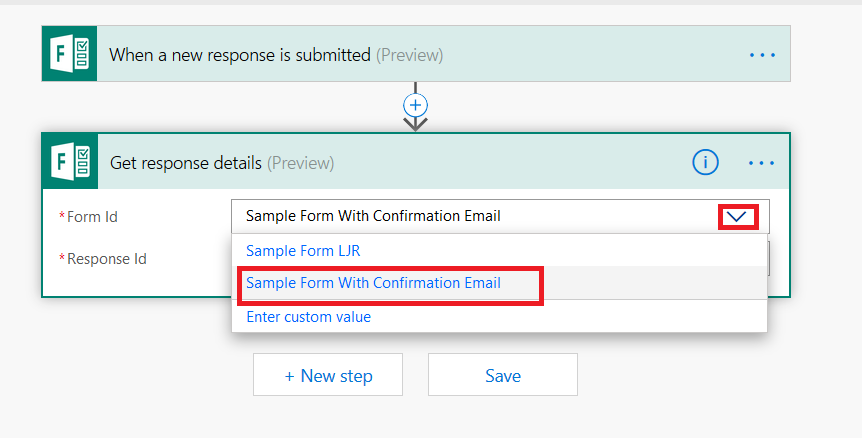
Click the inverted caret for “Form Id” and select your form again.
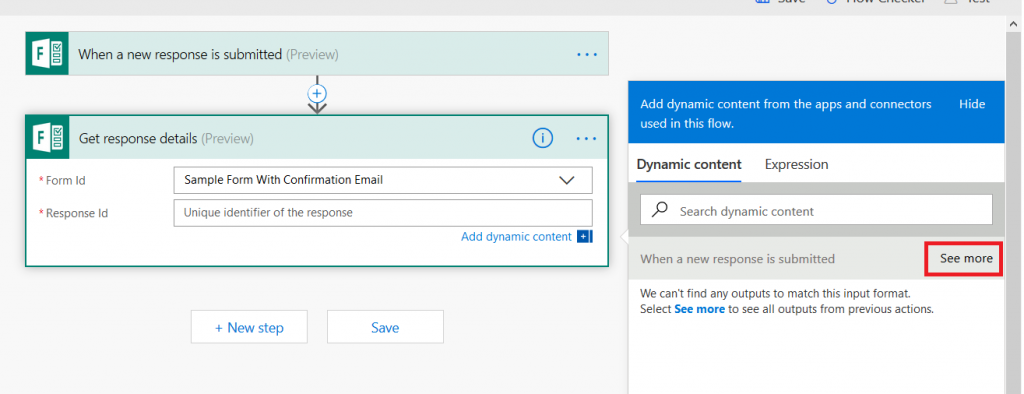
Click in the “Response Id” field – a new pane will appear to the right of your workflow. Click the “See more” button across from “When a new response is submitted”
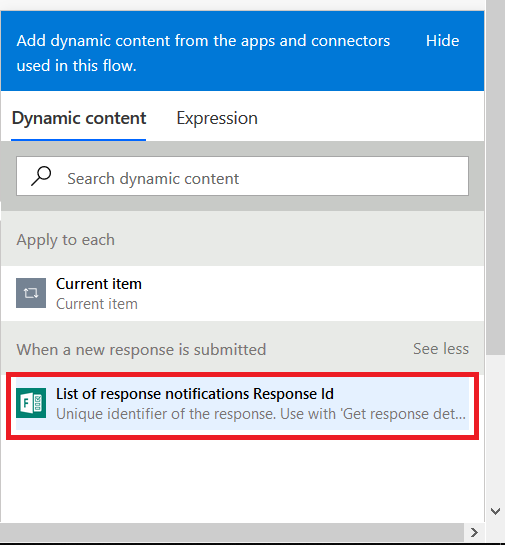
Select “List of response notification Response Id”
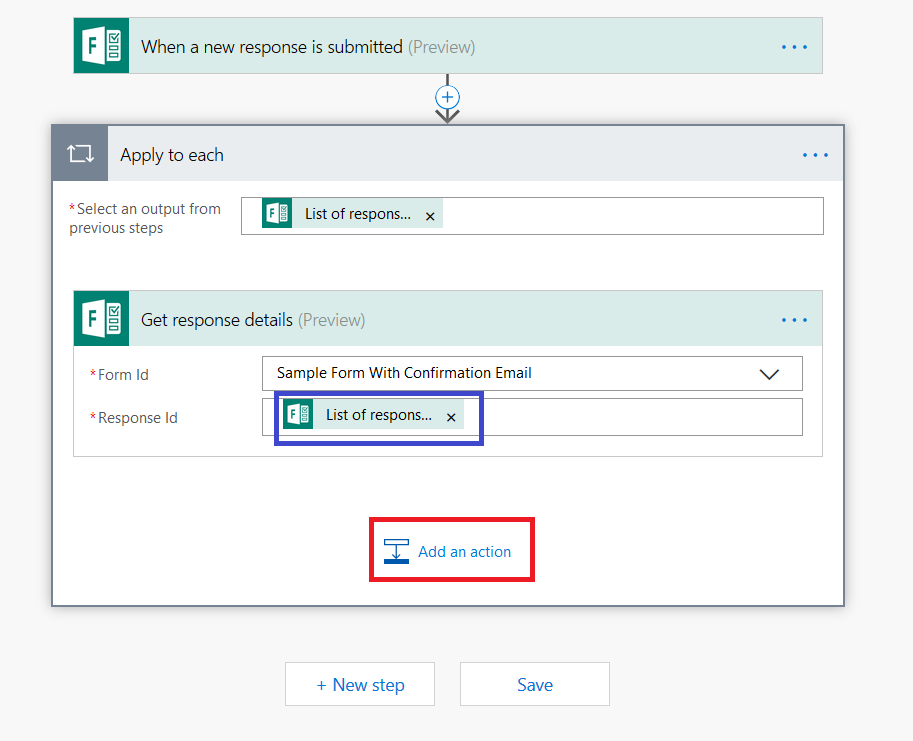
You’ll see the selection populated in the “Response Id” section. Click “Add an action”
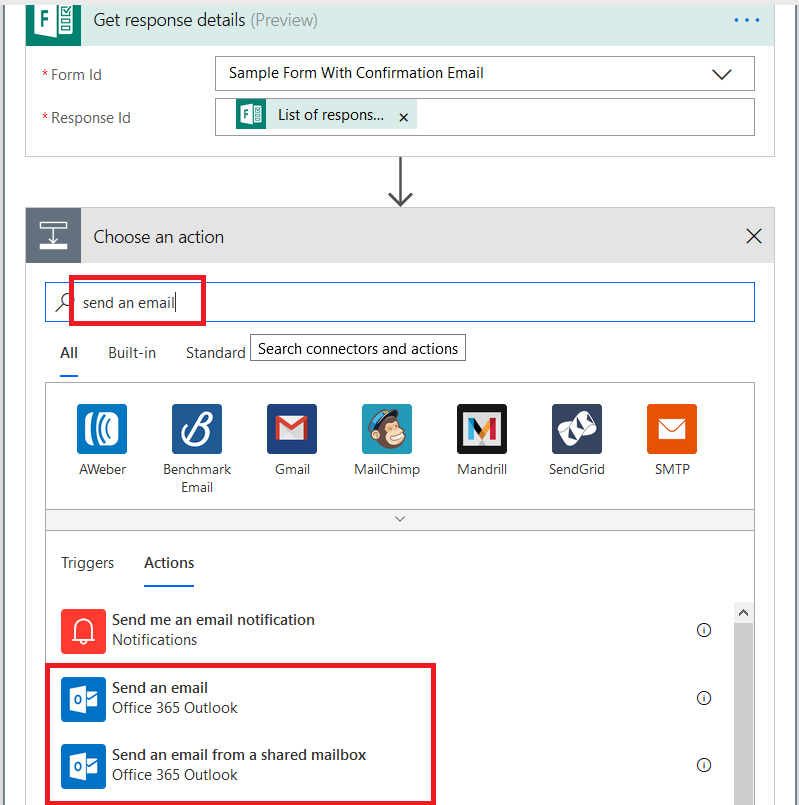
In the search dialog, type “send an email”. To send the receipt from your mailbox, select “Send an email” – to send the receipt from a generic mailbox to which you have send-as access select “Send an email from a shared mailbox”.
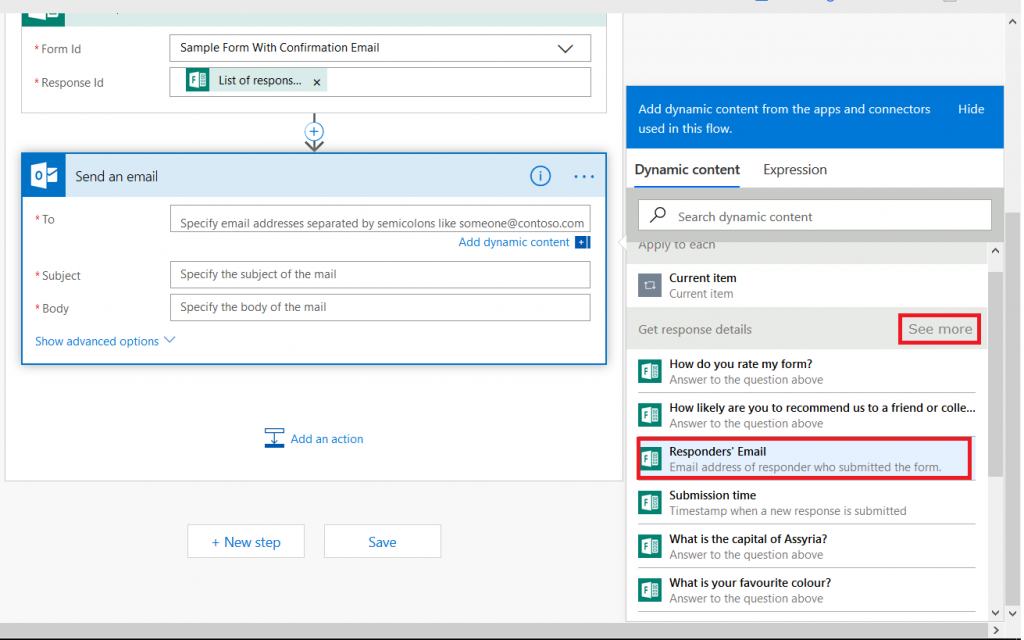
Click in the “To” field – the dynamic content pane will appear on the right again. Click “See more” across from “Get response details”. If this form is locked down to submitters within the organization and the submitter’s name is recorded, you can select “Responders’ email”, otherwise select the form question where you’re quested the submitter’s e-mail address (warning – since there’s nothing verifying the individual actually owns the e-mail address, forms that take freeform e-mail address submissions can be used to “spam” others).
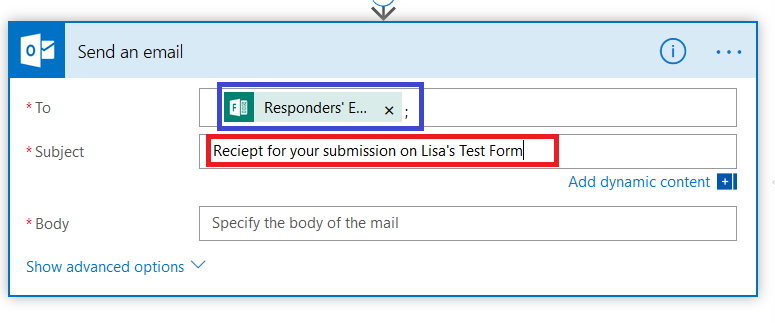
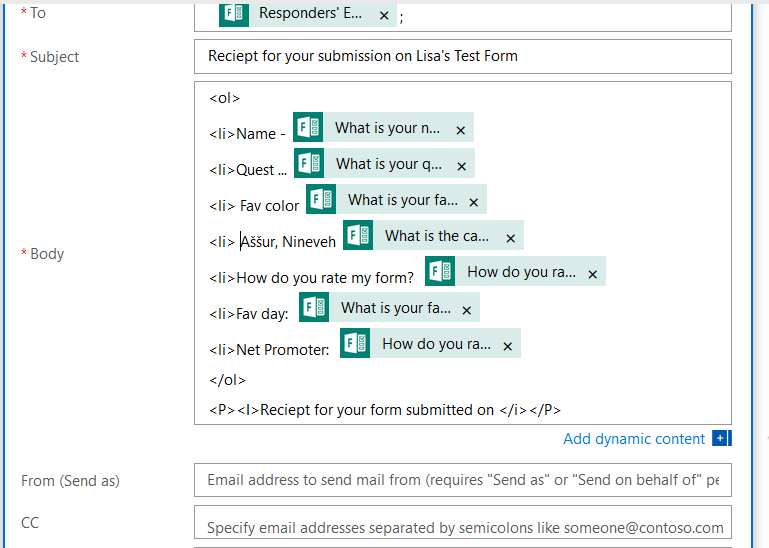
You’ll see “Responders’ E…” populated into the “To” field. Type in a reasonably descriptive subject for your message.
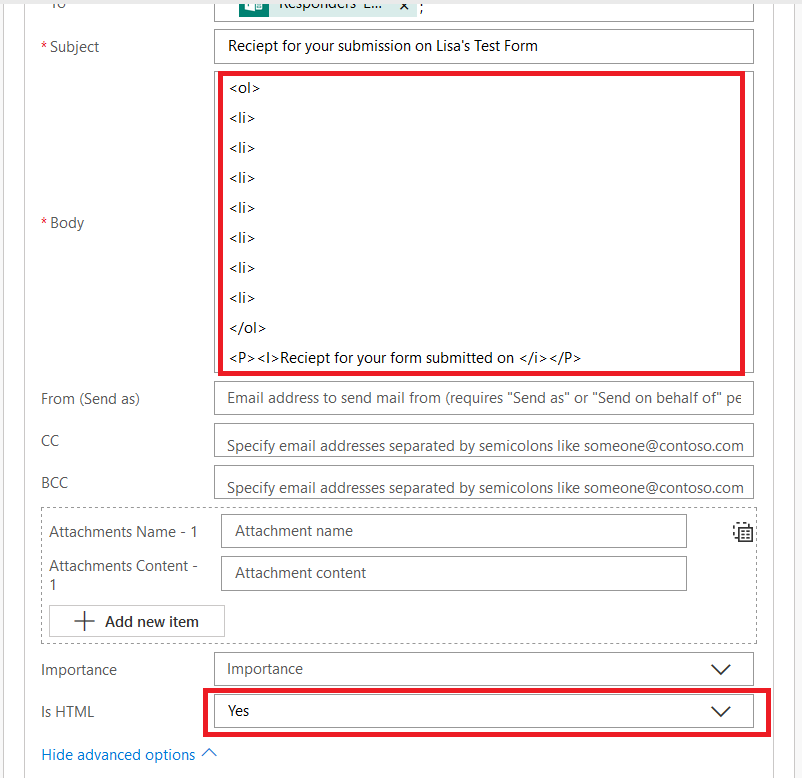
I start by creating my message template – pretty messages will require HTML, so click to “Show advanced options” and set “Is HTML” to yes.
Now’s the part where we include the individual’s response data – click back into the “Body” field and you’ll see the dynamic content pane again. Within the message body, click where you want the response to appear (here, it’s after my first “<LI>” tag. Then select the question whose response you want to insert into that position.
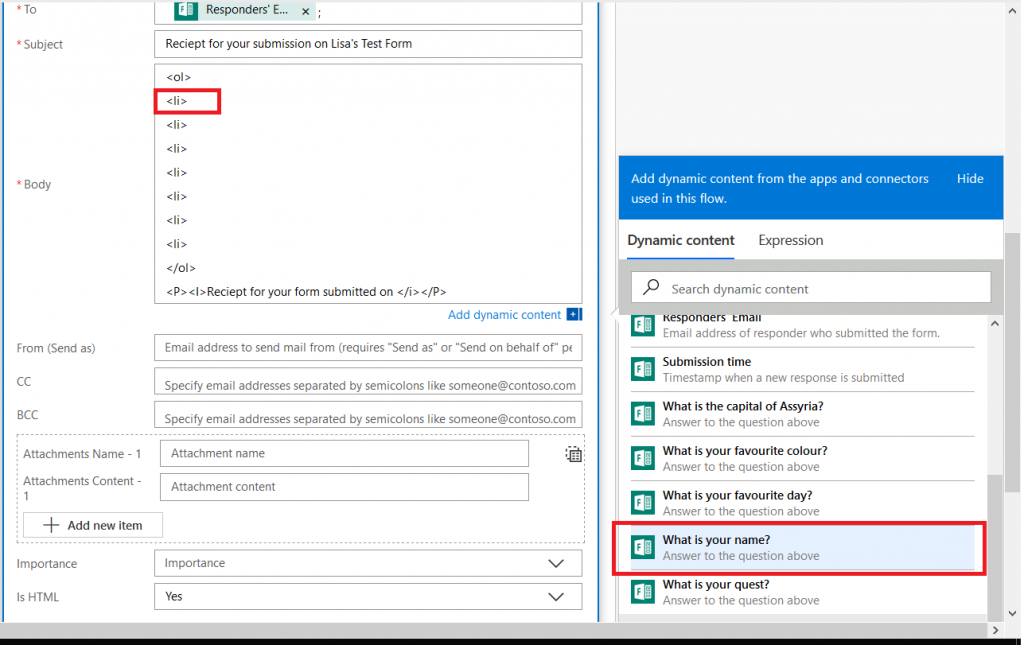
It’s generally helpful to type something before the answer to remind the person what the question was – it’s freeform text, and pretty much anything you can do in HTML is acceptable here.
Once you have finished creating your message template, scroll down to the bottom and click “Save”
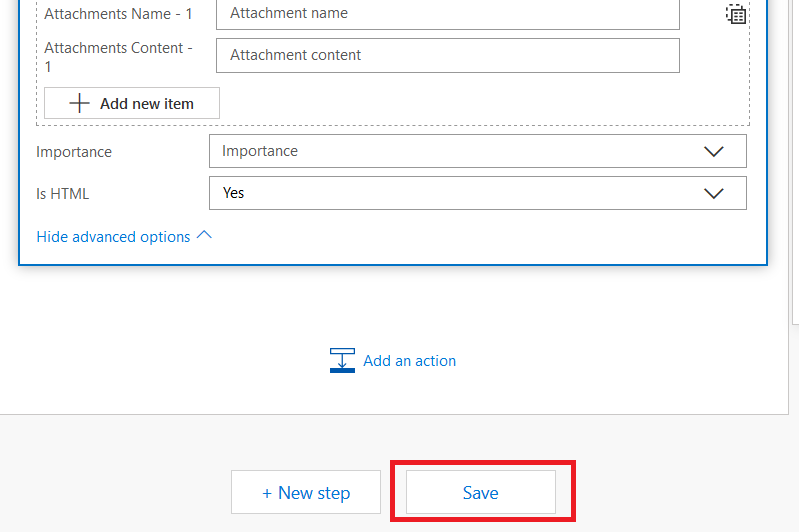
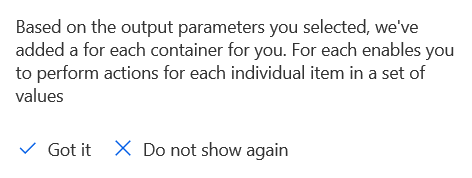
You may get a warning that a “for each” container has been added for you … that’s good, we want to generate a receipt for each submission!
Now that your workflow has been saved, click “Test”

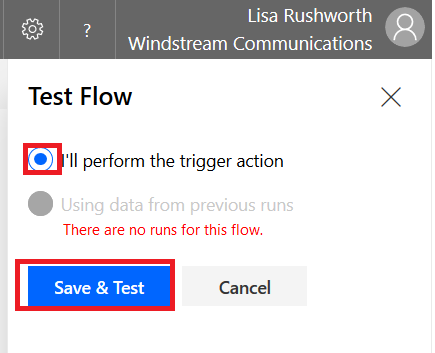
Select “I’ll perform the trigger action” and then click “Save & Test”
Return to your form and click “Preview”. Complete your form and click submit.

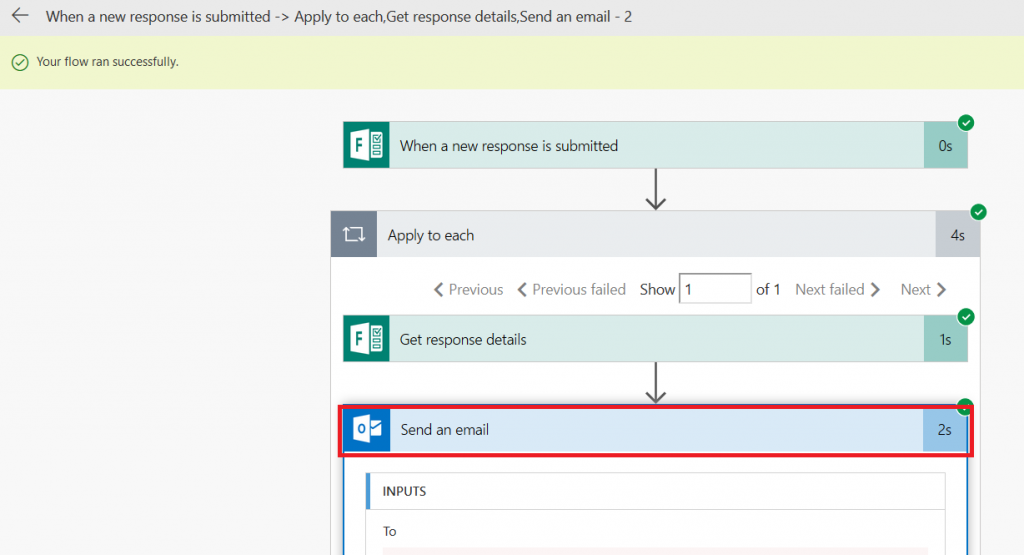
Return to Flow. If you are quick enough, you’ll see a message that your flow is running. Wait. Eventually you’ll see the results. You can click on the “Send an email” section to see detailed results.
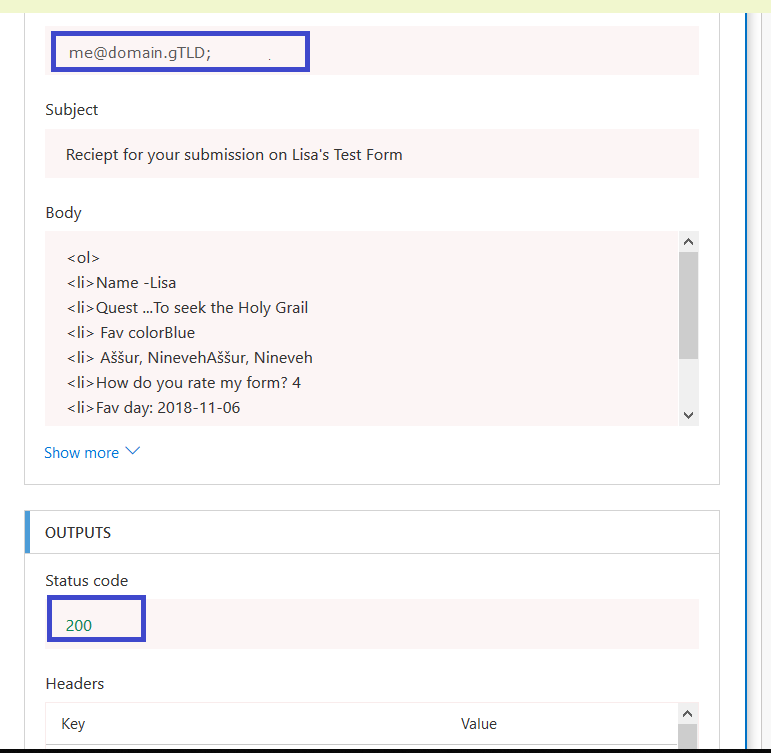
Including the e-mail address to which the receipt was sent and the status code (200 is good).
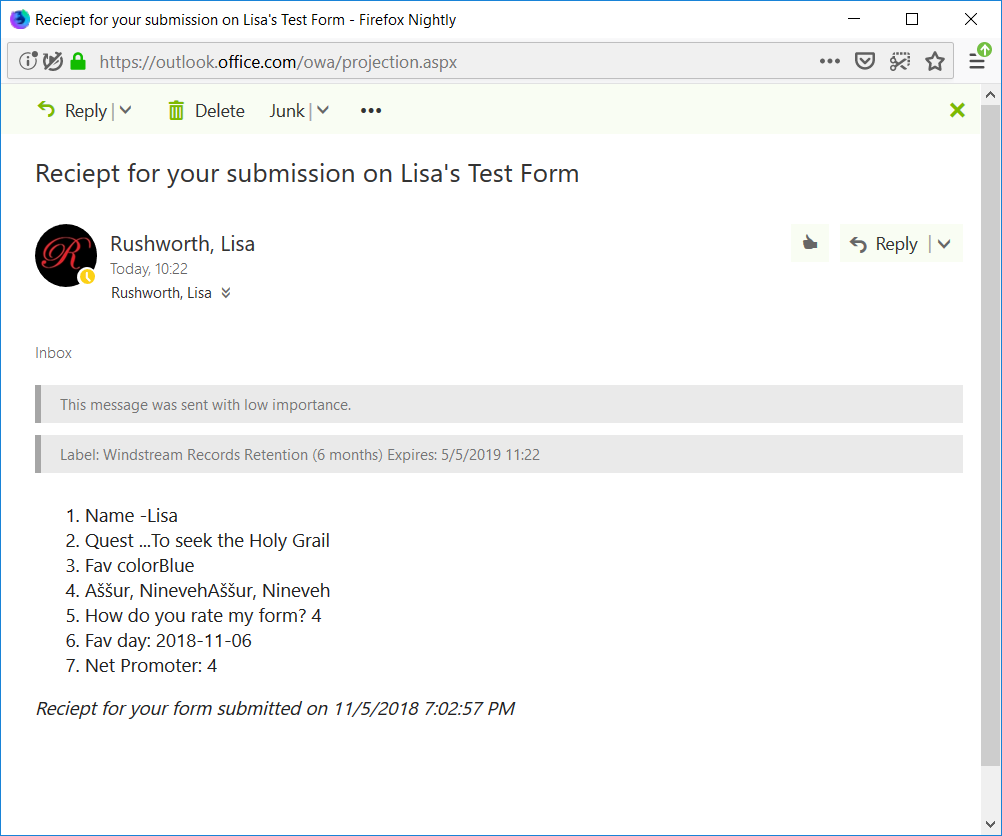
Check your mailbox too – you should have a message:
 

Did you know … Connectors can be used to display external information in Microsoft Teams Channels?

Microsoft Teams is a single workspace that provides access to a vast array of resources. You’ve got links to important web sites, posts from other Team members, discussion surrounding shared documents … but did you know posts can automatically be created from external systems?

Why? Well … doing so allows Teams to simplify finding and distributing information. Instead of having ten people subscribed to a vendor newsletter or five people trying to remember to check a web site for information, the information comes to every Team member directly in their Teams application.

You can turn vendor-provided patch and outage notifications via RSS or Twitter into Teams posts. Google Analytics data for your site can appear in Teams posts. Jenkins has an Office365 connector that reports pipeline information in Teams posts. Browse the available connectors to see what is useful in your group.

“Best practice” recommendation: some of these connectors rely solely on Microsoft’s Internet connection to an Internet-accessible resource – as in the example I present below. These connectors are essentially self-documenting because you can view the Connector configuration to determine the URL with which the connector communicates. Many connectors, however, use web hooks registered within your application or user credentials to access the remote system. In the “Files” or “Wiki” section of the channel in which the Connector is used, create a document detailing any configuration that was done – instructions for creating a web hook in your system, which account was used to access the remote system (don’t write the password in the document!).

For connectors that require user credentials, do not use a personal account. Create a new account for your Teams feed. Twitter, for example, requires a user account to follow other accounts or hashtags. Were I to use my Twitter account in the configuration … if I transfer ownership of the Team space to someone else, they’re inheriting a configuration with my account; but I’m not going just hand my password over to them. Even if ownership of the Team space never changes, we could cease seeing updates next time I change my Twitter password. Or decide to close my account. Or … point being, if you have a non-user account, the Team owners can maintain control of the account and any changes to it.

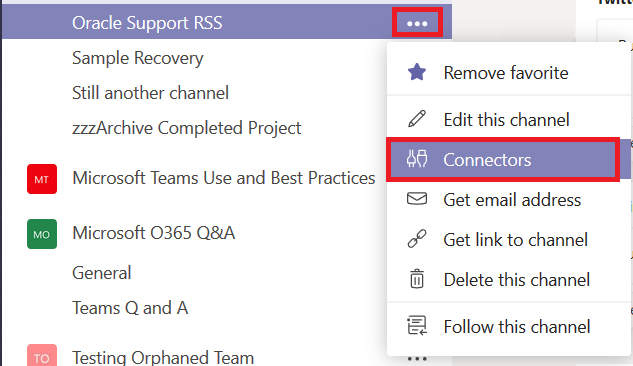
Using Connectors: Decide where you want the data posted – this can be a dedicated channel created just for this connector or it can be an existing one. Click the hamburger menu next to the channel into which you want messages posted. Select “Connectors”.

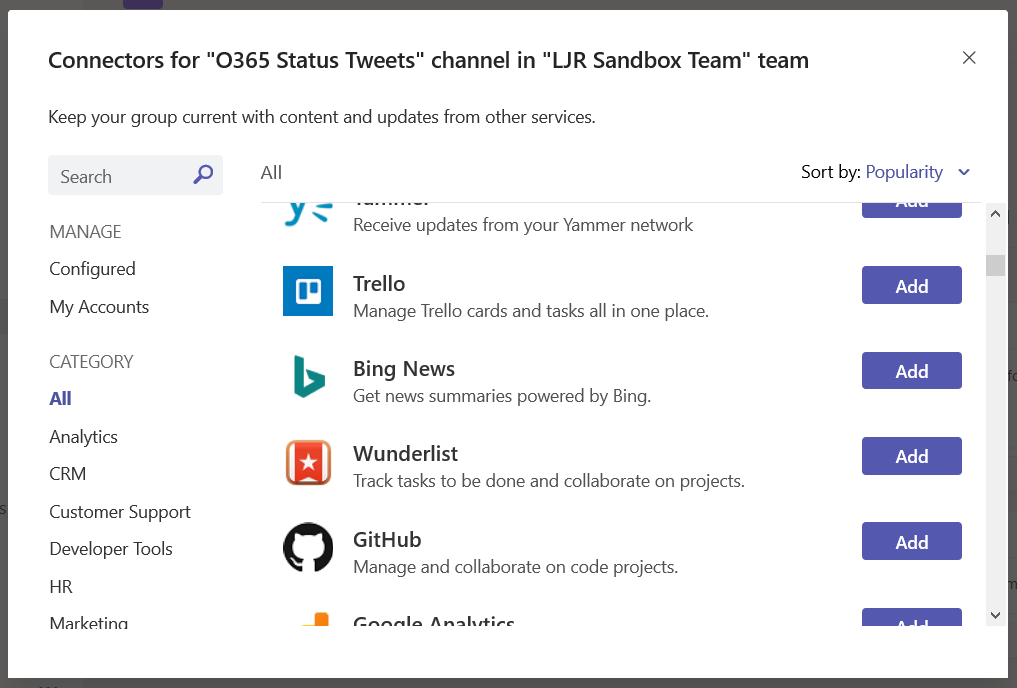
Browse through the list. Or type in the “Search” box to locate a specific connector. Click “Add” next to the connector you want to use.

Setup will vary depending on the connector selected – the Jenkins connector provides a URL to paste into your server config, Twitter asks for credentials and individuals or hashtags you want to follow in the channel. In this example, I am adding an RSS data feed.

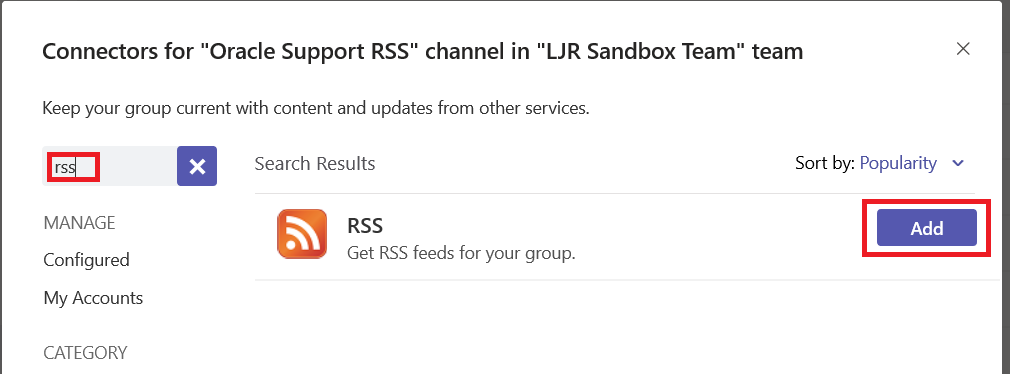
Type ‘rss’ in the search dialog. If this is the first time you’ve used the connector within this Team space, click “Add”.

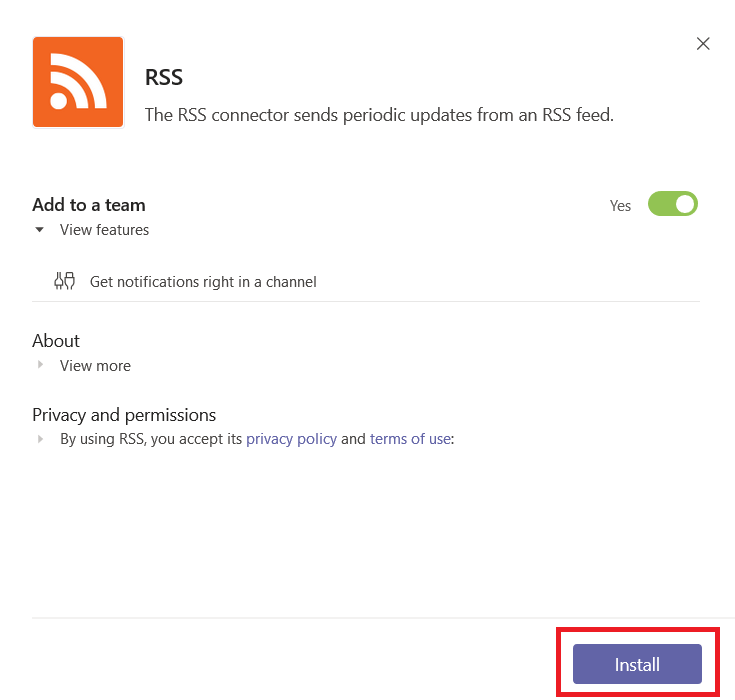
In this case, there’s not much on the next screen – read the privacy and terms of use statements.  Assuming the connector permits your intended use and you agree to all of their terms, click “Install”.

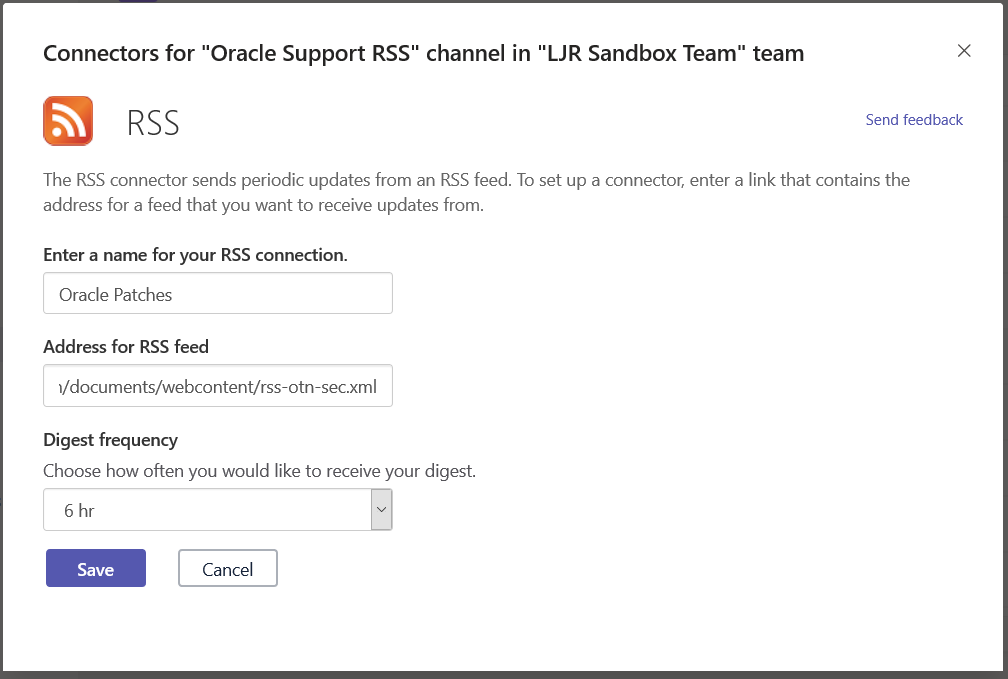
Enter a name for the connector, paste in the RSS feed URL, and select how often you want Teams to check for new data in the feed. Click “Save”

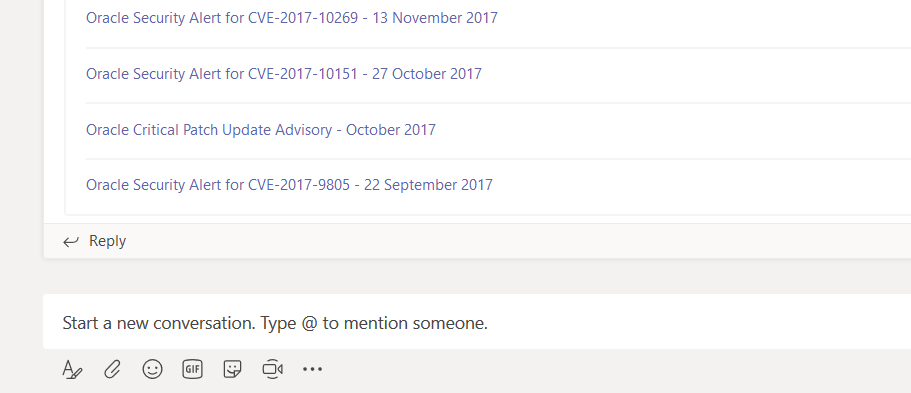
A post will be created in your channel with data from the RSS feed. Some feeds will provide information, some just provide a link. And when new data is posted to the RSS feed, a new post will be created in your Teams space.

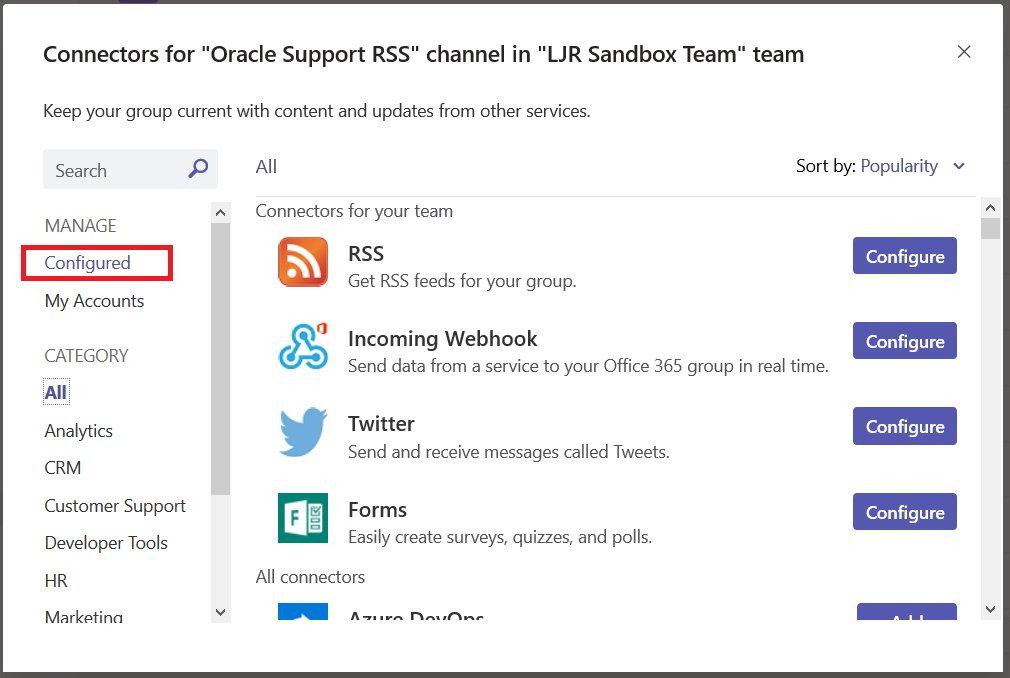
If you need to make a change to an existing connector, click the hamburger menu next to the channel on which the connector is configured. Select “Connectors”.

In the left-hand column, select “Configured”

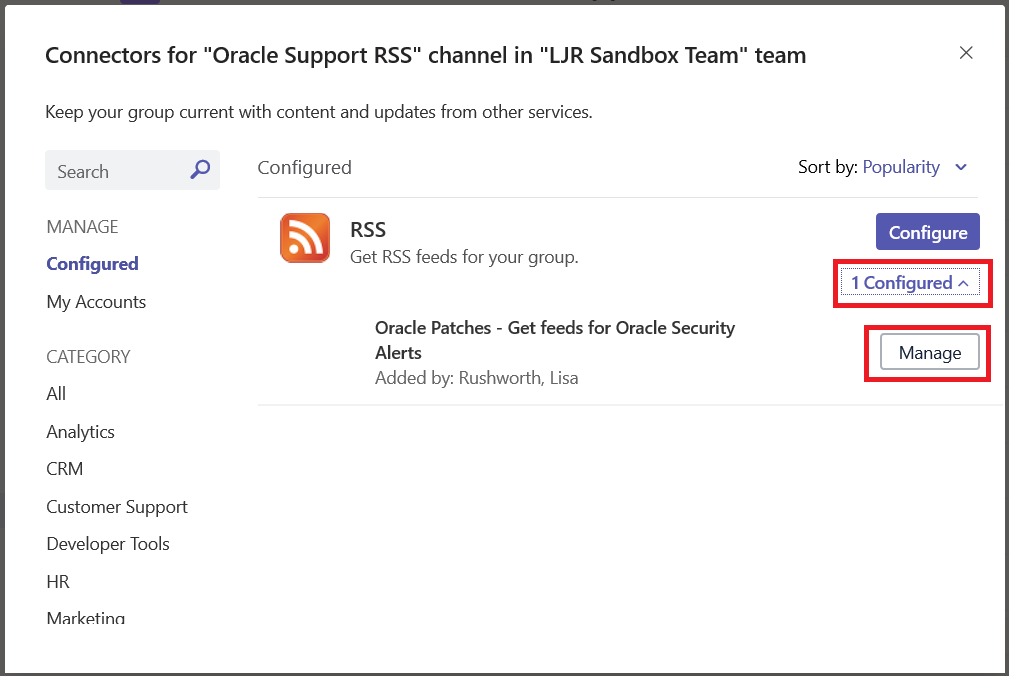
The “Configure” button will set up another connector on the channel. Instead, click the “# Configured” link below the “Configure” button. Then click “Manage” for the connector you want to manage.

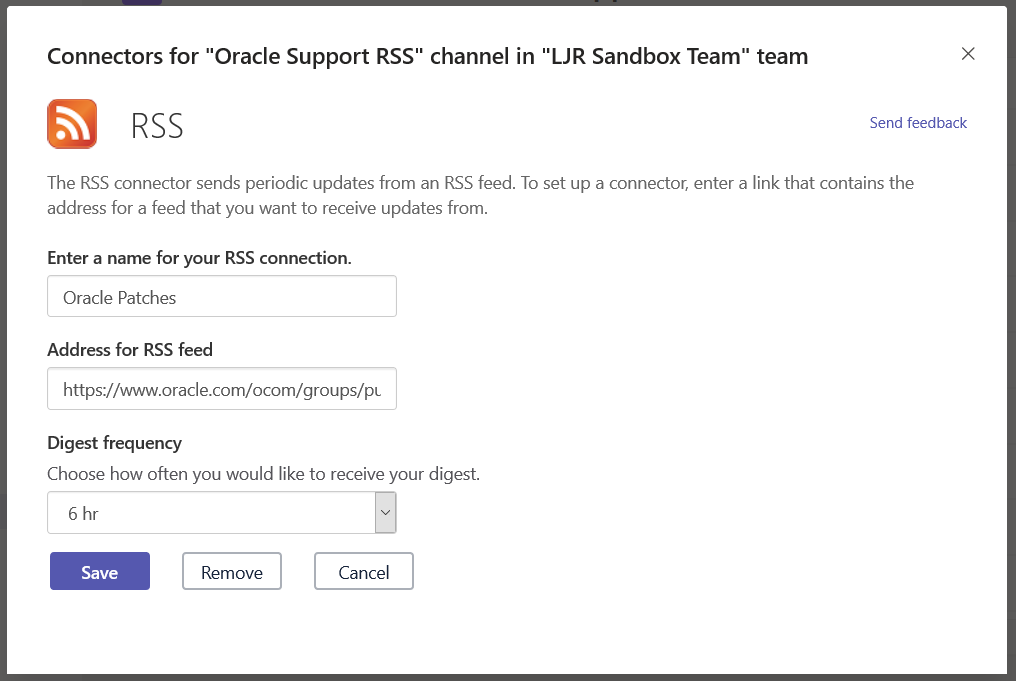
Make whatever changes you need to make and click save. Or click “Remove” to remove the connector from the channel.