Tag: Redhat

OpenZFS On RedHat 8 (From Package)

This process presumes you have generated a signing key (/root/signing/MOK.priv and /root/signing/MOK.der) that has been registered for signing modules.

################################################################################
## Install from Repo and Sign Modules
################################################################################
yum install https://dl.fedoraproject.org/pub/epel/epel-release-latest-8.noarch.rpm
yum install kernel-devel

# Install kmod version of ZS
yum install https://zfsonlinux.org/epel/zfs-release-2-3$(rpm --eval "%{dist}").noarch.rpm
dnf config-manager --disable zfs
dnf config-manager --enable zfs-kmod
yum install zfs

# And autoload
echo zfs >/etc/modules-load.d/zfs.conf

# Use rpm -ql to list out the kernel modules that this version of ZFS uses -- 2.1.x has quite a few of them, and they each need to be signed
# Sign zfs.ko and spl.ko in current kernel
/usr/src/kernels/$(uname -r)/scripts/sign-file sha256 /root/signing/MOK.priv /root/signing/MOK.der /lib/modules/$(uname -r)/weak-updates/zfs/zfs/zfs.ko
/usr/src/kernels/$(uname -r)/scripts/sign-file sha256 /root/signing/MOK.priv /root/signing/MOK.der /lib/modules/$(uname -r)/weak-updates/zfs/spl/spl.ko
# And sign the bunch of other ko files in the n-1 kernel rev (these are symlinked from the current kernel)
/usr/src/kernels/$(uname -r)/scripts/sign-file sha256 /root/signing/MOK.priv /root/signing/MOK.der /lib/modules/4.18.0-513.18.1.el8_9.x86_64/extra/zfs/avl/zavl.ko
/usr/src/kernels/$(uname -r)/scripts/sign-file sha256 /root/signing/MOK.priv /root/signing/MOK.der /lib/modules/4.18.0-513.18.1.el8_9.x86_64/extra/zfs/icp/icp.ko
/usr/src/kernels/$(uname -r)/scripts/sign-file sha256 /root/signing/MOK.priv /root/signing/MOK.der /lib/modules/4.18.0-513.18.1.el8_9.x86_64/extra/zfs/lua/zlua.ko
/usr/src/kernels/$(uname -r)/scripts/sign-file sha256 /root/signing/MOK.priv /root/signing/MOK.der /lib/modules/4.18.0-513.18.1.el8_9.x86_64/extra/zfs/nvpair/znvpair.ko
/usr/src/kernels/$(uname -r)/scripts/sign-file sha256 /root/signing/MOK.priv /root/signing/MOK.der /lib/modules/4.18.0-513.18.1.el8_9.x86_64/extra/zfs/unicode/zunicode.ko
/usr/src/kernels/$(uname -r)/scripts/sign-file sha256 /root/signing/MOK.priv /root/signing/MOK.der /lib/modules/4.18.0-513.18.1.el8_9.x86_64/extra/zfs/common/zcommon.ko
/usr/src/kernels/$(uname -r)/scripts/sign-file sha256 /root/signing/MOK.priv /root/signing/MOK.der /lib/modules/4.18.0-513.18.1.el8_9.x86_64/extra/zfs/zstd/zzstd.ko

# Verify they are signed now
modinfo -F signer /usr/lib/modules/$(uname -r)/weak-updates/zfs/zfs/zfs.ko
modinfo -F signer /usr/lib/modules/$(uname -r)/weak-updates/zfs/spl/spl.ko

modinfo -F signer /lib/modules/4.18.0-513.18.1.el8_9.x86_64/extra/zfs/avl/zavl.ko
modinfo -F signer /lib/modules/4.18.0-513.18.1.el8_9.x86_64/extra/zfs/icp/icp.ko
modinfo -F signer /lib/modules/4.18.0-513.18.1.el8_9.x86_64/extra/zfs/lua/zlua.ko
modinfo -F signer /lib/modules/4.18.0-513.18.1.el8_9.x86_64/extra/zfs/nvpair/znvpair.ko
modinfo -F signer /lib/modules/4.18.0-513.18.1.el8_9.x86_64/extra/zfs/unicode/zunicode.ko
modinfo -F signer /lib/modules/4.18.0-513.18.1.el8_9.x86_64/extra/zfs/zcommon/zcommon.ko
modinfo -F signer /lib/modules/4.18.0-513.18.1.el8_9.x86_64/extra/zfs/zstd/zzstd.ko

# Reboot
init 6

# And we've got ZFS, so create the pool
zpool create pgpool sdc
zfs create zpool/zdata
zfs set compression=lz4 zpool/zdata

zfs get compressratio zpool/zdata
zfs set mountpoint=/zpool/zdata zpool/zdata

What happens if you only sign zfs.ko? All sorts of errors that look like there’s some sort of other problem — zfs will not load. It will tell you the required key is not available

May 22 23:42:44 sandboxserver systemd-modules-load[492]: Failed to insert 'zfs': Required key not available

Using insmod to try to manually load it will tell you there are dozens of unknown symbols:

May 22 23:23:23 sandboxserver kernel: zfs: Unknown symbol ddi_strtoll (err 0)
May 22 23:23:23 sandboxserver kernel: zfs: Unknown symbol spl_vmem_alloc (err 0)
May 22 23:23:23 sandboxserver kernel: zfs: Unknown symbol taskq_empty_ent (err 0)
May 22 23:23:23 sandboxserver kernel: zfs: Unknown symbol zone_get_hostid (err 0)
May 22 23:23:23 sandboxserver kernel: zfs: Unknown symbol tsd_set (err 0)

But the real problem is that there are unsigned modules so … there are unknown symbols. But not because something is incompatible. Just because the module providing that symbol will not load.

OpenZFS on RedHat 8 – Build from Source

This process presumes you have generated a signing key (/root/signing/MOK.priv and /root/signing/MOK.der) that has been registered for signing modules.

# Install prerequisites
dnf install --skip-broken epel-release gcc make autoconf automake libtool rpm-build libtirpc-devel libblkid-devel libuuid-devel libudev-devel openssl-devel zlib-devel libaio-devel libattr-devel elfutils-libelf-devel kernel-devel-$(uname -r) python3 python3-devel python3-setuptools python3-cffi libffi-devel git ncompress libcurl-devel

dnf install --skip-broken --enablerepo=epel --enablerepo=powertools python3-packaging dkms

# Clone OpenZFS repo
git clone https://github.com/openzfs/zfs
cd zfs
# generally stay in the main branch, but if you want to use the latest then check out the staging branch
# git checkout zfs-2.2.5-staging
./autogen.sh
./configure
make 
make install

# Sign the kernel modules
/usr/src/kernels/$(uname -r)/scripts/sign-file sha256 /root/signing/MOK.priv /root/signing/MOK.der /lib/modules/$(uname -r)/extra/zfs.ko
/usr/src/kernels/$(uname -r)/scripts/sign-file sha256 /root/signing/MOK.priv /root/signing/MOK.der /lib/modules/$(uname -r)/extra/spl.ko

# And verify the modules are signed
modinfo -F signer /usr/lib/modules/$(uname -r)/extra/zfs.ko
modinfo -F signer /usr/lib/modules/$(uname -r)/extra/spl.ko

Signing Kernel Modules

The new servers being built at work use SecureBoot — something that you don’t even notice 99% of the time. But that 1% where you are doing something “strange” like trying to use OpenZFS … well, you’ve got to sign any kernel modules that you need to use. Just installing them doesn’t work — they won’t load.

To sign a kernel module, first you need to create a signing key and use mokutil to import it into the machine owner key store.

cd /root
mkdir signing
cd signing
openssl req -new -x509 -newkey rsa:2048 -keyout MOK.priv -outform DER -out MOK.der -nodes -days 36500 -subj "/CN=Windstream/"

mokutil --import MOK.der

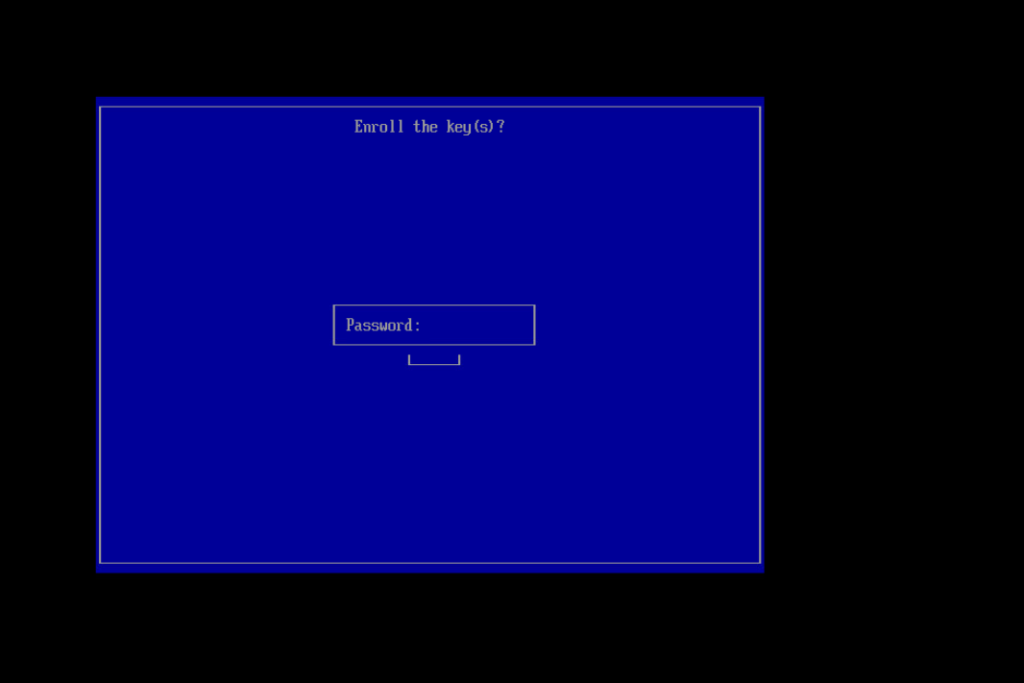
When you run mokutil, you will set a password. This password will be needed to complete importing the key to the machine.

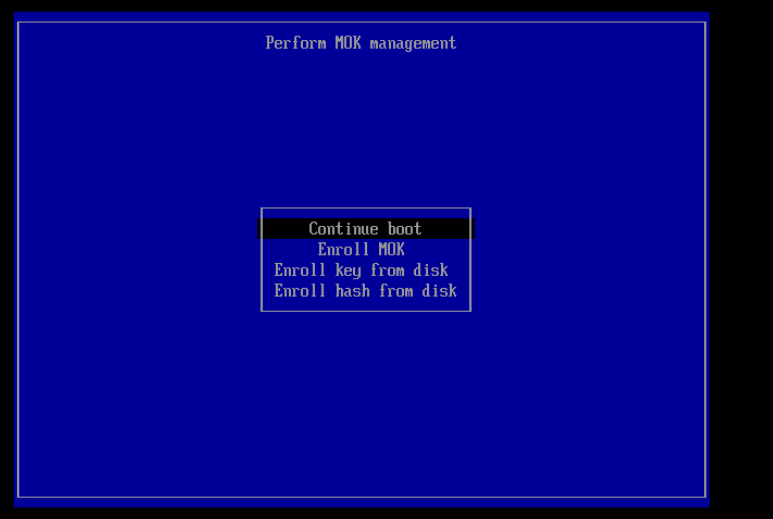
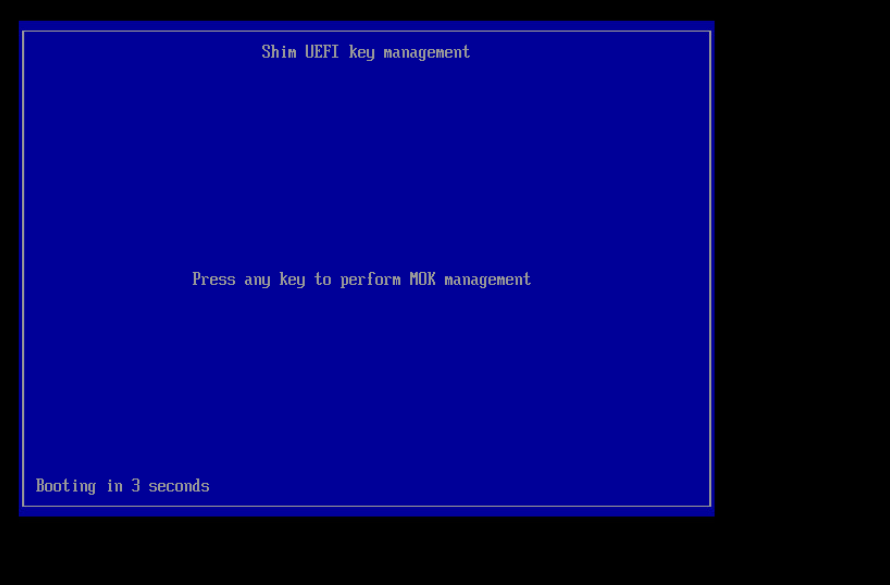
Get access to the console — out of band management, vSphere manager, stand in front of the server. Reboot, and there will be a “press any key” screen for ten seconds that begins the import process. Press any key!

Select “Enroll MOK”

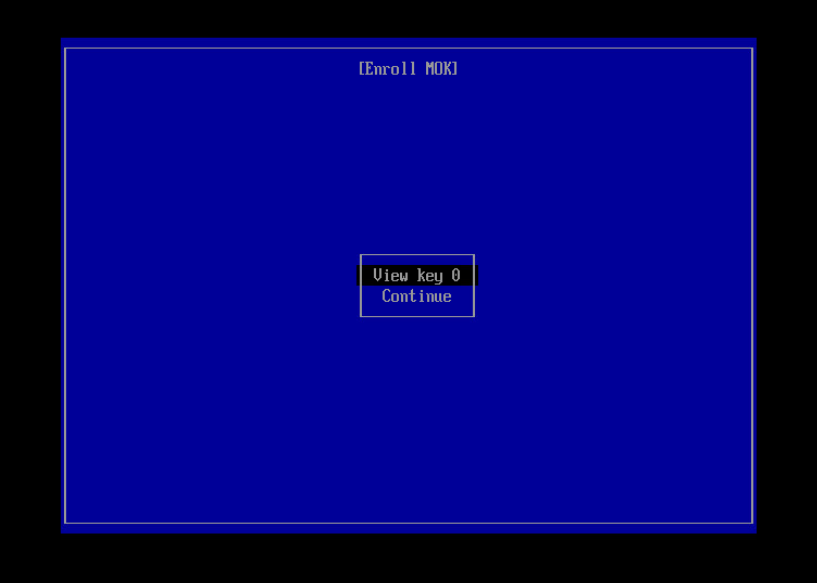
View the key and verify it is the right one, then use ‘Continue’ to import it

Enter the password used when you ran mokutil

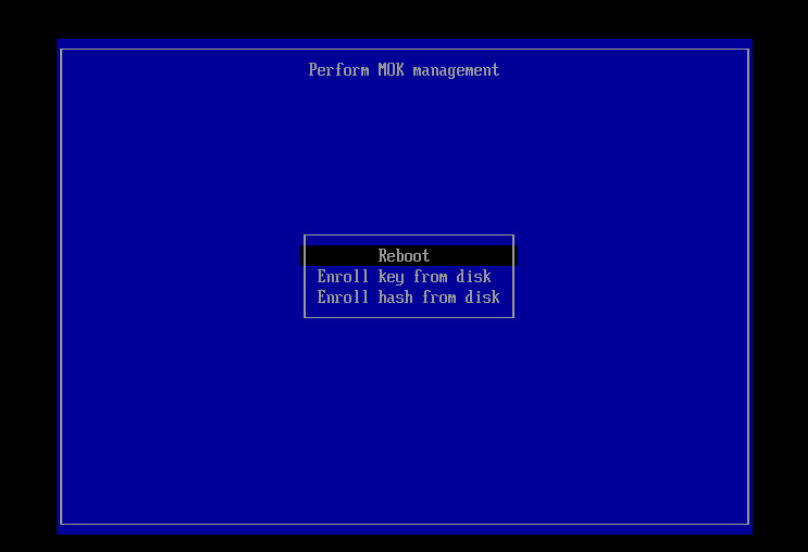
Then reboot

To verify your key has been successfully enrolled:

mokutil --list-enrolled

Postgresql with File System Compression – VDO and ZFS

Our database storage is sizable. To reduce the financial impact of storing so much data, we opted to use a compressed file system. This allows us to maintain, for example, 8TB of data in under 2TB of space. Unfortunately, the ZFS file system we use to compress our data is no longer “built in” with newer version of RedHat.

There are alternatives. BTRFS is a long-standing option, however it’s got reliability issues (we piloted BTRFS on one of the read only replicas, and the compression ratio is nowhere near as good — the 2TB of ZFS data filled the 10TB BTRFS disk even using the better compression option. And I/O was so slow there was a continual replication backlog). RedHat introduced Virtual Disk Optimizer to replace ZFS. In theory, it’s better since it also deduplicates data (e.g. if every one of us saved the same PPT presentation to the disk, only one copy would actually be stored). That’s great for email and file shares where a lot of people are likely to store the same information. Not so useful on a database server where there’s little to de-duplicate. It does, however, compress data … so we decided to try it out.

The results, unfortunately, are not spectacular. VDO does not allow you to do much customization of the compression. It’s on or off. I’ve found some people tweaking it up in unsupported ways, but the impetus behind trying VDO was that it’s supported by RedHat. Making unsupported changes to it defeats that purpose. And the compression that we’re seeing is far less than we get in ZFS. Our existing servers run between 4.5x and 6x compression

In VDO, however, we don’t even get a 2x compression factor. 11TB of information is stored in 8TB of space! That’s 1.4x

So, while we found the performance of VDO to be satisfactory and it’s really easy to use in newer RedHat releases … we’d have to increase our 20TB LUNs to 80TB to continue storing the data we store today. That seems like A Really Bad Idea(tm).

Seems like I’m going to have to sort out using OpenZFS on the new servers.

Postgresql and Timescale with RedHat VDO

RedHat is phasing out ZFS – there are several reasons for this move, but primarily ZFS is a closed source Solaris (now Oracle) codebase. While OpenZFS exists, it’s not quite ‘the same’. RedHat’s preferred solution is Virtual Data Optimizer (VDO). This page walks through the process of installing PostgreSQL and creating a database cluster on VDO and installing TimescaleDB extension on the database cluster for RedHat Enterprise 8 (RHEL8)

Before we create a VDO disk, we need to install it

yum install vdo kmod-kvdo

Then we need to create a vdo – here a VDO named ‘PGData’ is created on /dev/sdb – a 9TB volume on which we will hold 16TB

vdo create --name=PGData --device=/dev/sdb --vdoLogicalSize=16T

Check to verify that the object was created – it is /dev/mapper/PGData in this instance

vdo list

Now format the volume using xfs.

mkfs.xfs /dev/mapper/PGData

And finally add a mount point

# Create the mount point folder
mkdir /pgpool
# Update fstab to mount the new volume to that mount pint
cat /etc/fstab
/dev/mapper/PGData /pgpool xfs defaults,x-systemd.requires=vdo.service 0 0
# Load the updated fstab
systemctl daemon-reload
# and mount the volume
mount -a

it should be mounted at ‘/pgpool/’

The main reason for using VDO with Postgres is because of its compression feature – this is automatically enabled, although we may need to tweak settings as we test it.

We now have a place in our pool where we want our Postgres database to store its data. So let’s go ahead and install PostgreSQL,

here we are using RHEL8 and installing PostgreSQL 12

# Install the repository RPM:
dnf install -y https://download.postgresql.org/pub/repos/yum/reporpms/EL-8-x86_64/pgdg-redhat-repo-latest.noarch.rpm
dnf clean all
# Disable the built-in PostgreSQL module:
dnf -qy module disable postgresql
# Install PostgreSQL:
dnf install -y postgresql12-server

Once the installation is done we need to initiate the database cluster and start the server . Since we want our Postgres to store data in our VDO volume we need to initialize it into our custom directory, we can do that in many ways,

In all cases we need to make sure that the mount point of our zpool i.e., ‘/pgpool/pgdata/’ is owned by the ‘postgres’ user which is created when we install PostgreSQL. We can do that by running the below command before running below steps for starting the postgres server

mkdir /pgpool/pgdata
chown -R postgres:postgres /pgpool

Customize the systemd service by editing the postgresql-12 unit file and updateding the PGDATA environment variable

vdotest-uos:pgpool # grep Environment /usr/lib/systemd/system/postgresql-12.service
# Note: avoid inserting whitespace in these Environment= lines, or you may
Environment=PGDATA=/pgpool/pgdata

and  then initialize, enable and start our server as below

/usr/pgsql-12/bin/postgresql-12-setup initdb
systemctl enable postgresql-12
systemctl start postgresql-12

Here ‘/usr/pgsql-12/bin/’ is the bin directory of postgres installation you can substitute it with your bin directory path.

or

We can also directly give the data directory value while initializing db using below command

/usr/pgsql-12/bin/initdb -D /pgpool/pgdata/

and then start the server using

systemctl start postgresql-12

Now we have installed postgreSQL and started the server, we will install the Timescale extension for Postgres now.

add the time scale repo with below command

tee /etc/yum.repos.d/timescale_timescaledb.repo <<EOL
[timescale_timescaledb]
name=timescale_timescaledb
baseurl=https://packagecloud.io/timescale/timescaledb/el/8/\$basearch
repo_gpgcheck=1
gpgcheck=0
enabled=1
gpgkey=https://packagecloud.io/timescale/timescaledb/gpgkey
sslverify=1
sslcacert=/etc/pki/tls/certs/ca-bundle.crt
metadata_expire=300
EOL
sudo yum update -y

then install  it using below command

yum install -y timescaledb-postgresql-12

After installing we need to add ‘timescale’ to shared_preload_libraries in our postgresql.conf, Timescale gives us ‘timescaledb-tune‘ which can be used for this and also configuring different settings for our database. Since we initialize our PG database cluster in a custom location we need to point the direction of postgresql.conf to timescaledb-tune it also requires a path to our pg_config file we can do both by following command.

timescaledb-tune --pg-config=/usr/pgsql-12/bin/pg_config --conf-path=/pgpool/pgdata/postgresql.conf

After running above command we need to restart our Postgres server, we can do that by one of the below commands

systemctl restart postgresql-12

After restarting using one of the above commands connect to the database you want to use Timescale hypertables in and run below statement to load Timescale extension

CREATE EXTENSION IF NOT EXISTS timescaledb CASCADE;

you can check if Timescale is loaded by passing ‘\dx’ command to psql which will load the extension list.

in order to configure PostgreSQL to allow remote connection we need to do couple of changes as below

Fedora 39: Load Balancing Across Two Network Connections

I think this is one of those things that people don’t normally do at home, and the folks who configure this in enterprises know what they’re doing and don’t need guidance on how to do basic network things. But … we wanted to have two network cards in our server so high network traffic usage like backups and TV recording don’t create contention. When I was a server admin, I’d set up link aggregation — bonding, teaming — and it just magically worked. We’d put in a port request to get the new port turned up, note it was going to be a teamed interface, do our OS config, and everything was fine. What the network guys did? I had no idea. Well, now I do!

On the switch — a Cisco 2960-S in this case — you need to create an EtherChannel and assign the ports to that channel. Telnet’ing to the switch, you first need to elevate your privileges as we start with level 1

wc2906s01>show priv
Current privilege level is 1

One you’ve entered privilege level 15, go into config term. Create the port-channel interface and assign it a number (I used 1, but 1 through 6 are options). Then go into each interface and add it to the port channel group you just created (again 1) — I set the mode to “on” because I doubt our server is going to negotiate PAgP and I didn’t want to get into setting up LACP.

enable 15
config term

interface Port-channel 1

interface GigabitEthernet1/0/13
channel-group 1 mode on

interface GigabitEthernet1/0/14
channel-group 1 mode on

# src-mac is the default, can change to something else
# e.g. src-dst-mac would be set using
# port-channel load-balance src-dst-mac
end

Done! Using show etherchannel summary confirms that this worked:

wc2906s01>show etherchannel summary
Flags: D - down P - bundled in port-channel
I - stand-alone s - suspended
H - Hot-standby (LACP only)
R - Layer3 S - Layer2
U - in use f - failed to allocate aggregator

M - not in use, minimum links not met
u - unsuitable for bundling
w - waiting to be aggregated
d - default port

Number of channel-groups in use: 1
Number of aggregators: 1

Group Port-channel Protocol Ports
------+-------------+-----------+-----------------------------------------------
1 Po1(SU) - Gi1/0/13(P) Gi1/0/14(P)

Then you can configure a network bond in Fedora and add the physical interfaces. Since we’re using KVM/QEMU, there is a VMBridge bridge that contains the bond, and the bond joins two physical interfaces named enp10s2 and enp0s25

# VM Bridge configuration

[lisa@fedora39 /etc/NetworkManager/system-connections/]# cat vmbridge.nmconnection
[connection]
id=vmbridge
uuid=b2bca190-827b-4aa4-a4f5-95752525e5e5
type=bridge
interface-name=vmbridge
metered=2
timestamp=1708742580

[ethernet]

[bridge]
multicast-snooping=false
priority=1
stp=false

[ipv4]
address1=10.1.2.3/24,10.5.5.1
dns=10.1.2.200;10.1.2.199;
dns-search=example.com;
may-fail=false
method=manual

[ipv6]
addr-gen-mode=stable-privacy
method=disabled

[proxy]


# Bond configuration — master is the vmbridge, and the round robin load balancing option is used.
[lisa@fedora39 /etc/NetworkManager/system-connections/]# cat bond0.nmconnection
[connection]
id=bond0
uuid=15556a5e-55c5-4505-a5d5-a5c547b5155b
type=bond
interface-name=bond0
master=vmbridge
metered=2
slave-type=bridge
timestamp=1708742580

[bond]
downdelay=0
miimon=1
mode=balance-rr
updelay=0

[bridge-port]

# Finally two network interfaces that are mastered by bond2
[lisa@fedora39 /etc/NetworkManager/system-connections/]# cat enp0s25.nmconnection
[connection]
id=enp0s25
uuid=159535a5-65e5-45f5-a505-a53555958525
type=ethernet
interface-name=enp0s25
master=bond0
metered=2
slave-type=bond
timestamp=1708733538

[ethernet]
auto-negotiate=true
mac-address=55:65:D5:15:A5:25
wake-on-lan=32768

[lisa@fedora39 /etc/NetworkManager/system-connections/]# cat enp10s2.nmconnection
[connection]
id=enp10s2
uuid=158525f5-f5d5-4515-9525-55e515c585b5
type=ethernet
interface-name=enp10s2
master=bond0
metered=2
slave-type=bond
timestamp=1708733538

[ethernet]
auto-negotiate=true
mac-address=55:35:25:D5:45:B5
wake-on-lan=32768


Restart NetworkManager to bring everything online. Voila — two network interfaces joined together and connected to the switch. Check out the bond file under /proc/net/bonding to verify this side is working.

[lisa@fedora39 ~/]# cat /proc/net/bonding/bond0
Ethernet Channel Bonding Driver: v6.7.5-200.fc39.x86_64

Bonding Mode: load balancing (round-robin)
MII Status: up
MII Polling Interval (ms): 1
Up Delay (ms): 0
Down Delay (ms): 0
Peer Notification Delay (ms): 0

Slave Interface: enp0s25
MII Status: up
Speed: 1000 Mbps
Duplex: full
Link Failure Count: 2
Permanent HW addr: 55:65:d5:15:a5:25
Slave queue ID: 0

Slave Interface: enp10s2
MII Status: up
Speed: 1000 Mbps
Duplex: full
Link Failure Count: 0
Permanent HW addr: 55:35:35:d5:45:b5
Slave queue ID: 0

Mounting DD Raw Image File

And a final note from my disaster recovery adventure — I had to use ddrescue to copy as much data from a corrupted drive as possible (ddrescue /dev/sdb /mnt/vms/rescue/backup.raw –try-again –force –verbose) — once I had the image, what do you do with it? Fortunately, you can mount a dd file and copy data from it.

# Mounting DD image
2023-04-17 23:54:01 [root@fedora /]# kpartx -l backup.raw
loop0p1 : 0 716800 /dev/loop0 2048
loop0p2 : 0 438835200 /dev/loop0 718848

2023-04-17 23:55:08 [root@fedora /]# mount /dev/mapper/loop0p2 /mnt/recovery/ -o loop,ro
mount: /mnt/recovery: cannot mount /dev/loop1 read-only.
       dmesg(1) may have more information after failed mount system call.

2023-04-17 23:55:10 [root@fedora /]# mount /dev/mapper/loop0p2 /mnt/recovery/ -o loop,ro,norecovery

2023-04-18 00:01:03 [root@fedora /]# ll /mnt/recovery/
total 205G
drwxr-xr-x  2 root root  213 Jul 14  2021 .
drwxr-xr-x. 8 root root  123 Apr 17 22:38 ..
-rw-r--r--. 1 root root 127G Apr 17 20:35 ExchangeServer.qcow2
-rw-r--r--. 1 qemu qemu  10G Apr 17 21:42 Fedora.qcow2
-rw-r--r--. 1 qemu qemu  15G Apr 17 14:05 FedoraVarMountPoint.qcow2


Mounting a QCOW File

We had a power outage on Monday that took out the drive that holds our VMs. There are backups, but the backup drive copies had superblock errors and all sorts of issues. To recover our data, I learned all sorts of new things — firstly that you can mount a QCOW file and copy data out. First, you have to connect a network block device to the file. Once it is connected, you can use fdisk to list the partitions on the drive and mount those partitions. In this example, I had a partition called nbd0p1 that I mounted to /mnt/data_recovery

modprobe nbd max_part=2
qemu-nbd --connect=/dev/nbd0 /path/to/server_file.qcow2
fdisk /dev/nbd0 -l
mount /dev/nbd0p1 /mnt/data_recovery

Once you are done, unmount it and disconnect from the network block device.

umount /mnt/data_recovery
qemu-nbd --disconnect /dev/nbd0
rmmod nbd