There are things that are evidently too self-evident to bear mentioning — I’m certain I do it too. A friend of mine who taught computer programming used the example of telling a student how to get to the Bursar’s office v/s writing computer code to do it. You don’t have to tell the person to leave the room, go down the hall, down the stairs, and outside. There’s a lot of instruction humans will infer. A computer, on the other hand, will be completely stymied if you omit a few steps.
Well, 3D printing seems to be loaded with so-obvious-I-won’t-mention-it stuff. A lot of getting started guides and troubleshooting guides are out there in Internet-land — level the bed at the temp you’ll be printing, temperature guides for different materials, how to identify leveling or flow problems in prints. But to get started … there are a few vital pieces of info that seem to fall into the “so obvious it isn’t worth mentioning” category.
Loading the WanHao Duplicator i3 Plus / Monoprice Maker Select IIIp v2, you have to depress the little lever to load filament. Also — even though you’ve got a brand new 3D printer, they’ve run a test print on it. Nice way to confirm everything works … but it also means that brand new device you just pulled out of the box … has a clogged nozzle and needs to be cleaned.
Filament doesn’t start flowing perfectly immediately — add a couple lines of ‘skirt’ to your print. It does nothing to prevent warping or increase bed adhesion, but it makes a small loop that you don’t subsequently need to detach from your printout. If there are a couple of blobs before the extruder really gets going on that little loop? No big.
With three leveling screws, you are never going to get it perfect. Each little tweak throws all the others out of whack (three points define a plane, four over-define it). Get the bed level to the point you’re making little teeny tiny adjustments and you’re good.
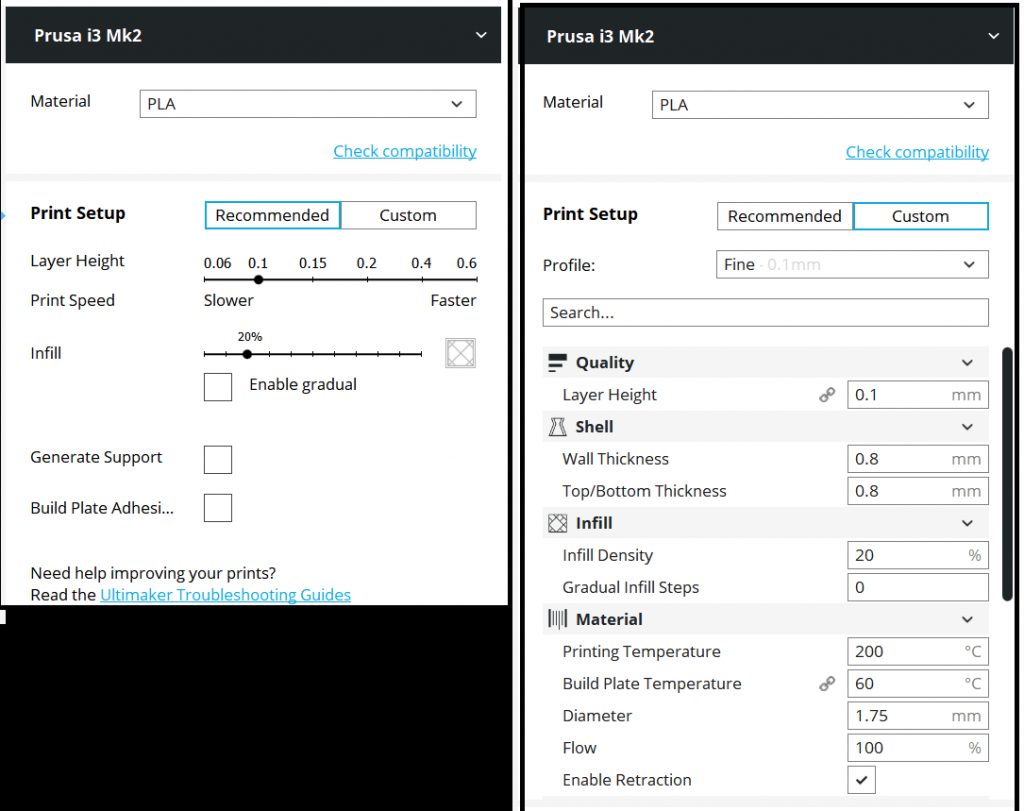
And in Cura – all of the good settings you need to tweak up to get adhesion (primarily temperatures, speed, and initial layer height) are hidden. The “Print Setup” section defaults to “Recommended”. Click “Custom” and you’ll see settings for all of the stuff people recommend to sort poor adhesion, poor print quality, etc.
And some gcode to wipe off the extruder tip before printing because I want to be able to find it again:
M107 ;turn off fan
G28 X0 Y0 Z0 ; home X, Y and Z axis end-stops
G29 ; initiate z-probing
G0 X0 Y0 F9000 ; Go to front
G0 Z0.15 ; Drop to bed
G92 E0 ; zero the extruded length
G1 X40 E25 F500 ; Extrude 25mm of filament in a 4cm line
G92 E0 ; zero the extruded length
G1 E-1 F500 ; Retract a little
G1 X80 F4000 ; Quickly wipe away from the filament line
G1 Z0.3 ; Raise and begin printing.
